


sdm636-mtp驱动
NodeMCU is an interactive firmware, which allows running Lua interpreter on the ESP8266 microcontroller (ESP32 support is in development). Alongside with all the regular hardware interfaces, it has WiFi module and SPIFFS file system.
NodeMCU是一个交互式固件 ,它允许在ESP8266微控制器上运行Lua解释器(正在开发ESP32支持)。 除所有常规硬件接口外,它还具有WiFi模块和SPIFFS文件系统。
This article describes the new module for the NodeMCU — sdm. SDM stands for simple driver model and it provides device-driver model abstraction for the system. In the first part of this article we will discuss the model itself and in the second part will be a showcase of dynamically created web user interface using sdm with some commentaries.
本文介绍了NodeMCU的新模块sdm。 SDM代表简单的驱动程序模型,它为系统提供设备驱动程序模型抽象。 在本文的第一部分中,我们将讨论模型本身,在第二部分中,将展示使用sdm以及一些注释的动态创建的Web用户界面。
驱动程序模型基础 (Driver model basics)
Two major components of the model are devices and drivers. Device is an abstract representation of some hardware or virtual device. It makes sense to place devices into tree hierarchy, with the microcontroller on top, buses in the middle and sensors as leaves.
该模型的两个主要组件是设备和驱动程序 。 设备是某些硬件或虚拟设备的抽象表示。 将设备置于树状结构中是有意义的,其中微控制器位于顶部,总线位于中间,传感器作为叶子。
DEVICES                  +   DRIVERS
                                      |
             +-----+                  |   +-----+
             |1WIRE<----------------------+1WIRE|
             ++-+-++                  |   +-----+
              | | |                   |
    +---------+ | +--------+          |   +------+
    |           |          |       +------+DS1820|
+---v----+  +---v----+ +---v----+  |  |   +------+
|DS1820|0|  |DS1820|1| |DS1822|0|  |  |
+---^----+  +---^----+ +---^----+  |  |   +------+
    |           |          +--------------+DS1822|
    |           |                  |  |   +------+
    +-----------+------------------+  +
Device driver is a piece of logic associated with given device. Functions provided by driver are called methods, data containers associated with driver are called attributes. Both methods and attributes live inside driver.
设备驱动程序是与给定设备关联的一条逻辑。 驱动程序提供的功能称为方法 ,与驱动程序关联的数据容器称为属性 。 方法和属性都位于驱动程序内部。
Attributes have two functions associated with them: getter and setter hooks. So attributes superset method functionality, but they also take up more memory (microcontroller memory is scarce, remember?).
属性具有两个与之关联的功能: getter和setter挂钩。 因此,属性超集方法具有功能性,但是它们也占用更多的内存(微控制器内存稀少,还记得吗?)。
sdm.attr_add(drv, -- device handle
             "ref", -- attribute name
             "Reference voltage", -- attribute description
             5,
             function(dev) -- this is a getter function
                return sdm.attr_data(sdm.attr_handle(dev, "ref"))
             end,
             function(dev, value) -- this is a setter function
                sdm.attr_set(sdm.attr_handle(dev, "ref"), value)
             end
)
设备绑定 (Device binding)
Tricky part of the driver model is device-driver binding. The process itself is quite simple: we match device with each available driver until it fits. Only two parts are missing — matching logic and some data to match to.
驱动程序模型的棘手部分是设备驱动程序绑定。 该过程本身非常简单:我们将设备与每个可用的驱动程序匹配,直到适合为止。 仅缺少两个部分-匹配逻辑和一些要匹配的数据。
In sdm matching logic lives in drivers under the name _poll(). It is a regular method that is called with device handle as parameter and returns true or false if device could or could not be attached to the driver respectively.
在sdm中,匹配逻辑以_poll()的名称存在于驱动程序中。 这是一个常规方法,使用设备句柄作为参数调用该方法,如果设备无法连接到驱动程序,则分别返回true或false 。
sdm.method_add(drv, "_poll", nil,
               function(dev, drv, par)
                  local attr = sdm.attr_data(sdm.local_attr_handle(dev, "id")) -- get device attribute "id"
                  if attr == nil then return false end -- if it does not have one, driver does not match
                  -- parent name must be "ESP8266_1W" and first byte of "id" must be "0x28"
                  return (sdm.device_name(par) == "ESP8266_1W") and (attr:byte(1) == 0x28)
               end
)
As seen in the example above, driver matches device using attribute. But as noted above, attributes associate only with driver. Generally it is true, but there are some attributes that cannot be retrieved via software. These are chip IDs, used pins etc. For those a special type of attribute was added to the sdm — local attribute. This attribute is associated with one instance of the device and usually immutable.
如上例所示,驱动程序使用属性来匹配设备。 但是如上所述,属性仅与驱动程序关联。 通常,这是正确的,但是有些属性无法通过软件检索。 这些是芯片ID,使用的引脚等。对于那些属性,特殊类型的属性已添加到sdm — 本地属性 。 此属性与设备的一个实例相关联,通常是不可变的。
The only one thing left to say about driver binding. Usually devices require some kind of initialization on startup and cleanup after use. For this purpose sdm uses _init() and _free() methods. If driver has _init() method then it will be called automatically after device binding. Same with _free().
关于驱动程序绑定,只剩下一句话要说。 通常,设备在使用后需要在启动和清理时进行某种初始化。 为此,sdm使用_init()和_free()方法。 如果驱动程序具有_init()方法,则将在设备绑定后自动调用它。 与_free()相同。
sdm.method_add(drv, "_init", nil,
               function(dev, drv, par)
                  sdm.device_rename(dev, sdm.request_name("DS18B20")) -- rename device
                  sdm.attr_copy(dev, "temp") -- copy attribute
                  sdm.attr_copy(dev, "precision") -- copy attribute
                  local met = sdm.method_dev_handle(par, "setup") -- get 1Wire bus pin init function ..
                  local func = sdm.method_func(met) -- .. and ..
                  func(par, dev) -- .. call it
               end
)

sdm.method_add(drv, "_free", nil,
               function(dev, drv, par)
                  local met = sdm.method_dev_handle(par, "free") -- get 1Wire bus pin free function ..
                  local func = sdm.method_func(met) -- .. and ..
                  func(par, dev)  -- .. call it
               end
)
Attentive reader would probably ask: what does "copy attribute" in the example above mean? And he would be right, because this has to do with the third kind of attribute we have not discussed yet — private attribute. It does not make much sense to have all attribute data shared between all device instances. For this purpose sdm provides mechanism of copying attribute from driver and associate it with device. This makes driver attribute a prototype or template.
细心的读者可能会问:上例中的“复制属性”是什么意思? 他是正确的,因为这与我们尚未讨论的第三种属性-private属性有关 。 在所有设备实例之间共享所有属性数据没有多大意义。 为此,sdm提供了从驱动程序复制属性并将其与设备关联的机制。 这使驱动程序属性成为原型或模板。
A quick summary:
快速总结:
local attributes are used for data which cannot be retrieved by software. Like device IDs, connected pins etc.
本地属性用于无法通过软件检索的数据。 像设备ID,连接的引脚等。
driver attributes are used for data shared between all instances of devices attached to this driver.
驱动程序属性用于在连接到该驱动程序的所有设备实例之间共享的数据。
private attributes are copied from driver attributes and hold data associated with only one device instance. This type is the most common.
私有属性是从驱动程序属性中复制的,并且仅保留与一个设备实例关联的数据。 这种类型是最常见的。
| Property | Local attribute | Private attribute | Driver (public) attribute |
|---|---|---|---|
| Stored in | device | device | driver |
| Accessible using driver handle | - | - | + |
| Accessible using device handle | + | + | + |
| Shared between devices | - | - | + |
| Persist upon driver detach | + | - | + |
| 属性 | 本地属性 | 私人属性 | 驱动程序(公共)属性 |
|---|---|---|---|
| 存放于 | 设备 | 设备 | 司机 |
| 使用驱动程序句柄可访问 | -- | -- | + |
| 使用设备手柄可访问 | + | + | + |
| 设备之间共享 | -- | -- | + |
| 坚持驾驶员分离 | + | -- | + |
Web用户界面实现 (Web user interface implementation)
服务器代码 (Server code)
There's a lovely nodemcu-httpserver project that implements server code for NudeMCU. Sadly it seems to be dead. It was used as a basis for the server. Firstly, server functions were moved to LFS and then slightly modified to serve one static page for every call. Vue.js is a perfect choice for template based web pages. So it was used for frontend. It worth noting that NodeMCU may not be connected to the Internet. Because of this, vue.js library needs to be present locally and served by NodeMCU server.
有一个可爱的nodemcu-httpserver项目,该项目为NudeMCU实现服务器代码。 可悲的是它似乎已经死了。 它被用作服务器的基础。 首先,将服务器功能移至LFS ,然后稍作修改以为每个调用提供一个静态页面。 Vue.js是基于模板的网页的理想选择。 因此它被用于前端 。 值得注意的是,NodeMCU可能未连接到Internet。 因此, vue.js库需要在本地存在并由NodeMCU服务器提供服务。
Since all devices are organized in tree structure, they are accessed just like a directory: /ESP8266/ESP8266_1W/DS18S20-0. Here /ESP8266 is a NodeMCU page, /ESP8266/ESP8266_1W is a 1Wire bus page and finally /ESP8266/ESP8266_1W/DS18S20-0 is a temperature sensor.
由于所有设备均以树结构组织,因此可以像访问目录一样访问它们: /ESP8266/ESP8266_1W/DS18S20-0 。 /ESP8266是NodeMCU页面, /ESP8266/ESP8266_1W是1Wire总线页面,最后/ESP8266/ESP8266_1W/DS18S20-0是温度传感器。
As mentioned previously, all device pages are build from one template page which is served on every call. JS code inside this page then makes request to the same URL, prepended with /api. For the example above call URL would be /api/ESP8266/ESP8266_1W/DS18S20-0. On such requests the server responds with JSON-encoded device-specific data, which populates the page. Of course, the HTML page request may be skipped if only raw data is needed.
如前所述,所有设备页面都是从一个模板页面构建的,该模板页面可在每次调用时提供。 然后,此页面内的JS代码会请求使用/api开头的相同URL。 对于上面的示例,调用URL为/api/ESP8266/ESP8266_1W/DS18S20-0 。 对于此类请求,服务器将使用JSON编码的设备特定数据进行响应,该数据将填充页面。 当然,如果仅需要原始数据,则可以跳过HTML页面请求。
设备树 (Device tree)
Initial device configuration is done using simple device tree structure. It is like device tree, but simpler. It describes configuration of the hardware including device local attributes.
初始设备配置使用简单的设备树结构完成。 它就像设备树 ,但是更简单。 它描述了包括设备本地属性在内的硬件配置。
local root={
   -- local_attributes={},
   children={
      {
         name="ESP8266_1W",
         -- local_attributes={},
         children = {
            {
               name="DS18S20-0", -- static declaration alternative to 1Wire poll method
               local_attributes={
                  {
                     name="id",
                     desc=nil, -- empty description to save space
                     data=string.char(16) ..
                        string.char(221) ..
                        string.char(109) ..
                        string.char(104) ..
                        string.char(3) ..
                        string.char(8) ..
                        string.char(0) ..
                        string.char(150) -- ugly way to create byte array
                  },
                  {
                     datapin=2
                  }
               }
            },
         }
      },
      {
         name="ESP8266_SPI",
         -- local_attributes={},
         children = {
            {
               name="MCP3208-0"
            },
         }
      },
   }
}
硬件设定 (Hardware setup)
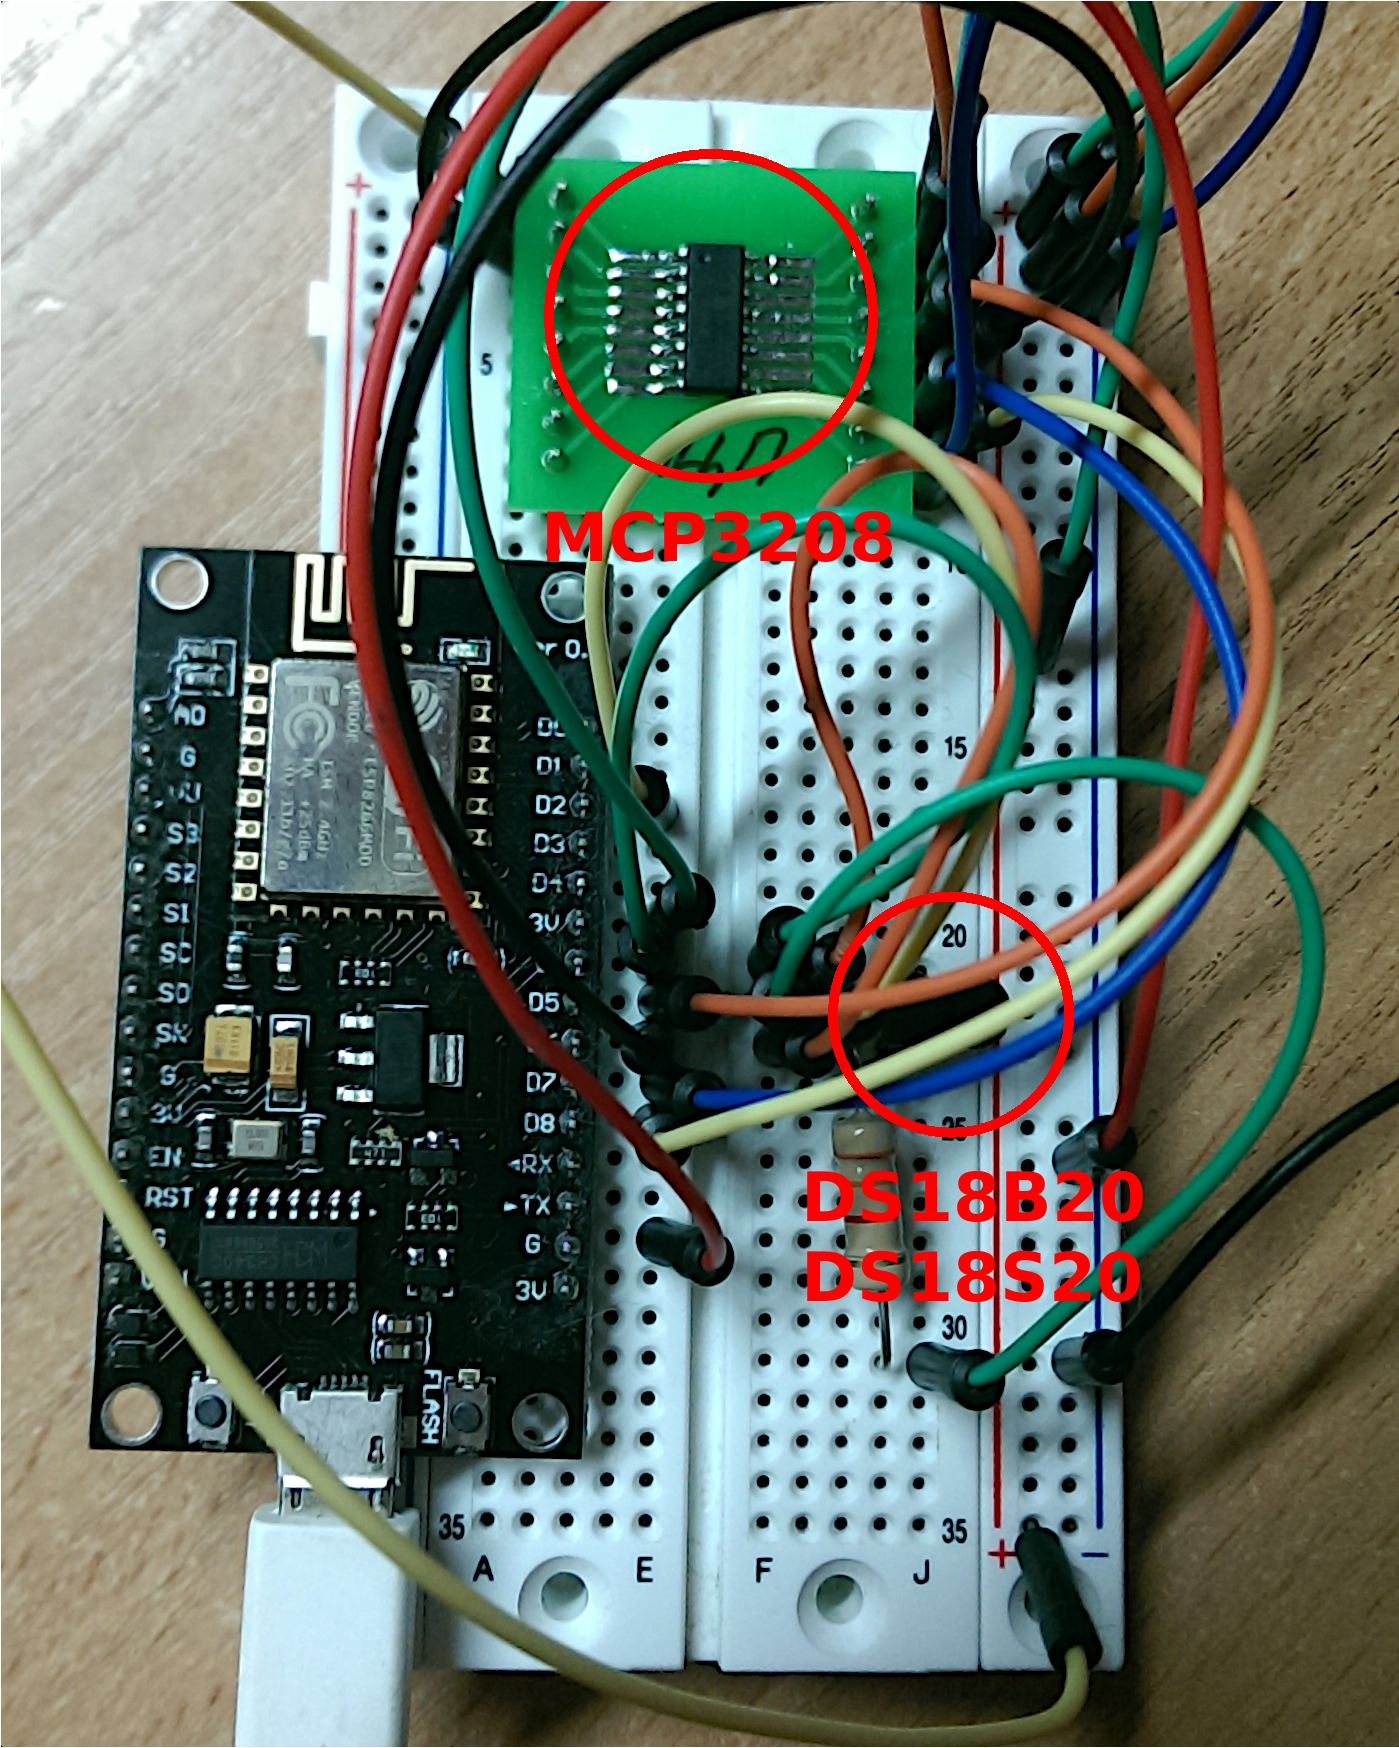
Here begins the showcase. For this purpose a bunch of sensors were connected to the NodeMCU:
从这里开始展示。 为此,将一堆传感器连接到NodeMCU:
DS18B20 temperature sensor
DS18B20温度传感器
DS18S20 temperature sensor
DS18S20温度传感器
MCP3208 ADC
MCP3208 ADC
1Wire sensors are connected to the same pin.
1Wire传感器连接到同一引脚。
网页和驱动程序 (Web pages and drivers)
根设备 (root device)
The main purpose of the root device (aka ESP8266) is to provide place for its children to connect to. However it's not restricted to have methods or attributes associated with it.
根设备(aka ESP8266)的主要用途是为其子设备提供连接的地方。 但是,不限于与之关联的方法或属性。
This code snippet is from here:
此代码段来自此处 :
sdm.method_add(drv, "_init", nil,
               function(dev, drv, par)
                  local attr = sdm.attr_handle(dev, "id") -- get device "id" attribute
                  sdm.attr_set(attr, node.chipid()) -- set "id" value
                  attr = sdm.attr_handle(dev, "float") -- get device "float" attribute
                  sdm.attr_set(attr, 3 / 2 ~= 1) -- set to true if firmware supports floating point instructions
               end
)

sdm.attr_add(drv, "float", "Floating point build", false,
             function(drv) -- attribute value is set inside "_init" function
                local attr = sdm.attr_drv_handle(drv, "float")
                return sdm.attr_data(attr) -- just return stored value
             end,
             nil
)
This code adds attribute float which is used to hold firmware build type. Its value is initialized in the _init() hook which is a special function, that runs once when driver attaches to the device.
此代码添加了float属性,该属性用于保存固件构建类型 。 它的值在_init()挂钩中初始化,该挂钩是一个特殊函数,当驱动程序连接到设备时,它将运行一次。
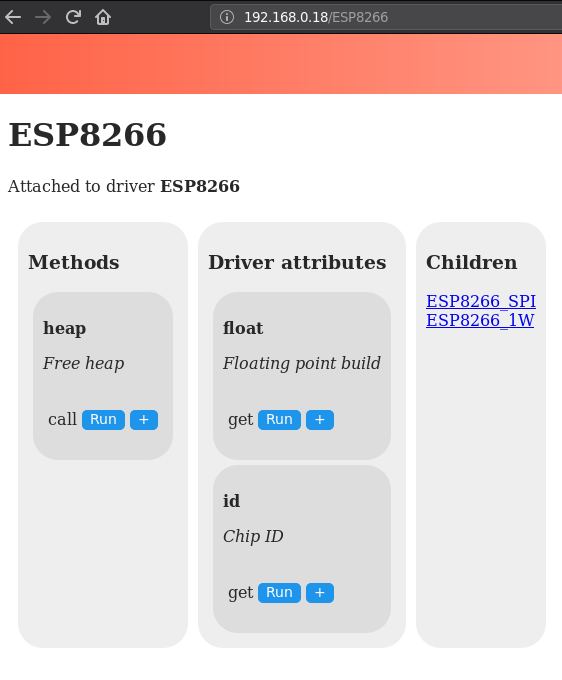
This is the generated page for the root device.
这是为根设备生成的页面。
Here we can see that the root device has one method heap, two driver attributes float and id. Finally, it has two devices connected to it — SPI and 1Wire buses.
在这里我们可以看到根设备有一个方法heap ,两个驱动程序属性float和id 。 最后,它连接了两个设备- SPI和的1-Wire总线。
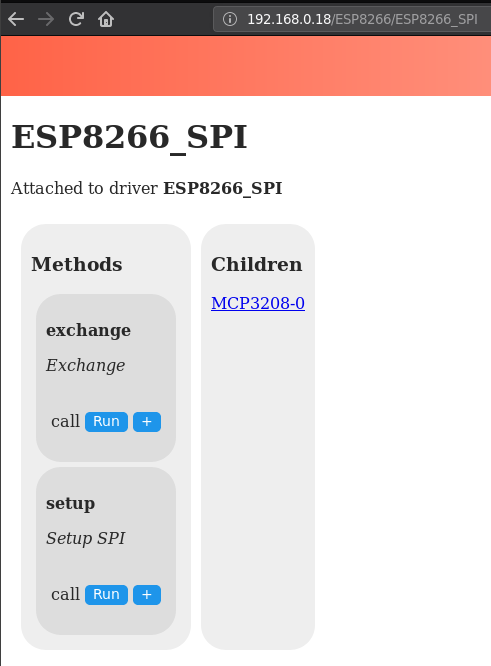
SPI (SPI)
SPI driver is not very interesting. It just maps NodeMCU SPI functions.
SPI驱动程序不是很有趣。 它仅映射NodeMCU SPI功能。
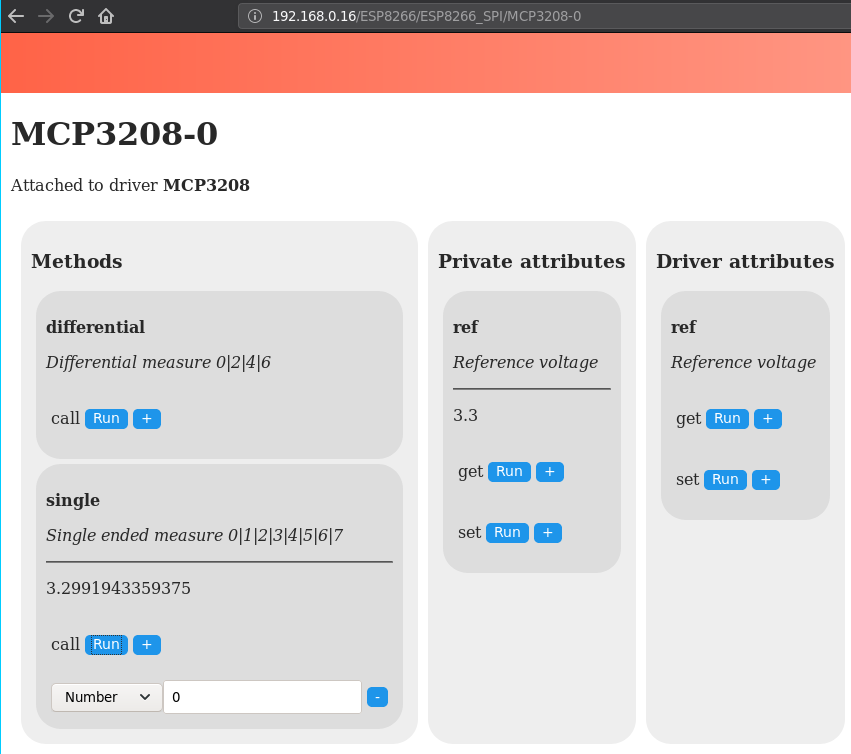
MCP3208 (MCP3208)
MCP3208 is an ADC chip. It measures voltages from zero to ref and returns 12 bit code. What's interesting about this driver implementation is that attribute ref would be present build only if firmware supports floating point arithmetic. If it is not supported then instead of absolute voltage, voltage code is returned by both single and differential methods.
MCP3208是ADC芯片。 它测量从零到参考电压,并返回12位代码。 此驱动程序实现的有趣之处在于,只有在固件支持浮点运算时,属性ref才会出现。 如果不支持,则通过single和differential方法返回电压代码,而不是绝对电压。
sdm.method_add(drv, "single", "Single ended measure 0|1|2|3|4|5|6|7",
               function(dev, channel)
                  -- ...
                  if ref ~= nil then
                     -- this part is executed only if floating point arithmetic is enabled
                     rv = ref * rv / 4096
                  end
                  return rv
               end
)

if 3/2~=1 then -- other alternative is to access ESP8266 "float" method
   sdm.attr_add(drv, "ref", "Reference voltage", 5,
                function(dev)
                   return sdm.attr_data(sdm.attr_handle(dev, "ref"))
                end,
                function(dev, value)
                   sdm.attr_set(sdm.attr_handle(dev, "ref"), value)
                end
   )
end
Also note that this device has attribute ref marked as private. It is set on per-device basis.
另请注意,此设备的属性ref标记为private 。 它是按设备设置的。
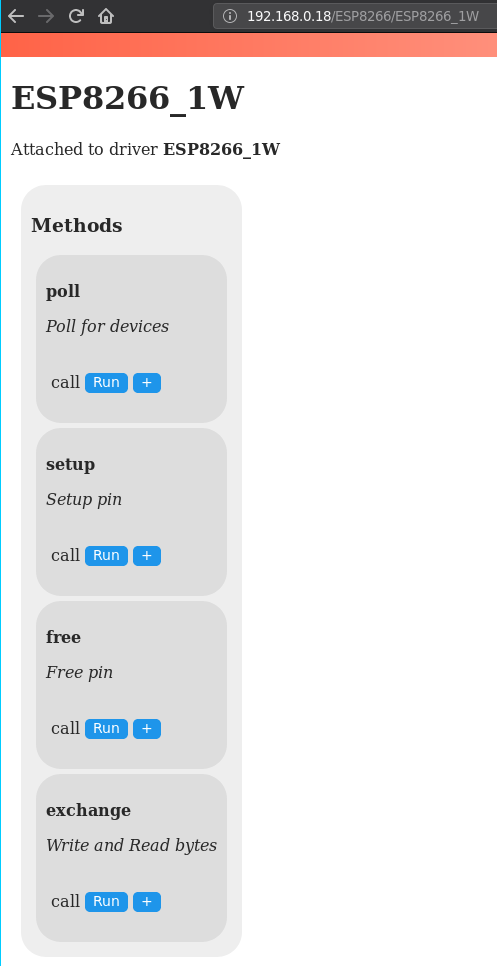
1线 (1Wire)
1Wire driver implements poll method — dynamic search for devices.
Right after device discovery its type is not known. So its 1Wire unique address is used as a new device name (bytes represented as numbers separated by _ character).
发现设备后,其类型立即未知。 因此,其1Wire 唯一地址用作新的设备名称(字节表示为以_字符分隔的数字)。
sdm.method_add(drv, "poll", "Poll for devices",
               function(bus, pin)
                  local children = sdm.device_children(bus) or {} -- already attached
                  local ids = {}
                  -- get IDs of attached devices
                  for name, handle in pairs(children) do
                     local dpin = sdm.attr_data(sdm.local_attr_handle(handle, "pin"))
                     if dpin == pin then
                        ids[sdm.attr_data(sdm.local_attr_handle(handle, "id"))] = true
                     end
                  end
                  ow.reset_search(pin) -- reset previous search
                  while true do
                     -- for all found devices
                     local id = ow.search(pin)
                     if id == nil then break end
                     if ids[id] == nil then -- if not already present
                        local name = ""
                        for i=1,#id do name = name .. tostring(id:byte(i)) .. "_" end
                        name = name:sub(1,-2)
                        -- add to system with their ID used as name
                        local device = sdm.device_add(name, bus)
                        -- add "pin" attribute
                        local rv = sdm.local_attr_add(device, "datapin", nil, pin, nil, nil)
                        -- add "id" attribute
                        local rv = sdm.local_attr_add(device, "id", nil, id, nil, nil)
                        -- poll for driver
                        local rv = sdm.device_poll(device)
                     end
                  end
               end
)
This is the initial page for 1Wire driver.
这是1Wire驱动程序的初始页面。
After issuing poll call with argument 2 and refreshing page, children section appears. Note that children names are human readable. This is because device_rename() function was called during their _init.
在发出带有参数2 poll并刷新页面后,出现子部分。 请注意,子名称是人类可读的。 这是因为device_rename()函数在其_init期间被调用。
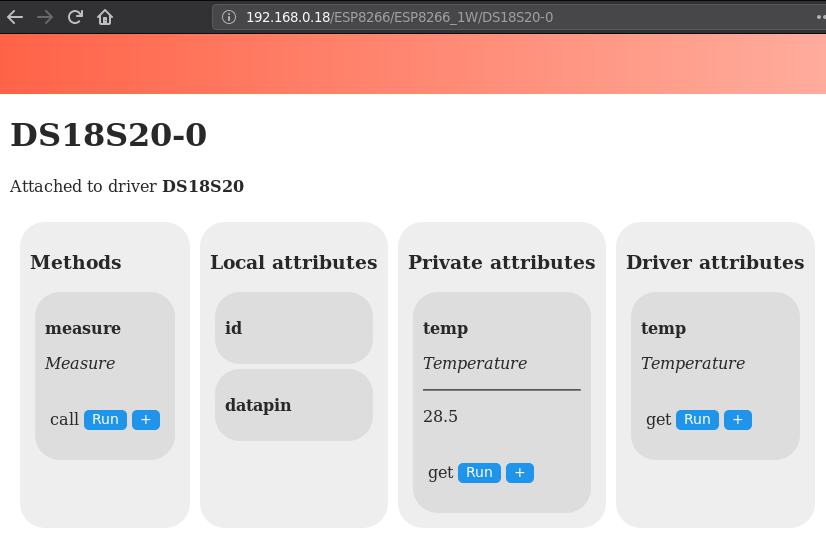
DS18S20 (DS18S20)
Upon initialization, DS18S20 driver checks that device ID begins with 0x10, which is a device family code. When device is attached to driver, it is renamed to the DS18S20-X, where DS18S20 is a basename and X is an instance number.
初始化后, DS18S20驱动程序将检查设备ID以设备家族代码0x10开头。 将设备连接到驱动程序后,它将重命名为DS18S20-X ,其中DS18S20是基本名称, X是实例编号。
sdm.method_add(drv, "_poll", nil,
               function(dev, drv, par)
                  local attr = sdm.attr_data(sdm.local_attr_handle(dev, "id"))
                  if attr == nil then return false end
                  return (sdm.device_name(par) == "ESP8266_1W") and (attr:byte(1) == 0x10) -- check family ID
               end
)

sdm.method_add(drv, "_init", nil,
               function(dev, drv, par)
                  sdm.device_rename(dev, sdm.request_name("DS18S20")) -- rename device
                  sdm.attr_copy(dev, "temp") -- copy attribute to device
                  local met = sdm.method_dev_handle(par, "setup")
                  local func = sdm.method_func(met)
                  -- use parent "setup" method on the device
                  func(par, dev)
               end
)
Local attributes id and datapin do not have getter and setter hooks, so only their names are visible.
本地属性id和datapin没有getter和setter挂钩,因此仅可见其名称。
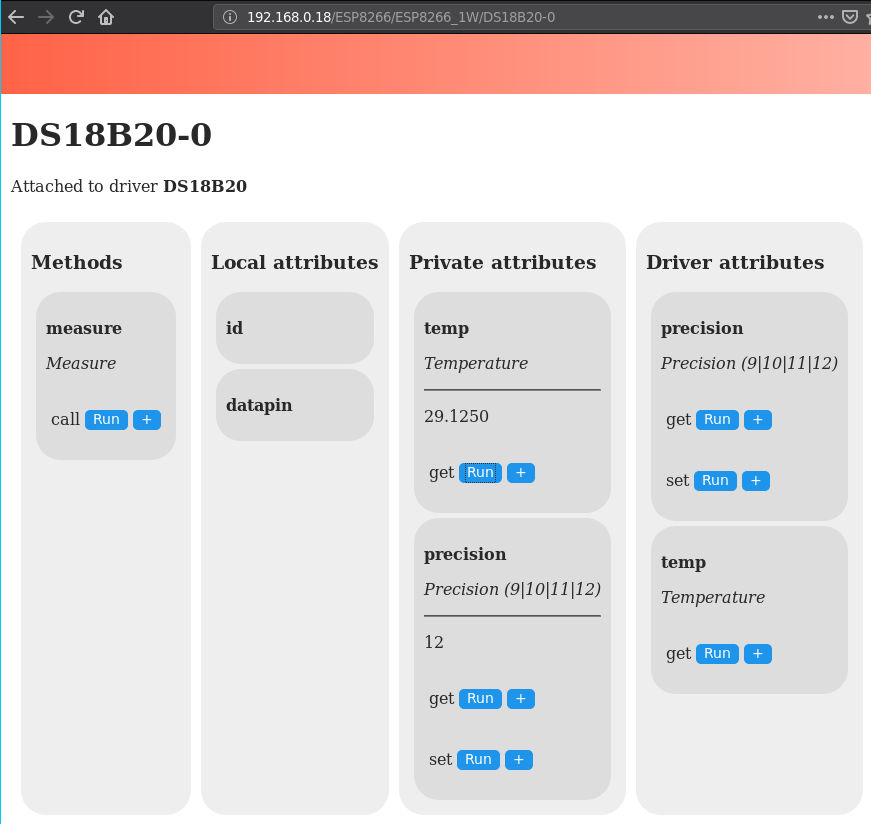
DS18B20 (DS18B20)
DS18B20 driver is almost the same as DS18S20 driver. The only difference is the precision method. Both DS18?20 drivers assume integer build and do not use floating point division.
DS18B20驱动程序与DS18S20驱动程序几乎相同。 唯一的区别是precision方法。 两个DS18?20驱动程序均假定为整数生成,并且不使用浮点除法。
sdm.attr_add(drv, "precision", "Precision (9|10|11|12)", 12,
             function(dev, precision)
                local attr = sdm.attr_dev_handle(dev, "precision")
                return sdm.attr_data(attr)
             end,
             function(dev, precision)
                local par = sdm.device_parent(dev)
                local attr = sdm.attr_dev_handle(dev, "precision")
                local ex = sdm.method_func(sdm.method_dev_handle(par, "exchange"))
                local modes = {[9]=0x1f, [10]=0x3f, [11]=0x5f, [12]=0x7f}
                if modes[precision] ~= nil then
                   ex(par, dev, {0x4e, 0, 0, modes[precision]})
                   sdm.attr_set(attr, precision)
                end
             end
)
内存使用情况 (Memory usage)
ESP8266 free memory is about 40k. Server code is moved to LFS, so it does not take any RAM space at initialization time (original code took about 10k).
ESP8266的可用内存约为40k 。 服务器代码已移至LFS ,因此在初始化时它不会占用任何RAM空间( 原始代码大约需要10k )。
SDM takes up about 10k for 5 device drivers and 5 devices. Slightly lesser for non-floating firmware build. So it's preferable to select in driver manifest only drivers needed for the task at hand. The most memory consuming task is to serve vue.js library.
对于5个设备驱动程序和5个设备, SDM大约需要1 万 。 非浮动固件版本略小。 因此,最好在驱动程序清单中选择仅手头任务所需的驱动程序。 最消耗内存的任务是提供vue.js库。
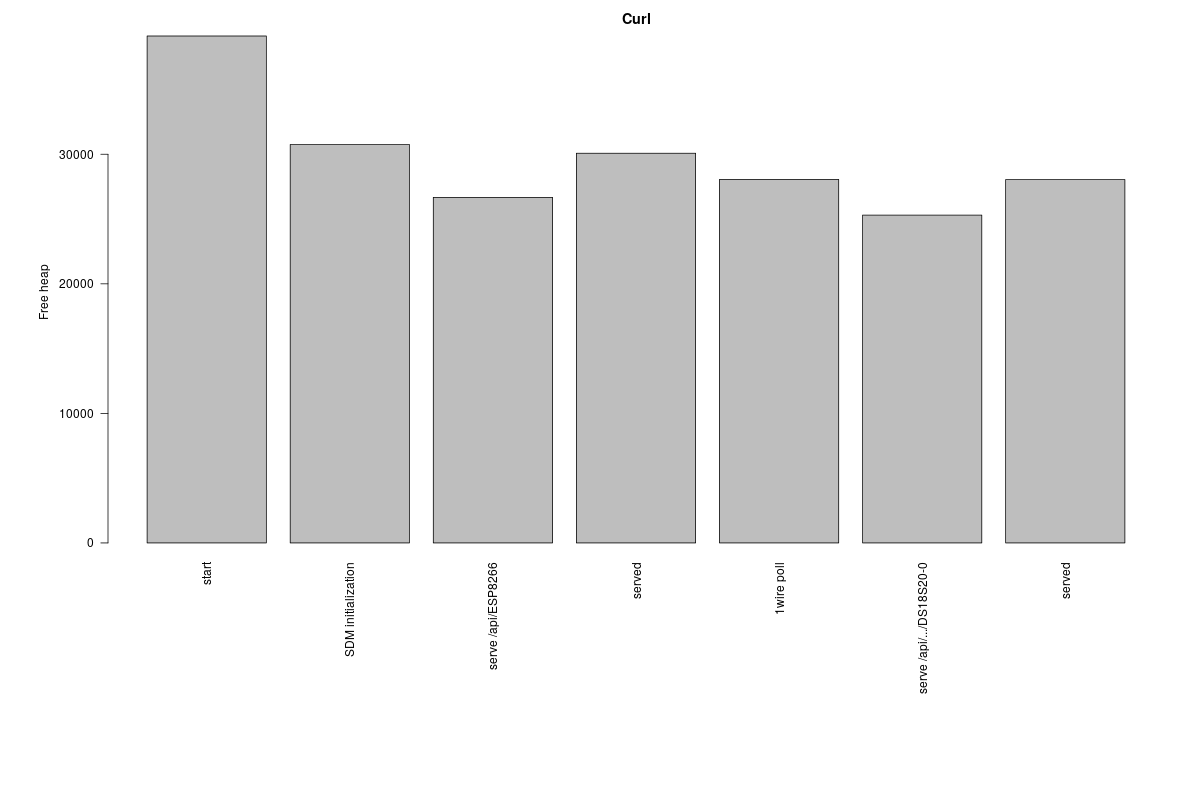
In case of requesting raw JSON-encoded data (using curl) peak memory consumption may be significantly reduced.
在请求原始JSON编码的数据(使用curl )的情况下,峰值内存消耗可能会大大减少。
代替结尾 (Instead of an Epilogue)
One of the first methods I implemented with sdm was the binding for node.restart(). Trying it out using web user interface produced a curious result. Right after the web browser issued the request, chip restarted as expected. But because NodeMCU did not properly respond to the HTTP request, web browser tried the same request again. When NodeMCU server restarted and was up again, browser connected to it, reset internal try again counter and called the node.restart() method, thus beginning an infinite loop of NodeMCU restarting.
我用sdm实现的第一个方法之一是node.restart()的绑定。 使用Web用户界面进行尝试产生了一个奇怪的结果。 在网络浏览器发出请求后,芯片立即按预期方式重新启动。 但是因为NodeMCU没有正确响应HTTP请求,所以Web浏览器再次尝试了相同的请求。 当NodeMCU服务器重新启动并再次启动时,浏览器已连接到该服务器,重置内部重试计数器并调用了node.restart()方法,从而开始了NodeMCU重新启动的无限循环。
sdm636-mtp驱动


 511
511

 被折叠的 条评论
为什么被折叠?
被折叠的 条评论
为什么被折叠?
 到【灌水乐园】发言


