


We have already presented Tarantool Cartridge that allows you to develop and pack distributed applications. Now let's learn how to deploy and control these applications. No panic, it's all under control! We have brought together all the best practices of working with Tarantool Cartridge and wrote an Ansible role, which will deploy the package to servers, start and join instances into replica sets, configure authorization, bootstrap vshard, enable automatic failover and patch cluster configuration.
我们已经介绍了Tarantool弹药筒 ,使您可以开发和打包分布式应用程序。 现在让我们学习如何部署和控制这些应用程序。 不用担心,一切都在掌控之中! 我们汇集了使用Tarantool Cartridge的所有最佳实践,并编写了Ansible角色 ,该角色将软件包部署到服务器,将实例启动和加入副本集,配置授权,引导vshard,启用自动故障转移和补丁集群配置。
Interesting, huh? Dive in, check details under the cut.
有意思吧? 潜入,检查切口下的详细信息。
从样本开始 (Starting off with a sample)
Let us walk you through only some of the role's functions. You can always find a full description of all its features and input parameters in the documentation. However, trying once is better than seeing it a hundred times, so let us deploy a small application.
让我们仅带您了解角色的某些功能。 您始终可以在文档中找到其所有功能和输入参数的完整说明。 但是,尝试一次总比看到一百次更好,因此让我们部署一个小型应用程序。
Tarantool Cartridge has a tutorial for creating a small Cartridge application that stores information about bank customers and their accounts, as well as provides an API for data management via HTTP. For this purpose, the application describes two possible roles that can be assigned to the instances: api and storage.
Tarantool Cartridge提供了一个教程,用于创建一个小型Cartridge应用程序,该应用程序存储有关银行客户及其帐户的信息,并提供用于通过HTTP进行数据管理的API。 为此,该应用程序描述了可以分配给实例的两个可能的角色: api和storage 。
Cartridge itself does not say anything about how to start processes — it only provides an opportunity to configure the running instances. So, the rest of it is up to the user: distributing configuration files, running services, and configuring topology. But we're not going to do all of that — Ansible will do it for us.
墨盒本身并没有说明如何启动进程,它只是提供了一个配置正在运行的实例的机会。 因此,其余的一切取决于用户:分发配置文件,运行服务和配置拓扑。 但是我们不会做所有这些事情-Ansible会为我们做这件事。
采取行动 (Getting down to action)
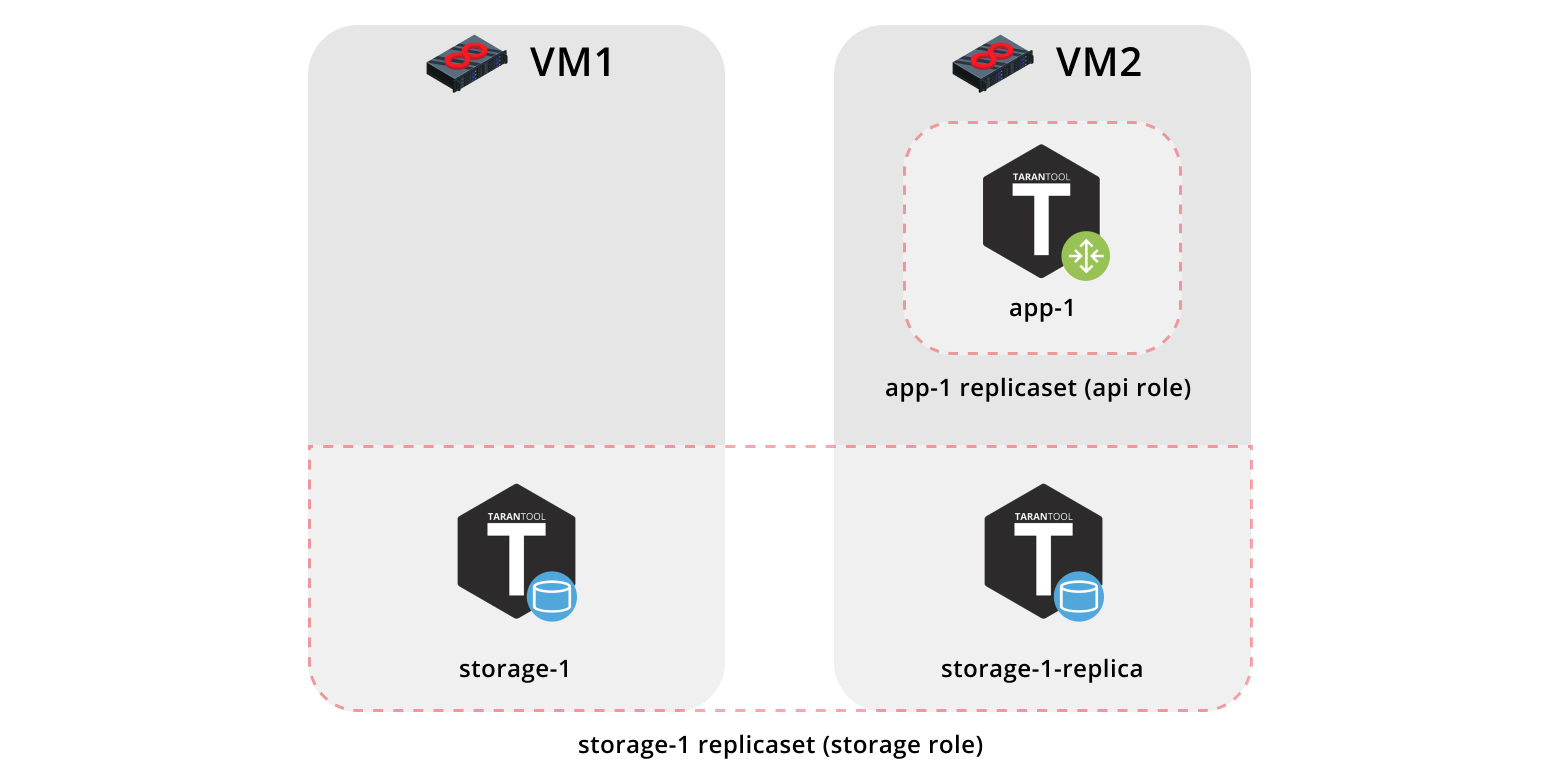
First, let us deploy our application onto two virtual machines and set up a simple topology:
首先,让我们将应用程序部署到两个虚拟机上并设置一个简单的拓扑:
The
app-1replica set will represent theapirole that contains thevshard-routerrole. There will be just one instance.app-1副本集将代表包含vshard-router角色的api角色。 只有一个实例。The
storage-1replica set will represent thestoragerole (including thevshard-storagerole) — here we will add two instances from different machines.storage-1副本集将代表storage角色(包括vshard-storage角色)—在这里,我们将添加来自不同计算机的两个实例。
To run the sample, we will need Vagrant and Ansible (version 2.8 or higher).
要运行示例,我们需要Vagrant和Ansible (2.8或更高版本)。
The role itself is stored in Ansible Galaxy — a repository that allows you to share your work and use the ready-made roles.
角色本身存储在Ansible Galaxy中 -一个存储库,可让您共享工作并使用现成的角色。
Now clone the sample repository:
现在克隆样本存储库:
$ git clone https://github.com/dokshina/deploy-tarantool-cartridge-app.git
$ cd deploy-tarantool-cartridge-app && git checkout 1.0.0
Then deploy the virtual machines:
然后部署虚拟机:
$ vagrant upAfter that, install the Tarantool Cartridge Ansible role:
之后,安装Tarantool Cartridge Ansible角色:
$ ansible-galaxy install tarantool.cartridge,1.0.1And start the installed role:
并开始安装角色:
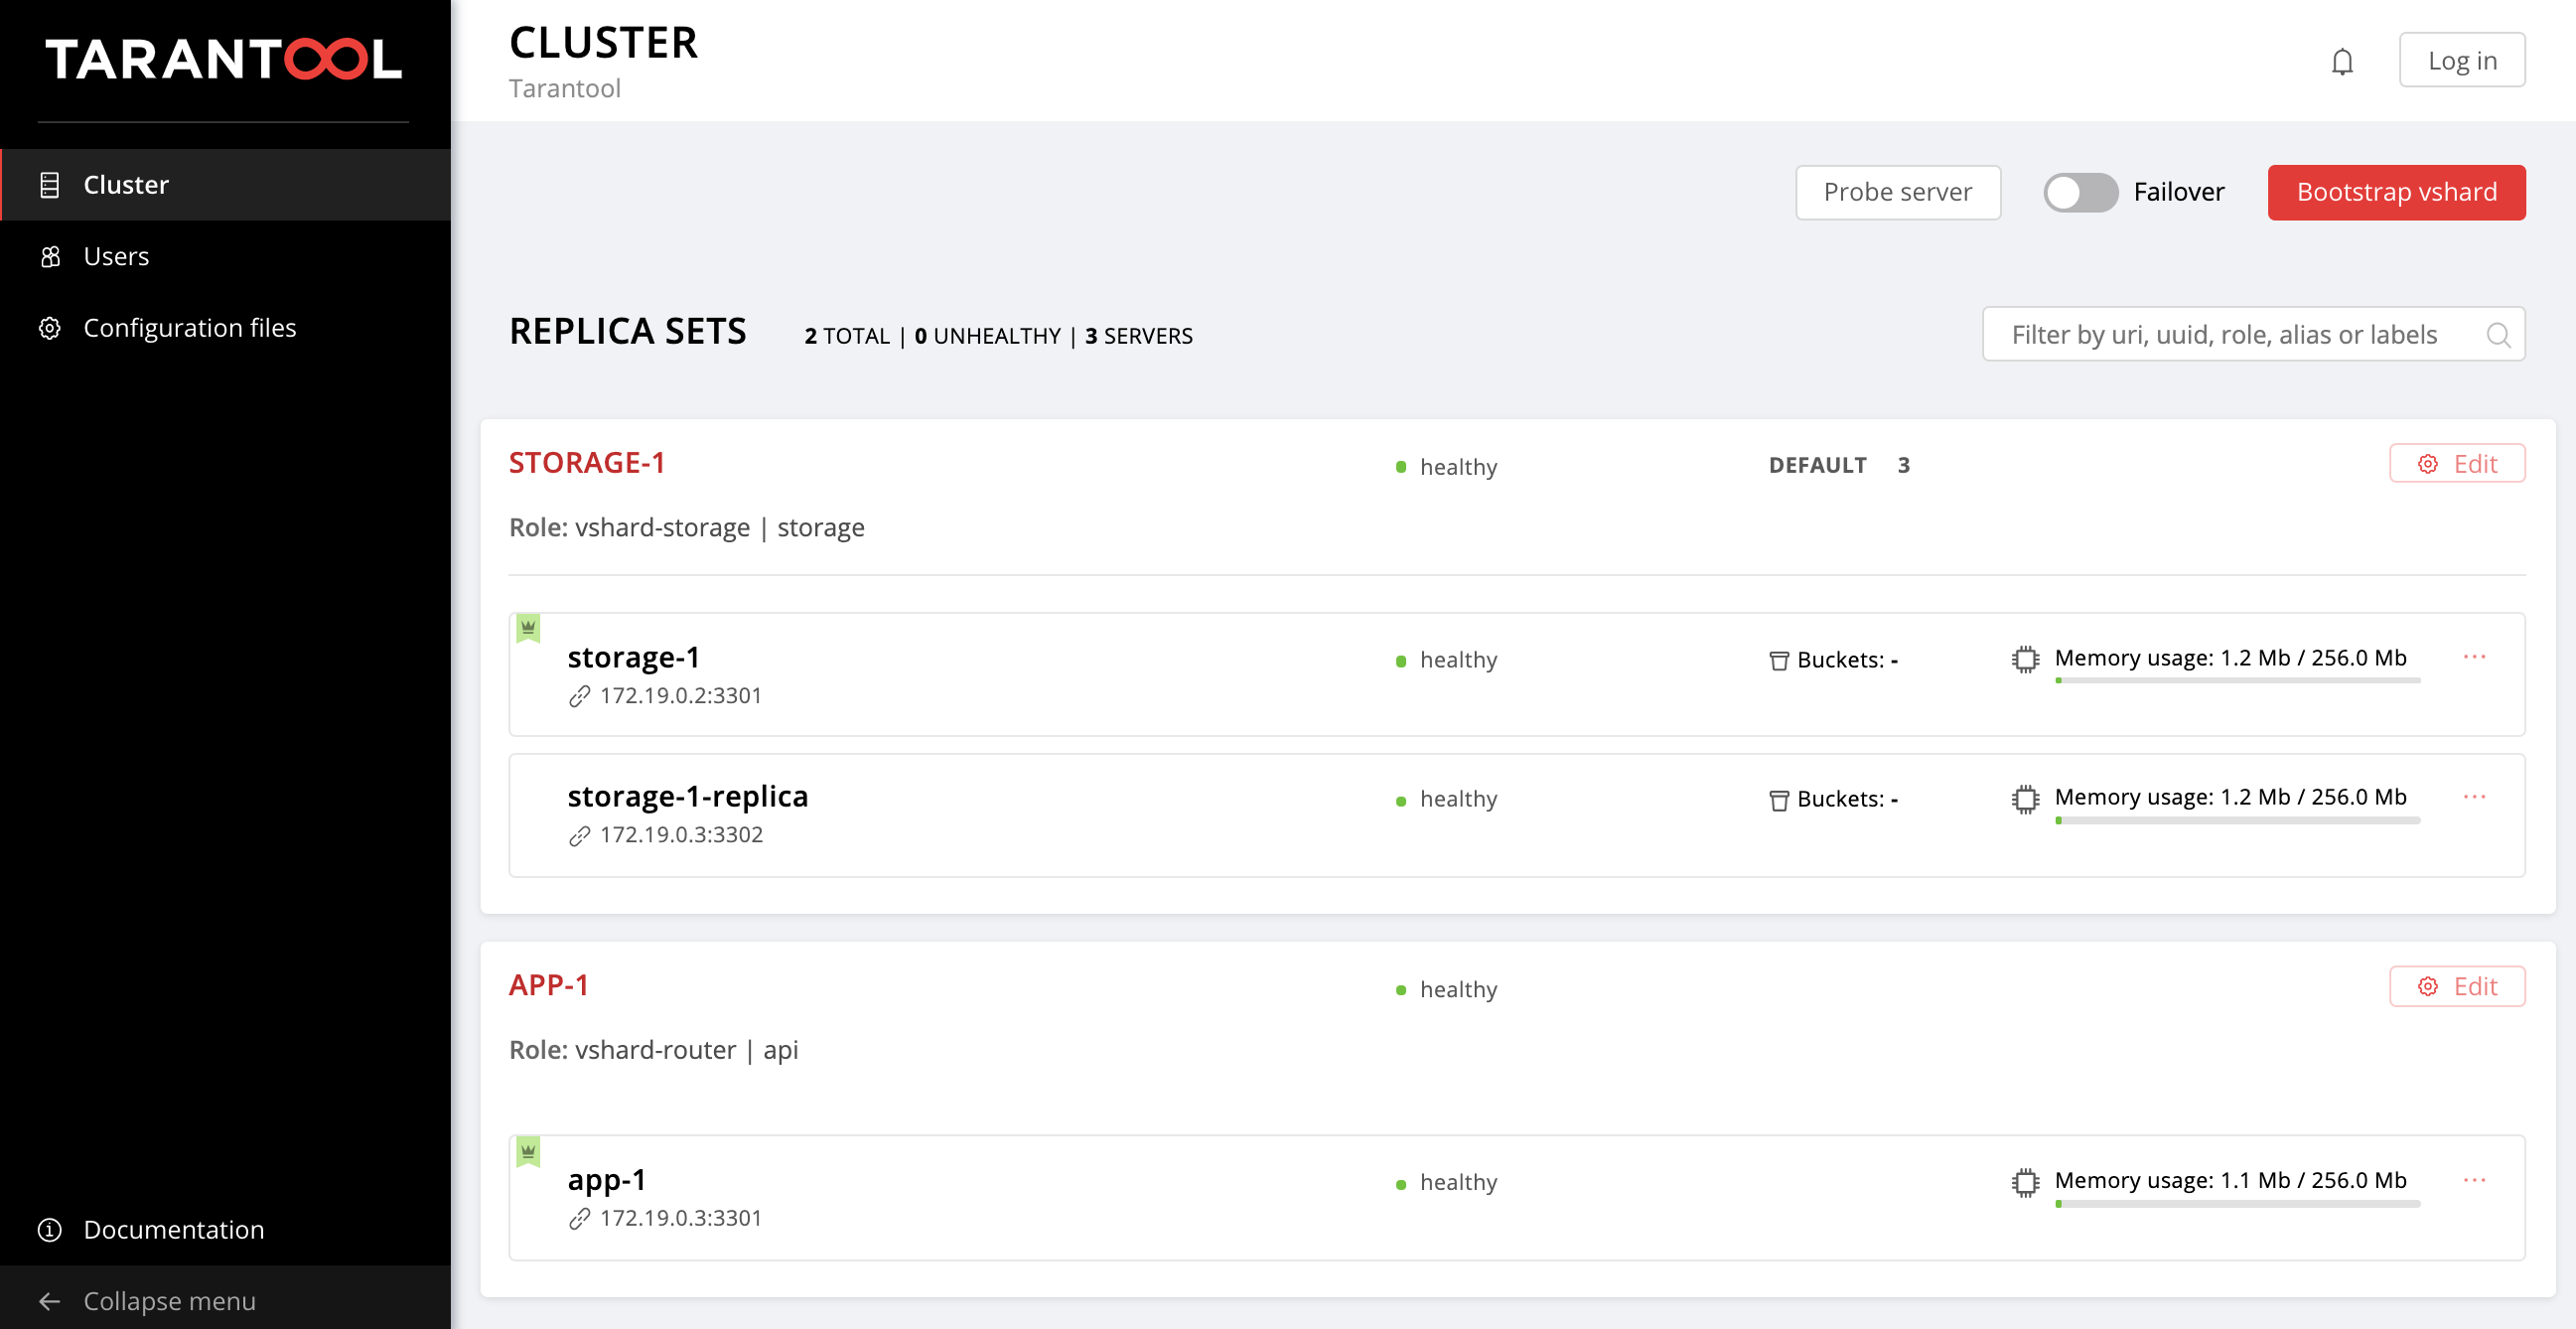
$ ansible-playbook -i hosts.yml playbook.ymlNow wait until the playbook process is finished, go to http://localhost:8181/admin/cluster/dashboard and enjoy the results:
现在,等到剧本程序完成后,转到http:// localhost:8181 / admin / cluster / dashboard并享受以下结果:
You can upload the data now. Awesome, isn't it?
您现在可以上传数据。 太好了,不是吗?
Now let us figure out how to work with it, and we may as well add another replica set to the topology.
现在让我们弄清楚如何使用它,我们还可以向拓扑中添加另一个副本集。
深入细节 (Getting deeper into details)
So, what happened?
所以发生了什么事?
We got two virtual machines up and running and launched the Ansible playbook that configured our cluster. Now let's look inside the playbook.yml file:
我们启动并运行了两个虚拟机,并启动了配置集群的Ansible剧本。 现在,让我们看一下playbook.yml文件:
---
- name: Deploy my Tarantool Cartridge app
  hosts: all
  become: true
  become_user: root
  tasks:
  - name: Import Tarantool Cartridge role
    import_role:
      name: tarantool.cartridge
Nothing interesting happens here; let's launch the Ansible role called tarantool.cartridge.
这里没有什么有趣的事。 让我们启动名为tarantool.cartridge的Ansible角色。
The most important things (namely, the cluster configuration) is in the hosts.yml inventory file:
最重要的事情(即集群配置)在hosts.yml清单文件中:
---
all:
  vars:
    # common cluster variables
    cartridge_app_name: getting-started-app
    cartridge_package_path: ./getting-started-app-1.0.0-0.rpm  # path to package

    cartridge_cluster_cookie: app-default-cookie  # cluster cookie

    # common ssh options
    ansible_ssh_private_key_file: ~/.vagrant.d/insecure_private_key
    ansible_ssh_common_args: '-o IdentitiesOnly=yes -o UserKnownHostsFile=/dev/null -o StrictHostKeyChecking=no'

  # INSTANCES
  hosts:
    storage-1:
      config:
        advertise_uri: '172.19.0.2:3301'
        http_port: 8181

    app-1:
      config:
        advertise_uri: '172.19.0.3:3301'
        http_port: 8182

    storage-1-replica:
      config:
        advertise_uri: '172.19.0.3:3302'
        http_port: 8183

  children:
    # GROUP INSTANCES BY MACHINES
    host1:
      vars:
        # first machine connection options
        ansible_host: 172.19.0.2
        ansible_user: vagrant

      hosts:  # instances to be started on the first machine
        storage-1:

    host2:
      vars:
        # second machine connection options
        ansible_host: 172.19.0.3
        ansible_user: vagrant

      hosts:  # instances to be started on the second machine
        app-1:
        storage-1-replica:

    # GROUP INSTANCES BY REPLICA SETS
    replicaset_app_1:
      vars:  # replica set configuration
        replicaset_alias: app-1
        failover_priority:
          - app-1  # leader
        roles:
          - 'api'

      hosts:  # replica set instances
        app-1:

    replicaset_storage_1:
      vars:  # replica set configuration
        replicaset_alias: storage-1
        weight: 3
        failover_priority:
          - storage-1  # leader
          - storage-1-replica
        roles:
          - 'storage'

      hosts:   # replica set instances
        storage-1:
        storage-1-replica:
All we need to do is learn how to manage instances and replica sets by modifying this file. Later on, we will add new sections to it. In order to avoid confusion while adding the sections, look at the final version of this file, or hosts.updated.yml, which is located in the sample repository.
我们需要做的就是学习如何通过修改此文件来管理实例和副本集。 稍后,我们将添加新的部分。 为了避免在添加各节时造成混淆,请查看此文件的最终版本,或位于示例存储库中的hosts.updated.yml 。
管理实例 (Managing the instances)
In Ansible terms, each instance is a host (not to be confused with a physical server), i.e. the infrastructure node that Ansible will manage. For each host, we can specify connection parameters (such as ansible_host and ansible_user) and instance configuration. The instance description is in the hosts section.
用Ansible术语来说,每个实例都是一个主机(不要与物理服务器混淆),即Ansible将管理的基础结构节点。 对于每个主机,我们可以指定连接参数(例如ansible_host和ansible_user )和实例配置。 实例说明在hosts部分中。
Let's look into the configuration of the storage-1 instance:
让我们看一下storage-1实例的配置:
all:
  vars:
    ...

  # INSTANCES
  hosts:
    storage-1:
      config:
        advertise_uri: '172.19.0.2:3301'
        http_port: 8181

  ...
In the config variable, we specified the instance parameters: advertise URI and HTTP port.
在config变量中,我们指定了实例参数: advertise URI和HTTP port 。
Below are the parameters of the app-1 and storage-1-replica instances.
以下是app-1和storage-1-replica实例的参数。
We should provide Ansible with connection parameters for each instance. It seems reasonable to group the instances by virtual machines. For this purpose, the instances are grouped together under host1 and host2, and each group in the vars section contains the ansible_host and ansible_user parameter values for a single virtual machine. And the hosts section contains hosts (or instances) included in this group:
我们应该为Ansible提供每个实例的连接参数。 通过虚拟机对实例进行分组似乎是合理的。 为此,实例在host1和host2下分组在一起,并且vars部分中的每个组都包含单个虚拟机的ansible_host和ansible_user参数值。 hosts部分包含此组中包含的主机(或实例):
all:
  vars:
    ...
  hosts:
    ...
  children:
    # GROUP INSTANCES BY MACHINES
    host1:
      vars:
        # first machine connection options
        ansible_host: 172.19.0.2
        ansible_user: vagrant
       hosts:  # instances to be started on the first machine
        storage-1:

     host2:
      vars:
        # second machine connection options
        ansible_host: 172.19.0.3
        ansible_user: vagrant
       hosts:  # instances to be started on the second machine
        app-1:
        storage-1-replica:
Let's start editing hosts.yml. Now we add two more instances: storage-2-replica on the first virtual machine and storage-2 on the second one:
让我们开始编辑hosts.yml 。 现在,我们再添加两个实例:第一个虚拟机上的storage-2-replica和第二个虚拟机上的storage-2 :
all:
  vars:
    ...

  # INSTANCES
  hosts:
    ...
    storage-2:  # <==
      config:
        advertise_uri: '172.19.0.3:3303'
        http_port: 8184

    storage-2-replica:  # <==
      config:
        advertise_uri: '172.19.0.2:3302'
        http_port: 8185

  children:
    # GROUP INSTANCES BY MACHINES
    host1:
      vars:
        ...
      hosts:  # instances to be started on the first machine
        storage-1:
        storage-2-replica:  # <==

    host2:
      vars:
        ...
      hosts:  # instances to be started on the second machine
        app-1:
        storage-1-replica:
        storage-2:  # <==
  ...
Start the Ansible playbook:
启动Ansible剧本:
$ ansible-playbook -i hosts.yml \
                   --limit storage-2,storage-2-replica \
                   playbook.yml
Note the --limit option. Since each cluster instance is a host in terms of Ansible, we can explicitly specify which instances should be configured when running the playbook.
注意--limit选项。 由于每个群集实例都是Ansible的主机,因此我们可以在运行剧本时明确指定应配置的实例。
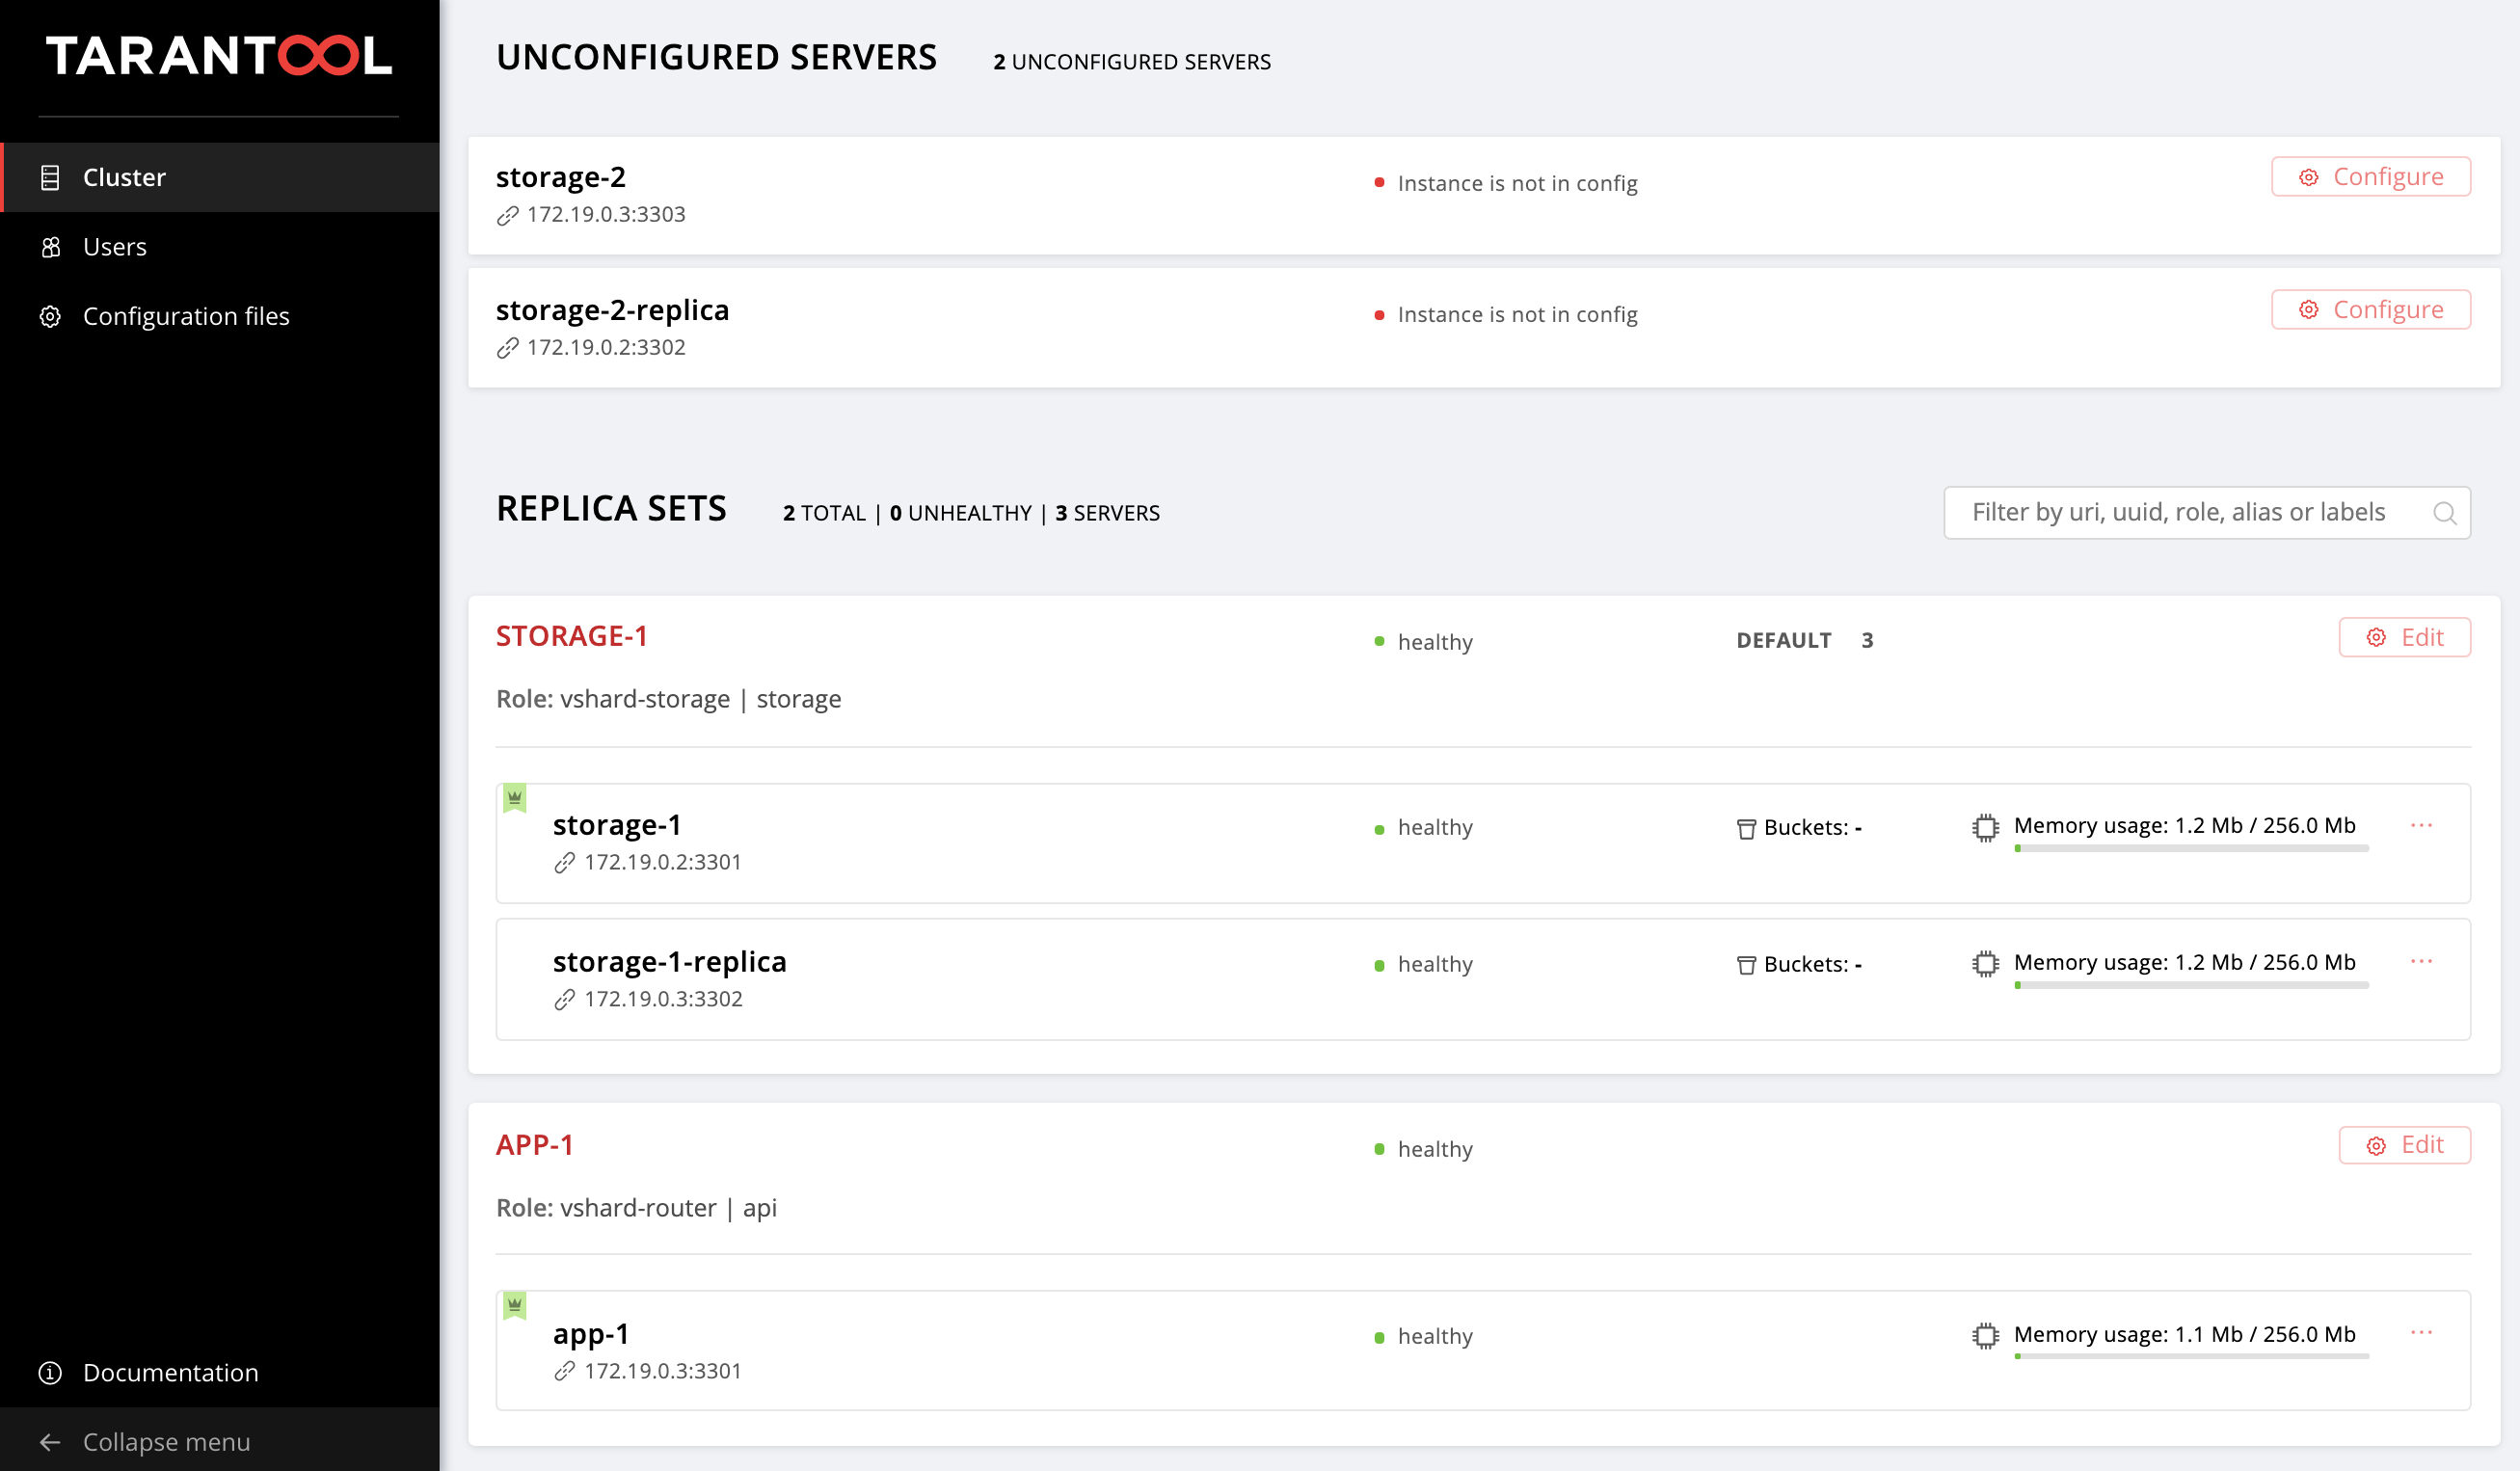
So we go back to the web UI at http://localhost:8181/admin/cluster/dashboard and look at our new instances:
因此,我们回到位于http:// localhost:8181 / admin / cluster / dashboard的Web UI,并查看我们的新实例:
Next, let's master topology management.
接下来,让我们掌握拓扑管理。
管理拓扑 (Managing the topology)
Let us group our new instances into the storage-2 replica set, add a new group of replicaset_storage_2, and describe the replica set parameters in the variables as we did for replicaset_storage_1. In the hosts section, we specify which instances should be included in this group (i.e. our replica set):
让我们将新实例分组到storage-2副本集中,添加新的replicaset_storage_2组,并像对replicaset_storage_1那样在变量中描述副本集参数。 在hosts部分,我们指定哪些实例应包含在该组中(即我们的副本集):
---
all:
  vars:
    ...
  hosts:
    ...
  children:
    ...
    # GROUP INSTANCES BY REPLICA SETS
    ...
    replicaset_storage_2:  # <==
      vars:  # replicaset configuration
        replicaset_alias: storage-2
        weight: 2
        failover_priority:
          - storage-2
          - storage-2-replica
        roles:
          - 'storage'

      hosts:   # replicaset instances
        storage-2:
        storage-2-replica:
Then we run the playbook again:
然后,我们再次运行该剧本:
$ ansible-playbook -i hosts.yml \
                   --limit replicaset_storage_2 \
                   --tags cartridge-replicasets \
                   playbook.yml
This time we pass the name of the group corresponding to our replica set in the --limit parameter.
这次,我们在--limit参数中传递了与我们的副本集相对应的组的名称。
Let's look at the tags option.
让我们看一下tags选项。
Our role successively executes various tasks marked with the following tags:
我们的角色先后执行带有以下标记的各种任务:
cartridge-instances: instance management (configuration, membership);cartridge-instances:实例管理(配置,成员);cartridge-replicasets: topology management (replica set management and permanent removal (expel) of instances from the cluster);cartridge-replicasets:拓扑管理(副本集管理和从群集中永久删除实例)。cartridge-config: control of other cluster parameters (vshard bootstrapping, automatic failover, authorization parameters, and application configuration).ettes
cartridge-config:控制其他群集参数(vshard引导程序,自动故障转移,授权参数和应用程序配置)。
We can explicitly specify what part of the work we want to be done — and the role will skip the rest of the tasks. In this case, we only want to work with topology, so we specify cartridge-replicasets.
我们可以明确指定要完成的工作的哪一部分-该角色将跳过其余任务。 在这种情况下,我们只想使用拓扑,因此我们指定了cartridge-replicasets 。
Let us evaluate the result of our efforts. Find the new replica set at http://localhost:8181/admin/cluster/dashboard.
让我们评估我们的努力结果。 在http:// localhost:8181 / admin / cluster / dashboard上找到新的副本集。
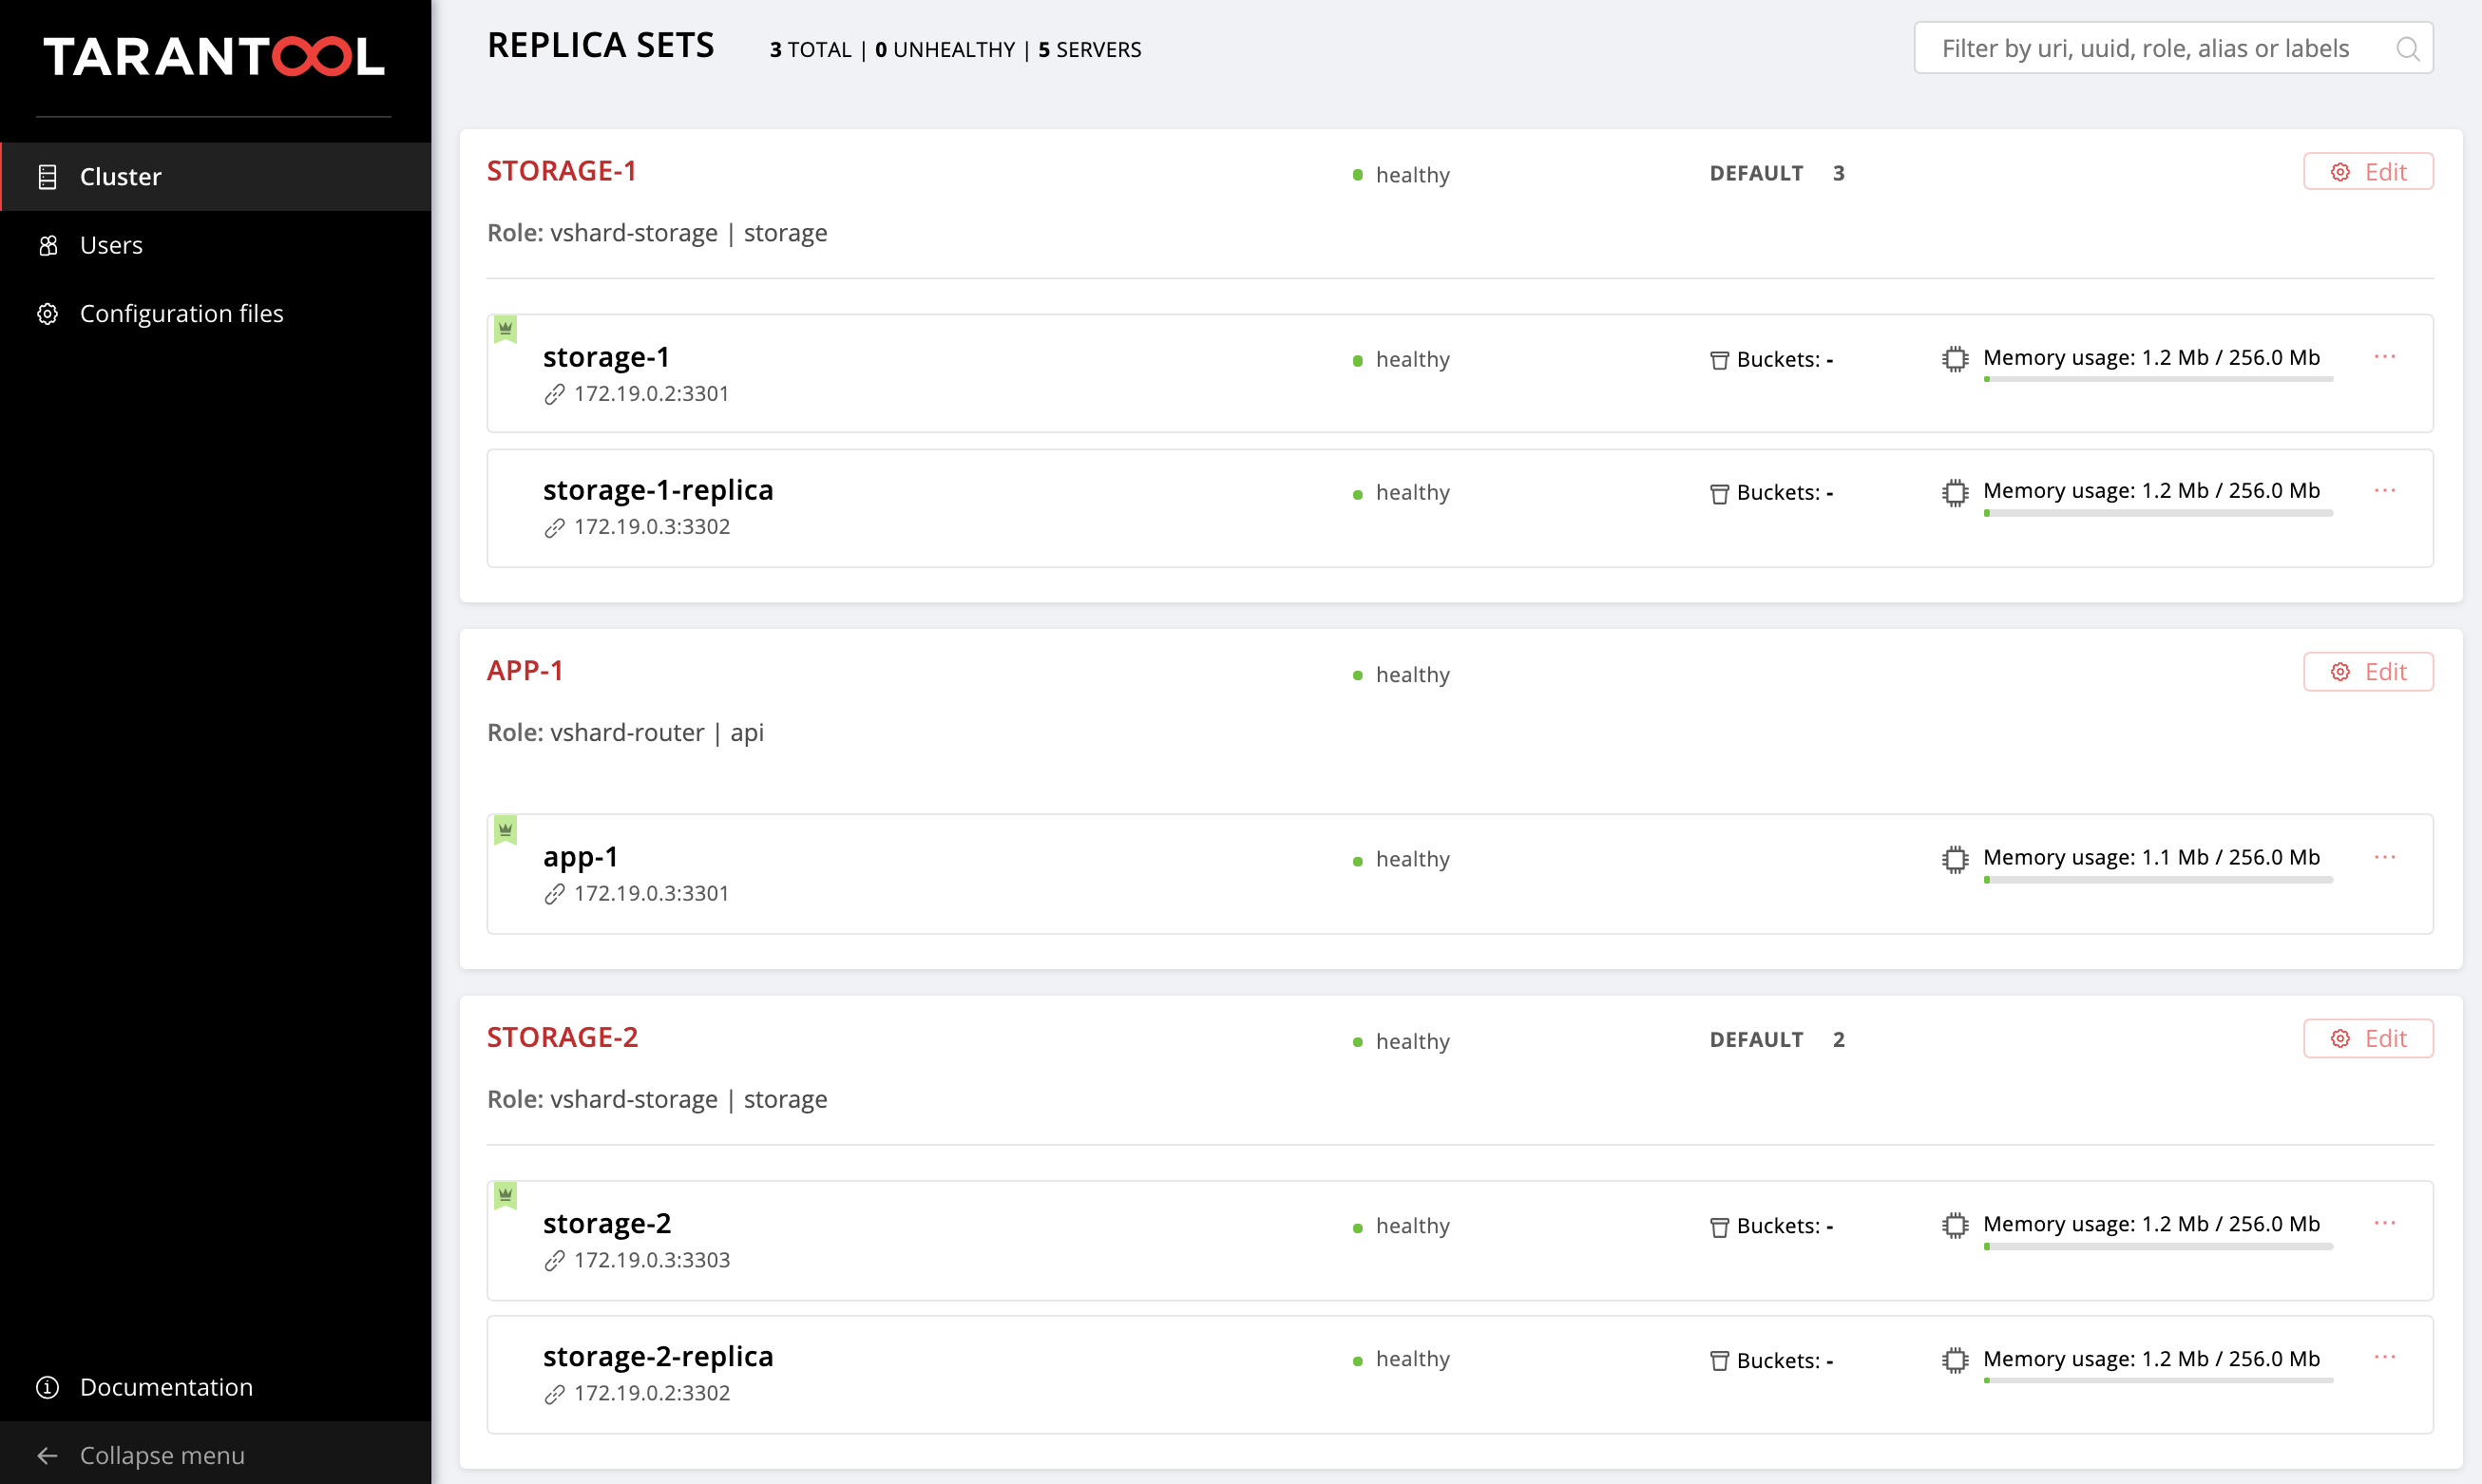
Yay!
好极了!
Try changing the configuration of the instances and replica sets and see how the topology of the cluster changes. You can try different use cases, such as rolling update or memtx_memory increase. The role would try to do this without restarting the instance to reduce the possible downtime of your application.
尝试更改实例和副本集的配置,然后查看群集的拓扑如何更改。 您可以尝试不同的用例,例如滚动更新或memtx_memory增加。 该角色将尝试执行此操作而无需重新启动实例,以减少应用程序可能的停机时间。
Don't forget to run vagrant halt to stop the virtual machines when you're done with them.
完成虚拟机操作后,不要忘记运行vagrant halt来停止虚拟机。
里面有什么? (What's inside?)
Here I will tell you more about what happened under the hood of the Ansible role during our tests.
在这里,我将详细介绍您在测试过程中Ansible角色的幕后经历。
Let's consider the steps of deploying a Cartridge application.
让我们考虑一下部署Cartridge应用程序的步骤。
安装软件包并启动实例 (Installing the package and starting the instances)
The first thing to do is to deliver the package to the server and install it. Now the role can work with RPM-packages and DEB-packages.
首先要做的是将软件包交付到服务器并进行安装。 现在,该角色可以与RPM包和DEB包一起使用。
Next, we launch the instances. It is very simple: every instance is a separate systemd service. For example:
接下来,我们启动实例。 这很简单:每个实例都是一个单独的systemd服务。 例如:
$ systemctl start myapp@storage-1 This command launches the storage-1 instance of the myapp
此命令启动myapp的storage-1实例
application. The running instance looks for its configuration in /etc/tarantool/conf.d/. You can view the instance logs using journald.
应用。 正在运行的实例在/etc/tarantool/conf.d/查找其配置 。 您可以使用journald查看实例日志。
The Unit file /etc/systemd/systemd/myapp@.sevice for the systemd service is delivered with the package.
该软件包随附了用于systemd服务的单元文件/etc/systemd/systemd/myapp@.sevice 。
Ansible has built-in modules for installing packages and managing systemd services, so we did not invent anything new here.
Ansible具有用于安装软件包和管理系统服务的内置模块,因此我们在这里没有发明任何新东西。
配置集群拓扑 (Configuring the cluster topology)
The most exciting things happen here. I am sure you would agree that it is strange to bother with a special Ansible role for installing packages and running systemd services.
最激动人心的事情发生在这里。 我相信您会同意,对于安装软件包和运行systemd服务的特殊Ansible角色感到困扰是很奇怪的。
You can configure the cluster manually:
您可以手动配置集群:
- The first option is to open the Web UI and click on the buttons. It is quite suitable for a one-time start of several instances. 第一个选项是打开Web UI并单击按钮。 非常适合一次启动多个实例。
- The second option is to use GraphQL API. Here you can already automate something, for example, write a script in Python. 第二种选择是使用GraphQL API。 在这里,您已经可以使某些东西自动化,例如,用Python编写脚本。
The third option is for the courageous: go to the server, connect to one of the instances with the help of
tarantoolctl connectand perform all the necessary actions with thecartridgeLua module.第三种选择是勇敢的:转到服务器,借助
tarantoolctl connect连接到实例之一,并使用cartridgeLua模块执行所有必要的操作。
The main task of our invention is to do this most difficult part of the work for you.
我们发明的主要任务是为您完成这项工作中最困难的部分。
Ansible allows you to write your own module and use it in your role. Our role uses these modules to manage the various cluster components.
Ansible允许您编写自己的模块并在您的角色中使用它。 我们的角色使用这些模块来管理各种集群组件。
How does it work? You describe the desired state of the cluster in a declarative configuration, and the role gives each module its own configuration section as input. The module receives the current state of the cluster and compares it with the input. Then the code for the necessary cluster state is launched using the socket of one of the instances.
它是如何工作的? 您以声明性配置描述集群的所需状态,该角色为每个模块提供其自己的配置部分作为输入。 该模块接收集群的当前状态,并将其与输入进行比较。 然后,使用其中一个实例的套接字启动必要集群状态的代码。
结果 (Results)
Today we have shown you how to deploy your Tarantool Cartridge application and configure a simple topology. To do this, we used Ansible, a powerful tool that is easy to use and allows you to configure multiple infrastructure nodes at the same time (in our case, the cluster instances).
今天,我们向您展示了如何部署Tarantool Cartridge应用程序和配置简单的拓扑。 为此,我们使用了Ansible,这是一个易于使用的功能强大的工具,它允许您同时配置多个基础结构节点(在我们的示例中是集群实例)。
Above we went over one of the many ways to describe the cluster configuration by means of Ansible. Once you feel that you are ready for more, learn the best practices for writing playbooks. You may find it easier to manage the topology with group_vars and host_vars.
上面我们介绍了通过Ansible描述集群配置的多种方法之一。 一旦您准备好了更多,请学习编写剧本的最佳实践 。 您可能会发现使用group_vars和host_vars管理拓扑更容易。
Very soon, we will tell you how to remove (expel) instances from the topology permanently, bootstrap vshard, manage automatic failover, configure authorization, and patch cluster configuration. In the meantime, you can review the documentation yourself and try changing cluster settings.
很快,我们将告诉您如何从拓扑中永久删除(删除)实例,引导vshard,管理自动故障转移,配置授权以及修补程序集群配置。 同时,您可以自己查看文档并尝试更改群集设置。
If something goes wrong, make sure to let us know about the problem. We will do our best to resolve any issue!
如果出现问题,请确保让我们知道该问题。 我们将尽力解决任何问题!


 2万+
2万+


 被折叠的 条评论
为什么被折叠?
被折叠的 条评论
为什么被折叠?
 到【灌水乐园】发言


