


 本文介绍了如何使用Ubuntu Live CD创建驱动器映像。通过dd工具,可以将硬盘中的所有数据复制到一个大文件中,方便备份或多次复制。文章详细阐述了创建驱动器映像的步骤,包括启动Live CD环境,确定源驱动器标识,以及使用dd命令创建和还原映像。

ubuntu 映像
Cloning a hard drive is useful, but what if you have to make several copies, or you just want to make a complete backup of a hard drive? Drive images let you put everything, and we mean everything, from your hard drive in one big file.
克隆硬盘很有用,但是如果您必须制作多个副本,或者只想完整备份硬盘,该怎么办? 通过驱动器映像,您可以将硬盘中的所有内容(我们要指的是一切)放入一个大文件中。
With an Ubuntu Live CD, this is a simple process – the versatile tool dd can do this for us right out of the box.
使用Ubuntu Live CD,这是一个简单的过程-多功能工具dd可以立即为我们完成此任务。
We’ve used dd to clone a hard drive before. Making a drive image is very similar, except instead of copying data from one hard drive to another, we copy from a hard drive to a file. Drive images are more flexible, as you can do what you please with the data once you’ve pulled it off the source drive.
我们以前曾用dd 克隆硬盘 。 制作驱动器映像非常相似,只是我们不是将数据从一个硬盘复制到另一个硬盘,而是从硬盘复制到文件。 驱动器映像更加灵活,因为将数据从源驱动器中拉出后,您可以根据自己的需要进行处理。
Your drive image is going to be a big file, depending on the size of your source drive – dd will copy every bit of it, even if there’s only one tiny file stored on the whole hard drive. So, to start, make sure you have a device connected to your computer that will be large enough to hold the drive image.
根据源驱动器的大小,驱动器映像将是一个大文件-即使整个硬盘驱动器上只存储了一个小文件, dd也会复制其中的每一位。 因此,首先,请确保您有连接到计算机的设备,该设备的大小足以容纳驱动器映像。
Some ideas for places to store the drive image, and how to connect to them in an Ubuntu Live CD, can be found at this previous Live CD article. In this article, we’re going to make an image of a 1GB drive, and store it on another hard drive in the same PC.
可以在此先前的Live CD文章中找到一些有关存储驱动器映像的地方以及如何在Ubuntu Live CD中进行连接的想法。 在本文中,我们将制作一个1GB驱动器的映像,并将其存储在同一台PC上的另一个硬盘驱动器上。
Note: always be cautious when using dd, as it’s very easy to completely wipe out a drive, as we will show later in this article.
注意:使用dd时请务必谨慎,因为完全擦除驱动器非常容易,正如我们将在本文后面显示的那样。
Creating a Drive Image
创建驱动器映像
Boot up into the Ubuntu Live CD environment.
启动进入Ubuntu Live CD环境。
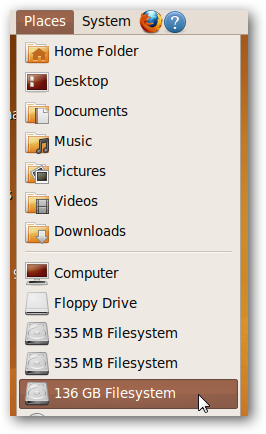
Since we’re going to store the drive image on a local hard drive, we first have to mount it. Click on Places and then the location that you want to store the image on – in our case, a 136GB internal drive.
由于我们要将驱动器映像存储在本地硬盘驱动器上,因此我们首先必须安装它。 单击位置,然后单击要在其中存储映像的位置–在我们的示例中是136GB内置驱动器。
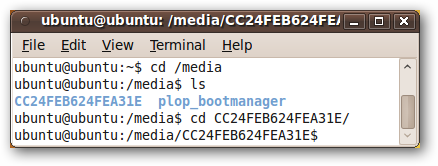
Open a terminal window (Applications > Accessories > Terminal) and navigate to the newly mounted drive. All mounted drives should be in /media, so we’ll use the command
打开一个终端窗口(应用程序>附件>终端),然后导航到新安装的驱动器。 所有已安装的驱动器应位于/ media中,因此我们将使用以下命令
cd /media
cd /媒体
and then type the first few letters of our difficult-to-type drive, press tab to auto-complete the name, and switch to that directory.
然后键入我们难以键入的驱动器的前几个字母,按Tab键自动完成名称,然后切换到该目录。
If you wish to place the drive image in a specific folder, then navigate to it now. We’ll just place our drive image in the root of our mounted drive.
如果要将驱动器映像放置在特定的文件夹中,请立即导航到该文件夹。 我们将驱动器映像放置在已安装驱动器的根目录中。
The next step is to determine the identifier for the drive you want to make an image of. In the terminal window, type in the command
下一步是确定要为其制作映像的驱动器的标识符。 在终端窗口中,输入命令
sudo fdisk -l
须藤fdisk -l
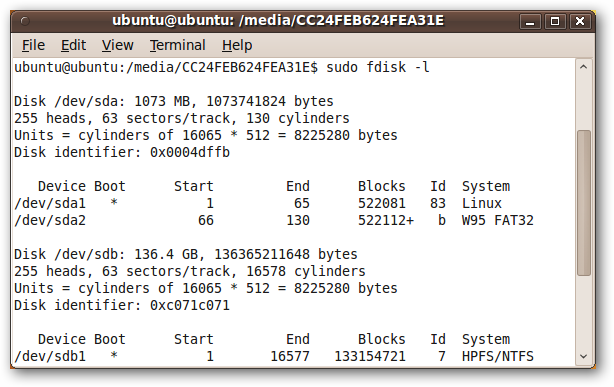
Our 1GB drive is /dev/sda, so we make a note of that.
我们的1GB驱动器是/ dev / sda,因此请注意。
Now we’ll use dd to make the image. The invocation is
现在,我们将使用dd制作图像。 调用是
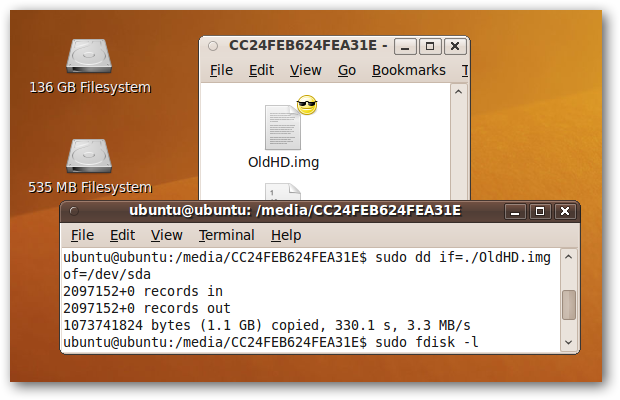
sudo dd if=/dev/sda of=./OldHD.img
须藤dd if = / dev / sda of =。/ OldHD.img
This means that we want to copy from the input file (“if”) /dev/sda (our source drive) to the output file (“of”) OldHD.img, which is located in the current working directory (that’s the “.” portion of the “of” string).
这意味着我们要从输入文件(“ if”)/ dev / sda(我们的源驱动器)复制到输出文件(“ of”)OldHD.img,该文件位于当前工作目录(即“ 。”部分的字符串)。
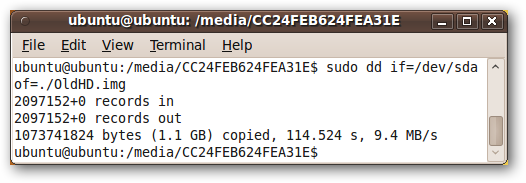
It takes some time, but our image has been created…Let’s test to make sure it works.
这需要一些时间,但是我们的图像已经创建出来……请进行测试以确保其正常工作。
Drive Image Testing: Wiping the Drive
驱动器映像测试:擦拭驱动器
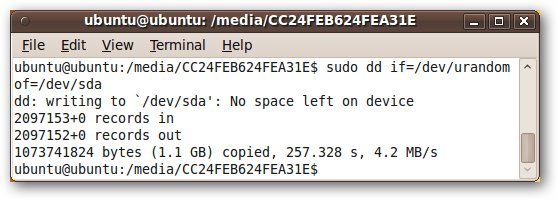
Another interesting thing that dd can do is totally wipe out the data on a drive (a process we’ve covered before). The command for that is
dd可以做的另一件有趣的事情是完全擦除驱动器上的数据(我们之前已经介绍过一个过程)。 该命令是
sudo dd if=/dev/urandom of=/dev/sda
须藤dd if = / dev / urandom of = / dev / sda
This takes some random data as input, and outputs it to our drive, /dev/sda.
这将一些随机数据作为输入,并将其输出到我们的驱动器/ dev / sda。
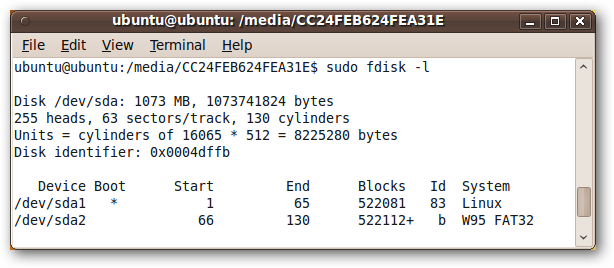
If we examine the drive now using sudo fdisk –l, we can see that the drive is, indeed, wiped.
如果现在使用sudo fdisk –l检查驱动器,则可以看到该驱动器确实已擦除。

Drive Image Testing: Restoring the Drive Image
驱动器映像测试:还原驱动器映像
We can restore our drive image with a call to dd that’s very similar to how we created the image. The only difference is that the image is going to be out input file, and the drive now our output file.
我们可以通过调用dd来还原驱动器映像,这与我们创建映像的方式非常相似。 唯一的区别是映像将是输入文件,而驱动器现在是我们的输出文件。
The exact invocation is
确切的调用是
sudo dd if=./OldHD.img of=/dev/sda
须藤dd if =。/ OldHD.img of = / dev / sda

It takes a while, but when it’s finished, we can confirm with sudo fdisk –l that our drive is back to the way it used to be!
这需要一段时间,但是完成后,我们可以使用sudo fdisk –l确认我们的驱动器已恢复到以前的状态!
Conclusion
结论
There are a lots of reasons to create a drive image, with backup being the most obvious. Fortunately, with dd creating a drive image only takes one line in a terminal window – if you’ve got an Ubuntu Live CD handy!
创建驱动器映像的原因很多,其中最明显的是备份。 幸运的是,使用dd创建驱动器映像仅需在终端窗口中显示一行-如果您有Ubuntu Live CD的话!
翻译自: https://www.howtogeek.com/howto/19446/make-a-drive-image-using-an-ubuntu-live-cd/
ubuntu 映像


 5793
5793

 被折叠的 条评论
为什么被折叠?
被折叠的 条评论
为什么被折叠?
 到【灌水乐园】发言


