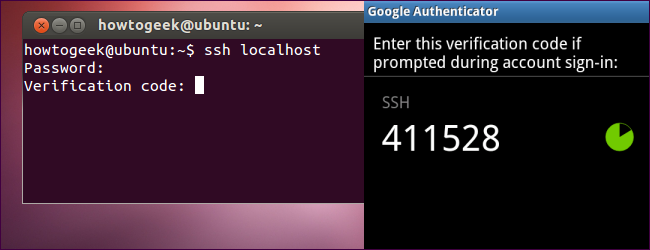
Want to secure your SSH server with easy-to-use two-factor authentication? Google provides the necessary software to integrate Google Authenticator’s time-based one-time password (TOTP) system with your SSH server. You’ll have to enter the code from your phone when you connect.
是否想通过易于使用的两因素身份验证来保护SSH服务器? Google提供了必要的软件,以将Google Authenticator的基于时间的一次性密码(TOTP)系统与您的SSH服务器集成。 连接时,您必须从手机中输入验证码。
Google Authenticator doesn’t “phone home” to Google — all the work happens on your SSH server and your phone. In fact, Google Authenticator is completely open-source, so you can even examine its source code yourself.
Google Authenticator不会将电话“拨回家”给Google-所有工作都在您的SSH服务器和电话上进行。 实际上,Google Authenticator是完全开源的 ,因此您甚至可以自己检查其源代码。
安装Google Authenticator (Install Google Authenticator)
To implement multifactor authentication with Google Authenticator, we’ll need the open-source Google Authenticator PAM module. PAM stands for “pluggable authentication module” – it’s a way to easily plug different forms of authentication into a Linux system.
要使用Google Authenticator实现多因素身份验证,我们需要开源的Google Authenticator PAM模块。 PAM代表“可插入身份验证模块” –这是一种将各种形式的身份验证轻松插入Linux系统的方法。
Ubuntu’s software repositories contain an easy-to-install package for the Google Authenticator PAM module. If your Linux distribution doesn’t contain a package for this, you’ll have to download it from the Google Authenticator downloads page on Google Code and compile it yourself.
Ubuntu的软件存储库包含一个易于安装的Google Authenticator PAM模块软件包。 如果您Linux发行版不包含此软件包,则必须从Google Code上的Google Authenticator下载页面下载它,然后自己进行编译。
To install the package on Ubuntu, run the following command:
要在Ubuntu上安装该软件包,请运行以下命令:
sudo apt-get install libpam-google-authenticator
须藤apt-get install libpam-google-authenticator
(This will only install the PAM module on our system – we’ll have to activate it for SSH logins manually.)
(这只会在我们的系统上安装PAM模块-我们必须手动激活它才能进行SSH登录。)

创建身份验证密钥 (Create an Authentication Key)
Log in as the user you’ll be logging in with remotely and run the google-authenticator command to create a secret key for that user.
以您将要远程登录的用户身份登录,然后运行google-authenticator命令为该用户创建密钥。
Allow the command to update your Google Authenticator file by typing y. You’ll then be prompted with several questions that will allow you to restrict uses of the same temporary security token, increase the time window that tokens can be used for, and limit allowed acces attempts to hinder brute-force cracking attempts. These choices all trade some security for some ease-of-use.
通过输入y允许命令更新您的Google Authenticator文件。 然后,系统将提示您一些问题,这些问题将允许您限制使用同一临时安全令牌,增加令牌可使用的时间范围,并限制允许的尝试尝试来阻止暴力破解尝试。 这些选择都为某种易用性而牺牲了一些安全性。

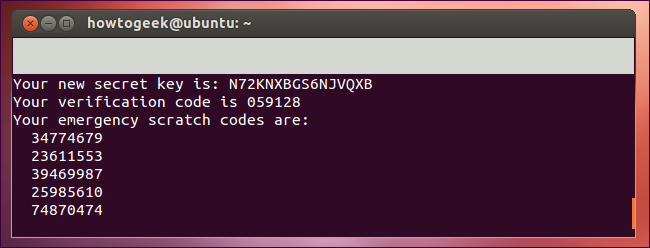
Google Authenticator will present you with a secret key and several “emergency scratch codes.” Write down the emergency scratch codes somewhere safe – they can only be used one time each, and they’re intended for use if you lose your phone.
Google身份验证器将为您提供一个秘密密钥和几个“紧急暂存代码”。 在安全的地方写下紧急刮刮码-每次只能使用一次,并且如果您丢失手机则打算使用它们。

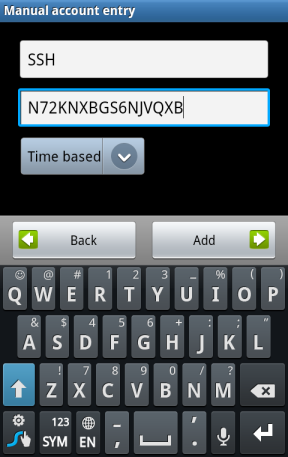
Enter the secret key in the Google Authenticator app on your phone (official apps are available for Android, iOS, and Blackberry). You can also use the scan barcode feature – go to the URL located near the top of the command’s output and you can scan a QR code with your phone’s camera.
在手机的Google Authenticator应用中输入密钥(官方应用可用于Android,iOS和Blackberry )。 您还可以使用扫描条形码功能–转到命令输出顶部附近的URL,然后可以使用手机的摄像头扫描QR码。

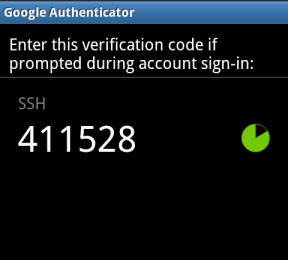
You’ll now have a constantly changing verification code on your phone.
现在,您的手机上的验证码会不断变化。

If you want to log in remotely as multiple users, run this command for each user. Each user will have their own secret key and their own codes.
如果要以多个用户身份远程登录,请为每个用户运行此命令。 每个用户将拥有自己的秘密密钥和自己的代码。
激活Google身份验证器 (Activate Google Authenticator)
Next you’ll have to require Google Authenticator for SSH logins. To do so, open the /etc/pam.d/sshd file on your system (for example, with the sudo nano /etc/pam.d/sshd command) and add the following line to the file:
接下来,您需要使用Google Authenticator进行SSH登录。 为此,请在系统上打开/etc/pam.d/sshd文件(例如,使用sudo nano /etc/pam.d/sshd命令),并将以下行添加到该文件中:
auth required pam_google_authenticator.so
需要验证pam_google_authenticator.so
Next, open the /etc/ssh/sshd_config file, locate the ChallengeResponseAuthentication line, and change it to read as follows:
接下来,打开/ etc / ssh / sshd_config文件,找到ChallengeResponseAuthentication行,并将其更改为以下内容:
ChallengeResponseAuthentication yes
ChallengeResponseAuthentication是
(If the ChallengeResponseAuthentication line doesn’t already exist, add the above line to the file.)
(如果ChallengeResponseAuthentication行尚不存在,请将上述行添加到文件中。)
Finally, restart the SSH server so your changes will take effect:
最后,重新启动SSH服务器,以使您的更改生效:
sudo service ssh restart
sudo服务ssh重新启动

You’ll be prompted for both your password and Google Authenticator code whenever you attempt to log in via SSH.
每当您尝试通过SSH登录时,系统都会提示您输入密码和Google Authenticator代码。


 1万+
1万+


 被折叠的 条评论
为什么被折叠?


