


Until now, we learned to install and configure SQL Server 2019 using the Docker container. In this article, we will directly install SQL Server on the Ubuntu Linux and explore more on this.
到目前为止,我们学习了使用Docker容器安装和配置SQL Server 2019。 在本文中,我们将直接在Ubuntu Linux上安装SQL Server,并对此进行更多研究。
SQL Server works on both the windows as well as Linux platform operating systems from SQL Server 2017. In my previous articles, we explored the following topics
SQL Server可在SQL Server 2017的Windows以及Linux平台操作系统上运行。在我以前的文章中,我们探讨了以下主题
- Ubuntu operating system on it Ubuntu操作系统
- Docker Container Docker容器在Ubuntu Linux上安装SQL Server 2019 2.0
- tools on the Ubuntu virtual machine and Connect SQL Server from inside and outside the VM machine 工具 ,并从VM机器内部和外部连接SQL Server
Also described in a previous article, we can install SQL Server on Linux directly on Ubuntu OS or we can run it using the Docker container.
在上一篇文章中也进行了描述,我们可以在Ubuntu OS上直接在Linux上安装SQL Server,也可以使用Docker容器运行它。
入门 (Getting started)
Launch the Virtual Machine and connect to it using the Putty terminal with the credentials.
启动虚拟机,然后使用带有凭据的Putty终端连接到虚拟机。
安装 (Installation)
Follow the below steps to install SQL Server 2019 2.1 (latest preview version)
请按照以下步骤安装SQL Server 2019 2.1(最新预览版)
As per GPG key documentation, “GnuPG allows you to encrypt and sign your data and communications; it features a versatile key management system, along with access modules for all kinds of public key directories. GnuPG, also known as GPG, is a command line tool with features for easy integration with other applications”
根据GPG密钥文档 ,“ GnuPG允许您对数据和通信进行加密和签名; 它具有通用的密钥管理系统以及用于各种公钥目录的访问模块。 GnuPG,也称为GPG ,是一种命令行工具,具有易于与其他应用程序集成的功能。”
wget -qO- https://packages.microsoft.com/keys/microsoft.asc | sudo apt-key add –
wget -qO- https://packages.microsoft.com/keys/microsoft.asc | sudo apt-key添加–
In this step, we need to register the Microsoft SQL Server Ubuntu repository for SQL Server 2019 preview using the add-apt-repository. We can get web content using the wget command for the URL specified in the below command.
在此步骤中,我们需要使用add-apt-repository为Microsoft SQL Server 2019预览版注册Microsoft SQL Server Ubuntu存储库。 我们可以使用wget命令获取以下命令中指定的URL的Web内容。
sudo add-apt-repository “$(wget -qO- https://packages.microsoft.com/config/ubuntu/16.04/mssql-server-preview.list)”
sudo add-apt-repository“ $(wget -qO- https://packages.microsoft.com/config/ubuntu/16.04/mssql-server-preview.list)”
After the command, update the repository using the below command
命令之后,使用以下命令更新存储库
sudo apt-get update
sudo apt-get更新
- Now, we are ready to install SQL Server database engine services. Run the below command to start SQL Server 2019 2.1 installation. 现在,我们准备安装SQL Server数据库引擎服务。 运行以下命令以启动SQL Server 2019 2.1安装。
sudo apt-get install -y mssql-server
须藤apt-get install -y mssql-server
In the screenshot below, you can notice that it installs the dependent package and upgrades a few existing packages. It requires 1,292 MB of additional disk space.
在下面的屏幕截图中,您会注意到它安装了从属软件包并升级了一些现有软件包。 它需要1,292 MB的额外磁盘空间。
Once dependency is installed, it installs the mssql-server package. You can see details progress message about each component.
安装依赖项后,它将安装mssql-server软件包。 您可以查看有关每个组件的详细信息进度消息。
At this point, you get the image of SQL Server instance on the Ubuntu. However, in order to use this SQL instance, we need to run ‘sudo /opt/mssql/bin/mssql-conf setup’.
此时,您将在Ubuntu上获得SQL Server实例的映像。 但是,为了使用此SQL实例,我们需要运行“ sudo / opt / mssql / bin / mssql-conf安装程序”。
In a windows environment, when we install SQL Server during the installation wizard, we need to specify details such as edition, instance name, license agreement, SA password etc. In a Linux environment, it first installs the base version and then we can configure an instance with the desired configuration.
在Windows环境中,当我们在安装向导中安装SQL Server时,需要指定详细信息,例如版本,实例名称,许可协议,SA密码等。在Linux环境中,它首先安装基本版本,然后我们可以进行配置具有所需配置的实例。
组态 (Configuration)
Run the command with administrative permission user
以管理员权限用户运行命令
Sudo /opt/mssql/bin/mssql-conf setup’
须藤/ opt / mssql / bin / mssql-conf设置'
1. Choose an edition of SQL Server:
1.选择一个版本SQL Server:
Each edition is listed with a serial number. Enter the edition no (1-8) from the list. In this instance, we will install number 1 -Evaluation (free, no production rights, 180-days limit)
每个版本都列出了序列号。 从列表中输入版本号(1-8)。 在这种情况下,我们将安装编号1-评估(免费,没有生产权,期限为180天)
2. Next part is to accept the license terms. Provide the input as Yes or No.
2.下一部分是接受许可条款。 提供的输入为是或否。
3. Third input required is the language for the SQL Server. Enter option 1-11 from the list shown.
3.所需的第三项输入是SQL Server的语言。 从显示的列表中输入选项1-11。
4. Now, we need to specify the system administrator (SA) password. Enter the password again to confirm the password.
4.现在,我们需要指定系统管理员(SA)密码。 再次输入密码以确认密码。
Once we have provided all these inputs, we can see the message that ‘ this is an evaluation version. There are (152) days left in the evaluation period. The license PID was successfully processed. ‘
提供所有这些输入后,我们将看到消息“这是评估版”。 评估期还剩下(152)天。 许可证PID已成功处理。 '
It starts the SQL Server with this configuration and we get the message at the end ‘Set up has completed successfully. SQL Server is now starting’
它使用此配置启动SQL Server,并在最后显示消息“安装成功完成。 SQL Server现在开始了”
重新启动并连接 (Restarting and connecting)
You can check the SQL Service status from the command line using the systemctl command. We can check the status, stop and start SQL Services using the systemctl command.
您可以使用systemctl命令从命令行检查SQL Service状态。 我们可以使用systemctl命令检查状态,停止和启动SQL Services。
Systemctl status mssql-server
Systemctl状态mssql-server
In the output, you will see the status as ‘active (running) since timestamp’ message.
在输出中,您将看到状态为“自时间戳记起活动(运行)”。
As per Microsoft documentation, you can enable the sqlagent and then restart SQL Server to use it. However, I believe there is some issue in this with the sqlagent. However, you can note down the steps to start sqlagent service.
根据Microsoft文档,您可以启用sqlagent,然后重新启动SQL Server以使用它。 但是,我相信sqlagent中存在一些问题。 但是,您可以记下启动sqlagent服务的步骤。
Sudo /opt/mssql/bin/mssql-conf set sqlagent.enabled.true
须藤/ opt / mssql / bin / mssql-conf设置sqlagent.enabled.true
Restart SQL Services using below command
使用以下命令重新启动SQL Services
Systemctl restart mssql-server.service
Systemctl重新启动mssql-server.service
First, check the IP address of the VM using the command
首先,使用以下命令检查VM的IP地址
IP addr show
IP地址显示
Connect to Ubuntu Linux instance using SQL Server Management Studio 18.0
使用SQL Server Management Studio 18.0连接到Ubuntu Linux实例
Here, we connected to SQL Server instance using the IP address. If we want to connect to SQL Server using the Virtual Server (hostname), we need to enter the details in the host file. The host file in Windows is available at C:\windows\System32\drivers\etc
在这里,我们使用IP地址连接到SQL Server实例。 如果要使用虚拟服务器(主机名)连接到SQL Server,则需要在主机文件中输入详细信息。 Windows中的主机文件位于C:\ windows \ System32 \ drivers \ etc
Check the hostname using the command ‘hostname’ in Linux. Our hostname is ‘Rajendra-VirtualBox’
在Linux中使用命令“主机名”检查主机名。 我们的主机名为“ Rajendra-VirtualBox”
Open the host file with administrative permission and add the details. Save and close the file.
在具有管理权限的情况下打开主机文件,然后添加详细信息。 保存并关闭文件。
However, I found one issue with my hostname registered in the instance. In the below query, you can see the svrname ‘Rajendra-Virtual’ while my hostname is ‘Rajendra-VirtualBox’
但是,我发现实例中注册的主机名存在一个问题。 在下面的查询中,您可以看到svrname'Rajendra-Virtual',而我的主机名是'Rajendra-VirtualBox'

Drop the server name using the command
使用以下命令删除服务器名称
Sp_dropserver ‘Rajendra-Virtual’
Sp_dropserver'Rajendra-Virtual'
Add the server name using the sp_addserver command
使用sp_addserver命令添加服务器名称
Sp_addserver @server=’rajendra-VirtualBox’,@local=’Local’
Sp_addserver @ server ='rajendra-VirtualBox',@ local ='本地'
Restart SQL Services
重新启动SQL服务
Verify the server name. Now the server name is correctly configured.
验证服务器名称。 现在,服务器名称已正确配置。

You can now connect with both the hostname and IP address.
现在,您可以同时连接主机名和IP地址。
在Ubuntu Linux实例上还原WideWorldStore数据库 (Restore the WideWorldStore database on Ubuntu Linux instance)
In the previous articles, we learned to use the import and export utility to transfer the objects and the data from the windows based SQL instance. In this article, we will restore the database backup onto Ubuntu instance.
在先前的文章中,我们学习了使用导入和导出实用程序从基于WindowsSQL实例传输对象和数据。 在本文中,我们将数据库备份还原到Ubuntu实例上。
The default directory for the data files and the log files in Ubuntu is /var/opt/mssql/data. We can go to the directory and view the content using the ls -lrt command.
Ubuntu中数据文件和日志文件的默认目录为/ var / opt / mssql / data。 我们可以使用ls -lrt命令转到目录并查看内容。
In below screenshot, we can see all system databases files in this directory.
在下面的屏幕截图中,我们可以看到此目录中的所有系统数据库文件。
Download WideWorldImporters-Full.bak sample database and transfer it to Ubuntu using the WinSCP.
下载WideWorldImporters-Full.bak示例数据库,并使用WinSCP将其传输到Ubuntu。
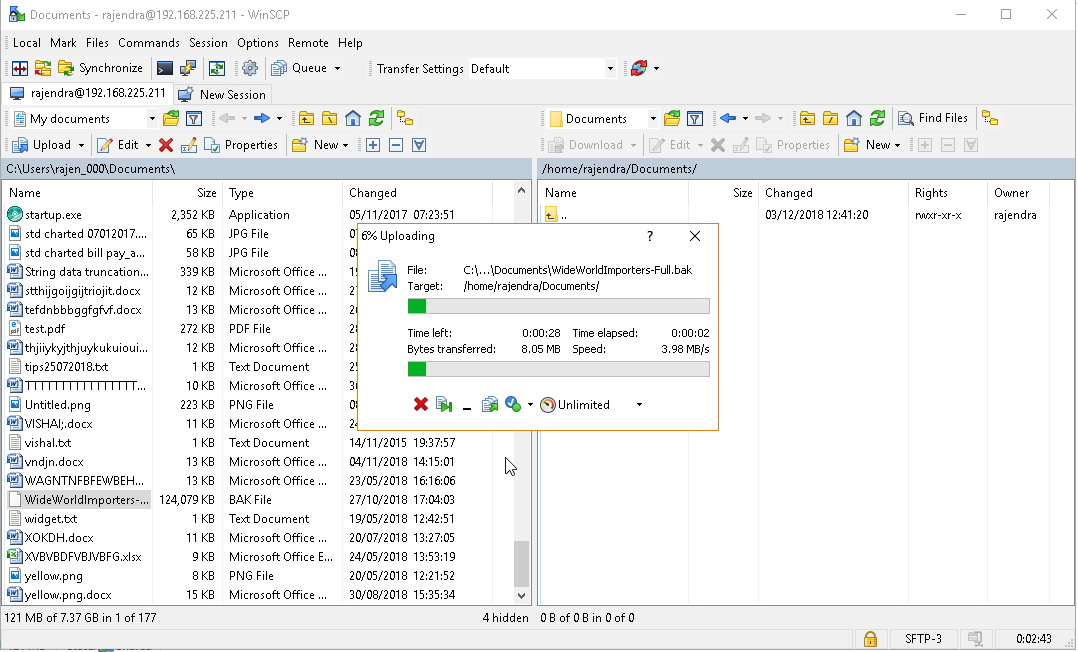
It transfers the file from the windows directory to the Ubuntu directory.
它将文件从Windows目录传输到Ubuntu目录。
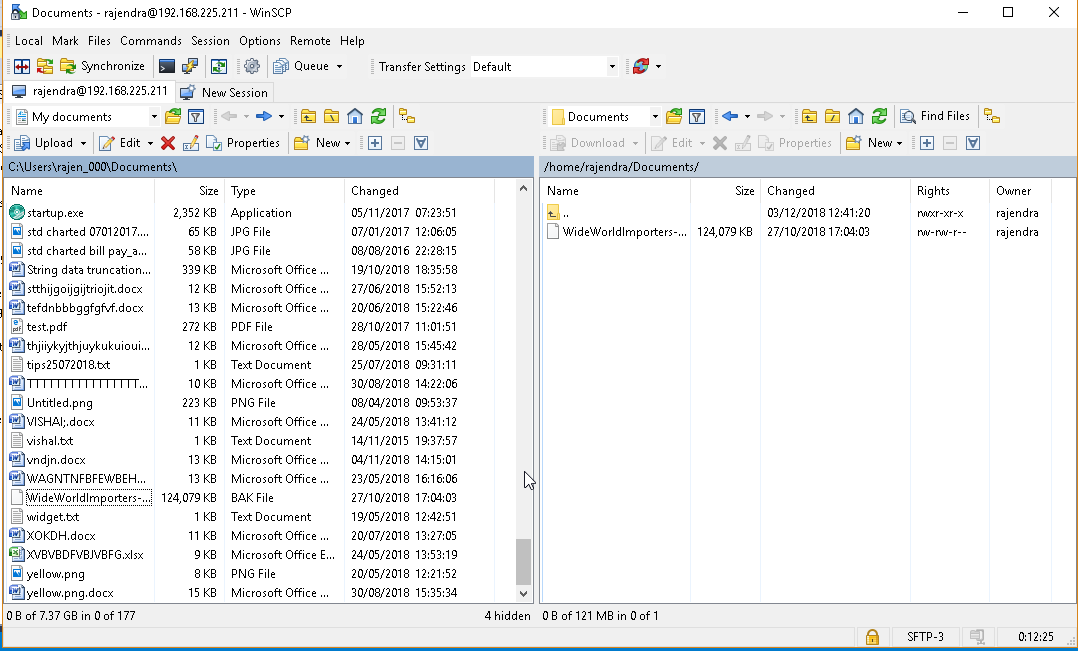
Verify the backup file at Ubuntu directory.
在Ubuntu目录中验证备份文件。
Move this backup file to the SQL directory /var/opt/mssql/data using the administrative permission.
使用管理权限将此备份文件移动到SQL目录/ var / opt / mssql / data。
# sudo su
#sudo su
#mv WideWorldImporters-Full.bak /var/opt/mssq/data/ WideWorldImporters-Full.bak
#mv WideWorldImporters-Full.bak / var / opt / mssq / data / WideWorldImporters-Full.bak
Verify the backup file at the /var/opt/msssql/data
验证/ var / opt / msssql / data中的备份文件
In the SSMS, restore the database with the Restore database wizard.
在SSMS中,使用“还原数据库”向导还原数据库。
View the restore plan
查看还原计划
View the database file location. You can see here that all the database files are moving to /var/opt/mssql/data directory.
查看数据库文件位置。 您可以在此处看到所有数据库文件都移至/ var / opt / mssql / data目录。
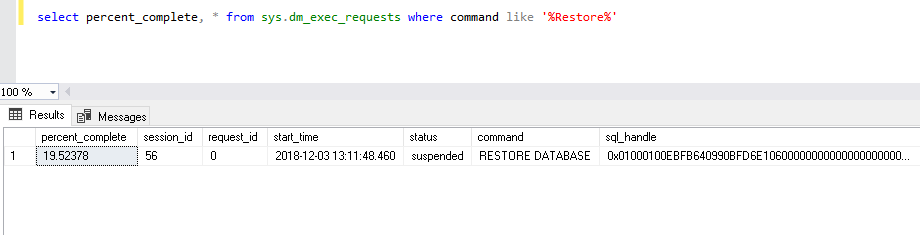
You can track the restore progress as usual way DMV.
您可以像往常一样通过DMV跟踪还原进度。
Select percent_complete, * from sys.dm_exec_requests where a command like ‘%Restores%’
从sys.dm_exec_requests中选择percent_complete,*,其中类似“%Restores%”的命令
Below script does the restore database wizard generate the script. You can view the detailed restored progress.
下面的脚本执行还原数据库向导生成的脚本。 您可以查看详细的还原进度。
View the DATABASE property in SSMS
查看SSMS中的DATABASE属性
Change the compatibility mode to SQL Server 2019 (150) using below command or from the drop-down options.
使用以下命令或从下拉选项将兼容模式更改为SQL Server 2019(150)。
USE [master]
GO
ALTER DATABASE [WideWorldImporters] SET COMPATIBILITY_LEVEL = 150
GO

GO
Verify the database compatibility level is set to SQL Server 2019 (150)
验证数据库兼容性级别设置为SQL Server 2019(150)
结论 (Conclusion)
In this article, we explored a SQL Server 2019 installation on Ubuntu and restored a database on it. We also connected with an IP address and the hostname using SQL Server Management Studio. In the next articles, we will learn further SQL Server on Linux.
在本文中,我们探索了Ubuntu上SQL Server 2019安装并在其上还原了数据库。 我们还使用SQL Server Management Studio连接了IP地址和主机名。 在接下来的文章中,我们将进一步学习Linux上SQL Server。
目录 (Table of contents)
| SQL Server 2019 on Linux with Ubuntu and Azure Data Studio |
| SQL Server 2019 on Linux with a Docker container on Ubuntu |
| SQL Server 2019 on Linux with Ubuntu |
| SQL Server 2019 installation on Ubuntu without a Docker Container |
| Renaming Logical and Physical file names in SQL Server on Linux |
| Rename SQL Server instance on Ubuntu Linux |
翻译自: https://www.sqlshack.com/sql-server-2019-installation-on-ubuntu-without-a-docker-container/


 264
264

 被折叠的 条评论
为什么被折叠?
被折叠的 条评论
为什么被折叠?
 到【灌水乐园】发言


