vscode创建一个css

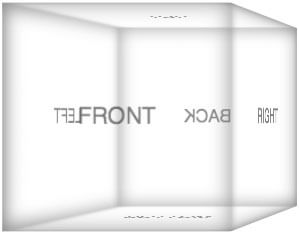
CSS cubes really showcase what CSS has become over the years, evolving from simple color and dimension directives to a language capable of creating deep, creative visuals. Add animation and you've got something really neat. Unfortunately each CSS cube tutorial I've read is a bit long and a mixes visual style with the cube basics, so I've decided to write a post which provides just the basic detail needed to create a CSS cube. I'm basing my example off of an outstanding CodePen demo by Mircea Georgescu.
CSS多维数据集确实展示了CSS多年来的发展,从简单的颜色和尺寸指令演变为能够创建深刻的,具有创意的视觉效果的语言。 添加动画,您将获得真正整洁的东西。 不幸的是,我阅读的每个CSS多维数据集教程都有些长,并且将视觉样式与多维数据集基础知识融合在一起,因此我决定写一篇文章,其中仅提供创建CSS多维数据集所需的基本细节。 我的示例基于Mircea Georgescu出色的CodePen演示 。
HTML (The HTML)
The cube element, a wrapper in itself, will actually have a wrapper of its own:
本身就是包装器的多维数据集元素实际上将具有自己的包装器:
<div class="wrap">
	<div class="cube">
		<div class="front">front</div>
		<div class="back">back</div>
		<div class="top">top</div>
		<div class="bottom">bottom</div>
		<div class="left">left</div>
		<div class="right">right</div>
	</div>
</div>
Each face of the cube will have its own element. As you can imagine, we'll be CSS-ing the hell out of them to put them in the proper position.
立方体的每个面都会有自己的元素。 可以想像,我们将对它们进行CSS处理以将它们放置在适当的位置。
CSS (The CSS)
Let's take this one meaningful bit at a time. The first meaningful element is the entire animation wrapper, which will provide a CSS perspective for the 3D element:
让我们一次了解一下这一点。 第一个有意义的元素是整个动画包装器,它将为3D元素提供CSS透视图 :
.wrap {
	perspective: 800px;
	perspective-origin: 50% 100px;
}
CSS perspective is a difficult concept to explain but MDN does a great job so I wont duplicate their explanation. To better understand perspective, I recommend modifying the perspective property to see how it effects the demo. Next up is the cube container which will hold all of the different cube faces:
CSS角度是一个很难解释的概念,但是MDN做得很好,因此我不会重复他们的解释。 为了更好地理解透视图,我建议修改Perspective属性以查看其如何影响演示。 接下来是多维数据集容器,它将容纳所有不同的多维数据集面:
.cube {
	position: relative;
	width: 200px;
	transform-style: preserve-3d;
}
The cube will be 200 pixels wide, with relative positioning so that the absolutely positioned faces will stay within bounds. We'll also use preserve-3d to keep the element 3D and not flat. Before getting to any of the specific face rules, there will be a few general styles that will apply to each face:
立方体将具有相对定位的200像素宽,以便绝对定位的面将保持在范围之内。 我们还将使用reserve-3d来保持元素3D而不是平坦。 在使用任何特定的面Kong规则之前,将有一些适用于每张面Kong的常规样式:
.cube div {
	position: absolute;
	width: 200px;
	height: 200px;
}
With the position and dimensions of the faces set, we can get to creating the transformation code for individual faces:
设置好脸部的位置和尺寸后,我们可以为各个脸部创建转换代码:
.back {
	transform: translateZ(-100px) rotateY(180deg);
}
.right {
	transform: rotateY(-270deg) translateX(100px);
	transform-origin: top right;
}
.left {
	transform: rotateY(270deg) translateX(-100px);
	transform-origin: center left;
}
.top {
	transform: rotateX(-90deg) translateY(-100px);
	transform-origin: top center;
}
.bottom {
	transform: rotateX(90deg) translateY(100px);
	transform-origin: bottom center;
}
.front {
	transform: translateZ(100px);
}
The rotateY values rotate the faces of the to move the face show the text at the correct angled, while the translateZ setting moves the elements forward and backward within the stack. The translateY setting may be confusing, but note that it represents raising or lowering a face to show 3D effect via the transparent panes. Each face has its own translations settings to place them in the appropriate place, so feel free to modify those values to see why each corresponds to its face.
rotationY值旋转的面,以使面以正确的角度移动以显示文本,而translateZ设置将元素在堆栈内前后移动。 translateY设置可能会造成混淆,但是请注意,它表示抬起或放下脸部以通过透明窗格显示3D效果。 每个人脸都有自己的转换设置,以将其放置在适当的位置,因此可以随意修改这些值以了解每个人为何都对应于其人脸。
多维数据集的水平旋转 (Horizontal Spinning of the Cube)
Of course, what good is a 3D element set without animating it. The answer: none. No good at all. So here are a few steps we need to take to making our precious cube animate horizontally:
当然,没有动画的3D元素集有什么用。 答案:没有。 一点都不好。 因此,我们需要采取一些步骤来使我们宝贵的立方体水平进行动画处理:
@keyframes spin {
	from { transform: rotateY(0); }
	to { transform: rotateY(360deg); }
}

.cube {
	animation: spin 5s infinite linear;
}
Probably easier than you think, yes? The text looks correct due to the facing rotation we implemented originally, and I've used keyframe animation in case we want to add more sexiness in the future.
可能比您想像的要容易,是吗? 由于我们最初实现了面向旋转,因此文本看起来是正确的,并且我使用了关键帧动画,以防将来需要增加更多的性感。
多维数据集的垂直旋转 (Vertical Spinning of the Cube)
Spinning the cube vertically should simple require changing the animation to Y axis, right? Unfortunately not -- the panes as they are would show text backward in some cases, so we'll need to revise the rotation of a few elements:
垂直旋转立方体应该简单地要求将动画更改为Y轴,对吗? 不幸的是,并非如此-原来的窗格在某些情况下会向后显示文本,因此我们需要修改一些元素的旋转方式:
@keyframes spin-vertical {
	from { transform: rotateX(0); }
	to { transform: rotateX(-360deg); }
}

.cube-wrap.vertical .cube {
	margin: 0 auto; /* keeps the cube centered */

	transform-origin: 0 100px;
	animation: spin-vertical 5s infinite linear;
}

.cube-wrap.vertical .top {
	transform: rotateX(-270deg) translateY(-100px);
}

.cube-wrap.vertical .back {
	transform: translateZ(-100px) rotateX(180deg);
}

.cube-wrap.vertical .bottom {
	transform: rotateX(-90deg) translateY(100px);
}
... as well as change the animation.
...以及更改动画。
展平立方体 (Flattening the Cube)
To remove the 3D look of the cube, and simply display one block at a time (without other face hinting), remove the perspective and origin settings from the wrapper:
要删除多维数据集的3D外观,并一次只显示一个块(没有其他面提示),请从包装器中删除透视图和原点设置:
.wrap {
	/* no more perspective */
	perspective: none;
	perspective-origin: 0 0;
}
Now the only one face will display at any given time.
现在,在任何给定时间都只会显示一张脸。
CSS cubes have been around for a while but I hope this article simplified their composition enough for you to attack your own. And don't get discouraged if you run into issues creating your cube -- I did too! I look forward to seeing what you create!
CSS多维数据集已经存在了一段时间,但我希望本文能够简化它们的构成,以使您能够攻击自己的多维数据集。 如果您在创建多维数据集时遇到问题,也不要气disc-我也是! 我期待看到您的创造!
vscode创建一个css


 本文介绍了如何使用VSCode创建一个CSS立方体,通过CSS实现3D效果。文章详细讲解了HTML结构、CSS样式设置,包括水平和垂直旋转以及立方体展平的效果。同时,文章提供了关键代码片段,帮助读者理解并创建自己的CSS立方体。


 574
574

 被折叠的 条评论
为什么被折叠?


