


qgc mission
Gynvael Coldwind is a security researcher at Google, who hosts weekly livestreams about security and programming in Polish and English). As part of the streams, he gives out missions — basically, CTF-style reverse engineering tasks. Yesterday’s mission was about Elvish — I mean Paint — I mean Python programming and bytecode.
Gynvael Coldwind是Google的安全研究员,他每周都会用波兰语和英语主持有关安全和编程的实时直播。 作为工作流的一部分,他发出任务-基本上是CTF风格的逆向工程任务。 昨天的任务是关于Elvish-我的意思是Paint-我的意思是Python编程和字节码。
MISSION 011               goo.gl/13Bia9             DIFFICULTY: ██████░░░░ [6╱10]
MISSION 011               goo.gl/13Bia9             DIFFICULTY: ██████░░░░ [6╱10]
┅┅┅┅┅┅┅┅┅┅┅┅┅┅┅┅┅┅┅┅┅┅┅┅┅┅┅┅┅┅┅┅┅┅┅┅┅┅┅┅┅┅┅┅┅┅┅┅┅┅┅┅┅┅┅┅┅┅┅┅┅┅┅┅┅┅┅┅┅┅┅┅┅┅┅┅┅┅┅┅┅
┅┅┅┅┅┅┅┅┅┅┅┅┅┅┅┅┅┅┅┅┅┅┅┅┅┅┅┅┅┅┅┅┅┅┅┅┅┅┅┅┅┅┅┅┅┅┅┅┅┅┅┅┅┅┅┅┅┅┅┅┅┅┅┅┅┅┅┅┅┅┅┅┅┅┅┅┅┅┅┅┅


Finally some real work!
Finally some real work!


One of our field agents managed to infiltrate suspects hideout and steal a
One of our field agents managed to infiltrate suspects hideout and steal a
pendrive possibly containing important information. However, the pendrive
pendrive possibly containing important information. However, the pendrive
actually requires one to authenticate themselves before accessing the stored
actually requires one to authenticate themselves before accessing the stored
files.
files.


We gave the pendrive to our laboratory and they managed to dump the firmware. We
We gave the pendrive to our laboratory and they managed to dump the firmware. We
looked at the deadlisting they sent and for our best knowledge it's some form of
looked at the deadlisting they sent and for our best knowledge it's some form of
Elvish. We can't read it.
Elvish. We can't read it.


Here is the firmware: goo.gl/axsAHt
Here is the firmware: goo.gl/axsAHt


And off you go. Bring us back the password.
And off you go. Bring us back the password.


Good luck!
Good luck!


---------------------------------------------------------------------------------
---------------------------------------------------------------------------------


If you decode the answer, put it in the comments under this video! If you write
If you decode the answer, put it in the comments under this video! If you write
a blogpost / post your solution online, please add a link in the comments too!
a blogpost / post your solution online, please add a link in the comments too!


P.S. I'll show/explain the solution on the stream in ~two weeks.
P.S. I'll show/explain the solution on the stream in ~two weeks.
P.S.2. Bonus points for recreating the original high-level code.
P.S.2. Bonus points for recreating the original high-level code.
Here’s the firmware:
这是固件:
To the uninitiated, this might look like Elvish. In reality, this is Python bytecode — the instruction set understood by Python’s (CPython 2.7) virtual machine. Python, like many other languages, uses a compiler to translate human-readable source code into something more appropriate for computers. Python code compiles to bytecode, which is then executed by CPython’s virtual machine. CPython bytecode can be ported between different hardware, while machine code cannot. However, machine code can often be faster than languages based on virtual machines and bytecode. (Java and C# work the same way as Python, C compiles directly to machine code)
对于初学者来说,这可能看起来像精灵。 实际上,这是Python字节码-Python的(CPython 2.7)虚拟机可以理解的指令集。 与许多其他语言一样,Python使用编译器将人类可读的源代码转换为更适合计算机的内容。 Python代码编译为字节码,然后由CPython的虚拟机执行。 CPython字节码可以在不同的硬件之间移植,而机器代码则不能。 但是,机器代码通常可以比基于虚拟机和字节码的语言更快。 (Java和C#与Python的工作方式相同,C直接编译为机器代码)
This is the internal representation of a Python function. The first few lines are the member variables of the f.__code__ object of our function. We know that:
这是Python函数的内部表示。 前几行是我们函数的f .__ code__对象的成员变量。 我们知道:
- it takes 1 argument
- it has 7 constants: None, a long string of hex digits, the string 'hex', and numbers: 89, 255, 115, 50.
- its flags are set to 67 (CO_NOFREE, CO_NEWLOCALS, CO_OPTIMIZED). This is the “standard” value that most uncomplicated functions take.
- its name is check_password
- it uses the following globals or attribute names: decode, len, False, all, zip, ord
- it has 4 local variables
- it uses a stack of size 6
- its variables are named s, good, cs, cg
- 它需要一个参数
- 它具有7个常数:无,一长串十六进制数字,字符串'hex'和数字:89、255、115、50。
- 其标志设置为67(CO_NOFREE,CO_NEWLOCALS,CO_OPTIMIZED)。 这是大多数简单功能所采用的“标准”值。
- 它的名字是check_password
- 它使用以下全局名称或属性名称: decode , len , False , all , zip , ord
- 它有4个局部变量
- 它使用6号纸堆
- 其变量名为s , good , cs , cg
There are two ways to solve this task: you can re-assemble the dis output, or try to re-create the function by hand, using the bytecode and the opcode module. I chose the latter method.
解决此任务的方法有两种:可以使用字节码和操作码模块重新组装dis输出,或尝试手动重新创建函数。 我选择了后一种方法。
逆向工程Python字节码:手动重新创建函数 (Reverse-engineering Python bytecode: re-creating the function by hand)
I started by recreating the original firmware file. I created an empty function and wrote some code to print out __code__ contents and dis.dis output. I also added color-coding to help me read it:
我从重新创建原始固件文件开始。 我创建了一个空函数,并编写了一些代码以打印出__code__内容和dis.dis输出。 我还添加了颜色编码以帮助阅读:
 #!/usr/bin/env python2
#!/usr/bin/env python2
 import import dis
dis
 import import sys
sys


 # Write code here
# Write code here
 def def check_passwordcheck_password (( ss ):
):
        pass
pass


 # Reverse engineering the code
# Reverse engineering the code
 cnames cnames = = (( 'co_argcount''co_argcount' , , 'co_consts''co_consts' , , 'co_flags''co_flags' , , 'co_name''co_name' , , 'co_names''co_names' , , 'co_nlocals''co_nlocals' , , 'co_stacksize''co_stacksize' , , 'co_varnames''co_varnames' )
)
 cvalues cvalues = = (( 11 , , (( NoneNone , , '4e5d4e92865a4e495a86494b5a5d49525261865f5758534d4a89''4e5d4e92865a4e495a86494b5a5d49525261865f5758534d4a89' , , 'hex''hex' , , 8989 , , 255255 , , 115115 , , 5050 ), ), 6767 , , 'check_password''check_password' , , (( 'decode''decode' , , 'len''len' , , 'False''False' , , 'all''all' , , 'zip''zip' , , 'ord''ord' ), ), 44 , , 66 , , (( 's''s' , , 'good''good' , , 'cs''cs' , , 'cg''cg' ))
))


 for for nn , , ov ov in in zipzip (( cnamescnames , , cvaluescvalues ):
):
        v v = = getattrgetattr (( check_passwordcheck_password .. __code____code__ , , nn )
)
        if if v v == == ovov :
:
                syssys .. stderrstderr .. writewrite (( '' 3333 [1;32m'[1;32m' )
)
        elseelse :
:
                syssys .. stderrstderr .. writewrite (( '' 3333 [1;31m'[1;31m' )
)
        syssys .. stderrstderr .. flushflush ()
()


        syssys .. stdoutstdout .. writewrite (( strstr (( nn ) ) + + " " " " + + strstr (( vv ) ) + + "" nn "" )
)
        syssys .. stdoutstdout .. flushflush ()
()


        syssys .. stderrstderr .. writewrite (( '' 3333 [0m'[0m' )
)
        syssys .. stderrstderr .. flushflush ()
()


 disdis .. disdis (( check_passwordcheck_password )
)
If we run this solver, we get the following output (text in brackets added by me):
如果运行此求解器,则会得到以下输出(我在括号中添加的文本):
We can see (with the help of colors, not reproduced here), that we’ve got co_argcount, co_flags, co_name correctly. We also have one constant (None, in every function) and one variable name (s, the argument name). We can also see dis.dis() output. While it looks similar to the assignment, there are a few noticeable differences: there is no 7 at the start, and LOAD_CONST instructions in the original code did not have anything in parentheses (only comparisions and loops did). This makes reading byte-code harder, but still possible. (I originally thought about using diff for help, but it’s not hard to do it by hand. I did use diff for the final checking after a manual conversion)
我们可以看到(借助颜色(此处未复制)),我们正确地拥有了co_argcount , co_flags和co_name 。 我们还有一个常量(每个函数中都为None )和一个变量名称( s为参数名称)。 我们还可以看到dis.dis()输出。 虽然看起来与分配相似,但是有一些明显的区别:开始没有7 ,并且原始代码中的LOAD_CONST指令的括号中没有任何内容(只有比较和循环)。 这使得读取字节码更加困难,但仍然可行。 (我本来是想使用diff来获得帮助的,但手动操作并不难。在手动转换后,我确实使用diff进行了最终检查)
Let’s stop to look at the constants and names for a second. The long string is followed by hex, and one of the constants is decode. This means that we need to use str.decode('hex') to create a (byte)string of some information. Puzzle answers tend to be human-readable, and this string isn’t — so we need to do some more work.
让我们停止看一下常量和名称。 长字符串后跟十六进制 ,并且常量之一是解码 。 这意味着我们需要使用str.decode('hex')创建一些信息的(字节)字符串。 谜题答案通常是人类可读的,而该字符串不是-因此我们需要做更多的工作。
So, let’s try reproducing the start of the original mission code using what we’ve just discussed. Python’s VM is based on a stack. In the bytecode above, you can see that instructions take 0 or 1 arguments. Some of them put things on the stack, others do actions and remove them. Most instruction names are self-explanatory, but the full list can be found in the dis module documentation.
因此,让我们尝试使用刚刚讨论的内容来再现原始任务代码的开始。 Python的VM基于堆栈。 在上面的字节码中,您可以看到指令采用0或1个参数。 其中一些将内容放到堆栈上,另一些则执行操作并将其删除。 大多数指令名称是不言自明的,但是完整的列表可以在dis模块文档中找到 。
Instructions like LOAD and STORE refer to indices in the constants/names/varnames tuples. To make it easier, here’s a “table” of them:
诸如LOAD和STORE之类的指令引用常量/名称/变量名元组中的索引。 为了简化起见,下面是其中的“表格”:
constants
constants
 0     1                                                       2      3   4    5    6
 0     1                                                       2      3   4    5    6
(None, '4e5d4e92865a4e495a86494b5a5d49525261865f5758534d4a89', 'hex', 89, 255, 115, 50)
(None, '4e5d4e92865a4e495a86494b5a5d49525261865f5758534d4a89', 'hex', 89, 255, 115, 50)


names (globals, attributes)
names (globals, attributes)
 0         1      2        3      4      5
 0         1      2        3      4      5
('decode', 'len', 'False', 'all', 'zip', 'ord')
('decode', 'len', 'False', 'all', 'zip', 'ord')


varnames (locals, _fast)
varnames (locals, _fast)
 0    1       2     3
 0    1       2     3
('s', 'good', 'cs', 'cg')
('s', 'good', 'cs', 'cg')
In order to improve readability, I will use “new” dis output with names in parentheses below:
为了提高可读性,我将使用“ new” dis输出,并在下面的括号中添加名称:
As I guessed before, the first line of our function is as follows:
正如我之前猜到的,我们函数的第一行如下:
 def def check_passwordcheck_password (( ss ):
):
        good good = = '4e5d4e92865a4e495a86494b5a5d49525261865f5758534d4a89''4e5d4e92865a4e495a86494b5a5d49525261865f5758534d4a89' .. decodedecode (( 'hex''hex' )  )  # new
# new
If we run the solver again, we’ll see that the first 12 bytes of our bytecode match the mission text. We can also see that varnames is filled in half, we’ve added two constants, and one name. The next few lines are as follows:
如果再次运行求解器,我们将看到字节码的前12个字节与任务文本匹配。 我们还可以看到varnames被填充了一半,我们添加了两个常量和一个名称。 接下来的几行如下:
We can see that we’re putting a global name on stack and calling it with one argument. In both cases, the global has the index 1, that’s len. The two arguments are s and good. We put both lengths on stack, then compare them. If the comparison fails (they’re equal), we jump to the instruction starting at byte 43, otherwise we continue execution to load the second global (False) and return it. This wall of text translates to the following simple code:
我们可以看到我们正在将一个全局名称放在堆栈上,并使用一个参数调用它。 在这两种情况下,全局索引均为1,即len 。 这两个参数是s和good 。 我们将两个长度放在一起,然后进行比较。 如果比较失败(它们相等),我们将跳转到从字节43开始的指令,否则我们将继续执行以加载第二个全局变量(False)并返回它。 此文本墙可转换为以下简单代码:
 def def check_passwordcheck_password (( ss ):
):
        good good = = '4e5d4e92865a4e495a86494b5a5d49525261865f5758534d4a89''4e5d4e92865a4e495a86494b5a5d49525261865f5758534d4a89' .. decodedecode (( 'hex''hex' )
)
        if if lenlen (( ss ) ) != != lenlen (( goodgood ):  ):  # new
# new
                return return False         False         # new
# new
Let’s take another look at our names. We can see we’re missing all, zip, ord. You can already see a common pattern here: we will iterate over both strings at once (using zip), do some math based on the character’s codes (ord), and then check if all the results are truthy.
让我们再来看一下我们的名字。 我们可以看到我们丢失了所有 zip和ord 。 您已经在这里看到一个常见的模式:我们将一次遍历两个字符串(使用zip ),根据字符代码( ord )进行一些数学运算,然后检查所有结果是否正确。
Here’s the bytecode with value annotations and comments, which explain what happens where:
这是带有值注释和注释的字节码,它们解释了在什么地方发生的情况:
We can now write the full answer.
现在,我们可以写出完整的答案。
listings/gynvaels-mission-11-en/mission11.py (Source)
清单/gynvaels-mission-11-en/mission11.py (来源)
 def def check_passwordcheck_password (( ss ):
):
        good good = = '4e5d4e92865a4e495a86494b5a5d49525261865f5758534d4a89''4e5d4e92865a4e495a86494b5a5d49525261865f5758534d4a89' .. decodedecode (( 'hex''hex' )
)
        if if lenlen (( ss ) ) != != lenlen (( goodgood ):
):
                return return False
False


        return return allall ([([ ordord (( cscs ) ) - - 89 89 & & 255 255 ^ ^ 115 115 ^ ^ 50 50 == == ordord (( cgcg ) ) for for cscs , , cg cg in in zipzip (( ss , , goodgood )])
)])
In the end, our dis.dis() output matches the mission text (except the removed values, but their IDs do match), our co_* variables are all green, and we can get to work on solving the puzzle itself!
最后,我们的dis.dis()输出与任务文本匹配(除去的值除外,但它们的ID确实匹配),我们的co_ *变量均为绿色,我们可以着手解决难题本身!
Side note: this task uses a list comprehension. You might want to optimize it, remove the brackets, and end up with a generator expression. This would make the task harder, since would require working with the internal generator code object as well:
旁注:此任务使用列表推导。 您可能需要对其进行优化,删除括号并以生成器表达式结尾。 这将使任务更加艰巨,因为还需要使用内部生成器代码对象:
BINARY_* and ord disappeared from the new listing. You can see the modified code (which differs by two bytes) and solver output.
解决真正的难题 (Solving the real puzzle)
I solved the extra credit part of the puzzle. The real aim of the puzzle was to recover the password — the text for which check_password() will return True.
我解决了难题中多余的部分。 难题的真正目的是恢复密码-check_password()将针对其返回True的文本。
This part is pretty boring. I built a dictionary, where I mapped every byte (0…256) to the result of the calculation done in the check_password() function’s loop. Then I used that to recover the original text.
这部分很无聊。 我建立了一个字典,在其中将每个字节(0…256)映射到在check_password()函数的循环中完成的计算结果。 然后,我用它来恢复原始文本。
 pass_values pass_values = = {}
{}
 for for i i in in rangerange (( 256256 ):
):
        result result = = i i - - 89 89 & & 255 255 ^ ^ 115 115 ^ ^ 50
50
        pass_valuespass_values [[ resultresult ] ] = = i
i


 good good = = '4e5d4e92865a4e495a86494b5a5d49525261865f5758534d4a89''4e5d4e92865a4e495a86494b5a5d49525261865f5758534d4a89' .. decodedecode (( 'hex''hex' )
)
 password password = = ''
''
 for for c c in in goodgood :
:
        password password += += chrchr (( pass_valuespass_values [[ ordord (( cc )])
)])


 printprint (( passwordpassword )
)
 printprint (( check_passwordcheck_password (( passwordpassword ))
))
The password is: huh, that actually worked!.
密码是: 嗯,那确实有效! 。
那Paint是怎么回事? (What was that Paint thing about?)
Yesterday’s mission was about Elvish — I mean Paint — I mean Python programming.
昨天的任务是关于Elvish- 我的意思是Paint- 我的意思是Python编程。
Most of my readers were probably puzzled by the mention of Paint. Long-time viewers of Gynvael’s streams in Polish remember the Python 101 video he posted on April Fools last year. See original video, explanation, code (video and explanation are both Polish; you can get the gist of the video without hearing the audio commentary though.) Spoilers ahead.
我的大多数读者可能对Paint的提及感到困惑。 波兰语中Gynvael的流媒体的长期观看者还记得他去年在愚人节上发布的Python 101视频。 见原始视频 , 解释 , 代码 (视频和解释都是波兰人,你可以得到视频的要点没有听到声音解说虽然。) 扰流板前面。
In that prank, Gynvael taught Python basics. The first part concerned itself with writing bytecode by hand. The second part was about drawing custom Python modules. In Paint. Yes, Paint, the simple graphics program included with Microsoft Windows. He drew a custom Python module in Paint, and saved it using the BMP format. It looked like this (zoomed PNG below; download gynmod.bmp):
在那个恶作剧中,Gynvael教授了Python基础知识。 第一部分涉及手工编写字节码。 第二部分是关于绘制自定义Python模块。 在油漆中。 是的,Paint是Microsoft Windows附带的简单图形程序。 他在Paint中绘制了一个自定义的Python模块,并使用BMP格式保存了该模块。 看起来像这样(下面的PNG放大; 下载gynmod.bmp ):
How was this done? There are three things that come into play:
这是怎么做的? 有三件事在起作用:
- Python can import modules from a ZIP file (if it’s appended to sys.path). Some tools that produce .exe files of Python code use this technique; the old egg file format also used ZIPs this way.
- BMP files have their header at the start of a file.
- ZIP files have their header at the end of a file.
- Thus, one file can be a valid BMP and ZIP at the same time
- Python可以从ZIP文件(如果附加到sys.path中)导入模块。 一些生成Python代码的.exe文件的工具使用此技术。 旧的鸡蛋文件格式也以这种方式使用ZIP。
- BMP文件的头位于文件开头。
- ZIP文件的标题位于文件末尾。
- 因此,一个文件可以同时是有效的BMP和ZIP
I took the code of check_password and put it in mission11.py (which I already cited above). Then I compiled to .pyc and created a .zip out of it.
我使用了check_password的代码,并将其放在mission11.py中 (我已经在上面引用了)。 然后我编译为.pyc并从中创建一个.zip 。
listings/gynvaels-mission-11-en/mission11.py (Source)
清单/gynvaels-mission-11-en/mission11.py (来源)
Since I’m not an expert in any of the formats, I booted my Windows virtual machine and blindly copied the parameters used by Gynvael to open the ZIP file (renamed .raw) in IrfanView and save as .bmp. I changed the size to 83×2, because my ZIP file was 498 bytes long (3 BPP * 83 px * 2 px = 498 bytes) — by doing that, and through sheer luck with the size, I could avoid adding comments and editing the zip. I ended up with this (PNG again; download mission11.bmp):
由于我不是任何一种格式的专家,因此我启动了Windows虚拟机,并盲目复制了Gynvael用来在IrfanView中打开ZIP文件(重命名为.raw )并保存为.bmp的参数 。 我将大小更改为83×2,因为我的ZIP文件长为498字节(3 BPP * 83 px * 2 px = 498字节),这样做是可以的,而且由于尺寸的原因,我可以避免添加注释和编辑拉链 。 我结束了这一点(再次PNG; 下载mission11.bmp ):

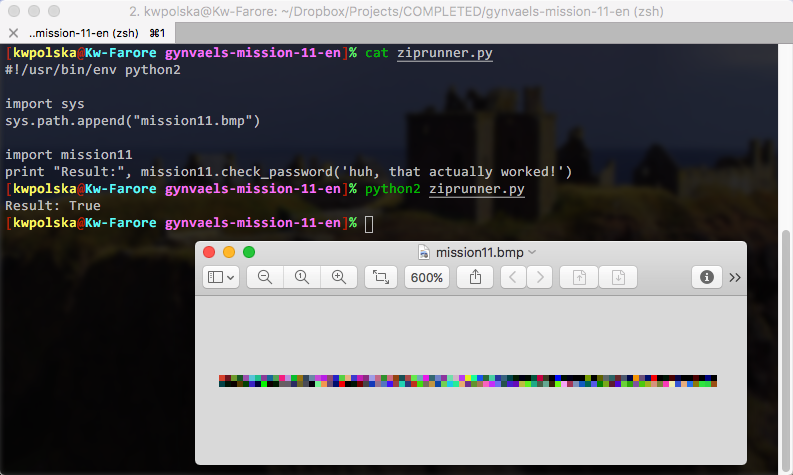
The .bmp file is runnable! We can use this code:
.bmp文件是可运行的! 我们可以使用以下代码:
listings/gynvaels-mission-11-en/ziprunner.py (Source)
清单/gynvaels-mission-11-en/ziprunner.py (来源)
 #!/usr/bin/env python2
#!/usr/bin/env python2


 import import sys
sys
 syssys .. pathpath .. appendappend (( "mission11.bmp""mission11.bmp" )
)


 import import mission11
mission11
 print print "Result:""Result:" , , mission11mission11 .. check_passwordcheck_password (( 'huh, that actually worked!''huh, that actually worked!' )
)
And we get this:
我们得到这个:
资源资源 (Resources)
- mission11-solver.py (full solver code)
- mission11-genexpr.py, mission11-genexpr.txt (used for side note regarding generator expressions vs list comprehensions)
- mission11.py code, used in BMP file
- ziprunner.py, file that runs the BMP/ZIP module (adapted from Gynvael’s)
- gynmod.bmp
- mission11.bmp
- mission11-solver.py(完整的求解器代码)
- mission11-genexpr.py , mission11-genexpr.txt (用于有关生成器表达式与列表推导的旁注 )
- mission11.py代码,在BMP文件中使用
- ziprunner.py,运行BMP / ZIP模块的文件 (改编自Gynvael的文件)
- gynmod.bmp
- mission11.bmp
Thanks for the mission (and BMP idea), Gynvael!
感谢Gynvael的任务(和BMP创意)!
翻译自: https://www.pybloggers.com/2017/08/gynvaels-mission-11-en-python-bytecode-reverse-engineering/
qgc mission


 922
922

 被折叠的 条评论
为什么被折叠?
被折叠的 条评论
为什么被折叠?
 到【灌水乐园】发言


