Do you need people to pick a date when they fill in a form on your website?
当人们在您的网站上填写表格时,您是否需要挑选日期?
Perhaps you want to know a good time to call them, or maybe you want to gather information such as date of birth, etc. That’s where a date picker field can help.
也许您想知道打电话给他们的好时机,或者您想收集诸如出生日期等信息。这就是日期选择器字段可以提供帮助的地方。
In this article, we’ll show you how to create a WordPress form with a date picker.
在本文中,我们将向您展示如何使用日期选择器创建WordPress表单。

使用日期选择器创建WordPress表单 (Creating a WordPress Form With a Date Picker)
For this tutorial, we’ll be using the WPForms. It’s one of the best contact form plugins out there, and you can use it for all sorts of different forms.
在本教程中,我们将使用WPForms 。 它是目前最好的联系表单插件之一,您可以将其用于各种不同的表单。
You’ll need to install and active the WPForms plugin on your site. If you’re not sure how to do that, take a look at our step by step guide on how to install a WordPress plugin.
您需要在网站上安装并激活WPForms插件。 如果您不确定该怎么做,请查看有关如何安装WordPress插件的分步指南。
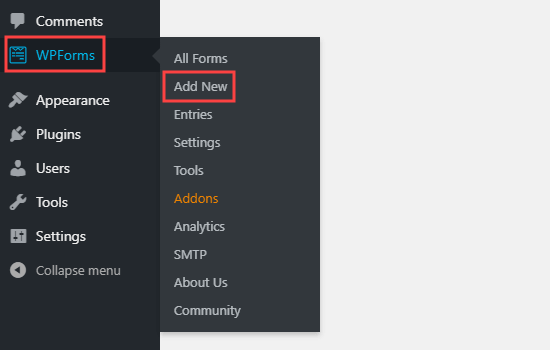
Once you’ve activated the plugin, go to WPForms » Add New in your WordPress dashboard.
激活插件后,转到WordPress仪表板中的WPForms»Add New 。

The WPForms builder will appear. First, type in a name for your form. Then, hover your mouse cursor over a template and click the button to select it. We’re going to use the Simple Contact Form template.
将显示WPForms构建器。 首先,为您的表单输入名称。 然后,将鼠标光标悬停在模板上,然后单击按钮将其选中。 我们将使用简单联系表单模板。

WPForms will automatically create a form for you using that template. Here’s the default simple contact form.
WPForms将使用该模板为您自动创建一个表单。 这是默认的简单联系表格。

You can now edit the form in any way you like.
现在,您可以按自己喜欢的任何方式编辑表单。
Let’s add the date picker field.
让我们添加日期选择器字段。
In the form builder, you’ll see all the fields that you can add to your form in the right column. Scroll down to the Fancy Fields section, and you will see the Date / Time field.
在表单构建器中,您会在右栏中看到可以添加到表单中的所有字段。 向下滚动到“花式字段”部分,您将看到“日期/时间”字段。

Drag and drop the field to where you want it on your form. We’ve placed it just below the Email field on our form.
将字段拖放到表单上所需的位置。 我们已将其放置在表单上“电子邮件”字段的正下方。

Next, click on the field to edit it. This will bring up the ‘Field Options’ tab on the left hand side of your screen.
接下来,单击该字段以对其进行编辑。 这将在屏幕左侧弹出“字段选项”标签。
You can change the label of the field, which defaults to ‘Date / Time’. We’re going to use ‘Preferred Time for Phone Call’ for our field.
您可以更改字段的标签,默认为“日期/时间”。 我们将在字段中使用“首选通话时间”。
You can also change the format of the field using the Format dropdown. For instance, you might want to use just a date and no time, such as for a date of birth field.
您还可以使用格式下拉菜单更改字段的格式。 例如,您可能只想使用日期而不使用时间,例如用于出生日期字段。
You can also check the Required box if you want to make this a mandatory field. This means the user will have to select a date and time before they can submit the form.
如果要将此项设置为必填字段,也可以选中“必需”框。 这意味着用户必须先选择日期和时间,然后才能提交表单。

You can add any other new fields that you want to use, too. Just click the ‘Add Fields’ tab then drag and drop the field onto your field. To edit a field, simply click on it.
您也可以添加要使用的任何其他新字段。 只需点击“添加字段”标签,然后将该字段拖放到您的字段中即可。 要编辑一个字段,只需单击它。
为日期选择器设置高级选项 (Setting Advanced Options for your Date Picker)
By default, the date picker on your form will be a calendar with a time dropdown next to it. The user simply clicks on a day to select that date.
默认情况下,表单上的日期选择器将是日历,旁边是一个时间下拉列表。 用户只需单击一天即可选择该日期。

The time dropdown defaults to a 12 hour clock with 30 minute intervals, like this:
时间下拉菜单默认为12小时制,间隔30分钟,如下所示:

You might want to change how the date picker works. That’s easy to do in WPForms. In the Field Options tab, scroll down to Advanced Options.
您可能想更改日期选择器的工作方式。 在WPForms中很容易做到。 在“字段选项”选项卡中,向下滚动到“高级选项”。
Next, click the arrow to open up that section.
接下来,单击箭头以打开该部分。

Here, you can make lots of changes. For instance, you might want to change the date format. The default is mm/dd/yyyy.
在这里,您可以进行很多更改。 例如,您可能要更改日期格式。 默认值为mm / dd / yyyy。

You can also switch from the date picker to a date dropdown, if you prefer. In this case, the user selects the month, day, and year from dropdown boxes, like this:
如果愿意,还可以从日期选择器切换到日期下拉菜单。 在这种情况下,用户从下拉框中选择月,日和年,如下所示:

You can also change the time picker. It defaults to a 12 hour clock, but you can switch this to a 24 hour clock if you prefer. You can also change the intervals to 15 minutes or 1 hour instead of 30 minutes.
您还可以更改时间选择器。 默认为12小时制,但您可以根据需要将其切换为24小时制。 您也可以将间隔更改为15分钟或1小时,而不是30分钟。

Once you’re happy with your form, you can save it by clicking the Save button on the top right.
对表单满意后,可以单击右上角的“保存”按钮将其保存。
You may also want to set up your form so that the person completing the form gets a copy of the details they submitted.
您可能还需要设置表格,以便填写表格的人获得他们提交的详细信息的副本。
This could be helpful, for example, if they’re scheduling a call with you. They’ll have an email record of the call time they booked.
例如,如果他们正在与您安排通话,这可能会有所帮助。 他们将收到他们预订的通话时间的电子邮件记录。
You can do that by following the instructions in our tutorial on creating a contact form with multiple recipients.
您可以按照我们的教程中有关创建具有多个收件人的联系表单的说明进行操作。
将您的表格添加到您的网站 (Adding Your Form to Your Website)
You can either add your form to an existing page (or post) on your site, or you can create a new one. To create a new page, go to Pages » Add New in your WordPress dashboard.
您可以将表单添加到网站上的现有页面(或发布),也可以创建一个新页面。 要创建新页面,请转至WordPress仪表板中的Pages»Add New 。
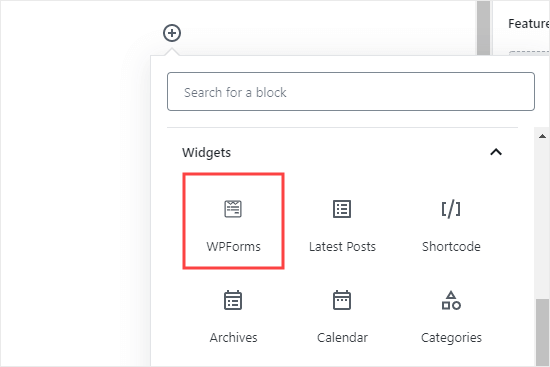
You’ll then need to add a new block to your page. Click on the (+) to add the block then select the WPForms block. You can find it in the Widgets section or you can search for it using the search bar.
然后,您需要在页面上添加一个新块。 单击(+)添加块,然后选择WPForms块。 您可以在“窗口小部件”部分找到它,也可以使用搜索栏搜索它。

Next, you’ll need to select your form from the WPForms dropdown, like this:
接下来,您需要从WPForms下拉列表中选择表单,如下所示:

That’s all you need to do. You can now publish your page and your form will be live on your website. It should look something like this:
这就是您需要做的。 现在,您可以发布页面,并且表单将在您的网站上发布。 它看起来应该像这样:

Note: The styling of the form will depend on the WordPress theme you’re using.
注意:表单的样式将取决于您使用的WordPress主题 。
All forms created with WPForms are mobile-friendly out of the box and will work on any mobile devices. WPForms date-picker tool is also mobile-friendly and works on all screen sizes.
使用WPForms创建的所有表单均支持移动设备,可在任何移动设备上使用。 WPForms日期选择器工具还适合移动设备使用,并且适用于所有屏幕尺寸。

It’s always a good idea to test out your form to make sure it’s working as you expected. If you aren’t getting emails but you’re sure your notification settings are correct, our article on how to fix the WordPress not sending email issue should help.
测试表单以确保其按预期工作始终是一个好主意。 如果您没有收到电子邮件,但是确定您的通知设置正确,那么有关如何修复WordPress不发送电子邮件问题的文章应该会有所帮助。
You can make changes to your form by going to WPForms » All Forms. Then, just click on the title of your form or the Edit link beneath the title to edit it.
您可以转到WPForms»所有表单来更改表单 。 然后,只需单击表单标题或标题下方的“编辑”链接即可对其进行编辑。

Once you save your form, it’ll be updated on your website automatically.
保存表单后,它将在您的网站上自动更新。
We hope this article helped you learn how to create a WordPress form with a datepicker. You might also want to take a look at our articles on how to block contact form spam in WordPress and how to track and reduce form abandonment in WordPress.
我们希望本文能帮助您学习如何使用日期选择器创建WordPress表单。 您可能还想看看我们有关如何在WordPress中阻止联系表单垃圾邮件以及如何 在WordPress 中跟踪和减少表单废弃的文章 。
If you liked this article, then please subscribe to our YouTube Channel for WordPress video tutorials. You can also find us on Twitter and Facebook.
如果您喜欢这篇文章,请订阅我们的YouTube频道 WordPress视频教程。 您也可以在Twitter和Facebook上找到我们。
翻译自: https://www.wpbeginner.com/plugins/how-to-create-a-wordpress-form-with-a-date-picker/


 930
930

 被折叠的 条评论
为什么被折叠?


