
codeguard
Do you want to create a time machine for your website? Having an automatic cloud backup of your WordPress site is the first step in securing your website because it gives you the option to revert changes should anything go wrong. In this article, we will show you how to setup an automatic WordPress backup with CodeGuard along with sharing our honest CodeGuard review, so you can make an educated decision.
您要为网站创建时间机器吗? 对您的WordPress网站进行自动云备份是保护网站安全的第一步,因为它使您可以选择在出现任何问题时还原更改。 在本文中,我们将向您展示如何使用CodeGuard设置自动WordPress备份以及共享我们诚实的CodeGuard评论,以便您做出明智的决定。
什么是CodeGuard? (What is CodeGuard?)
CodeGuard is a website backup service that can automatically backup your WordPress site and save it on the cloud. It also allows you to track your changes daily.
CodeGuard是一个网站备份服务,可以自动备份您的WordPress网站并将其保存在云中。 它还允许您每天跟踪更改。
There are plenty of WordPress backup plugins available, and we have created a list of the best WordPress backup plugins.
有很多可用的WordPress备份插件,我们已经创建了最好的WordPress备份插件列表。
However, using a plugin means you will have to keep it up to date, and in most cases the backups aren’t stored properly on an offsite location.
但是,使用插件意味着您必须保持最新状态,并且在大多数情况下,备份未正确存储在异地位置。
If you are managing client websites, then managing all backups separately is quite difficult. Not to mention that clients can accidentally turn off backups.
如果要管理客户端网站,则很难分别管理所有备份。 更不用说客户端可能会意外关闭备份。
CodeGuard is a paid backup service that works on all website platforms including WordPress. Their monthly plans start from $5/month for 1 site and unlimited databases with up to 5GB storage. They also offer a free 14 day trial on all their plans.
CodeGuard是一项付费备份服务,可在包括WordPress在内的所有网站平台上使用。 他们的月费计划是从1个站点的每月5美元起,无限制的数据库,最多可存储5GB。 他们还为所有计划提供14天的免费试用期。
We decided to give CodeGuard a try because it makes a bold claim of being “a time machine for your website”. In this CodeGuard review, we will put that claim to test.
我们决定尝试一下CodeGuard,因为它大胆地宣称自己是“网站的时间机器”。 在此CodeGuard审查中,我们将对该声明进行检验。
Let’s start with setting up WordPress backups through CodeGuard.
让我们从通过CodeGuard设置WordPress备份开始。
影片教学 (Video Tutorial)
If you don’t like the video or need more instructions, then continue reading.
如果您不喜欢该视频或需要更多说明,请继续阅读。
在CodeGuard上设置WordPress备份 (Setting up WordPress Backup on CodeGuard)
First thing you need to do is visit CodeGuard website and click on Start Your Free Trial button.
您需要做的第一件事是访问CodeGuard网站,然后单击“开始免费试用”按钮。

This will bring you to the signup form. Fill it out and click on ‘start my free trial’ button. You will be asked to enter a password for your account.
这将带您进入注册表单。 填写并点击“开始免费试用”按钮。 系统将要求您输入帐户密码。
It’s essential that you use a strong password (See how to manage passwords guide for WordPress users), and then click on the next step button.
必须使用强密码(请参阅如何为WordPress用户管理密码指南),然后单击下一步按钮。
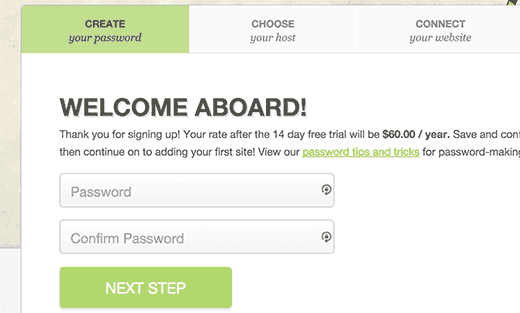
This will bring you to the add website page. First you need to enter your website’s URL and then provide your FTP information.
这将带您进入添加网站页面。 首先,您需要输入网站的URL,然后提供FTP信息 。
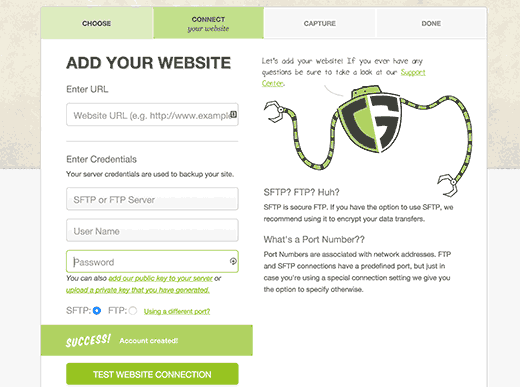
If you do not know your FTP username or password, then please contact your WordPress hosting provider. You can also find this information in the email your WordPress hosting provider sent you when you signed up. Alternately, you can also locate this information using cPanel by clicking on FTP or FTP manager.
如果您不知道FTP用户名或密码,请联系WordPress托管提供商。 您还可以在WordPress托管提供商注册时向您发送的电子邮件中找到此信息。 或者,您也可以使用cPanel通过单击FTP或FTP管理器找到此信息。
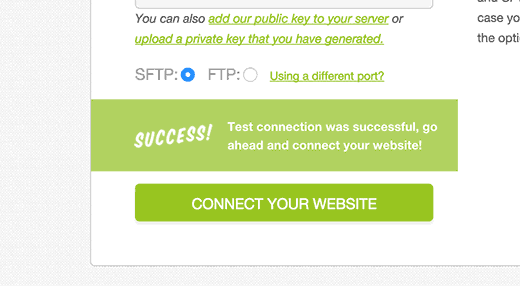
After entering your FTP/SFTP information, click on the test connection button. CodeGuard will show a success message. You can now click on the connect your website button.
输入FTP / SFTP信息后,单击测试连接按钮。 CodeGuard将显示成功消息。 现在,您可以单击“连接网站”按钮。
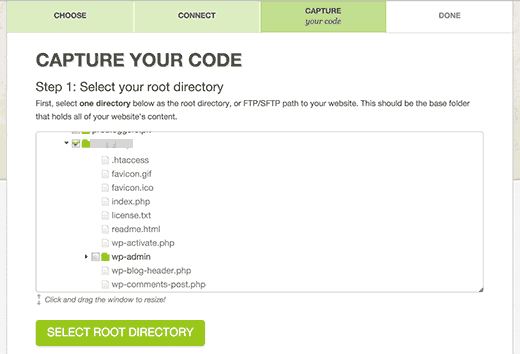
CodeGuard will connect to your website, and it will show you all the files stored on your server.
CodeGuard将连接到您的网站,并向您显示存储在服务器上的所有文件。
You will need to select the folder that contains all your WordPress files and then click ‘select root directory’ button to continue.
您将需要选择包含所有WordPress文件的文件夹,然后单击“选择根目录”按钮以继续。
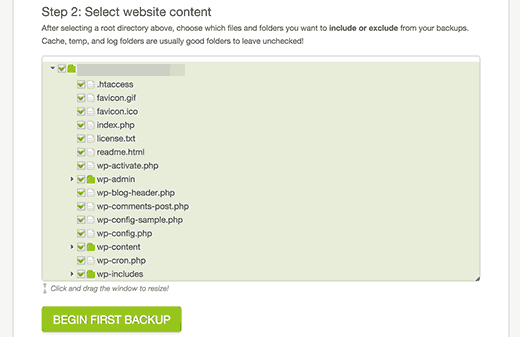
Now scroll down a bit, and you will see ‘Select website content’ section. You need to select all your files and folders.
现在向下滚动一点,您将看到“选择网站内容”部分。 您需要选择所有文件和文件夹。
Simply click on the top folder and all the files inside it will be automatically selected. Next, click on the begin first backup button to continue.
只需单击顶部文件夹,其中的所有文件将被自动选择。 接下来,单击“开始第一个备份”按钮以继续。
You will see a success message. CodeGuard will automatically start downloading your WordPress files to their cloud servers in the background.
您将看到一条成功消息。 CodeGuard将在后台自动开始将WordPress文件下载到其云服务器。
You will be asked to add your WordPress database for backup.
系统将要求您添加WordPress 数据库进行备份。
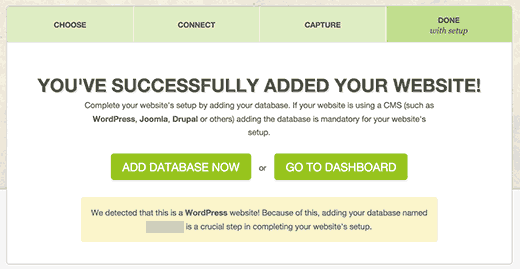
The next step is to connect your database and to do that you will need the following information.
下一步是连接数据库,并需要以下信息。
- Your database hostname or IP address 您的数据库主机名或IP地址
- MySQL username MySQL用户名
- MySQL user password MySQL用户密码
You can find this information in your WordPress website’s wp-config.php file itself. Alternatively, you can contact your web host to provide you this information.
您可以在WordPress网站的wp-config.php文件本身中找到此信息。 或者,您可以联系您的虚拟主机,以向您提供此信息。
If you connect to your host using localhost as your hostname, then you will need to enter your domain name as the hostname.
如果使用localhost作为主机名连接到主机,则需要输入域名作为主机名。
On the other hand, if you use a hostname like mysql.example.com, then you will have to enter that or add your MySQL server’s IP address.
另一方面,如果使用mysql.example.com之类的主机名,则必须输入该主机名或添加MySQL服务器的IP地址。
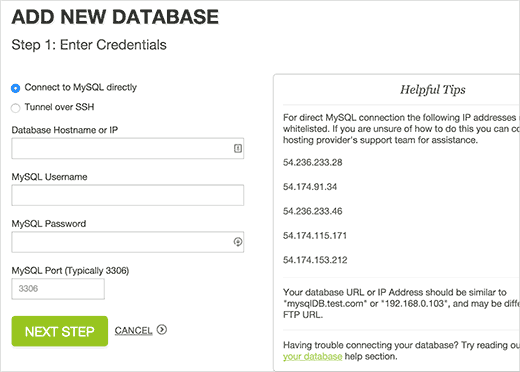
Enter your database connection information. Before you click on the next step button, you will need to copy the IP addresses shown under the Helpful Tips box on the right.
输入您的数据库连接信息。 在单击下一步按钮之前,您需要复制右侧“有用提示”框中显示的IP地址。
Your web host will not allow an external IP to connect to your database unless you explicitly allow it access. To do that, you need whitelist these IP addresses.
您的网络主机将不允许外部IP连接到数据库,除非您明确允许其访问。 为此,您需要将这些IP地址列入白名单。
Simply login to your cPanel account and click on the Remote MySQL icon.
只需登录您的cPanel帐户,然后单击“远程MySQL”图标。
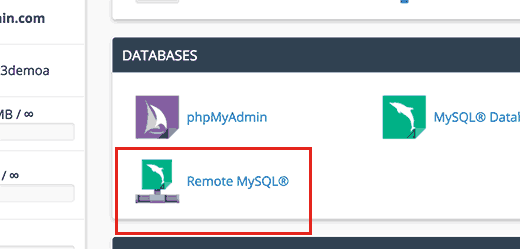
Copy and paste an IP address and then click on add host button. Repeat for all IP addresses given by CodeGuard.
复制并粘贴IP地址,然后单击添加主机按钮。 对CodeGuard提供的所有IP地址重复此操作。
Once you are done, come back to the CodeGuard’s add database screen and click on the next step button.
完成后,返回CodeGuard的添加数据库屏幕,然后单击下一步按钮。
CodeGuard will connect to your database now. If you have more than one database, then it will ask you to select one. Choose your WordPress database and click on add database button.
CodeGuard现在将连接到您的数据库。 如果您有多个数据库,它将要求您选择一个。 选择您的WordPress数据库,然后单击添加数据库按钮。
CodeGuard will now start backing up your database to their cloud servers. Upon completion it will show your database and some basic WordPress stats.
CodeGuard现在将开始将数据库备份到其云服务器。 完成后,它将显示您的数据库和一些基本的WordPress统计信息。
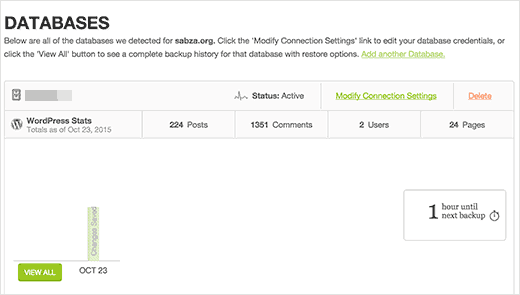
That’s all you have successfully backed up your WordPress site and database on CodeGuard’s cloud servers.
这就是您成功备份CodeGuard的云服务器上的WordPress站点和数据库的全部内容。
如何从CodeGuard备份还原站点和数据库 (How to Restore Site and Database from CodeGuard Backups)
As a website owner, you need to be sure that the backup solution you are using for your site is easy to restore. CodeGuard offers automatic restore options which allow you to restore your WordPress files and database with one click.
作为网站所有者,您需要确保用于站点的备份解决方案易于还原。 CodeGuard提供自动还原选项,使您可以一键还原WordPress文件和数据库。
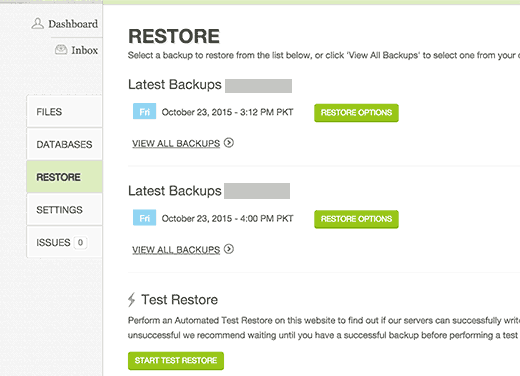
You can also download your backups to your own computer to perform a manual recovery.
您也可以将备份下载到自己的计算机上以执行手动恢复。
CodeGuard评论 (CodeGuard Review)
CodeGuard really measures up to the claim of being a time machine for your website. Using the FTP / MySQL method, you can backup just about any website including WordPress and your other sites.
CodeGuard确实可以声称是您网站的时间机器。 使用FTP / MySQL方法,您几乎可以备份任何网站,包括WordPress和其他网站。
We always recommend storing your backups on third-party cloud servers which makes CodeGuard an ideal backup solution for anyone starting out.
我们始终建议您将备份存储在第三方云服务器上,这使CodeGuard成为任何入门者的理想备份解决方案。
While having backups is a choice, we strongly recommend that you have one vs not. We’ve had too many users whose sites were hacked, and they had no backup (which means literally losing years of content).
虽然可以选择备份,但强烈建议您选择一个备份。 我们有太多用户的网站被黑客入侵,而且他们没有备份(这实际上意味着丢失了多年的内容)。
Regular site backups are the best insurance policy you can purchase for your web based business.
定期站点备份是您可以为基于Web的业务购买的最佳保险单。
We strongly recommend that you use a WordPress backup solution, and CodeGuard is definitely among the top of our list.
我们强烈建议您使用WordPress备份解决方案,而CodeGuard绝对是我们列表中的佼佼者 。
See the full list of our recommended WordPress backup plugins.
请参阅我们推荐的WordPress备份插件的完整列表。
That’s all. We hope this article helped you setup automatic WordPress backups with CodeGuard and you found our CodeGuard review helpful. You may also want to see our guide on 11 things to do before launching a WordPress site.
就这样。 我们希望本文能帮助您使用CodeGuard设置WordPress自动备份,并且对我们的CodeGuard评论有所帮助。 在启动WordPress网站之前,您可能还想查看11件事的指南。
If you liked this article, then please subscribe to our YouTube Channel for WordPress video tutorials. You can also find us on Twitter and Facebook.
如果您喜欢这篇文章,请订阅我们的YouTube频道 WordPress视频教程。 您也可以在Twitter和Facebook上找到我们。
翻译自: https://www.wpbeginner.com/wp-tutorials/how-to-setup-automatic-wordpress-backup-with-codeguard/
codeguard


 1024
1024

 被折叠的 条评论
为什么被折叠?


