


那篇文章的重点是:如何从Cloud Native Starter示例中为作者s微服务开发JUnit的的测试,以及如何在开发模式下在OpenLiberty上运行作者s微服务和JUnit测试。
该文章的目的不是成为编写JUnit测试,JUnit测试组织,测试策略等的蓝图或“如何指导”。 目的是从Cloud Native Starter项目的一个具体微服务示例开始,从技术上入手。
作者s微服务具有一个称为getAuthor的RESTful api端点。 端点为作者名称提供了一个参数。 端点以JSON格式返回Author数据。
注意事项:gif显示了在Visual Studio代码编辑器中使用OpenLiberty执行Author微服务的示例JUnit测试执行:
Let's start with: 我们需要什么以及如何实现?
我们要 ..
- 调用带有REST客户端的Authors微服务的REST端点。 *转变REST端点对Author数据类的JSON响应 *处理可以使用不同的值来调用Author名称的REST Endpoint参数,以运行带有Author名称变化形式的测试。
- 相比带有期望值的实际响应值,并记录结果。
以及如何..
- 为OpenLiberty服务器的开发模式设置JUnit测试?
- 使用JSON-B将JSON数据从字符串转换为Author Java实例?
- 定义一个REST客户端?
- 配置参数化的JUnit测试?
- 编写具体的参数化JUnit测试?
- 执行JUnit测试?
- 找到测试结果?
What are the tools和frameworks?
- 这是示例项目的工具和框架:
- IDE:带有Java开发扩展的Visual Studio代码
- 服务器:开放自由
- 框架:Eclipse MicroProfile
- Java项目组织:Apache Maven
1. 如何为OpenLiberty服务器的开发模式设置JUnit测试?
要在开发模式下使用OpenLiberty服务器设置和运行JUnit测试,我们必须在Java项目的src文件夹中提供一个测试文件夹。 下图显示了我的示例项目的文件夹。
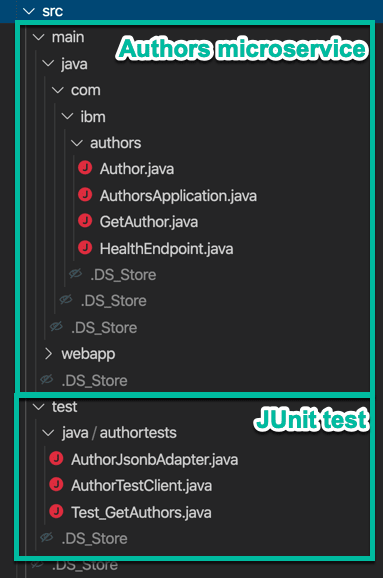
Content of the com.ibm.authors package for the Authors microservice
作者申请类表示JAX-RS RESTful Web应用程序。Author类表示我们用于Author的数据结构。GetAuthor类表示REST API端点。-
健康终点class表示对Kuber净es的就绪探针的支持。
Content of the authortests package for the JUnit test
-
作者杰森适配器类表示用于JSON-B映射配置的JSON-B适配器。 -
AuthorTestClient类表示作者微服务的REST客户端。 -
Test_GetAuthors类表示将作为参数化测试运行执行的JUnit测试。
1.2 The pom.xml configuration for the JUnit and OpenLiberty
- 依存关系
的junit-jupiter-api和朱尼木星引擎是单元测试的基础。 随着朱尼木星参数依赖关系,我们可以在以后定义参数化测试。
<!-- JUnit Test -->
<dependency>
 <groupId>org.junit.jupiter</groupId>
 <artifactId>junit-jupiter-api</artifactId>
 <version>5.6.0</version>
 <scope>test</scope>
</dependency>
<dependency>
 <groupId>org.junit.jupiter</groupId>
 <artifactId>junit-jupiter-engine</artifactId>
 <version>5.6.0</version> <scope>test</scope>
</dependency>
<dependency>
 <groupId>org.junit.jupiter</groupId>
 <artifactId>junit-jupiter-params</artifactId>
 <version>5.6.0</version>
 <scope>test</scope>
</dependency>
<!-- JUnit Test -->
- 构建插件
- JUnit
Maven-surefire-插件-
maven-failsafe-plugin
<!-- JUNIT -->
<plugin>
 <artifactId>maven-surefire-plugin</artifactId>
 <version>2.22.2</version>
</plugin>
<plugin>
 <artifactId>maven-failsafe-plugin</artifactId>
 <version>2.22.2</version>
</plugin>
<!-- JUNIT -->
- 开放自由
-
自由行家插件
-
<!-- Enable liberty-maven plugin -->
<plugin>
 <groupId>io.openliberty.tools</groupId>
 <artifactId>自由行家插件</artifactId>
 <version>3.1</version>
 <!-- libertyMavenConfiguration -->
 <configuration>
  <serverName>authorsDevJUnitServer</serverName>
  <configFile>liberty/server.xml</configFile>
 </configuration>
 <!-- libertyMavenConfiguration -->
</plugin>
<!-- Enable liberty-maven-plugin -->
2. 如何使用JSON-B将JSON数据从字符串转换为Author Java实例?
我们端点的回应获取作者是JSON格式的文本,但我们希望在Author类的实例中使用该数据。
在JSON-B中,我们定义了一个JsonbAdapter从JSON转换为Author类实例。 为此,我们@Override操作AdaptToJson and AdaptFromJson。 手术AdaptFromJson定义如何从JsonObject创建Author对象。
// Author data class
import com.ibm.authors.Author;
// JSON-binding
import javax.json.bind.adapter.JsonbAdapter;
import javax.json.JsonObject;
import javax.json.Json;

public class 作者JsonbAdapter implements JsonbAdapter<Author, JsonObject>
{ ...
  @Override
  public Author adaptFromJson(final JsonObject jsonObject) throws Exception {
   final Author author = new Author()
   author.setBlog(jsonObject.getString("blog"));
   author.setName(jsonObject.getString("name"));
   author.setTwitter(jsonObject.getString("twitter"));
   return author;
  }
}
在以下Test_GetAuthors类的代码中,您将了解如何利用AuthorJsonbAdapter创建一个新的JSON-B配置。 该JSON-B配置用于创建JSON-B对象。 JSON-B对象包含来自Json的已实现操作,并且知道如何创建的实例Author类。
final JsonbConfig config = new JsonbConfig().withAdapters(new AuthorJsonbAdapter());
final Jsonb jsonb = JsonbBuilder.create(config);
final Author author_json = jsonb.fromJson(response, Author.class);
3. 如何定义REST客户端?
以下代码显示了接口类AuthorTestClient。 该类包含Authors微服务的REST端点的REST客户端接口定义。 使用MicroProfile批注@RegisterRestClient在JUnit测试中使用该接口时,将创建一个RESTful客户端。
getAuthors响应类型的预期返回值定义为String。
import javax.ws.rs.Path;
import javax.ws.rs.GET;
import javax.ws.rs.Produces;
import javax.ws.rs.core.MediaType;
import javax.ws.rs.QueryParam;
import org.eclipse.microprofile.rest.client.inject.RegisterRestClient; @Path("/获取作者")
@RegisterRestClient
public interface AuthorTestClient {
  @GET
  @Produces(MediaType.APPLICATION_JSON)
  public String getAuthor(@QueryParam("name") String name);
}
4. 如何配置参数化的JUnit测试?
班级Test_GetAuthors在操作中实现JUnit测试testGetAuthor。 该测试定义为参数化测试并可以使用来自CsvSource.
参数化测试
在这里您可以看到注释@ParameterizedTest以及名称的配置。
该名称包含参数的计数,该测试具有两个参数并且可以重复。
@ParameterizedTest(name = "{index} => name=''{0},{1}''")
具体的测试实现本身发生在操作中testGetAuthor。 该操作包含之前定义的参数的名称。 我们将在测试实现中使用这些参数。
public void testGetAuthor( final String authorName, final String 预期结果)
For more details visit the JUnit documentation.
CsvSource
注释@CsvSource包含用逗号分隔的测试执行值列表。 值是为了适合参数nameAuthor(样本值:托马斯)和expectedResult(样本值:汤玛士 Suedbroecker)。
@CsvSource({"Thomas,Thomas Suedbroecker",
            "Niklas,Niklas Heidloff",
            "Michael,Michael Heinrich" })
For more details visit the JUnit documentation
5. 如何编写具体的参数化JUnit测试?
Step 1: 创建一个REST客户端
调用我们的REST端点getauthor关于作者微服务,我们使用RestClientBuilder从MicroProfile创建我们的REST客户端。
我们使用定义的MicroProfile RestClient接口AuthorTestClient.class和RestClientBuilder将为我们创建一个对象实例AuthorTestClient.
final AuthorTestClient authorClient = RestClientBuilder
 .newBuilder() .baseUri(baseURI)
 .build(AuthorTestClient.class);
Step 2: 调用REST客户端
现在我们调用REST Client,并使用测试参数nameAuthor作为输入。
final String response = authorClient.getAuthor(nameAuthor);
Step 3: 将响应转换为Author数据对象
再次使用JSON-B。
final JsonbConfig config = new JsonbConfig().withAdapters(new AuthorJsonbAdapter());
final Jsonb jsonb = JsonbBuilder.create(config);
final Author author_json = jsonb.fromJson(response, Author.class);
Step 4: 将响应的实际值与测试参数的预期值进行比较
为了比较实际值和期望值,我们使用来自JUnit的assertEquals。
assertEquals(expectedResult, author_json.getName());
如果a的值不相等,则assertEquals抛出aAssertionFailedError例外,并在target / surefire-reports / TEST-authortests.Test_GetAuthors.txt文件中记录错误。
这是示例输出TEST-authortests.Test_GetAuthors.txt文件:
org.opentest4j.AssertionFailedError: expected: <Michael Heinrich> but was: <Niklas Heidloff> at authortests.Test_GetAuthors.testGetAuthor(Test_GetAuthors.java:60)
For more details see in the JUnit documentation

6. 如何执行JUnit测试?
随着使用liberty-maven-plugin我们可以使用以下Maven命令以开发模式启动OpenLiberty服务器:
$ mvn liberty:dev
然后我们按回车键。
$ [INFO] Press the Enter key to run tests on demand.
7. 如何找到测试结果?
测试结果存储在目标/保证报告/ *夹。
Here are additional useful blog posts, videos or manuals
MicroProfile RestClient
JUnit
- Setup Unit Tests in OpenLiberty
- JUnit User Guide dependencies
- Using microprofile rest client for system testing (Adam-Bien)
- Unit 5 tutorial Writing parameterized tests (Petri Kainulainen)
- Create effective tests or create excuses — testing the Java EE way (Sebastian Daschner)
- JUnit user-guide running tests is vscode
Jsonb
我希望这对您有用,让我们看看下一步是什么?
问候,
Thomas
聚苯乙烯: My GitHub project with the source code is here.
www上的资源.suedbroecker.net


 230
230


 被折叠的 条评论
为什么被折叠?
被折叠的 条评论
为什么被折叠?
 到【灌水乐园】发言


