


 本文介绍了测试驱动开发(TDD)的概念,强调在编写代码前先编写测试用例,以确保代码的正确性。通过红绿重构循环(Red-Green-Refactor Loop)阐述TDD过程,并详细讲解了单元测试的含义。通过一个Unity 3D项目中的二次方程求解器为例,展示了如何应用TDD进行开发,包括如何创建测试用例、修复代码以使测试通过,以及重构代码以保持整洁。最后讨论了在绿色状态下遇到先前测试失败的情况以及TDD在大型项目中的价值。
unity3d的驱动接口
Test-driven development (TDD) is the practice of writing automated tests for a piece of code before writing the code itself. This basically means that we create and refactor (changing structure without changing behaviour) our project code on the basis of tests. The process of writing the code, testing the code and refactoring it all follow each other in a loop, until a satisfactory state is reached.
测试驱动开发(TDD)是在编写代码本身之前为一段代码编写自动化测试的实践。 这基本上意味着我们根据测试来创建和重构(在不改变行为的情况下更改结构)我们的项目代码。 编写代码,测试代码以及对其进行重构的过程都是相互循环的,直到达到令人满意的状态。
The following sequence of steps is generally followed:
通常遵循以下步骤顺序:
Add a test (that will initially fail)
添加测试(最初会失败)
Run all tests and see if the new one fails
运行所有测试,看看新测试是否失败
Write some code
写一些代码
Run tests
运行测试
Refactor code
重构代码
Repeat
重复
Following this workflow speeds up the process of refactoring code and making changes, because you can see straight away what has broken and why.
遵循此工作流程可以加快代码重构和更改的过程,因为您可以立即看到发生问题的原因。
You may wonder why we write the test before writing the code itself. This is because writing tests after writing the code can often lead to developers writing tests to make them pass. When you write a failing test first, you’re making sure that it fails for a good reason (such as not implementing the required functionality correctly), as well as ruling out false positives.
您可能想知道为什么我们在编写代码本身之前就编写测试。 这是因为在编写代码之后编写测试通常会导致开发人员编写测试以使其通过。 当您首先编写失败的测试时,您要确保它有充分的理由失败(例如未正确实现所需的功能),并排除误报。
红绿重构循环 (Red-Green Refactor Loop)

The most important thing to keep in mind is the red-green-refactor loop. It is the heart and soul of the TDD process. Here each step has a meaning:
要记住的最重要的事情是红绿色重构循环。 这是TDD进程的灵魂。 这里的每个步骤都有其含义:
RED: It refers to writing a test case that will definitely fail.
RED:这是指编写肯定会失败的测试用例。
GREEN: It refers to changing/writing code that will make the test created in the “RED” phase pass in such a way that all the tests that passed previously will still pass. This means that the developer must not break the working of the project to just pass one test.
绿色:它是指更改/编写代码,这些代码将使在“红色”阶段创建的测试通过,从而使先前通过的所有测试仍然通过。 这意味着开发人员不得仅通过一项测试就中断项目的工作。
REFACTOR: It refers to eliminating redundancy, increasing readability, etc of the code written.
参考:这是指消除编写的代码的冗余,提高可读性等。
These steps are repeated over and over again until all tests pass or encountering a failing test is impossible/improbable.
一遍又一遍地重复这些步骤,直到不可能/不可能通过所有测试或失败的测试为止。
单元测试 (Unit Testing)
UNIT TESTING is a level of software testing where individual units/ components of a software are tested. The purpose is to validate that each unit of the software performs as designed. A unit is the smallest testable part of any software. It usually has one or a few inputs and usually a single output.
单元测试是软件测试的级别,其中测试软件的各个单元/组件。 目的是验证软件的每个单元是否按设计执行。 单元是所有软件中最小的可测试部分。 它通常只有一个或几个输入,通常只有一个输出。
时间为例! (Time for an Example!)
Now what we believe is that action speaks louder than words. Hence, performing a task is the best form of learning. Hence what we will aim for is to set up a basic unit testing scenario were we can test out whether a function of a particular class performs as expected.
现在我们相信,行动胜于雄辩。 因此,执行任务是学习的最佳形式。 因此,我们的目标是建立一个基本的单元测试方案,以便我们可以测试特定类的功能是否按预期执行。
We will create a quadratic value solver to which when given an input as ‘x’, we receive the value of f(x).
我们将创建一个二次值求解器,当给定输入为“ x”时,它将接收f(x)的值。
For eg. Let f(x) = x2 -4x+4 now for a value of x=2, we get f(2)=0.
例如。 令f(x)= x2 -4x + 4现在对于x = 2的值,我们得到f(2)= 0。
We aim to create this using a TDD process.
我们旨在使用TDD流程创建此文件。
Now in Unity, after opening a new project, click on Window > Test Runner in the menu bar.
现在在Unity中,打开一个新项目后,在菜单栏中单击Window> Test Runner 。
Now a window like this appears.
现在出现这样的窗口。
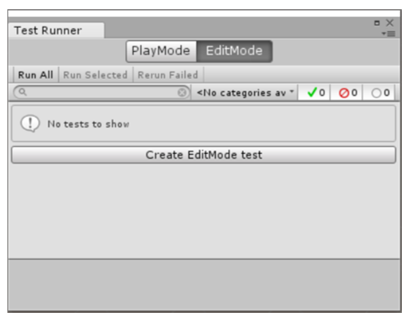
This is the inbuilt Unit Tester Module of Unity. We will avail of its services for TDD.
这是Unity的内置单元测试器模块。 我们将利用其为TDD提供的服务。
Attach this tab by dragging it next to the inspector (do it yourself).
通过将其拖到检查器旁边来附加此选项卡(自己动手做)。
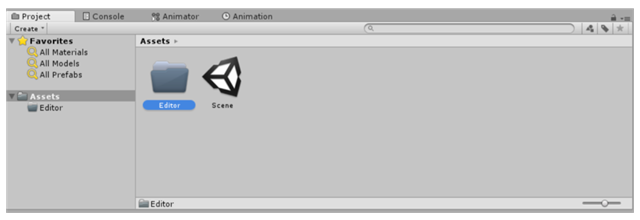
Now we have to know that the testing scripts are not same as our regular scripts. To make the unity editor treat a particular script as a Test Script, the first step is to save the script into a particular folder named “Editor” (without quotes).
现在我们必须知道测试脚本与我们的常规脚本不同。 为了使统一编辑器将特定脚本视为测试脚本,第一步是将脚本保存到名为“ Editor” (不带引号)的特定文件夹中。
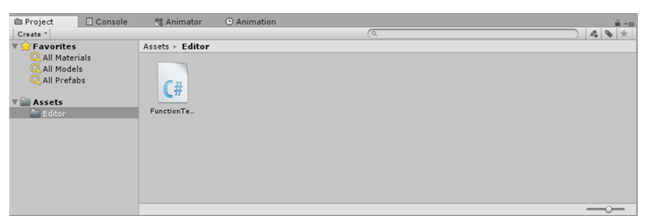
Thus create an “Editor” folder in the Assets and inside it create a script called “FunctionTester”
因此,在素材资源中创建一个“编辑器”文件夹,并在其中创建一个名为“ FunctionTester”的脚本
Now that the setup is complete, we will start with the development process. Here we will be utilizing the Red-Green-Refactor loop. Thus first we will write a test that fails (it is essential that we make the test fail). After that we will try to correct the code so that the test gives a positive result. Then finally we will try to make our code as clean and as readable as possible.
现在设置已经完成,我们将开始开发过程。 在这里,我们将利用Red-Green-Refactor循环 。 因此,首先我们将编写一个失败的测试 (使测试失败很重要)。 之后,我们将尝试更正代码,以便测试得出肯定的结果。 最后,我们将尝试使我们的代码尽可能干净和可读 。
Open the FunctionTester script and type the following code in it.
打开FunctionTester脚本,然后在其中键入以下代码。
using System;
using System.Collections.Generic;
using NUnit.Framework;
using UnityEngine;
[TestFixture]
public class FunctionTester
{
[Test]
public void T00_PassingTest ()
{
Assert.AreEqual (1, 0);
}
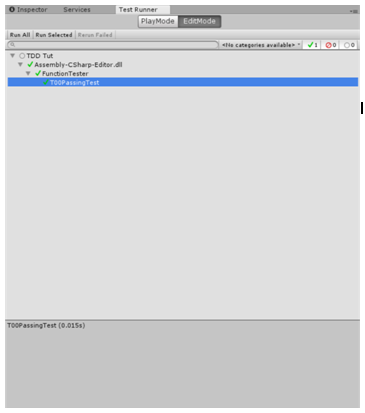
}Now in the Test Runner tab, click on Run All.
现在,在“测试运行器”选项卡中,单击“全部运行” 。
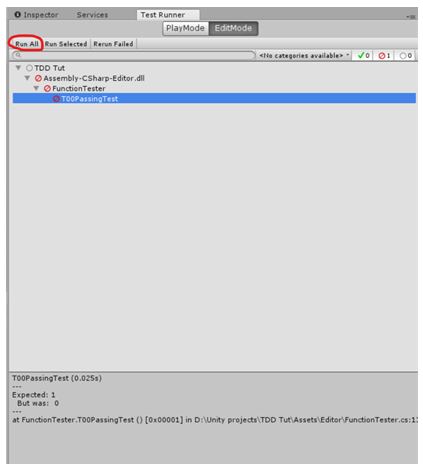
This is the completion of our first Red state. The place where the test failed is mention at the bottom of the tab.
这是我们第一个红色状态的完成。 选项卡底部会提到测试失败的位置。
Now for the Green state we need to correct the code so that the case tests true. To do this, change line 11 of the code to
现在,对于绿色状态,我们需要更正代码,以便案例测试为真。 为此,将代码的第11行更改为
Assert.AreEqual (1, 1);Now on clicking on Run All all the tests return true.
现在,单击“运行所有”,所有测试将返回true。
We do not need a refactoring state in this iteration as the code is in its simplest form. Only the refactoring state can be skipped if the developer feels the code is satisfactory.
由于该代码是最简单的形式,因此在此迭代中我们不需要重构状态。 如果开发人员认为代码令人满意,则只能跳过重构状态。
Now you must be thinking what does this code do. s
现在,您必须在考虑这段代码的作用。 s
Here in line 5, we describe the class as a [TestFixture]. This tells Unity that this class is our Tester class and will be used for Unit Testing.
在第5行中,我们将类描述为[TestFixture]。 这告诉Unity此类是我们的Tester类,将用于单元测试。
Now we will be performing each of our tests as functions. Before the definition of the function we mention that it is a [Test]. This allows the Test Runner to access it and show us the result.
现在,我们将作为功能执行每个测试。 在定义函数之前,我们提到它是[Test]。 这使Test Runner可以访问它并向我们显示结果。
The first test, as you can see is pretty trivial, but it is a good practice to write the first test as trivial as it makes sure that the testing system is functioning properly.
如您所见,第一个测试非常简单,但是将第一个测试编写得很简单是一个好习惯,因为它可以确保测试系统正常运行。
[Test]
public void T00_PassingTest ()
{
    Assert.AreEqual (1, 0);
}
Assert.AreEqual is a function of the Assert class from the Nunit library. It checks wheter the 2 objects passed into it as equal or not. An AssertionException is thrown if the objects are unequal.
Assert.AreEqual是Nunit库中Assert类的函数。 它检查传入的两个对象是否相等。 如果对象不相等,则抛出AssertionException。
This ends our first iteration.
这样就结束了我们的第一次迭代。
Next we will test that when x=2, we should get a value of 0 from the quadratic equation.
接下来,我们将测试当x = 2时,应该从二次方程中得到0值。
Now in the second iteration we will modify the code as follows:
现在在第二个迭代中,我们将代码修改如下:
using System;
using System.Collections.Generic;
using NUnit.Framework;
using UnityEngine;
[TestFixture]
public class FunctionTester
{
public Function function = new Function();
[Test]
public void T00_PassingTest ()
{
Assert.AreEqual (1, 1);
}
[Test]
public void T01_X2Y0()
{
Assert.AreEqual(function.Value(2f) ,0f);
}
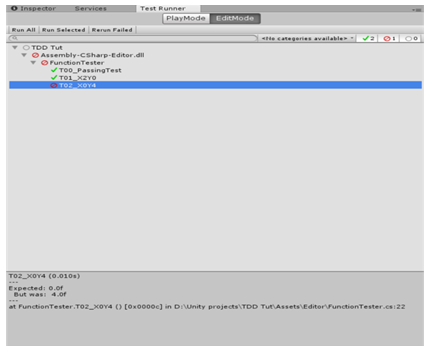
}Here we’ve started the second RGR(Red-Green-Refactor) loop. On running this test, we will get a fail on the test T01.
在这里,我们开始了第二个RGR(红绿色重构)循环。 运行此测试时,我们将在测试T01上失败。
Now you will see that this does not compile. This is because we do not have a Function class. This is where our real testing begins.
现在您将看到它无法编译。 这是因为我们没有Function类。 这是我们真正的测试开始的地方。
Now you will see that this does not compile. This is because we do not have a Function class. This is where our real testing begins.
现在您将看到它无法编译。 这是因为我们没有Function类。 这是我们真正的测试开始的地方。
Inside it type code:
在其中键入代码:
using System.Collections;
using System.Collections.Generic;
using UnityEngine;

public class Function
{
    public float Value (float x)
    {
        return 8f;
    }
}
Now on running the test we get a failure.
现在,运行测试失败了。

Moving toward the green state, we will change line 9 of the Function script to
移向绿色状态,我们将Function脚本的第9行更改为
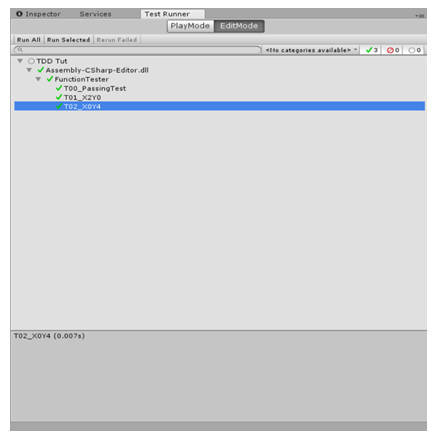
return 0f;Now on running the test again we will get a positive result
现在再次运行测试,我们将获得积极的结果
You must be thinking now that why didn’t we just compute anything in the function. You have to realise that the one and only objective that we have in TDD is to make all the tests pass and this method passes the tests just fine.
您现在必须在想,为什么我们不只计算函数中的任何内容。 您必须意识到,TDD中我们唯一的唯一目标就是使所有测试都通过,并且此方法通过测试就很好。
In our next iteration we will test for when x = 0, f(0) = 4. Implement the test in the FunctionTester for this test iteration (Challenge!). Try not to copy the code and write it yourself. Remember, mistakes are the best teachers.
在我们的下一个迭代中,我们将测试x = 0,f(0)= 4的时间。在FunctionTester中为该测试迭代实现测试(挑战!)。 尽量不要复制代码并自己编写。 记住,错误是最好的老师。
View the code below and compare for errors:
查看下面的代码并比较错误:
using System;
using System.Collections.Generic;
using NUnit.Framework;
using UnityEngine;
[TestFixture]
public class FunctionTester
{
public Function function = new Function();
[Test]
public void T00_PassingTest ()
{
Assert.AreEqual (1, 1);
}
[Test]
public void T01_X2Y0()
{
Assert.AreEqual(function.Value(2f) ,0f);
}
[Test]
public void T02_X0Y4()
{
Assert.AreEqual (function.Value (0f), 4f);
}
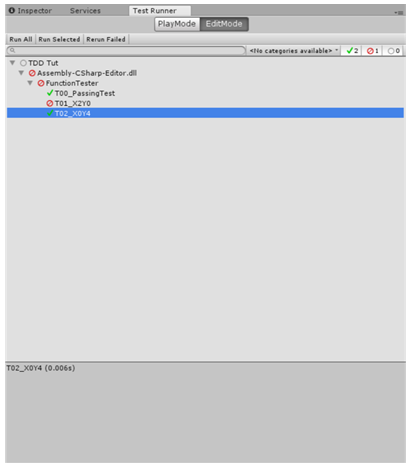
}This test will fail as our Value function returns 0f irrespective of input.
该测试将失败,因为我们的Value函数无论输入如何都返回0f。
Now for the green state. What we want is the value function to compute the quadratic equation value of x where f(x) = x2-4x+4.
现在为绿色状态。 我们想要的是值函数,用于计算x的二次方程值,其中f(x)= x2-4x + 4。
Thus we will change our Value function to:
因此,我们将Value函数更改为:
public float Value (float x)
{
    return (Mathf.Pow (x,2) - (4f*x) + 4f);
}
Now we reach the refactor state. Looking at our function, we can see that its pretty small so refactoring doesn’t effect our code much. Refactoring becomes important in larger scripts.
现在我们到达了重构状态。 查看我们的函数,我们可以看到它很小,因此重构对我们的代码影响不大。 在较大的脚本中,重构变得很重要。
Now as a task, try and write as many tests as possible in the FunctionTester class and follow the RGR loop to make the tests pass. The more the number of tests, the higher is the accuracy of the module.
现在作为一项任务,尝试在FunctionTester类中编写尽可能多的测试,并遵循RGR循环以使测试通过。 测试次数越多,模块的精度越高。
如果在绿色状态期间先前的测试失败,该怎么办? (What to do if a Previous Test fails during Green State?)
Consider the possibility that to make a particular test pass, you make changes to the script. This change causes one of the previous tests, which was passing before, to fail. If this occurs, rather than moving on to the next text, we will again enter the RED state for THAT test case. We will move on to new test cases only if all previous test cases are passing.
考虑通过特定的测试来更改脚本的可能性。 此更改导致以前通过的先前测试之一失败。 如果发生这种情况,我们将继续进入该测试用例的红色状态,而不是继续下一个文本。 仅当所有先前的测试用例都通过时,我们才继续进行新的测试用例。
结论 (Conclusion)
This was an example of creating an extremely basic and trivial projects by TDD. This may seem like a pain in the example, but when scaled up (for larger projects) TDD is a boon. It helps to identify and correct errors in a fast and effective manner. So try to use it in projects where lots of scenarios can occur. This also helps to keep track of all scenarios that have been tested.
这是一个由TDD创建极其基础和琐碎的项目的示例。 在示例中,这看起来似乎很痛苦,但是如果将其扩展(对于大型项目),TDD无疑是一个福音。 它有助于快速有效地识别和纠正错误。 因此,请尝试在可能发生许多情况的项目中使用它。 这也有助于跟踪已测试的所有方案。
翻译自: https://www.studytonight.com/game-development-in-2D/tdd-unit-testing
unity3d的驱动接口


 1万+
1万+

 被折叠的 条评论
为什么被折叠?
被折叠的 条评论
为什么被折叠?
 到【灌水乐园】发言


