


edison模块

Hanselminutes and CodeNewbie are teaming up to produce two new podcast episodes a week for the month of March, featuring incredible makers in the hardware space. There will be new content every weekday in March, so bookmark http://www.marchisformakers.com and join us!
Hanselminutes和CodeNewbie合作,每周三月制作两个新的播客节目,其中包括硬件领域令人难以置信的制作人。 三月的每个工作日都会有新内容,因此,对http://www.marchisformakers.com加入书签,并加入我们吧!
CodeNewbie is the most supportive community of programmers and people learning to code. Tune in every week for stories about people on their coding journey.
CodeNewbie是程序员和学习代码的人的最支持社区。 每周收看有关编码之旅中人们的故事的信息。
Subscribe via RSS or on iTunes. Published Mondays.
CodeNewbie is the most supportive community of programmers and people learning to code. Tune in every week for stories about people on their coding journey.
CodeNewbie是程序员和学习代码的人的最支持社区。 每周收看有关编码之旅中人们的故事的信息。
Hanselminutes: Fresh Air for Developers is a weekly talk show that brings interesting people together to talk about the web, culture, education, technology and more.
Hanselminutes :《面向开发人员的新鲜空气》是每周一次的脱口秀节目,汇集了有趣的人们来讨论网络,文化,教育,技术等等。
Subscribe via RSS or on iTunes. Published Thursdays.
Hanselminutes: Fresh Air for Developers is a weekly talk show that brings interesting people together to talk about the web, culture, education, technology and more.
Hanselminutes :《面向开发人员的新鲜空气》是每周一次的脱口秀节目,汇集了有趣的人们来讨论网络,文化,教育,技术等等。
Our hashtag for this event is #MarchIsForMakers and YOU, Dear Reader, can help us out by being our Street Team.
该活动的标签是#MarchIsForMakers ,亲爱的读者,您可以通过成为我们的街道团队来帮助我们。
Share our website http://marchisformakers.com!
分享我们的网站http://marchisformakers.com !
...with friends, kids, teachers, family, anyone you think my be benefit from learning about hardware and today's maker culture.
...与朋友,孩子,老师,家人以及任何您认为我将从硬件和当今创客文化中受益的人一起受益。
This is Week 2! At the end of March we'll have as many as 10 great podcasts, amazing guests, Live Google Hangouts, blog posts, Twitter Chats on Wednesdays, and a huge collection of links and projects for you to explore.
这是第二周! 3月底,我们将提供多达10个出色的播客,令人赞叹的嘉宾,实时Google环聊,博客文章,星期三的Twitter聊天,以及供您探索的大量链接和项目。
Please note that I'm learning. I'm sure some of you are fantastic experts, while others are working on Hello World. If you find errors, naïve or otherwise, in my code or solution, DO let me know in the comments and I'll update this post with notes and asides so we can all learn!
请注意,我正在学习。 我确定你们中的某些人是出色的专家,而其他人正在研究Hello World。 如果您在我的代码或解决方案中发现幼稚或其他错误,请在评论中让我知道,我将在本文中添加注释和帮助您进行学习!
I wanted to learn a little about Arduino this week. It's an huge and enthusiastic community based around an open-source electronics platform. The hardware is small and relatively inexpensive, and it brings hardware hacking to folks (like myself) that may not feel up to doing really low level electronics work. There or stackable "shields" you can plug on top and easily add new features, screens, sensors, and more.
我本周想学习一些有关Arduino的知识。 这是一个围绕开源电子平台的庞大而热情的社区。 硬件体积小且价格相对便宜,它给那些可能不愿意从事低级电子工作的人(例如我自己)带来硬件黑客攻击。 您可以在上面或堆叠的“防护罩”插入顶部,并轻松添加新功能,屏幕,传感器等。
There's lots of different choices for Arduino development, including some more interesting versions like the Intel Edison with Arduino Breakout Board. The Intel Edison supports not just Arduino, but also can run a full version of Yocto Linux, and can run Python and node.js. I have an older Arduino Atmega328 which was like $12.99, but I wanted a more flexible option that included on board Wi-Fi. Getting Wi-Fi connectivity is kind of a hassle if it's not built in.
Arduino开发有很多不同的选择,包括一些更有趣的版本,例如带有Arduino Breakout Board的Intel Edison 。 英特尔爱迪生不仅支持Arduino,而且还可以运行完整版的Yocto Linux,还可以运行Python和node.js。 我有一个较旧的Arduino Atmega328 ,当时的价格是$ 12.99,但我想使用板载Wi-Fi的更灵活的选择。 如果不是内置的,则获得Wi-Fi连接会很麻烦。
The Arduino Yún is a great choice, but I figured I'd spend more for the Edison and get a lot more options. I also got the "Seeed Studio Grove Starter Kit." This is a cool Arduino Shield that lets me (and the kids) attached sensors, buttons, screens, and lots of other stuff without soldering!
ArduinoYún是一个不错的选择,但我认为我会为爱迪生花更多钱,并获得更多选择。 我还获得了“ Seeed Studio Grove入门工具包” 。 这是一个很酷的Arduino Shield,可让我(和孩子们)连接传感器,按钮,屏幕和许多其他东西而无需焊接!
I download the Arduino software, but also found that Intel now has a complete Integrated IoT Windows 64 Installer that will get everything you need to get started with the Intel Edison. It makes it REALLY easy to start.
我下载了Arduino软件,但同时发现英特尔现在拥有完整的集成式IoT Windows 64安装程序,它将为您提供开始使用英特尔Edison所需的一切。 它真的很容易启动。
I tried a few small "Sketches" out, turning on a light with a button press, and such.
我尝试了一些小的“草图”,然后按下按钮打开了灯,等等。

But I wanted to make something more interesting to me personally. I'm a Type 1 Diabetic, and I wear an insulin pump and Dexcom Continuous Glucose Meter. They are connected to the cloud via a project called Nightscout. Nightscout takes my sugar values and pushes them into Azure, where they are available via a JSON web service.
但是我想让我个人变得更有趣。 我是1型糖尿病患者,我戴着胰岛素泵和Dexcom连续血糖仪。 它们通过名为Nightscout的项目连接到云。 Nightscout提取我的糖值并将其推送到Azure,可通过JSON Web服务在其中使用它们。
NOTE: I've put my Arduino Sketch on GitHub here. https://github.com/shanselman/NightscoutArduinoPlayground
注意:我已经将Arduino Sketch放在GitHub上了。 https://github.com/shanselman/NightscoutArduinoPlayground
Nightscout has a /pebble endpoint that is used to feed the Pebble Watch Face and show folks their blood sugar on their wrist. I thought it would be cool to hook up an Arduino to get my blood sugar from the cloud and display it on an LCD. It'll show the current value, change the background to green/yellow/red to display risk, and then a custom character to show trends (flat, up, down, etc).
Nightscout具有一个/ pebble端点,该端点用于喂养Pebble Watch Face并向人们展示其手腕上的血糖。 我认为连接一个Arduino从云中获取血糖并将其显示在LCD上会很酷。 它会显示当前值,将背景更改为绿色/黄色/红色以显示风险,然后显示一个自定义字符以显示趋势(平坦,向上,向下等)。
The JSON the Nightscout service returns looks like this, but I just want the "sgv" value and the "direction."
Nightscout服务返回的JSON如下所示,但我只需要“ sgv”值和“方向”。
{
    status: [{
        now: 1426017007130
    }],
    bgs: [{
        sgv: "102",
        bgdelta: 2,
        trend: 4,
        direction: "Flat",
        datetime: 1426016912000,
        filtered: 115232,
        unfiltered: 118368,
        noise: 1,
        rssi: 191,
        battery: "59"
    }]
}
I needed to bring in three libraries to achieve my goal. Remember I want to:
我需要引入三个库来实现我的目标。 记住我要:
- Connect to my Wi-Fi network 连接到我的Wi-Fi网络
- Download some JSON and parse it 下载一些JSON并解析
- Display values on an LCD screen 在LCD屏幕上显示值
So I needed:
所以我需要:
- #include <WiFi.h> //The Intel Edison has Wi-Fi built in #include <WiFi.h> // Intel Edison内置了Wi-Fi
#include <aJSON.h> //JSON is hard to parse on small memory devices, so this aJSON library helps
#include <aJSON.h> //很难在小型存储设备上解析JSON,因此此aJSON库有助于
#include "rgb_lcd.h" //I'm using the Grove - LCD RGB Backlight
#include“ rgb_lcd.h” //我正在使用Grove-LCD RGB背光
As with all problems when you're learning new things, you'll want to break them down one at a time.
与学习新事物时遇到的所有问题一样,您希望一次将其分解。
I wanted to just display a string on the LCD, that was easy, there's lots of examples online in the Arduino community.
我只想在LCD上显示一个字符串,这很容易,Arduino社区中有很多在线示例。
lcd.clear();
lcd.setCursor(0, 0);
lcd.print("Hello World");
Connecting to Wi-Fi was pretty easy also:
连接到Wi-Fi也很容易:
while (status != WL_CONNECTED) {
    // Connect to WPA/WPA2 network. Change this line if using open or WEP network:
    status = WiFi.begin(ssid, pass);

    // wait 3 seconds for connection:
    lcd.setCursor(0, 0);
    lcd.print("Waiting...");
    delay(3000);
}
When doing an HTTP call (given the libraries I was learning about) it's pretty low level. Constrained memory Arduinos (not like the Edison) don't seem to have SSL support, nor do they have high-level HTTP libraries. I had to craft the HTTP headers manually:
进行HTTP调用时(考虑到我正在学习的库),它的级别很低。 受约束的内存Arduino(与Edison不同)似乎没有SSL支持,也没有高级HTTP库。 我必须手工制作HTTP标头:
lcd.print("Connecting...");
if (client.connect(server, 80)) {
    lcd.clear();
    lcd.print("Server connected");
    // Make a HTTP request:
    client.println("GET /pebble HTTP/1.1");
    client.println("Host: hanselsugars");
    client.println("Connection: close");
    client.println();
}
Then I spin through the HTTP Response looking for the start of the JSON, and store it away. At this point I'm wondering if I'm doing it wrong. It isn't very robust.
然后,我遍历HTTP响应以查找JSON的开头,并将其存储起来。 在这一点上,我想知道我做错了什么。 它不是很健壮。
boolean jsonFound = false;
int bytes = 0;
while (client.available()) {
    char c = client.read();
    //look for first {, yes it could be in a cookie but I'm thinking positively.
    if (c == '{') jsonFound = true;
    if (!jsonFound) continue;

    stringBuffer[bytes++] = c;
    if (bytes >= MAXBUFFER) break; //that's all we have room for or we're done
}
Then once I've got the stringBuffer, I use the aJSON library to get the values I need. This isn't pretty, but it's how you use this library.
然后,一旦我得到了stringBuffer,就使用aJSON库获取所需的值。 这并不漂亮,但这是您使用此库的方式。
I also added a little bit to turn the color of the screen red/green/yellow.
我还添加了一点将屏幕的颜色设置为红色/绿色/黄色。
if (root != NULL) {
   aJsonObject* bgs = aJson.getObjectItem(root, "bgs");
   if (bgs != NULL) {
      aJsonObject* def = aJson.getArrayItem(bgs, 0);
      if (def != NULL) {
         aJsonObject* sgv = aJson.getObjectItem(def, "sgv");
         String bg = sgv->valuestring;
         int bgInt = bg.toInt();
         if (bgInt > 180) lcd.setRGB(255, 0, 0);
         if (bgInt > 150 && bgInt <= 180) lcd.setRGB(255, 255, 0);
         if (bgInt <= 150) lcd.setRGB(0, 255, 0);
         lcd.clear();
         lcd.setCursor(0, 0);
         lcd.print("Glucose (mg/dl)");
         lcd.setCursor(0, 1);
         lcd.print(bg);
}
I also created some custom characters to show trends, based on a string (pretending to be an enum) that comes back from the JSON service. For example, an up arrow:
我还基于从JSON服务返回的字符串(假装为枚举)创建了一些自定义字符来显示趋势。 例如,向上箭头:
byte SingleUp[8] = {
    B00000,
    B00100,
    B01110,
    B10101,
    B00100,
    B00100,
    B00100,
    B00000
};
All the questionable code is up at https://github.com/shanselman/NightscoutArduinoPlayground
所有可疑的代码都位于https://github.com/shanselman/NightscoutArduinoPlayground
At this point I'm confused/learning about a few things:
在这一点上,我很困惑/正在学习一些事情:
It runs for a while and then stops.
它运行一会儿然后停止。
- I don't know what state it's in. 我不知道它处于什么状态。
I would like it to call out to the web service every 5 min and update the LCD. I suspect I am not managing Wi-Fi connection state correctly (as in, not at all).
我想它调出该网络服务每5分钟和更新LCD。 我怀疑我没有正确管理Wi-Fi连接状态(例如,完全没有)。
- So the question is, how does one take a working prototype and turn it into a real appliance that can run forever? 因此,问题是,如何拿出一个可行的原型并将其变成可以永久运行的真实设备?
- I'm reusing the stringBuffer which is a bad idea. I need to clear it out. 我正在重用stringBuffer,这是一个坏主意。 我需要清除它。
Sometimes the Custom Characters are corrupted on the screen.
有时,自定义字符在屏幕上已损坏。
- No idea why. It works 8 out of 10 times. Perhaps it's an Edison bug or a SeeedStudio bug. 不知道为什么。 10次中有8次有效。 可能是Edison错误或SeeedStudio错误。
When I get it working reliably, I'd like to 3D Print a case and mount it somewhere. :)
当我确定它能可靠地工作时,我想对其进行3D打印并将其安装在某个地方。 :)
适用于Visual Studio的Arduino (Arduino for Visual Studio)
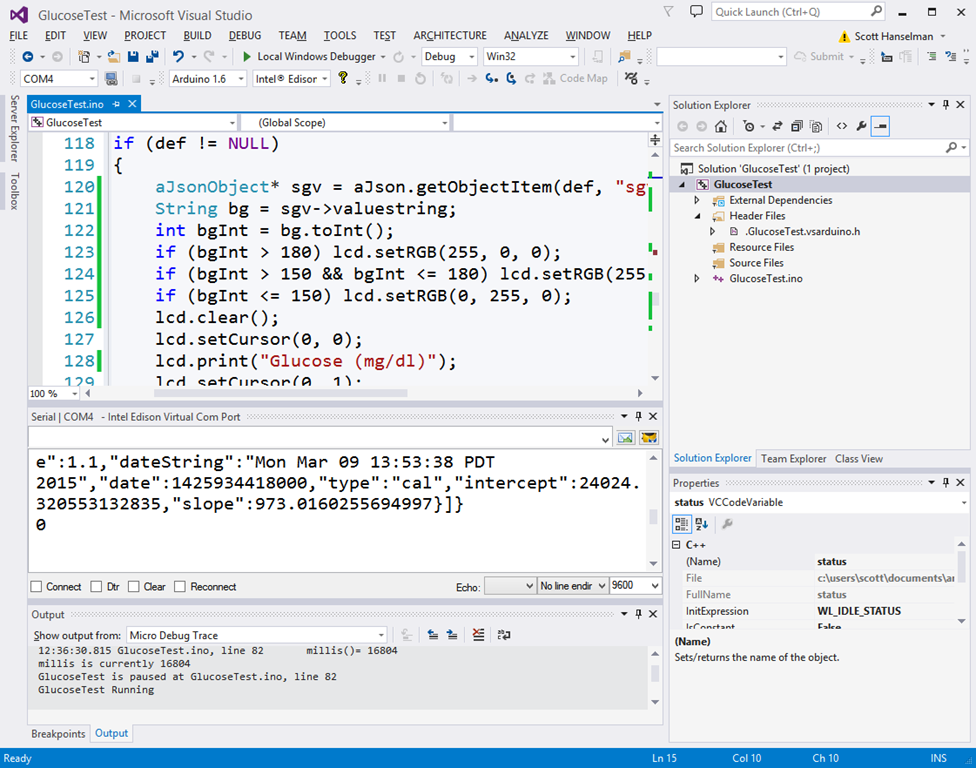
One other thing I found out, there's a fantastic add-in for Visual Studio that will give you a great Arduino Development Environment inside of Visual Studio. It includes simple debugging, breakpoints, a nice serial monitor and more. I'm still finding debugging to be challenging as local watches and step over isn't supported, but it's vastly superior to the tiny Arduino IDE.
我发现的另一件事是,Visual Studio有一个很棒的插件,它将为您提供Visual Studio内部的出色Arduino开发环境。 它包括简单的调试,断点,不错的串行监视器等等。 我仍然发现调试不具挑战性,因为不支持本地监视和跨步,但是它比小型Arduino IDE优越得多。
Arduino仿真器 (Arduino Emulator)
Don't have an Arduino or a breadboard? Check out http://123d.circuits.io online. It's amazing. It's an Arduino Circuit Simulator online. Check this out!
没有Arduino或面包板吗? 在线查看http://123d.circuits.io 。 太奇妙了。 这是在线的Arduino电路模拟器。 看看这个!

You can setup boards, write code, and practice in software before you test it out on hardware.
在硬件上进行测试之前,您可以设置板,编写代码并在软件中进行练习。

Don't forget, visit http://marchisformakers.com, tell your friends and tweet us at #MarchIsForMakers!
别忘了,访问http://marchisformakers.com ,告诉您的朋友,并在#MarchIsForMakers上鸣叫我们!
Sponsor: Big thanks to Aspose for sponsoring the blog feed this week! Are you working with Files? Aspose.Total for .NET has all the APIs you need to create, manipulate and convert Microsoft Office documents and many other formats in your applications. Start a free trial today.
赞助商:非常感谢Aspose本周赞助了博客提要! 您正在使用文件吗? .NET的Aspose.Total具有在应用程序中创建,处理和转换Microsoft Office文档以及许多其他格式所需的所有API。 立即开始免费试用。
翻译自: https://www.hanselman.com/blog/arduino-101-with-an-intel-edison-hooking-up-json-to-an-lcd-screen
edison模块


 4万+
4万+

 被折叠的 条评论
为什么被折叠?
被折叠的 条评论
为什么被折叠?
 到【灌水乐园】发言


