


First, let's level set with a disclaimer. I am a smart enough person but a total beginner at 3D printing. I've been 3D printing for about two weeks using a Printrbot Simple Metal from Amazon that I got for US$599. Other than Amazon affiliate links (buy from my links and you buy me tacos!) I don't have ANY relationship with Printrbot or anyone in the 3D Printing space. I'm unaffiliated. This "shootout" is an interesting experience. I'm sure I did something wrong, or perhaps my partner in crime on this experiment, Brandon Potter, missed a step. Who knows? But this is how it went down.
首先,让我们设置免责声明。 我足够聪明,但是是3D打印的初学者。 我已经使用Amazon的Printrbot Simple Metal进行了3D打印大约两个星期,当时我的价格为599美元。 除了Amazon会员链接(从我的链接购买,然后您购买炸玉米饼!)之外,我与Printrbot或3D打印领域的任何人都没有任何关系。 我没有隶属关系。 这种“拍摄”是一种有趣的体验。 我确定我做错了什么,或者也许我的犯罪伙伴布兰登·波特( Brandon Potter )错过了一步。 谁知道? 但这就是它下降的方式。
Brandon saw that I was doing some 3D printing and mentioned they had a <$22,000 3D printer at his work and what did I think about doing a comparison? I had been having trouble printing with success, ruining at least 2 out of 3 prints, but recently got my Printrbot dialed in nicely. '
布兰登看到我正在做一些3D打印,并提到他们在他的工作中有一台价格低于22,000美元的3D打印机,我觉得如何做比较? 我一直难以成功打印,至少破坏了三分之二的打印,但是最近我的Printrbot拨好了。 '
Here's my investment so far both in time and money.
到目前为止,这是我在时间和金钱上的投资。
Raspberry Pi and Raspberry Camera to watch my prints and do time-lapse videos with Octoprint. Figure $60.
Raspberry Pi和Raspberry Camera可以使用Octoprint观看我的照片并制作延时视频。 图$ 60。
A spool of RioRand 1.75mm PLA Filament in Black for $28.
黑色的RioRand 1.75mm PLA长丝线轴,现价$ 28。
Digital Calipers for measuring stuff. $20.
用于测量物品的数字卡尺。 $ 20。
And a number of printed parts to improve my 3D printer's performance including:
以及许多可改善我的3D打印机性能的打印零件,包括:
Feet for the Printrbot (plus little rubber feet-bits)
Printrbot的脚(加上小的橡胶支脚)
Uline brand blue tape. Works WAY WAY better than other blue tapes. This made a HUGE difference. $15
Uline品牌蓝带。 比其他蓝带更好地工作。 这带来了巨大的变化。 $ 15
So I'm into it for $722 and my time. I did NOT use a Heated Bed for my Printrbot Simple Metal but I am told it's a great upgrade.
所以我花了722美元和我的时间投入其中。 我没有为我的Printrbot Simple Metal使用加热床,但被告知这是一个不错的升级。
Here's Brandon's company's outlay in his words:
用他的话来说,这是布兰登公司的支出:
uPrint SE Pro Printer and Dissolving Bath – about $22,000
uPrint SE Pro打印机和溶解浴–约22,000美元
- 1 Spool of Model Material (Black) – $205.00 (produces 42 cubic inches of printing) 1个模型材料线轴(黑色)-$ 205.00(产生42立方英寸的打印面积)
- 1 Spool of Support Material – $200.00 (42 cubic inches worth) 1个支撑材料线轴– $ 200.00(价值42立方英寸)
- Box of Build Plates – $125.00 for 24 (you need one for each print, so it costs about $5.20/each) 一箱Build Plates-$ 125.00 for 24(您需要为每张纸制作一个,因此每张成本约$ 5.20)
- Soluble Concentrate – $149.00 for 12 bottles (dissolves support material, aka fancy drain-O) 可溶性浓缩物– 12瓶$ 149.00(溶解支撑材料,又称花哨排水O)
- Warranty Support – $2,000/year – because it does break from time to time. 保修支持–每年2,000美元–因为它有时会中断。
- Brandon says - Add a little bit of shipping, and for a mere $25K you’re ready to print your very own coffee cup. 布兰登说-添加一点运输,仅需$ 25K,您就可以打印自己的咖啡杯。
We decided to print a coffee cup. I don't plan on drinking from it because who knows if the plastic will leech off, but it seemed like an interesting and common object. As a 3D model it has some nice curves, the handle overhang is a small challenge and it's something we can easily compare.
我们决定印咖啡杯。 我不打算从中饮用,因为谁知道塑料是否会渗出,但它似乎是一个有趣且常见的对象。 作为3D模型,它具有一些不错的曲线,手柄悬垂是一个小挑战,我们可以轻松进行比较。
I printed one on my Printrbot and Brandon printed one on their Stratasys uPrint SE Pro. Then Brandon mailed me his cup and I'm sitting here holding them both in my hands.
我在我的Printrbot上打印了一个,而布兰登在他们的Stratasys uPrint SE Pro上打印了一个。 然后布兰登给我邮寄了他的杯子,我坐在这里,手里都拿着它们。
Here is a timelapse video of my cup printing. My 0.2mm print took about 7 hours and this video is 90 seconds. I used Octoprint and the Raspberry Pi to create the video.
这是我杯子印刷的缩时视频。 我的0.2毫米打印花了大约7个小时,而这段视频是90秒。 我使用了Octoprint和Raspberry Pi来创建视频。
I downloaded the Coffee Cup model from Thingiverse as an STL 3D model. I ran the STL model through the Microsoft 3D Printing NetFabb online service to make sure the model was watertight. Then I loaded the result directly into Repetier and used Cura to slice the model into individual instructions for the printer. I made one adjustment to the slicing settings, telling it to make a "support structure" when it sees an overhang over 30 degrees. I was concerned about the cup's handle. Other than that one settings change which resulted in the support being added (which is easily pulled off after the print) it was a "printing as is." Brandon's model also used a support structure to print the cup and keep the handle stable so we decided this was pretty typical. He also printed on his pro printer with no changes.
我从Thingiverse下载了Coffee Cup模型作为STL 3D模型。 我通过Microsoft 3D打印NetFabb在线服务运行了STL模型,以确保模型是防水的。 然后,我将结果直接加载到Repetier中,并使用Cura将模型切成单独的打印机说明。 我对切片设置进行了一次调整,告诉它在看到超过30度的悬垂时做出“支撑结构”。 我担心杯子的手柄。 除了一项设置更改导致添加支持(在打印后很容易将其删除)之外,其他设置都是“按原样打印”。 布兰登(Brandon)的模型还使用了支撑结构来印刷杯子,并保持手柄稳定,因此我们认为这很典型。 他还可以在其专业打印机上进行打印,而无需更改。

Here is a picture of my setup. There's my printer on the right with some stuff I've made and my box of tools/crap on the left. You can see the spool, the printer (the red lipstick looking thing is where the hot plastic comes out), the Raspberry Pi and the tape that I print on. I can print objects up to 6 inches on a side, so a big 6 inch cube. If I paid more money I could get the 10 inch model, but so far for my hobbies I'm happy with that size. I can break things up and assemble them with acetone or bolts if I want to make larger models. One fellow 3D-printed a whole full-sized motorcycle with a small printer and assembled the parts.
这是我的设置的图片。 右边有我的打印机,上面有我做过的东西,左边是我的工具/废纸box。 您会看到线轴,打印机(看起来像红色唇膏的东西是热塑料出来的地方),Raspberry Pi和我在其上打印的胶带。 我可以在一个侧面上打印最多6英寸的对象,所以可以打印一个6英寸的大立方体。 如果我付更多的钱,我可以买到10英寸的机型,但到目前为止,对于我的爱好,我对这种尺寸感到满意。 如果要制造更大的模型,可以将其分解并用丙酮或螺栓组装。 一个同伴用3D打印机用一台小型打印机打印了一辆全尺寸的摩托车,并组装了零件。

Here is Brandon's printer. Again, $600 vs. $25000.
这是布兰登的打印机。 同样,600美元对25000美元。

By the way, is this a silly comparison? Perhaps. But no more than a Tesla vs. a Challenger Hellcat. Actually, I think my printer is a Geo Metro. But I get great mileage!
顺便说一句,这是一个愚蠢的比较吗? 也许。 但只不过是特斯拉与挑战者地狱猫。 实际上,我认为我的打印机是Geo Metro。 但是我得到了不错的成绩!
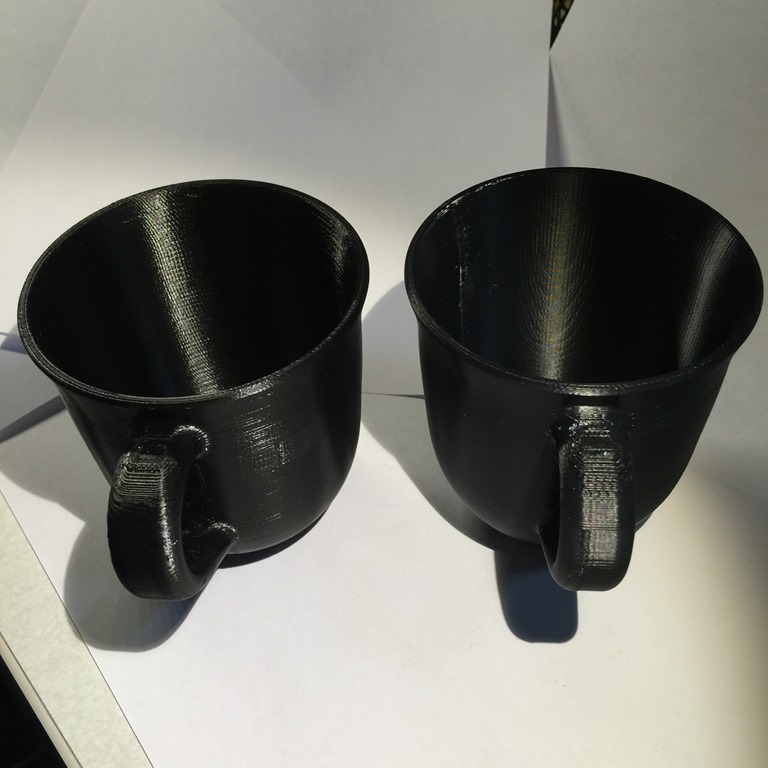
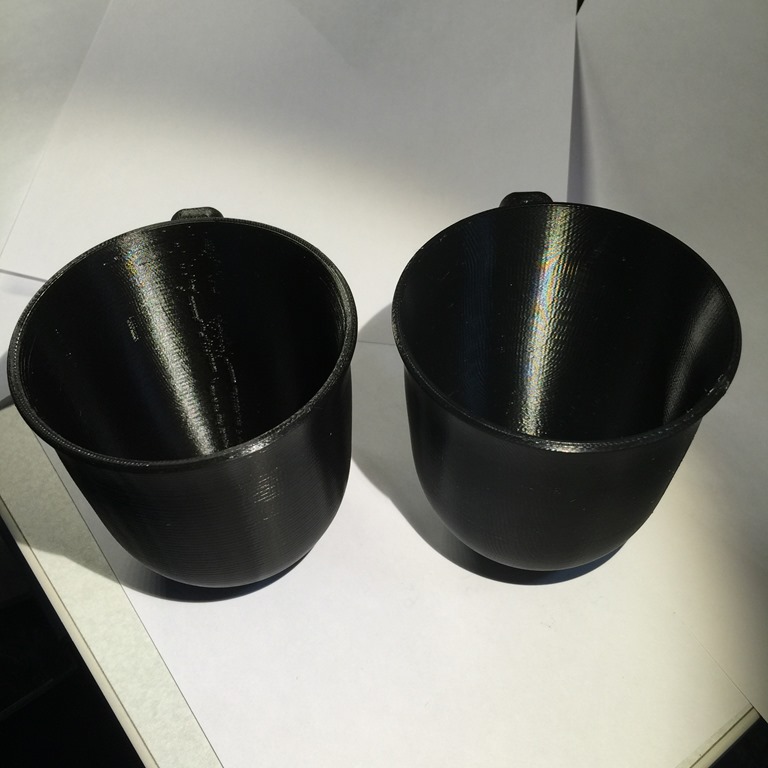
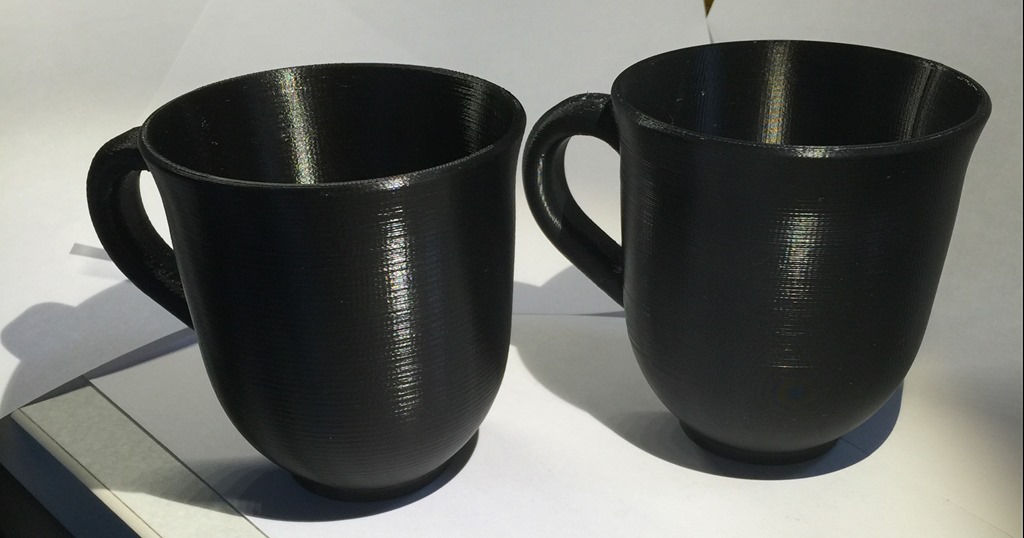
Ok, here's the prints. Feel free to click to zoom in to make your decision. Which cup came from which printer?
好的,这是照片。 随时单击放大以做出决定。 哪个杯子来自哪个打印机?
Here's slightly larger pics. Note I am not/have not moved the cups side to side. Left/right is consistent for this photo series.
这是稍大的照片。 注意我没有/没有左右移动杯子。 左/右与该照片系列一致。
Which is which?
哪一个
The $599 Printrbot Simple Model printing at 0.2mm is on the left. The $20k uPrint SE Plus printing at 0.1mm is on the right.
售价599美元的0.2毫米Printrbot Simple Model打印在左侧。 售价2万美元的uPrint SE Plus可以在0.1mm处进行打印。
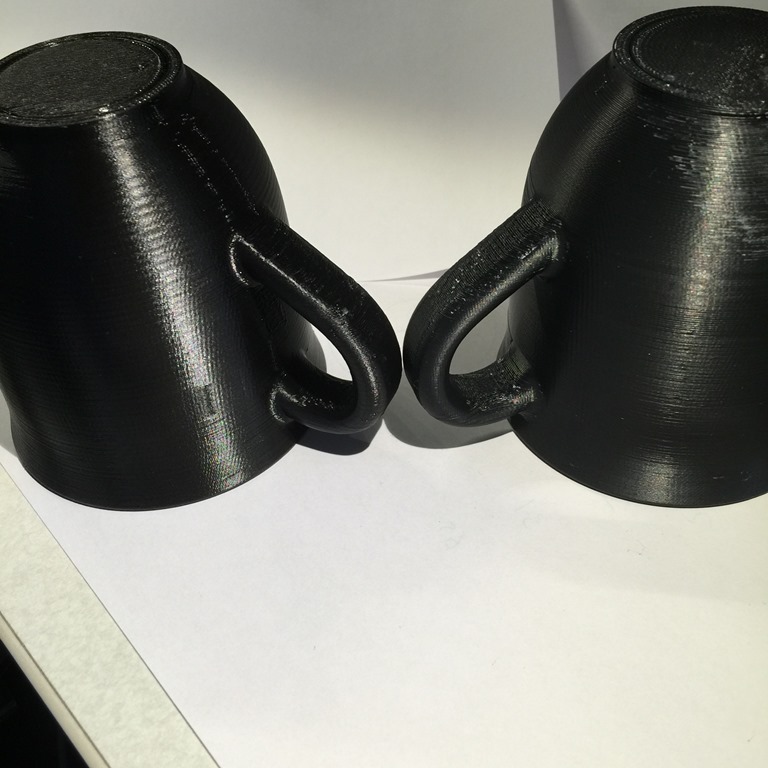
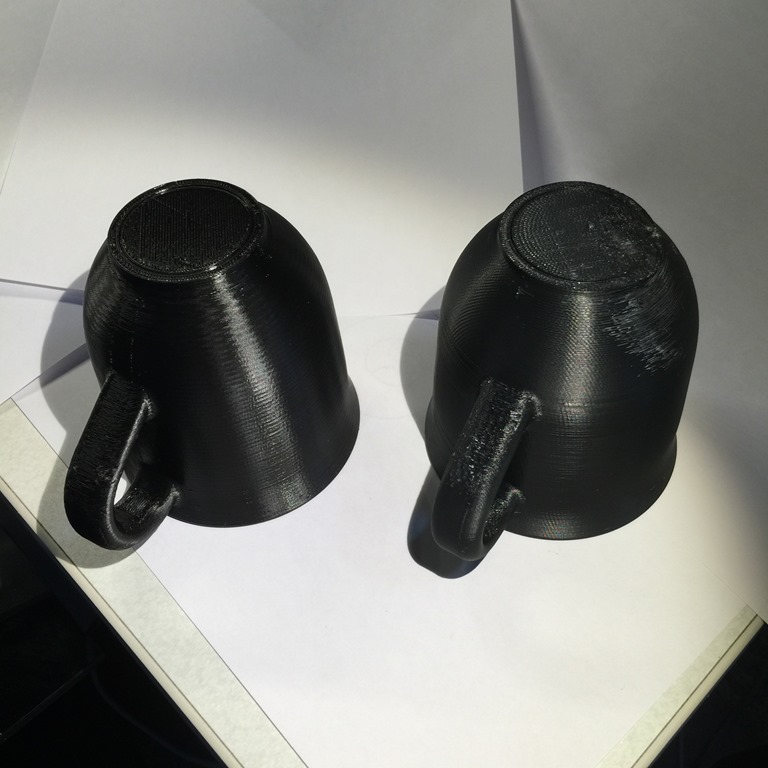
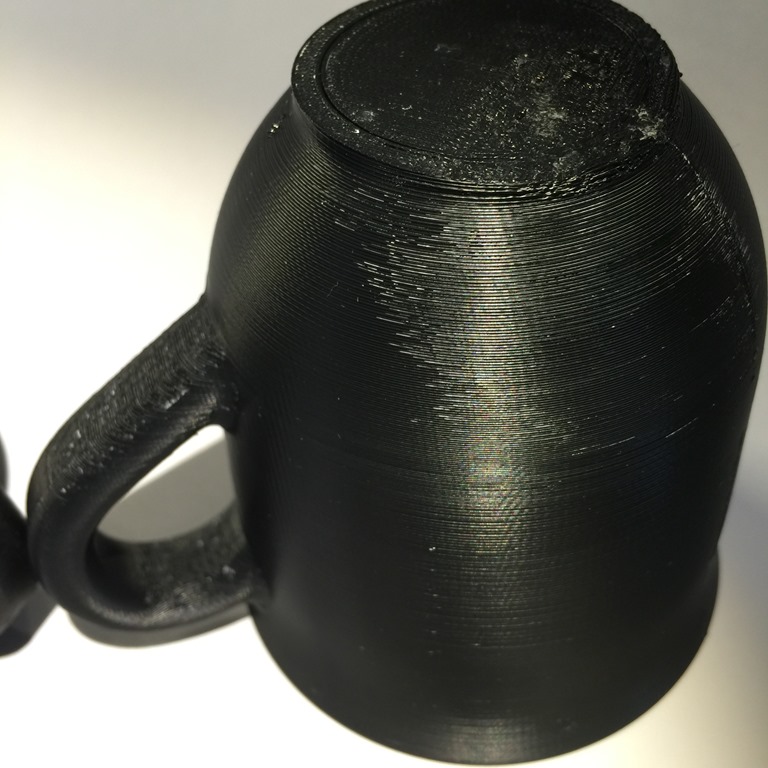
The uPrint's base was messed up somehow. A bad start perhaps, but unfortunate as it's supposed to just work since Brandon used the one-time-use custom bases that the uPrint comes with. He also used the dissolving bath to take the white support structure off. You can see some of the white still there, perhaps it wasn't in long enough. My print had supports but I just pulled them off with my hands. Of course, if you have an intricate print with small parts that's not always possible. This is a very simple object, to be clear. It's not interlocking gears or something.
uPrint的底座以某种方式弄乱了。 也许这是一个不好的开始,但是不幸的是,由于布兰登使用了uPrint附带的一次性使用的自定义底座,因此应该可以正常工作。 他还使用溶解浴将白色支撑结构取下。 您可以看到仍然有一些白色,可能时间不够长。 我的印刷品有支撑,但我只是用手将它们拉下来。 当然,如果您要打印出复杂的小零件,那并非总是可能的。 要清楚,这是一个非常简单的对象。 它不是互锁的齿轮或其他东西。
Here's the uPrint cup. Brandon said it took 8 hours and 22 minutes.
这是uPrint杯子。 布兰登说花费了8个小时22分钟。
Here's the Printrbot's cup. Note the "Z scar" (an artifact from the printer moving up the Z-Axis) on the print? On my print it ended up by the handle, but on Brandon's it ended up on the side of the cup, marring the print, in my opinion.
这是Printrbot的杯子。 注意打印上的“ Z疤痕”(打印机在Z轴上移动的伪影)吗? 在我看来,它的末端是把手,但在布兰登身上的,它末端是杯子的侧面,我认为这会损害印迹。
What's the takeaway? If we assume that I have a totally dialed-in well calibrated super cheap consumer/hobbyist 3D Printer and that Brandon has a $20k professional 3D Printer that's maybe got some calibration issues, they seem very comparable.
什么是外卖? 如果我们假设我有一台经过完全校准的,超便宜的消费者/业余爱好者3D打印机,并且布兰登拥有一台价值2万美元的专业3D打印机,可能会遇到一些校准问题,那么它们似乎具有可比性。
However, in real one-time costs my cup cost me 21.02 meters of filament, costing me perhaps $2 maybe a little more if you count the few pieces of tape. For Brandon and his Pro printer, in direct costs, he used $23.62 in model material, $2.06 in support material, and $5.20 build plate, for a total of $30.88 for this cup.
但是,在一次一次性的成本中,我的杯子花了我21.02米的灯丝,如果算上几条胶带,可能要花2美元或更多。 对于布兰登和他的Pro打印机,直接成本中,他使用了23.62美元的模型材料,2.06美元的支撑材料和5.20美元的制版板,总共花了30.88美元。
Naysayers will say that this isn't a great model to have chosen. Clearly my little Printrbot Simple Metal can only make things of a certain size, but it's clearly fair to say that it's a surprisingly competent printer when it's calibrated well. Additionally, if I were a 3D modeling shop with a Pro printer, I think I would definitely pick up a few sub-$1000 printers for basic stuff as the big printers may be costing you money. If I was a small business I would really do my homework before buying a pro printer that claims to be problem- and maintenance-free. Go read Brandon Potter's account of his "pro print" and compare notes!
反对者会说,这不是一个很好的选择模型。 显然,我的小型Printrbot Simple Metal只能制造一定尺寸的东西,但是可以很公平地说,经过良好的校准,它是一款性能出众的打印机。 此外,如果我是一家配备Pro打印机的3D建模店,我想我肯定会为基本的东西挑选几台低于1000美元的打印机,因为大型打印机可能会花钱。 如果我是一家小型企业,那么在购买声称没有问题且无需维护的专业打印机之前,我真的会做作业。 仔细阅读布兰登·波特(Brandon Potter)的“专业照片”,并比较笔记!
NOTE: This post is intended in no way to talk up Printrbot nor to talk down Stratasys. It's a simple one time anecdote as it happened, using a simple model.
注意:这篇文章绝不是要谈论Printrbot也不是要谈论Stratasys。 使用一个简单的模型,这是一个简单的一次性轶事。
What do you think, Dear Reader?
亲爱的读者,您如何看待?
翻译自: https://www.hanselman.com/blog/3d-printer-shootout-600-printrbot-vs-20000-uprint-se-plus


 1万+
1万+

 被折叠的 条评论
为什么被折叠?
被折叠的 条评论
为什么被折叠?
 到【灌水乐园】发言


