


aes加密 对称加密
A lot of folks have been very vocally pushing for “HTTPS Everywhere”, and for good reason. The fact that the lack of HTTPS makes you miss out on shiny new things like HTTP/2 and Service Workers adds even more incentive for those a little less inspired by the security arguments.
有充分的理由 ,很多人一直在大力推动“ HTTPS Everywhere”。 缺乏HTTPS的事实使您错过了诸如HTTP / 2和Service Workers之类的闪亮新事物,这为那些受到安全性论点启发较少的人提供了更大的动力。
Unfortunately, moving to HTTPS can be kind of painful as you can see from Jeremy Keith’s excellent post detailing exactly how he got adactio.com onto HTTPS. He pinpoints the major obstacle with HTTPS adoption at the end of his post:
不幸的是,从杰里米·基思(Jeremy Keith)的精彩文章中详细了解了他如何将adactio.com移植到HTTPS上,转向HTTPS可能会很痛苦。 他在文章结尾指出了采用HTTPS的主要障碍:
The issue with https is not that web developers don’t care or understand the importance of security. We care! We understand!
https的问题不是Web开发人员不在乎或不了解安全性的重要性。 我们关心! 我们明白!
The issue with https is that it’s really bloody hard.
https的问题在于它真的很血腥。
Let’s Encrypt—a new certificate authority from the Internet Security Research Group (ISRG)—has been promising to help with this, pledging to be “free, automated and open”.
互联网安全研究小组(ISRG)的新证书颁发机构Let's Encrypt承诺将为此提供帮助,并承诺“免费,自动化和开放”。
They just announced public beta today, so I decided to give the beta version of their system a try on wpostats.com. Like Jeremy’s blog, WPO Stats is housed on a Digital Ocean virtual machine running Ubuntu 14.04 and Apache 2.4.7.
他们今天才宣布公开测试版,因此我决定在wpostats.com上尝试使用其系统的测试版。 就像Jeremy的博客一样,WPO Stats位于运行Ubuntu 14.04和Apache 2.4.7的Digital Ocean虚拟机上。
安装“让我们加密” (Getting Let’s Encrypt installed)
The first thing I had to do was get the Let’s Encrypt client installed. To do this, I logged into the WPO Stats server and followed the instructions on the Let’s Encrypt repo.
我要做的第一件事就是安装“让我们加密”客户端。 为此,我登录了WPO Stats服务器,并按照Let's Encrypt存储库中的说明进行操作。
First I grabbed the repo using git:
首先,我使用git抓取了仓库:
git clone https://github.com/letsencrypt/letsencrypt
git clone https://github.com/letsencrypt/letsencrypt
Once git had done it’s magic and pulled down the Let’s Encrypt client, I needed to actually install it. To do that, I navigated to the newly created letsencrypt directory and then ran the Let’s Encrypt client with the help flag enabled.
一旦git完成了它的魔力,并且关闭了Let's Encrypt客户端,我需要实际安装它。 为此,我导航到新创建的letsencrypt目录,然后运行启用了帮助标志的Let's Encrypt客户端。
cd letsencrypt
cd letsencrypt
./letsencrypt-auto --help
./letsencrypt-auto --help
This does that scary-looking thing where it downloads a bunch of different dependencies and gets the environment setup. It went off without a hitch and after a few moments it completed and told me I was ready to begin.
这样做看起来很恐怖,它会下载许多不同的依赖项并获取环境设置。 它顺利进行了片刻,并完成了一段时间,告诉我我准备开始了。
获取并安装证书 (Obtaining and installing a certificate)
The install process was smooth, but I was bracing myself for the actual SSL setup to be a bit more painful. As it turns out, I didn’t have to worry.
安装过程很顺利,但是我为实际的SSL安装做好了准备,这让我更加痛苦。 事实证明,我不必担心。
To run the client and get my certificate, I ran the same command without the help flag:
为了运行客户端并获取我的证书,我运行了没有帮助标志的相同命令:
./letsencrypt-auto
./letsencrypt-auto
This popped up a pleasant little GUI (Figure 1) that walks through the rest of the process. The first screen it popped up was a warning.
这弹出了一个令人愉悦的小GUI(图1),该GUI贯穿了其余的过程。 它弹出的第一个屏幕是警告。
No names were found in your configuration files. You should specific ServerNames in your config files in order to allow for accurate installation of your certificate. If you do use the default vhost, you may specify the name manually. Would you like to continue?
在您的配置文件中找不到名称。 您应该在配置文件中指定特定的ServerName,以便准确安装证书。 如果确实使用默认虚拟主机,则可以手动指定名称。 你想继续吗?
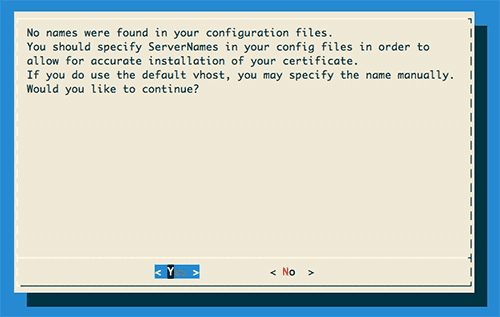
Figure 1: First screen of the letsencrypt client GUI banner.
图1:letsencrypt客户端GUI标语的第一个屏幕。
In this case, I only use the server for WPO Stats—nothing more. This means that, yes, I use the default vhost. I selected ‘Yes’ and moved along. Where this might be different is if you were hosting multiple domain names on a single server. For example, if I ran this site on the same server, I may have virtual hosts set for both timkadlec.com and wpostats.com and would need to have that specified in my config files.
在这种情况下,我仅将服务器用于WPO统计信息,仅此而已。 这意味着,是的,我使用默认的虚拟主机。 我选择“是”并继续前进。 如果您在一台服务器上托管多个域名,则可能有所不同。 例如,如果我在同一服务器上运行此站点,则可能为timkadlec.com和wpostats.com设置了虚拟主机,并且需要在配置文件中指定虚拟主机。
The next three prompts were straightforward. I had to enter my domain name, my email address, and then accept the terms of service. I’ve always liked easy questions.
接下来的三个提示很简单。 我必须输入我的域名,我的电子邮件地址,然后接受服务条款。 我一直喜欢简单的问题。
After that, I was prompted to choose whether I wanted all requests to be HTTPS, or if I wanted to allow HTTP access as well. I had no reason to use HTTP for anything, so I selected to make everything secure.
此后,系统提示我选择是否要所有请求均为HTTPS,还是要允许HTTP访问。 我没有任何理由使用HTTP,因此我选择确保所有内容的安全。
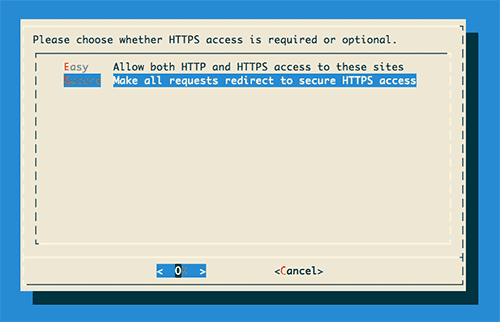
Figure 2: GUI screen for choosing to make everything HTTPS or keep HTTP around.
图2:用于选择使所有HTTPS或保持HTTP不变的GUI屏幕。
And, well, that was it. The next GUI prompt was informing me I was all set and that I should probably test everything out on SSL Labs.
而且,就是这样。 下一个GUI提示告知我一切就绪,我应该在SSL Labs上进行所有测试。
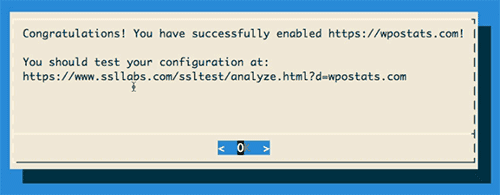
Figure 3: Final screen of the letsencrypt GUI informing me I was victorious.
图3:letsencrypt GUI的最终屏幕告诉我我胜利了。
I checked the site, and everything was in working order. I ran the SSL Labs test and everything came back a-ok. For once, it really was as simple as advertised.
我检查了站点,一切正常。 我运行了SSL Labs测试,一切正常 。 一次,它确实和广告宣传一样简单。
I felt like trying my luck so I went through the process again for pathtoperf.com and, again, it went through without a hiccup. All told it took me about 10 minutes and $0 to secure both sites. Not bad at all.
我感觉很想运气,所以我再次通过pathtoperf.com进行了整个过程,然后又顺利进行了一次。 总共花了我大约10分钟时间和$ 0来保护两个网站。 一点也不差。
向前走 (Going forward)
The improvement between the obnoxiously complicated process Jeremy had to suffer through and the simplified process provided by Let’s Encrypt is absolutely fantastic.
Jeremy必须忍受的令人讨厌的复杂过程与Let's Encrypt提供的简化过程之间的改进绝对是太棒了。
I don’t want to mislead you—there’s work to be done here. I don’t know that every server is setup to be quite as smooth as the Apache process, and without root access to the server you still have to go through some manual steps.
我不想误导您-这里要做的工作。 我不知道每个服务器的设置都像Apache进程一样流畅,而且如果没有root访问服务器,您仍然必须执行一些手动步骤。
UPDATE: It looks like Dreamhost is going to allow customers to generate and enable Let’s Encrypt certificates from the control panel. Hopefully other hosting providers will follow suit.
更新:看来Dreamhost将允许客户从控制面板生成并启用“让我们加密证书” 。 希望其他托管服务提供商也会效仿。
But that’s where they’ll need you. Try it out on your own servers and test sites and if you run into difficulties, let them know. I’m really optimistic that with enough feedback and input, Let’s Encrypt can finally make HTTPS everywhere a less painful reality.
但这就是他们需要您的地方。 在您自己的服务器和测试站点上进行尝试,如果遇到困难,请告知他们 。 我真的很乐观,有了足够的反馈和输入,Let's Encrypt最终可以使各地的HTTPS不再那么痛苦。
翻译自: https://timkadlec.com/2015/12/taking-lets-encrypt-for-a-spin/
aes加密 对称加密


 441
441

 被折叠的 条评论
为什么被折叠?
被折叠的 条评论
为什么被折叠?
 到【灌水乐园】发言


