


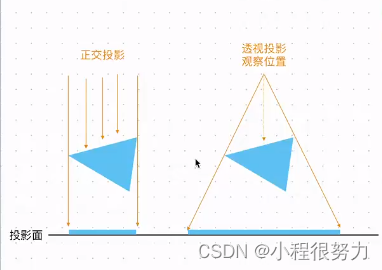
正交相机
const camera = new THREE.OrthographicCamera(
-aspect,
aspect,
aspect,
-aspect,
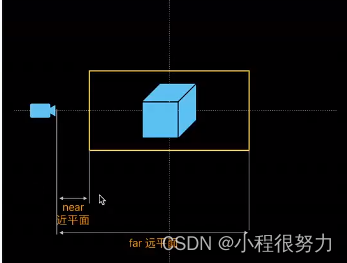
0.1, //进平面
1000 //远平面
); // 透视相机
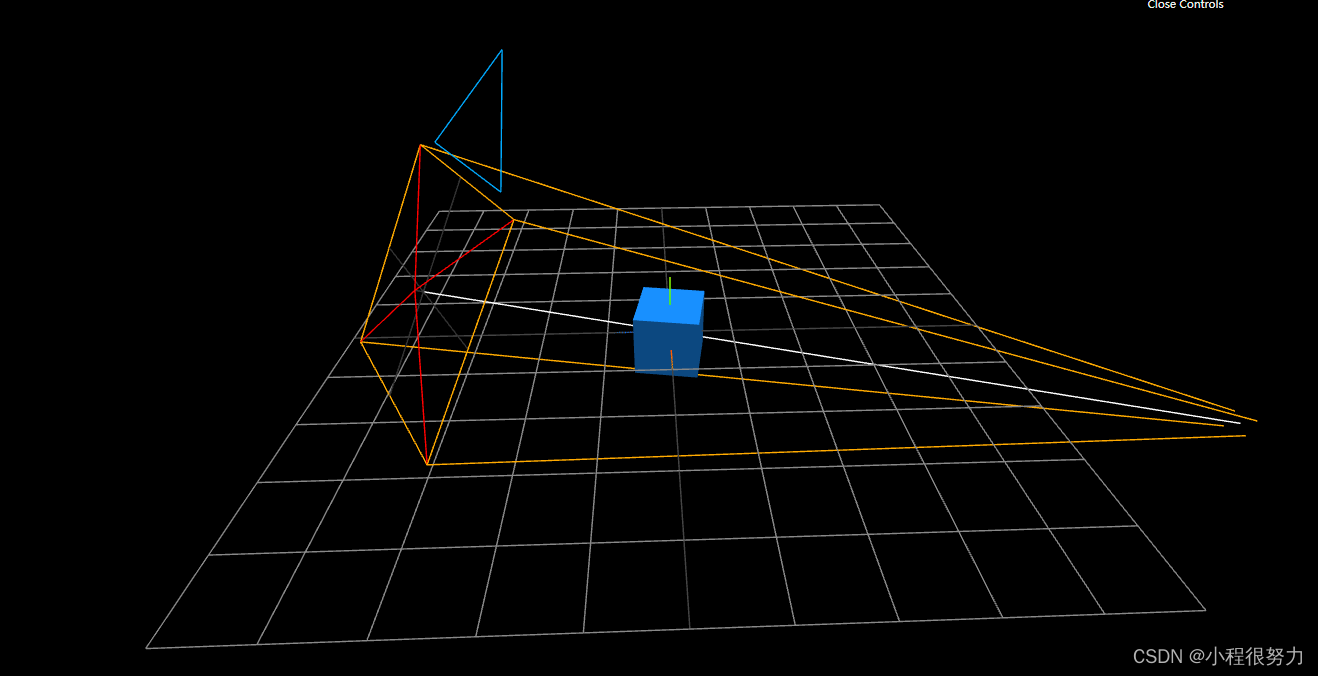
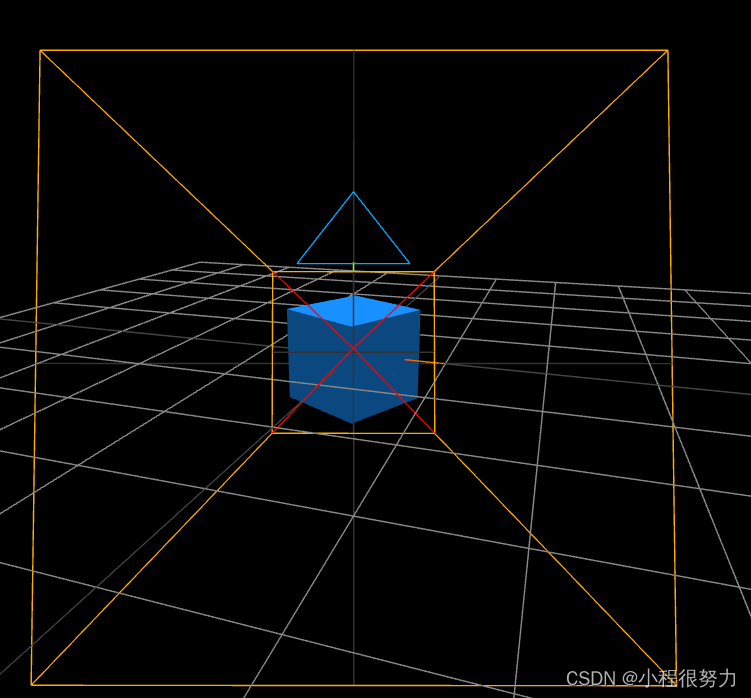
创建相机辅助线
const cameraHelper = new THREE.CameraHelper(this.camera);
创建一个透视相机观察正交相机
 // 创建透视相机
        const watchCamera = new THREE.PerspectiveCamera(
          75,
          this.width / this.height
        );
        // 在正交投影后,距离人眼更近
        watchCamera.position.set(2, 2, 6);
        watchCamera.lookAt(this.scene.position);
        this.scene.add(watchCamera);
        this.camera = watchCamera;
        this.watchCamera = watchCamera;
上面的
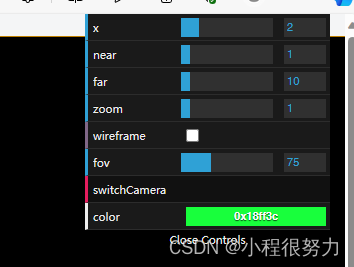
GUI调试相机参数:dat.gui
可以配置设置对象的属性:可以是number和boolean类型和方法类型,点击gui插件方法名称时,会执行改方法,可以通过addColor调整颜色。
npm install --save dat.gui
import * as dat from 'dat.gui';
...,
const gui = new dat.GUI();
        let params = {
          wireframe: false,
          switchCamera: () => {
            if (this.camera.type === 'OrthographicCamera') {
              this.camera = this.watchCamera;
              // 鼠标控制拖动开启
              this.orbitControls.enabled = true;
            } else {
              this.camera = this.otherCamera;
              this.orbitControls.enabled = false;
            }
          },
        };
        gui.add(this.camera.position, 'x', 0.1, 10, 0.1);
        gui.add(this.camera, 'near', 0.01, 10, 0.01).onChange((val) => {
          this.camera.near = val;
          // 矩阵更新函数
          this.camera.updateProjectionMatrix();
        });
        gui.add(this.camera, 'far', 1, 100, 1).onChange((val) => {
          this.camera.far = val;
          // 矩阵更新函数
          this.camera.updateProjectionMatrix();
        });
        gui.add(this.camera, 'zoom', 0.1, 10, 0.1).onChange((val) => {
          this.camera.zoom = val;
          // 矩阵更新函数
          this.camera.updateProjectionMatrix();
        });
        gui.add(params, 'wireframe').onChange((val) => {
          this.mesh.material.wireframe = val;
        });
        gui.add(params, 'switchCamera');
        gui.addColor(params, 'color').onChange((val) => {
          this.mesh.material.color.set(val);
        });
透视相机
透视相机的可视角度,使用一个透视相机观察透视相机

包围盒
threejs默认没有对物体进行包围盒计算,mesh.geometry.boundingBox默认为null,通过调用mesh.geometry.computeBoundingBox()方法生成物体包围盒。
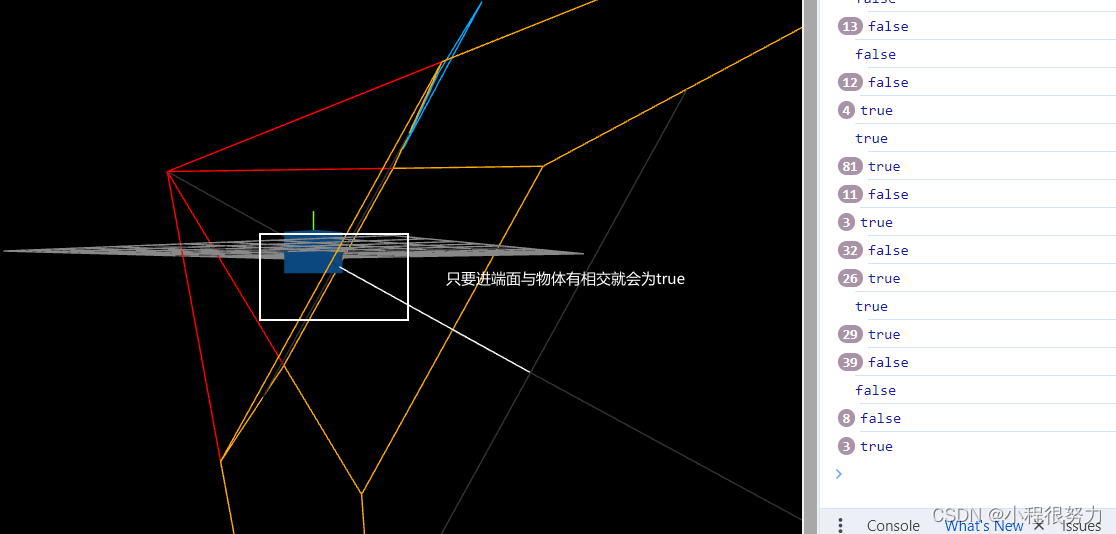
检测包围盒是否在视锥体以内
// 视锥体:用于确定相机视野内的东西
        const frustum = new THREE.Frustum();
        this.camera.updateProjectionMatrix(); //保证拿到最新正确的结果
        // 根据投影矩阵 matrix 来设置当前视椎体的六个面 参数为投影矩阵
        frustum.setFromProjectionMatrix(
          new THREE.Matrix4().multiplyMatrices(
            this.camera.projectionMatrix, //投影变化矩阵
            this.camera.matrixWorldInverse //相机的世界变换矩阵的逆矩阵
          )
        );
        const result = frustum.intersectsBox(this.mesh.geometry.boundingBox);
        console.log(result);
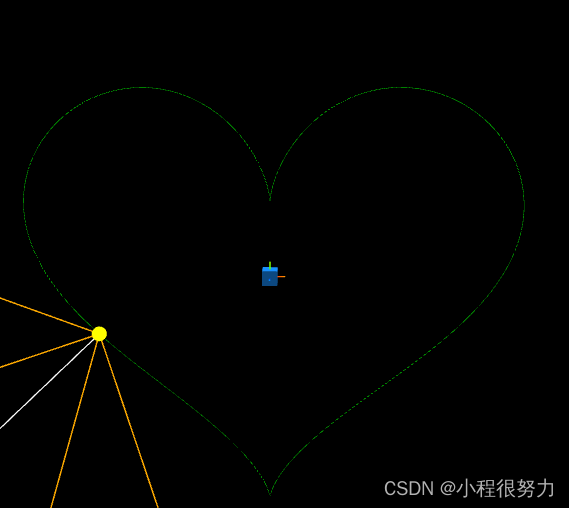
相机漫游(模拟飞行器)
本质是让相机沿着曲线移动
curver
创建曲线
import { HeartCurve } from 'three/examples/jsm/curves/CurveExtras';

		curveGenerator() {
        const curve = new HeartCurve(1);
        // 管道缓冲几何体
        const tubeGeometry = new THREE.TubeGeometry(curve, 200, 0.01, 8, true);
        const material = new THREE.MeshBasicMaterial({
          color: 0x00ff00,
        });
        const tubeMesh = new THREE.Mesh(tubeGeometry, material);
        // 把曲线分割为1000段
        this.points = curve.getPoints(1500);
        // 心旋转90度
        tubeMesh.rotation.x = -Math.PI / 2;
        this.scene.add(tubeMesh);
        this.curve = curve;
		// 设置一个虚拟相机的小球 方便看效果
        const sphereGeometry = new THREE.SphereGeometry(0.5, 32, 64);
        const sphereMaterial = new THREE.MeshBasicMaterial({
          color: 0xffff00,
        });
        const sphereMesh = new THREE.Mesh(sphereGeometry, sphereMaterial);
        sphereMesh.position.copy(this.pCamera.position);
        this.scene.add(sphereMesh);
        this.sphereMesh = sphereMesh;
      },
移动相机
将路径分为多个点,让相机沿着每个点运动
moveCamera() {
        const index = this.count % this.points.length;
        const point = this.points[index];
        const nextPoint =
          this.points[index + 1 >= this.points.length ? 0 : index + 1];
        //  this.pCamera.position.set(point.x, point.y, point.z);
        this.pCamera.position.set(point.x, 0, -point.y);
        // this.pCamera.lookAt(nextPoint.x, 0, -nextPoint.y); //让人眼视角沿着路径移动
        //  this.sphereMesh.position.set(point.x, point.y, point.z);
        this.sphereMesh.position.set(point.x, 0, -point.y);
        this.count++;
      },
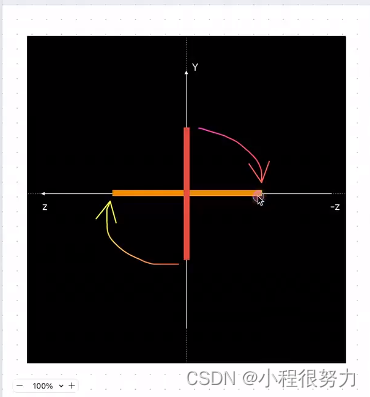
在tick方法中调用moveCamera相机移动方法,可以看到不断运动的效果,但是相机目前是在垂直方向运行,如果想修改为水平方向上运行,先将桃心旋转90度tubeMesh.rotation.x = -Math.PI / 2;,以红色为轴旋转桃心。
然后修改相机和小球的移动,可见一直在y轴的平面上运动 y固定为0,z轴原本为0,改为沿着y轴运动
控制器
轨道控制器
import { OrbitControls } from 'three/examples/jsm/controls/OrbitControls';

const orbitControls = new OrbitControls(camera, canvas);

orbitControls.enableDamping = true; // 启用惯性效果
orbitControls.dampingFactor = 0.1; // 阻尼系数
orbitControls.enablePan = true; // 启用或禁用相机平移(Mac按住cmd生效)
orbitControls.panSpeed = 1; // 位移的速度
orbitControls.autoRotate = true; // 自动围绕目标旋转
orbitControls.autoRotateSpeed = 2; // 控制旋转速度
orbitControls.enabled = true; // 是否启用
orbitControls.enableRotate = true; // 启用相机水平或垂直旋转
orbitControls.enableZoom = true; // 启用相机缩放
orbitControls.minZoom = 0; // 限制缩放
orbitControls.maxZoom = 10; // 限制缩放
orbitControls.zoomSpeed = 2; // 缩放速度
orbitControls.minDistance = 0; // 将相机向内移动多少(仅适用于PerspectiveCamera)
orbitControls.maxDistance = 0; // 将相机向外移动多少(仅适用于PerspectiveCamera)
orbitControls.target.y = 2; // 改变初始视角的位置
// ...
拖拽控制器
import { DragControls } from 'three/examples/jsm/controls/DragControls';

const dragControls = new DragControls([objects], camera, canvas);
拖拽控制器与轨道控制器的放大缩小功能冲突解决
dragControls.addEventListener('dragstart', function(e) {
  orbitControls.enabled = false;
});
dragControls.addEventListener('dragend', e => {
  orbitControls.enabled = true;
});
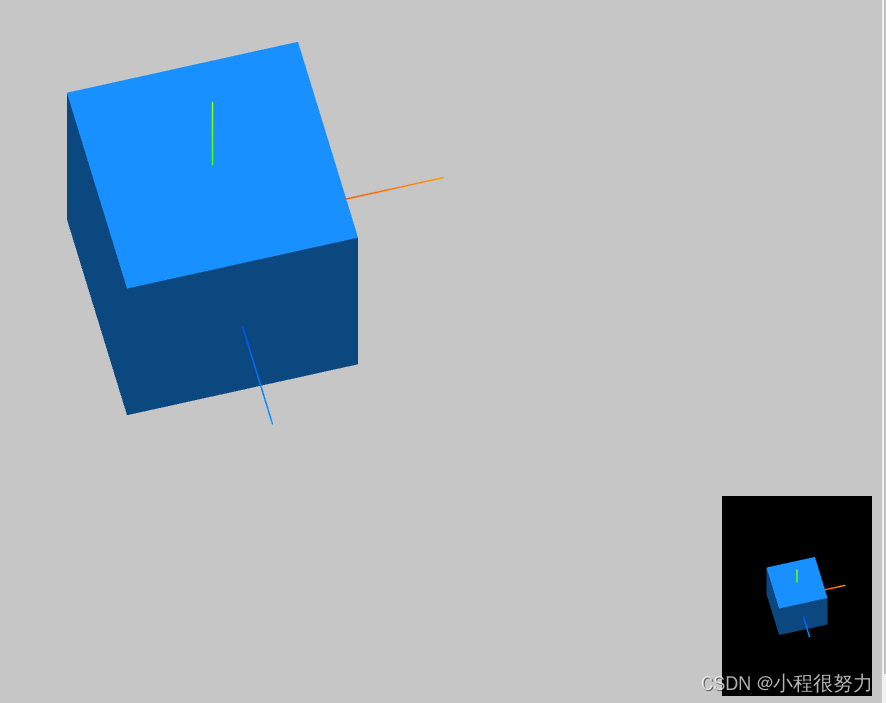
多相机控制
- 创建缩略图相机
      createCamera() {
        // 设置尺寸同步变量
        const frustumSize = 2;
        const aspect = this.width / this.height;
        const pCamera = new THREE.OrthographicCamera(
          -aspect * frustumSize,
          aspect * frustumSize,
          frustumSize,
          -frustumSize,
          0.1,
          1000
        );
        pCamera.position.set(1, 1, 2);
        pCamera.lookAt(this.scene.position);
        this.scene.add(pCamera);
        this.pCamera = pCamera;
        this.camera = pCamera;

        // 创建缩略图相机
        const thumbnailCamera = new THREE.OrthographicCamera(
          (-150 / 200) * frustumSize,
          (150 / 200) * frustumSize,
          frustumSize,
          -frustumSize,
          0.1,
          1000
        );

        thumbnailCamera.position.set(1, 1, 2);
        thumbnailCamera.lookAt(this.scene.position);
        this.thumbnailCamera = thumbnailCamera;
        this.scene.add(thumbnailCamera);
      },
      // 全局裁剪
      clipScene(renderer) {
        const dpr = window.devicePixelRatio || 1;
        // 裁剪
        renderer.setScissor(0, 0, this.width, this.height);
        renderer.setClearColor(0x999999, 0.5);
        renderer.setPixelRatio(dpr);

        // 设置渲染器大小
        renderer.setSize(this.width, this.height);
        // 执行渲染
        renderer.render(this.scene, this.camera);
      },
      // 缩略图裁剪
      clipThumbnail(renderer) {
        const w = this.width - 150 - 10;

        renderer.setScissor(w, 10, 150, 200);
        renderer.setViewport(w, 10, 150, 200);
        renderer.setClearColor(0x000000);
        // 执行渲染
        renderer.render(this.scene, this.thumbnailCamera);

        this.thumbnailCamera.position.copy(this.camera.position);
        this.thumbnailCamera.quaternion.copy(this.camera.quaternion);
        this.thumbnailCamera.zoom = this.camera.zoom;
        this.thumbnailCamera.updateProjectionMatrix();
      },
      render() {
        if (!this.renderer) {
          this.renderer = new THREE.WebGLRenderer({
            canvas: this.canvas,
            antialias: true, //抗锯齿
          });
        }
        // 解决裁剪区域遮住原来区域问题 需要开启裁剪
        this.renderer.setScissorTest(true);

        // 全局裁剪
        this.clipScene(this.renderer);
        // 缩略图
        this.clipThumbnail(this.renderer);
      },


 518
518


 被折叠的 条评论
为什么被折叠?
被折叠的 条评论
为什么被折叠?
 到【灌水乐园】发言


