


React简介
React 是⼀个声明式,⾼效且灵活的⽤于构建⽤户界⾯的 JavaScript 库。使⽤ React 可以将⼀些简短、独⽴的代码⽚段组合成复杂的 UI 界⾯,这些代码⽚段被称作“组件”。
- Vue是不是MVVM?React呢?
- 严格来讲都不是
- React:ui = render (data) 单向数据流
- Vue: ref 直接操作DOM,跳过了ViewModel
JSX模板语法
JSX称为JS的语法扩展,将UI与逻辑层耦合在组件⾥,⽤{}标识
因为 JSX 语法上更接近 JS ⽽不是 HTML,所以使⽤ camelCase(⼩驼峰命名)来定义属性的名称;
JSX ⾥的 class 变成了 className,⽽ tabindex 则变为 tabIndex。
JSX⽀持表达式
// 变量
const name = 'Josh Perez';
const element = <h1>Hello, {name}</h1>;
function formatName(user) {
  return user.firstName + ' ' + user.lastName;
}
// ⽅法
const user = {
  firstName: 'Harper',
  lastName: 'Perez'
};
const element = (
  <h1>
   Hello, {formatName(user)}!
  </h1>
);
function getGreeting(user) {
  if (user) {
    return <h1>Hello, {formatName(user)}!</h1>;
 }
  return <h1>Hello, Stranger.</h1>;
}
JSX指定属性
const element = <img src={user.avatarUrl}></img>;
注意:JSX⽀持防注⼊(防⽌XSS攻击)
const title = response.potentiallyMaliciousInput; // 此时只是字符串
// 直接使⽤是安全的: const element = <h1>{title}</h1>;
React 如何预防XSS
// 反射型 XSS
https://xxx.com/search?query=userInput
// 服务器在对此 URL 的响应中回显提供的搜索词:query=123
<p>您搜索的是: 123</p>
// https://xxx.com/search?query=<img src="empty.png" onerror
="alert('xss')">
<p>您搜索的是: <img src="empty.png" onerror ="alert('xss')"></p>
// 如果有⽤户请求攻击者的 URL ,则攻击者提供的脚本将在⽤户的浏览器中执⾏。
// 存储型 XSS,存储到⽬标数据库
// 评论输⼊,所有访问⽤户都能看到了
<textarea>
<img src="empty.png" onerror ="alert('xss')">
</textarea>
// 部分源码
for (index = match.index; index < str.length; index++) {
switch (str.charCodeAt(index)) {
case 34: // "
escape = '"';
break;
case 38: // &
escape = '&';
break;
case 39: // '
escape = ''';
break;
case 60: // <
escape = '<';
break;
case 62: // >
escape = '>';
break;
default:
continue;
}
}
// ⼀段恶意代码
<img src="empty.png" onerror ="alert('xss')">
// React 在渲染到浏览器前进⾏的转义,可以看到对浏览器有特殊含义的字符都被转义了,恶意
代码在渲染到 HTML 前都被转成了字符串
<img src="empty.png" onerror
="alert('xss')">
// JSX
const element = (
<h1 className="greeting">
Hello, world!
</h1>
);
// 通过 babel 编译后的代码
const element = React.createElement(
'h1',
{className: 'greeting'},
'Hello, world!'
);
// React.createElement() ⽅法返回的 ReactElement
const element = {
$$typeof: Symbol('react.element'),
type: 'h1',
key: null,
props: {
children: 'Hello, world!',
className: 'greeting'
}
...
}
// 如何模拟⼀个Children会如何?
const storedData = `{
"ref":null,
"type":"body",
"props":{
"dangerouslySetInnerHTML":{
"__html":"<img src=\"empty.png\" onerror =\"alert('xss')\"/>"
}
}
}`;
// 转成 JSON
const parsedData = JSON.parse(storedData);
// 将数据渲染到⻚⾯
render () {
return <span> {parsedData} </span>;
}
// $$typeof 是⽤来标记⼀个ReactElement的,JSON化后Symbol会丢失,React会报错
JSX表示对象
const element = (
  <h1 className="greeting">
   Hello, world!
  </h1>
);
// 等同于React.createElement
const element = React.createElement(
  'h1',
 {className: 'greeting'},
  'Hello, world!'
);
const element = {
  type: 'h1',
  props: {
    className: 'greeting',
    children: 'Hello, world!'
 }
};
将JSX渲染为DOM
// 使⽤ReactDOM.render
const element = <h1>Hello, world</h1>;
ReactDOM.render(element, document.getElementById('root'));
// render只能代表当前时刻的状态
// 更新元素 只能再次 ReactDOM.render
function tick() {
  const element = (
    <div>
      <h1>Hello, world!</h1>
      <h2>It is {new Date().toLocaleTimeString()}.</h2>
    </div>
 );
  ReactDOM.render(element, document.getElementById('root'));
}
setInterval(tick, 1000); // 不建议多次render
JSX转JS
JSX可以当做语法糖,可以在babel官⽹中尝试,https://babeljs.io/repl
可以使⽤官⽹提供的create-react-app npm run eject 来看babelrc中的配置,主要使⽤https://www.babeljs.cn/docs/babel-preset-react
// 安装babel 及react 的依赖
npm install core-js @babel/core @babel/preset-env @babel/preset-react
@babel/register babel-loader @babel/plugin-transform-runtime --save-dev
.babelrc
{
    "presets" : [
        "@babel/preset-env" ,
        "@babel/preset-es2015",
        "@babel/preset-react"
   ],
    "plugins" : [
        "@babel/plugin-transform-runtime"
   ]
}
props和state
组件,从概念上类似于 JavaScript 函数。它接受任意的⼊参(即 “
props”),并返回⽤于描述⻚⾯展示内容的 React 元素。
组件
- 函数式组件
- 类式组件
function Welcome(props) {
  return <h1>Hello, {props.name}</h1>;
}
class Welcome extends React.Component {
  render() {
    return <h1>Hello, {this.props.name}</h1>;
 }
}
渲染组件
function Welcome(props) {
  return <h1>Hello, {props.name}</h1>;
}
const element = <Welcome name="Sara" />;
ReactDOM.render(
  element,
  document.getElementById('root')
);
// ⾃定义组件使⽤⼤写字⺟开头
import React from 'react';
// 正确!组件需要以⼤写字⺟开头:
function Hello(props) {
  // 正确! 这种 <div> 的使⽤是合法的,因为 div 是⼀个有效的 HTML 标签:
  return <div>Hello {props.toWhat}</div>;
}
function HelloWorld() {
  // 正确!React 知道 <Hello /> 是⼀个组件,因为它是⼤写字⺟开头的:
  return <Hello toWhat="World" />;
}
组件的组合与拆分
// ⻚⾯内多次引⽤
<div>
  <Welcome name="Sara" />
  <Welcome name="Cahal" />
  <Welcome name="Edite" />
</div>
function Comment(props) {
  return (
    <div className="Comment">
      <div className="UserInfo">
        <img className="Avatar"
          src={props.author.avatarUrl}
          alt={props.author.name}
        />
        <div className="UserInfo-name">
         {props.author.name}
        </div>
      </div>
      <div className="Comment-text">
       {props.text}
      </div>
      <div className="Comment-date">
       {formatDate(props.date)}
      </div>
    </div>
 );
}
// 拆分后为
function Comment(props) {
  return (
    <div className="Comment">
      <UserInfo user={props.author} />
      <div className="Comment-text">
       {props.text}
      </div>
      <div className="Comment-date">
       {formatDate(props.date)}
      </div>
    </div>
 );
}
props
所有 React 组件都必须像纯函数⼀样保护它们的 props 不被更改。
// 错误,要像纯函数⼀样幂等
function withdraw(account, amount) {
account.total -= amount;
}
// 使⽤props形式
function Clock(props) {
  return (
    <div>
      <h1>Hello, world!</h1>
      <h2>It is {props.date.toLocaleTimeString()}.</h2>
    </div>
 );
}
function tick() {
  ReactDOM.render(
    <Clock date={new Date()} />,
    document.getElementById('root')
 );
}
setInterval(tick, 1000);
// 如何避免多次React.DOM render?
// 引⽤⽣命周期,根组件保留⼀个
class Clock extends React.Component {
  constructor(props) {
    super(props);
    this.state = {date: new Date()};
 }
  componentDidMount() {
    this.timerID = setInterval(
     () => this.tick(),
      1000
   );
 }
  componentWillUnmount() {
    clearInterval(this.timerID);
 }
  tick() {
    this.setState({
      date: new Date()
   });
 }
   render() {
    return (
      <div>
        <h1>Hello, world!</h1>
        <h2>It is {this.state.date.toLocaleTimeString()}.</h2>
      </div>
   );
 }
}
ReactDOM.render(
  <Clock />,
  document.getElementById('root')
);
1. setState
构造函数是唯⼀可以给state赋值的地⽅
this.setState({comment: 'Hello'});
2. state更新可能是异步的
// Wrong
this.setState({
  counter: this.state.counter + this.props.increment,
});
// Correct
this.setState(function(state, props) {
  return {
    counter: state.counter + props.increment
 };
});
3. state更新会合并
constructor(props) {
  super(props);
  this.state = {
    posts: [],
    comments: []
 };
}
componentDidMount() {
  fetchPosts().then(response => {
    // 相当于{post: response.posts, ...otherState}
    this.setState({
      posts: response.posts
   });
 });
  fetchComments().then(response => {
    this.setState({
      comments: response.comments
   });
 });
}
4. 单向数据流
state 只在当前的组件⾥⽣效,属于组件内的属性,重复实例化相同的组件,内部的内存地址也是
不⼀样的;
例如Clock中计时器都是独⽴的
// setState 异步
// 异步⽬的:batch 处理,性能优化
1. 合成事件
class App extends Component {

 state = { val: 0 }

 increment = () => {
 this.setState({ val: this.state.val + 1 })
 console.log(this.state.val) // 输出的是更新前的val --> 0
 }

 render() {
 return (
 <div onClick={this.increment}>
 {`Counter is: ${this.state.val}`}
 </div>
 )
 }
}
2. ⽣命周期
class App extends Component {

 state = { val: 0 }

 componentDidMount() {
 this.setState({ val: this.state.val + 1 })
 console.log(this.state.val) // 输出的还是更新前的值 --> 0
 }
 render() {
 return (
 <div>
 {`Counter is: ${this.state.val}`}
 </div>
 )
 }
}
3. 原⽣事件
class App extends Component {

 state = { val: 0 }

 changeValue = () => {
  this.setState({ val: this.state.val + 1 })
 console.log(this.state.val) // 输出的是更新后的值 --> 1
 }

 componentDidMount() {
 document.body.addEventListener('click', this.changeValue, false)
 }

 render() {
 return (
 <div>
 {`Counter is: ${this.state.val}`}
 </div>
 )
 }
}
4. setTimeout
class App extends Component {

 state = { val: 0 }

 componentDidMount() {
 setTimeout(_ => {
 this.setState({ val: this.state.val + 1 })
 console.log(this.state.val) // 输出更新后的值 --> 1
 }, 0)
 }

 render() {
 return (
 <div>
 {`Counter is: ${this.state.val}`}
 </div>
 )
 }
}
5. 批处理
class App extends Component {

 state = { val: 0 }

 batchUpdates = () => {
 this.setState({ val: this.state.val + 1 })
 this.setState({ val: this.state.val + 1 })
 this.setState({ val: this.state.val + 1 })
 }
render() {
 return (
 <div onClick={this.batchUpdates}>
 {`Counter is ${this.state.val}`} // 1
 </div>
 )
 }
}
- setState 只在合成事件和⽣命周期中是“异步”的,在原⽣事件和 setTimeout 中都是同步的;
- setState的“异步”并不是说内部由异步代码实现,其实本身执⾏的过程和代码都是同步的, 只是合成
事件和钩⼦函数的调⽤顺序在更新之前,导致在合成事件和钩⼦函数中没法⽴⻢拿到更新后的值,形式
了所谓的“异步”, 当然可以通过第⼆个参数 setState(partialState, callback) 中的callback拿到更新后
的结果。 - setState 的批量更新优化也是建⽴在“异步”(合成事件、钩⼦函数)之上的,在原⽣事件和
setTimeout 中不会批量更新,在“异步”中如果对同⼀个值进⾏多次 setState , setState 的批量更新策
略会对其进⾏覆盖,取最后⼀次的执⾏,如果是同时 setState 多个不同的值,在更新时会对其进⾏合并
批量更新。
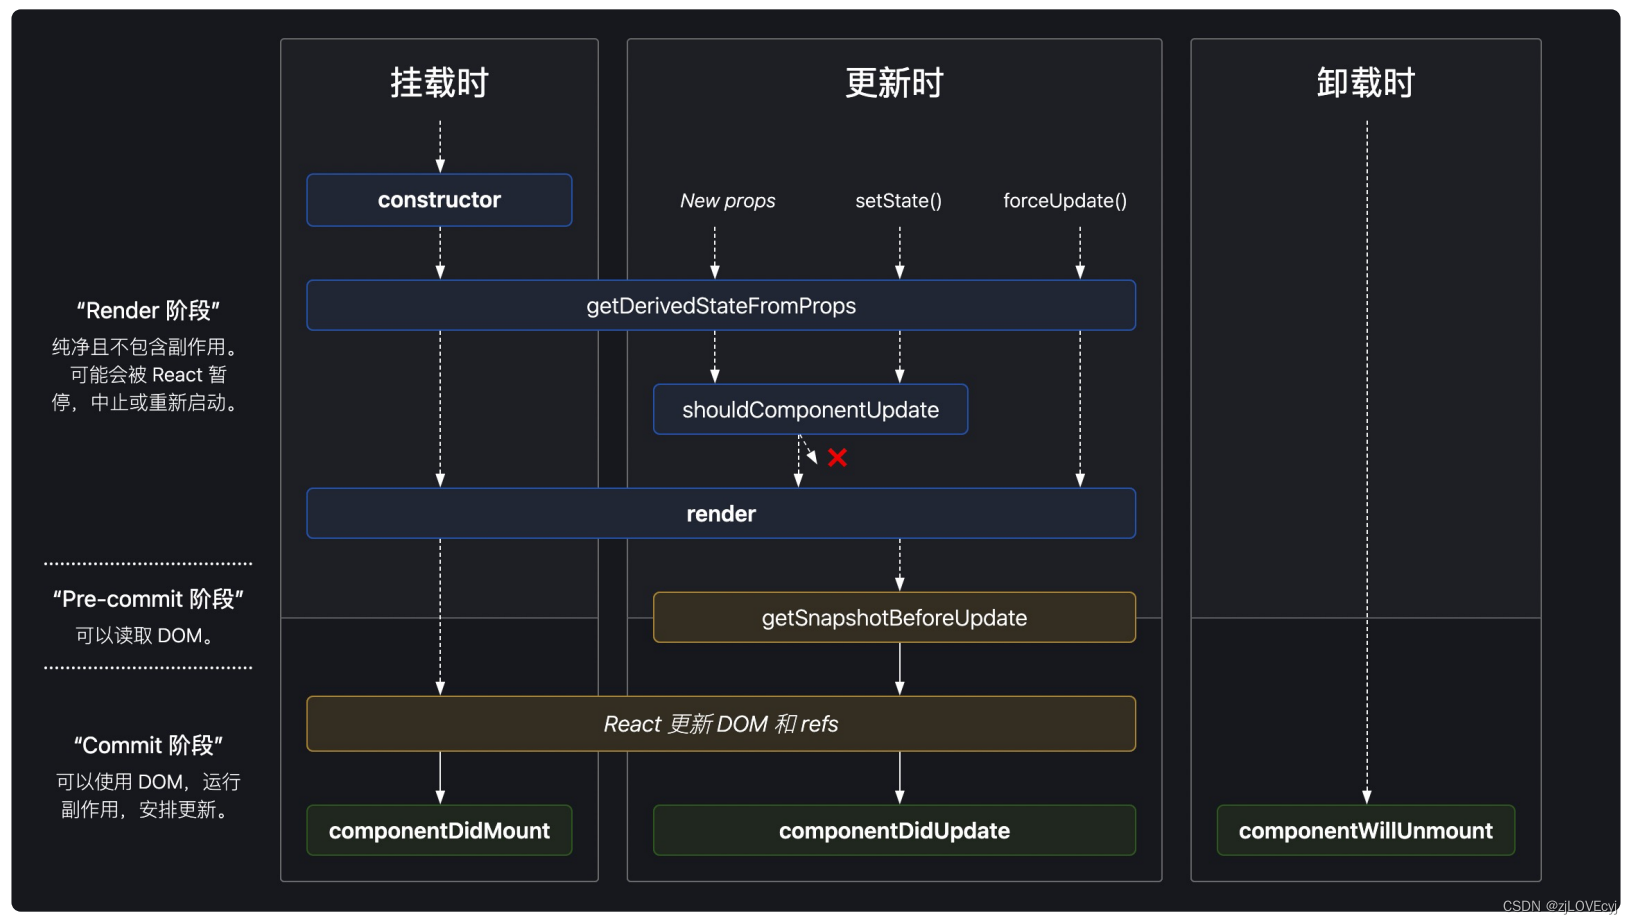
生命周期
事件处理
语法格式
- 在JSX元素上添加事件,通过on*EventType这种内联⽅式添加,命名采⽤⼩驼峰式(camelCase)的形
式,⽽不是纯⼩写(原⽣HTML中对DOM元素绑定事件,事件类型是⼩写的); - 无需调用addEventListener进⾏事件监听,也⽆需考虑兼容性,React已经封装好了⼀些的事件类
型属性; - 使⽤ JSX 语法时你需要传⼊⼀个函数作为事件处理函数,⽽不是⼀个字符串;
- 不能通过返回 false 的⽅式阻⽌默认⾏为。你必须显式的使⽤ preventDefault;
// DOM
<button onclick="activateLasers()">
 Activate Lasers
</button>
// React
<button onClick={activateLasers}>
 Activate Lasers
</button>
// JS
<form onsubmit="console.log('You clicked submit.'); return false">
  <button type="submit">Submit</button>
</form>
// React
⼀般不需要使⽤ addEventListener 为已创建的 DOM 元素添加监听器;
function Form() {
  function handleSubmit(e) {
    e.preventDefault();
    console.log('You clicked submit.');
 }
  return (
    <form onSubmit={handleSubmit}>
      <button type="submit">Submit</button>
    </form>
 );
}
class Toggle extends React.Component {
  constructor(props) {
    super(props);
    this.state = {isToggleOn: true};
    // 为了在回调中使⽤ `this`,这个绑定是必不可少的
    this.handleClick = this.handleClick.bind(this);
 }
  handleClick() {
    this.setState(prevState => ({
      isToggleOn: !prevState.isToggleOn
   }));
 }
  render() {
    return (
      // class 的⽅法默认不会绑定 this。如果没有绑定 this.handleClick 并把它传⼊
了 onClick,
      // this 的值为 undefined。
      <button onClick={this.handleClick}>
       {this.state.isToggleOn ? 'ON' : 'OFF'}
      </button>
   );
 }
}
ReactDOM.render(
  <Toggle />,
  document.getElementById('root')
);
// 为什么要绑定this
function createElement(dom, params) {
  var domObj = document.createElement(dom);
  domObj.onclick = params.onclick;
  domObj.innerHTML = params.conent;
  return domObj
}
// createElement 的onClick函数是绑定到domObj上的,如果this不显式绑定,不会绑定到
Toggle上
// 不显式使⽤bind
1.  public class fields 语法
class LoggingButton extends React.Component {
 // 此语法确保 `handleClick` 内的 `this` 已被绑定。
  // 注意: 这是 *实验性* 语法。
  handleClick = () => {
    console.log('this is:', this);
 }
  render() {
    return (
      <button onClick={this.handleClick}>
       Click me
      </button>
   );
 }
}
2. 箭头函数,问题: 每次render都会创建不同的回调函数,如果该回调函数作为props传⼊⼦组
件,每次⼦组件都要re-render
class LoggingButton extends React.Component {
  handleClick() {
    console.log('this is:', this);
 }
  render() {
    // 此语法确保 `handleClick` 内的 `this` 已被绑定。
    return (
      <button onClick={() => this.handleClick()}>
 //  <button onClick={this.handleClick().bind(this)}>
       Click me
      </button>
   );
 }
}
3. createReactClass代替
接收参数
- 事件对象 e 会被作为第⼆个参数传递;
- 通过箭头函数的⽅式,事件对象必须显式的进⾏传递;
- 通过 Function.prototype.bind 的⽅式,事件对象以及更多的参数将会被隐式的进⾏传递;
<button onClick={(e) => this.deleteRow(id, e)}>Delete Row</button>
<button onClick={this.deleteRow.bind(this, id)}>Delete Row</button>
条件渲染
if-else
class LoginControl extends React.Component {
  constructor(props) {
    super(props);
    this.handleLoginClick = this.handleLoginClick.bind(this);
    this.handleLogoutClick = this.handleLogoutClick.bind(this);
    this.state = {isLoggedIn: false};
 }
  handleLoginClick() {
    this.setState({isLoggedIn: true});
 }
  handleLogoutClick() {
    this.setState({isLoggedIn: false});
 }
  render() {
    const isLoggedIn = this.state.isLoggedIn;
    let button;
    if (isLoggedIn) {
      button = <LogoutButton onClick={this.handleLogoutClick} />;
   } else {
      button = <LoginButton onClick={this.handleLoginClick} />;
   }
    return (
      <div>
        <Greeting isLoggedIn={isLoggedIn} />
       {button}
      </div>
   );
 }
}
ReactDOM.render(
  <LoginControl />,
  document.getElementById('root')
);
与运算符&&
function Mailbox(props) {
  const unreadMessages = props.unreadMessages;
  return (
    <div>
      <h1>Hello!</h1>
     {unreadMessages.length > 0 &&
        <h2>
         You have {unreadMessages.length} unread messages.
        </h2>
     }
    </div>
 );
}
const messages = ['React', 'Re: React', 'Re:Re: React'];
ReactDOM.render(
  <Mailbox unreadMessages={messages} />,
  document.getElementById('root')
);
// 返回false的表达式,会跳过元素,但会返回该表达式
render() {
  const count = 0;
  return (
    <div>
     { count && <h1>Messages: {count}</h1>}
    </div>
 );
}
三元运算符
render() {
  const isLoggedIn = this.state.isLoggedIn;
  return (
    <div>
     {isLoggedIn
        ? <LogoutButton onClick={this.handleLogoutClick} />
       : <LoginButton onClick={this.handleLoginClick} />
     }
    </div>
 );
}
如何阻止组件渲染
function WarningBanner(props) {
  if (!props.warn) {
    return null;
 }
  return (
    <div className="warning">
     Warning!
    </div>
 );
}
class Page extends React.Component {
  constructor(props) {
    super(props);
    this.state = {showWarning: true};
    this.handleToggleClick = this.handleToggleClick.bind(this);
 }
  handleToggleClick() {
    this.setState(state => ({
      showWarning: !state.showWarning
   }));
 }
  render() {
    return (
      <div>
        <WarningBanner warn={this.state.showWarning} />
        <button onClick={this.handleToggleClick}>
         {this.state.showWarning ? 'Hide' : 'Show'}
        </button>
      </div>
   );
 }
}
ReactDOM.render(
  <Page />,
  document.getElementById('root')
);
列表
function NumberList(props) {
  const numbers = props.numbers;
  const listItems = numbers.map((number) =>
    <li key={number.toString()}>
     {number}
    </li>
 );

  return (
    <ul>{listItems}</ul>
 );
}
const numbers = [1, 2, 3, 4, 5];
ReactDOM.render(
  <NumberList numbers={numbers} />,
  document.getElementById('root')
);
// 若没有key,会warning a key should be provided for list items
// key可以帮助react diff,最好不⽤index作为key,会导致性能变差;
// 如果不指定显式的 key 值,默认使⽤索引⽤作为列表项⽬的 key 值;
key的注意点
key要保留在map的遍历元素上
// demo1
function ListItem(props) {
  // 正确!这⾥不需要指定 key:
  return <li>{props.value}</li>;
}
function NumberList(props) {
  const numbers = props.numbers;
  const listItems = numbers.map((number) =>
    // 正确!key 应该在数组的上下⽂中被指定
    <ListItem key={number.toString()} value={number} />
 );
  return (
    <ul>
     {listItems}
    </ul>
 );
}
const numbers = [1, 2, 3, 4, 5];
ReactDOM.render(
  <NumberList numbers={numbers} />,
  document.getElementById('root')
);
// demo2
function Blog(props) {
  const sidebar = (
    <ul>
     {props.posts.map((post) =>
        <li key={post.id}>
         {post.title}
        </li>
     )}
    </ul>
 );
  const content = props.posts.map((post) =>
    <div key={post.id}>
      <h3>{post.title}</h3>
      <p>{post.content}</p>
    </div>
 );
  return (
      <div>
     {sidebar}
      <hr />
     {content}
    </div>
 );
}
const posts = [
 {id: 1, title: 'Hello World', content: 'Welcome to learning React!'},
 {id: 2, title: 'Installation', content: 'You can install React from
npm.'}
];
ReactDOM.render(
  <Blog posts={posts} />,
  document.getElementById('root')
);
// demo3
function NumberList(props) {
  const numbers = props.numbers;
  return (
    <ul>
     {numbers.map((number) =>
        <ListItem key={number.toString()}
                  value={number} />
     )}
    </ul>
 );
}
create-react-app
官⽅地址:https://create-react-app.dev/
github:https://github.com/facebook/create-react-app
create-react-app是⼀个官⽅⽀持的创建React单⻚应⽤程序的脚⼿架。它提供了⼀个零配置的
现代化配置设置。
immutable 及immer
immutable
官⽅地址:https://immutable-js.com/
解决的问题:
JavaScript 中的对象⼀般是可变的(Mutable),因为使⽤了引⽤赋值,新的对象简单的引⽤了原始对象,改变新的对象将影响到原始对象。如 foo={a: 1}; bar=foo; bar.a=2 你会发现此时 foo.a也被改成了 2。虽然这样做可以节约内存,但当应⽤复杂后,这就造成了⾮常⼤的隐患,Mutable 带来的优点变得得不偿失。为了解决这个问题,⼀般的做法是使⽤ shallowCopy(浅拷⻉)或 deepCopy(深拷⻉)来避免被修改,但这样做造成了 CPU 和内存的浪费。
什么是immutable data
- Immutable Data 就是⼀旦创建,就不能再被更改的数据;
- 对 Immutable 对象的任何修改或添加删除操作都会返回⼀个新的 Immutable 对象;
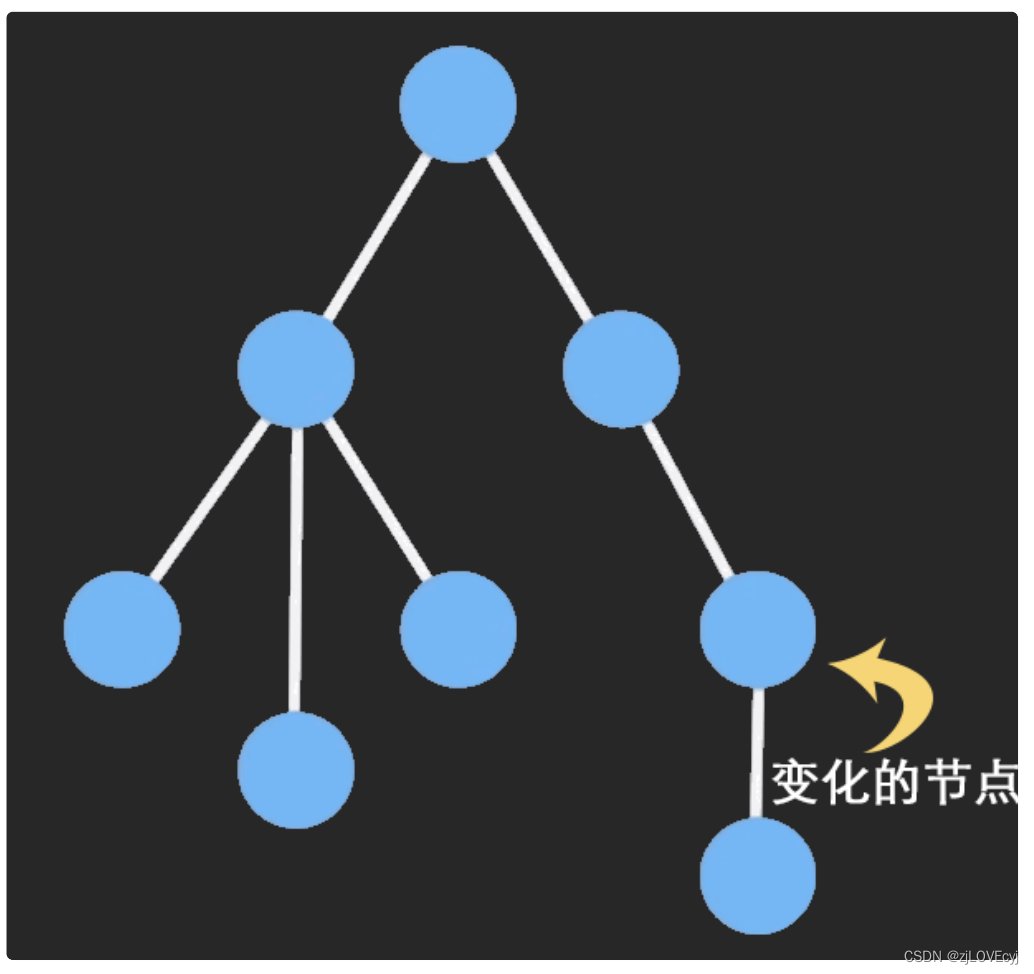
- Immutable 实现的原理是 Persistent Data Structure(持久化数据结构):也就是使⽤旧数据创建新数据时,要保证旧数据同时可⽤且不变。同时为了避免 deepCopy 把所有节点都复制⼀遍带来的性能损耗,Immutable 使⽤了 Structural Sharing(结构共享),即如果对象树中⼀个节点发⽣变化,只修改这个节点和受它影响的⽗节点,其它节点则进⾏共享。
immutable.js
Facebook ⼯程师 Lee Byron 花费 3 年时间打造,与 React 同期出现,但没有被默认放到 React ⼯具集⾥(React 提供了简化的 Helper)。它内部实现了⼀套完整的 Persistent Data Structure,还有很多易⽤的数据类型。像 Collection、List、Map、Set、Record、Seq。有⾮常全⾯的map、filter、groupBy、reduce``find函数式操作⽅法。同时 API 也尽量与 Object 或 Array 类似。
// 原来的写法
let foo = {a: {b: 1}};
let bar = foo;
bar.a.b = 2;
console.log(foo.a.b);  // 打印 2
console.log(foo === bar);  // 打印 true
// 使⽤ immutable.js 后
import Immutable from 'immutable';
foo = Immutable.fromJS({a: {b: 1}});
bar = foo.setIn(['a', 'b'], 2);   // 使⽤ setIn 赋值
console.log(foo.getIn(['a', 'b']));  // 使⽤ getIn 取值,打印 1
console.log(foo === bar);  // 打印 false
immmutable.js 优点
- 降低了mutable带来的复杂性
function touchAndLog(touchFn) {
  let data = { key: 'value' };
  touchFn(data);
  console.log(data.key);
  // 因为不知道touchFn进⾏了什么操作,所以⽆法预料,但使⽤immutable,肯定是value
}
- 节省内存
会尽量复⽤内存,甚⾄以前使⽤的对象也可以再次被复⽤。没有被引⽤的对象会被垃圾回收
import { Map} from 'immutable';
let a = Map({
  select: 'users',
  filter: Map({ name: 'Cam' })
})
let b = a.set('select', 'people');
a === b; // false
a.get('filter') === b.get('filter');
- Undo/Redo,Copy/Paste
因为每次数据都是不⼀样的,所有可以存储在数组⾥,想回退到哪⾥就拿出对应数据即可
immutable.js缺点
- 需要学习新的API
- 容易与原⽣对象混淆
虽然 Immutable.js 尽量尝试把 API 设计的原⽣对象类似,有的时候还是很难区别到底是 Immutable 对象还是原⽣对象,容易混淆操作。
Immutable 中的 Map 和 List 虽对应原⽣ Object 和 Array,但操作⾮常不同,⽐如你要⽤
map.get(‘key’) ⽽不是 map.key,array.get(0) ⽽不是 array[0]。另外 Immutable 每次修改都会返回新对象,也很容易忘记赋值; - 当使⽤外部库的时候,⼀般需要使⽤原⽣对象,也很容易忘记转换。
- 下⾯给出⼀些办法来避免类似问题发⽣:
- 使⽤TypeScript 这类有静态类型检查的⼯具;
- 约定变量命名规则:如所有 Immutable 类型对象以 $$ 开头;
- 使⽤ Immutable.fromJS ⽽不是 Immutable.Map 或 Immutable.List 来创建对象,这样可以避免Immutable 和原⽣对象间的混⽤;
immutable.is & cursor
- immutable.is
由于 Immutable 数据⼀般嵌套⾮常深,为了便于访问深层数据,Cursor 提供了可以直接访问这个深层数据的引⽤。
import Immutable from 'immutable';
import Cursor from 'immutable/contrib/cursor';
let data = Immutable.fromJS({ a: { b: { c: 1 } } });
// 让 cursor 指向 { c: 1 }
let cursor = Cursor.from(data, ['a', 'b'], newData => {
  // 当 cursor 或其⼦ cursor 执⾏ update 时调⽤
  console.log(newData);
});
cursor.get('c'); // 1
cursor = cursor.update('c', x => x + 1);
cursor.get('c'); // 2
使⽤immutable.js优化react
- React可以使⽤ shouldComponentUpdate()进⾏性能优化,但它默认返回 true,即始终会执⾏render() ⽅法,然后做 Virtual DOM ⽐较,并得出是否需要做真实 DOM 更新;
- 可以在shouldComponentUpdate 周期⾥执⾏deepCopy 和 deepCompare 避免⽆意义的render,但deepFn也很耗时
import { is } from 'immutable';
shouldComponentUpdate: (nextProps = {}, nextState = {}) => {
  const thisProps = this.props || {}, thisState = this.state || {};
  if (Object.keys(thisProps).length !== Object.keys(nextProps).length ||
      Object.keys(thisState).length !== Object.keys(nextState).length) {
    return true;
 }
  for (const key in nextProps) {
    if (!is(thisProps[key], nextProps[key])) {
      return true;
   }
 }
  for (const key in nextState) {
    if (thisState[key] !== nextState[key] && !is(thisState[key],
nextState[key])) {
      return true;
   }
 }
  return false;
}
immer
官⽅地址:https://immerjs.github.io/immer/zh-CN/
先来看⼀个问题
let currentState = {
  p: {
    x: [2],
 },
}
// 下列哪些currentState被修改了
// Q1
let o1 = currentState;
o1.p = 1;
o1.p.x = 1;
// Q2
fn(currentState);
function fn(o) {
  o.p1 = 1;
  return o;
};
// Q3
let o3 = {
  ...currentState
};
o3.p.x = 1;
// Q4
let o4 = currentState;
o4.p.x.push(1);
// 结果:都被修改了
如何解决引⽤类型对象被修改?
- 深度拷⻉,但是深拷⻉的成本较⾼,会影响性能;
- ImmutableJS,⾮常棒的⼀个不可变数据结构的库,可以解决上⾯的问题,但跟 Immer ⽐起来,ImmutableJS 有两个较⼤的不⾜:
a. 需要使⽤者学习它的数据结构操作⽅式,没有 Immer 提供的使⽤原⽣对象的操作⽅式简单、易⽤;
b. 它的操作结果需要通过toJS⽅法才能得到原⽣对象,这使得在操作⼀个对象的时候,时刻要注意操作的是原⽣对象还是 ImmutableJS 的返回结果,稍不注意,就会产⽣问题;
// 如何使⽤immer解决上述问题
// Q1 Q3
import produce from 'immer';
let o1 = produce(currentState, draft => {
  draft.p.x = 1;
})
// Q2
import produce from 'immer';
fn(currentState);
function fn(o) {
  return produce(o, draft => {
    draft.p1 = 1;
 })
};
// Q4
import produce from 'immer';
let o4 = produce(currentState, draft => {
  draft.p.x.push(1);
})
概念说明
- currentState:被操作对象的最初状态
- draftState:根据 currentState ⽣成的草稿状态,它是 currentState 的代理,对 draftState 所做的任何修改都将被记录并⽤于⽣成 nextState 。在此过程中,currentState 将不受影响
- nextState:根据 draftState ⽣成的最终状态
- produce:⽤来⽣成 nextState 或 producer 的函数
- producer:通过 produce ⽣成,⽤来⽣产 nextState ,每次执⾏相同的操作
- recipe:⽤来操作 draftState 的函数
produce的使用
// Q1
let nextState = produce(currentState, (draft) => {
})
currentState === nextState; // true
// Q2
let currentState = {
  a: [],
  p: {
    x: 1
 }
}
let nextState = produce(currentState, (draft) => {
  draft.a.push(2);
})
currentState.a === nextState.a; // false
currentState.p === nextState.p; // true
a. 对 draftState 的修改都会反应到 nextState;
b. Immer 使⽤的结构是共享的,nextState 在结构上⼜与 currentState 共享未修改的部分;
immer⽀持⾃动冻结:通过produce⽣产的nextState是被Object.freeze的
const currentState = {
  p: {
    x: [2],
 },
};
const nextState = produce(currentState, draftState => {
    draftState.p.x.push(3);
});
console.log(nextState.p.x); // [2, 3]
nextState.p.x = 4;
console.log(nextState.p.x); // [2, 3]
nextState.p.x.push(5); // 报错
- produce(recipe: (draftState) => void | draftState, ?PatchListener)(currentState): nextState
利⽤⾼阶函数的特点,提前⽣成⼀个 producer
let producer = produce((draft) => {
  draft.x = 2
});
let nextState = producer(currentState);
配套习题
setState异步顺序
下列执⾏结果分别是多少?
import React from "react";
class App extends React.Component {
  constructor(props) {
    super(props);
    this.state = { val: 0 };
 }
  // 1. 合成事件 setState
  // increment = () => {
  //   this.setState({ val: this.state.val + 1 });
  //   console.log(this.state.val);
  // };
  // render() {
  //   return (
  //     <div onClick={this.increment}>{`Counter is: ${this.state.val}`}
</div> // 合成事件
  //   );
  // }
  // 2. ⽣命周期
  // componentDidMount() {
  //   this.setState({ val: this.state.val + 1 });
  //   console.log(this.state.val); // 输出的还是更新前的值 --> 0
  // }
  // render() {
  //   return <div>{`Counter is: ${this.state.val}`}</div>;
  // }
  // 3. 原⽣事件
  // changeValue = () => {
  //   this.setState({ val: this.state.val + 1 });
  //   console.log(this.state.val); // 输出的是更新后的值 --> 1
  // };
  // componentDidMount() {
  //   document.body.addEventListener("click", this.changeValue, false);
  // }
  // render() {
  //   return <div>{`Counter is: ${this.state.val}`}</div>;
  // }
  // 4. setTimeout
  // componentDidMount() {
  //   setTimeout((_) => {
  //     this.setState({ val: this.state.val + 1 });
  //     console.log(this.state.val); // 输出更新后的值 --> 1
  //   }, 0);
  // }
  // render() {
  //   return <div>{`Counter is: ${this.state.val}`}</div>;
  // }
  // 5. batch 处理
  // batchUpdates = () => {
  //   this.setState({ val: this.state.val + 1 });
  //   this.setState({ val: this.state.val + 1 });
  //   this.setState({ val: this.state.val + 1 });
  //   console.log(this.state.val);
  // };
  // render() {
  //   return (
  //     <div onClick={this.batchUpdates}>{`Counter is
${this.state.val}`}</div>
  //   );
  // }
  // 6. 综合
  componentDidMount() {
    // ⽣命周期中调⽤
    this.setState({ val: this.state.val + 1 });
    console.log("lifecycle: " + this.state.val);
    setTimeout(() => {
      // setTimeout中调⽤
      this.setState({ val: this.state.val + 1 });
      console.log("setTimeout: " + this.state.val);
   }, 0);
    document.getElementById("div2").addEventListener("click",
this.increment2);
 }
  increment = () => {
    // 合成事件中调⽤
    this.setState({ val: this.state.val + 1 });
    console.log("react event: " + this.state.val);
 };
 increment2 = () => {
    // 原⽣事件中调⽤
    this.setState({ val: this.state.val + 1 });
    console.log("dom event: " + this.state.val);
 };
  render() {
    return (
      <div className="App">
        <h2>Count: {this.state.val}</h2>
        <div id="div1" onClick={this.increment}> // 点击第⼀次
         click me and val + 1
        </div>
答案:
lifecycle: 0 、setTimeout: 2 、react event: 2 、dom event: 4
- setState 只在合成事件和⽣命周期中是“异步”的,在原⽣事件和 setTimeout 中都是同步的;
- setState的“异步”并不是说内部由异步代码实现,其实本身执⾏的过程和代码都是同步的,只是合成事件和钩⼦函数的调⽤顺序在更新之前,导致在合成事件和钩⼦函数中没法⽴⻢拿到更新后的值,形成了所谓的“异步”,当然可以通过第⼆个参数setState(partialState, callback) 中的callback拿到更新后的结果。
- setState 的批量更新优化也是建⽴在“异步”(合成事件、钩⼦函数)之上的,在原⽣事件和setTimeout 中不会批量更新,在“异步”中如果对同⼀个值进⾏多次 setState , setState 的批量更新策略会对其进⾏覆盖,取最后⼀次的执⾏,如果是同时 setState 多个不同的值,在更新时会对其进⾏合并批量更新。
使⽤哪些⽣命周期可以完成性能优化?
shouldComponentUpdate:判断是否每次state变化都要更新;
如何不使⽤ES6实现⼀个React组件?
使⽤create-react-class
// 使⽤ create-react-class代替
class Greeting extends React.Component {
  render() {
    return <h1>Hello, {this.props.name}</h1>;
 }
}
var createReactClass = require('create-react-class');
var Greeting = createReactClass({
  render: function() {
    return <h1>Hello, {this.props.name}</h1>;
 }
});
1. 默认属性声明
class Greeting extends React.Component {
  // ...
}
Greeting.defaultProps = {
  name: 'Mary'
};
var Greeting = createReactClass({
  getDefaultProps: function() {
    return {
      name: 'Mary'
   };
 },
  // ...
});
2. 初始化 State
class SayHello extends React.Component {
  constructor(props) {
    super(props);
    this.state = {message: 'Hello!'};
    // 这⼀⾏很重要!
    this.handleClick = this.handleClick.bind(this);
 }
  handleClick() {
     alert(this.state.message);
 }
  render() {
    // 由于 `this.handleClick` 已经绑定⾄实例,因此我们才可以⽤它来处理点击事件
    return (
      <button onClick={this.handleClick}>
       Say hello
      </button>
   );
 }
}
// createReactClass创建的实例⾥,组件的⽅法会⾃动绑定上
var SayHello = createReactClass({
  getInitialState: function() {
    return {message: 'Hello!'};
 },
  handleClick: function() {
    alert(this.state.message);
 },
  render: function() {
    return (
      <button onClick={this.handleClick}>
       Say hello
      </button>
   );
 }
});


 7899
7899


 被折叠的 条评论
为什么被折叠?
被折叠的 条评论
为什么被折叠?
 到【灌水乐园】发言


