


1. 安装swagger依赖包
pnpm i @nestjs/swagger swagger-ui-express
2. 在main.ts添加swagger
async function bootstrap() {
  const app = await NestFactory.create(AppModule);

  const config = new DocumentBuilder()
    .setTitle('NestJS API')
    .setDescription('API description')
    .setVersion('1.0')
    .build();
  const document = SwaggerModule.createDocument(app, config);
  SwaggerModule.setup('doc', app, document);

  await app.listen(3000);
}
bootstrap();
3. 准备统一的返回数据模型
3.1 添加ResponseDto
export class ResponseDto<T = any> {
  @ApiProperty()
  code: number;

  @ApiProperty()
  message: string;

  @ApiProperty({ type: () => Object })
  data: ResponseData<T>;
}
3.2 添加ResponseData
export class ResponseData<T> extends PaginationDto<T> {
  @ApiProperty({ type: () => Object })
  object: T;
}
3.3 添加PaginationDto
export class PaginationDto<T> {
  @ApiProperty()
  total: number;

  @ApiProperty()
  limit: number;

  @ApiProperty()
  offset: number;

  @ApiProperty({ type: () => [Object] })
  list: T[];
}
4. 封装ApiDataResponse装饰器
4.1 当返回单个实体数据
期望data中包含 object 实体数据
ApiDataResponse装饰器代码如下:
export function ApiDataResponse<T>(entity: Type<T>) {
  return applyDecorators(
    ApiExtraModels(ResponseDto, entity),
    ApiOkResponse({
      schema: {
        allOf: [
          { $ref: getSchemaPath(ResponseDto) },
          {
            properties: {
              data: {
                properties: {
                  object: { $ref: getSchemaPath(entity) },
                },
              },
            },
          },
        ],
      },
    }),
  );
}
在控制器中使用,返回单个实体数据:
@ApiTags('coffees')
@Controller('coffees')
export class CoffeesController {
  constructor(private readonly coffeesService: CoffeesService) {}

  @ApiDataResponse(Coffee)
  @ApiOperation({ description: '通过ID查询咖啡' })
  @Get(':id')
  async findOne(@Param('id') id: number) {
    const object = await this.coffeesService.findOne(id);
    return { object };
  }
}
4.1.1 接口调用返回的结构
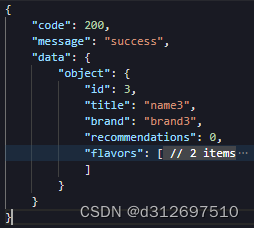
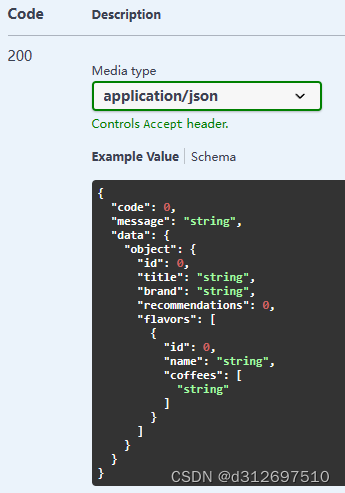
4.1.2 swagger文档的结构
4.2 当返回集合实体数据
期望data中包含 total 总数 limit offset 分页 list 集合数据
ApiDataResponse装饰器代码如下:
export function ApiDataResponse<T>(entity: Type<T>) {
  return applyDecorators(
    ApiExtraModels(ResponseDto, PaginationDto, entity),
    ApiOkResponse({
      schema: {
        allOf: [
          { $ref: getSchemaPath(ResponseDto) },
          {
            properties: {
              data: {
                $ref: getSchemaPath(PaginationDto),
                properties: {
                  list: {
                    type: 'array',
                    items: { $ref: getSchemaPath(entity) },
                  },
                },
              },
            },
          },
        ],
      },
    }),
  );
}
在控制器中使用,返回实体集合数据:
@ApiTags('coffees')
@Controller('coffees')
export class CoffeesController {
  constructor(private readonly coffeesService: CoffeesService) {}

  @ApiDataResponse(Coffee)
  @ApiOperation({ description: '获取所有咖啡列表' })
  @Get()
  async findAll(@Query() query: PaginationQueryDto) {
    const list = await this.coffeesService.findAll(query);
    const result = {
      total: list.length,
      limit: query.limit,
      offset: query.offset,
      list: list,
    };
    return result;
  }
}
4.2.1 接口调用返回的结构
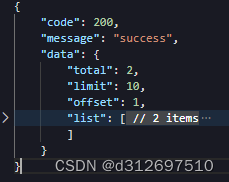
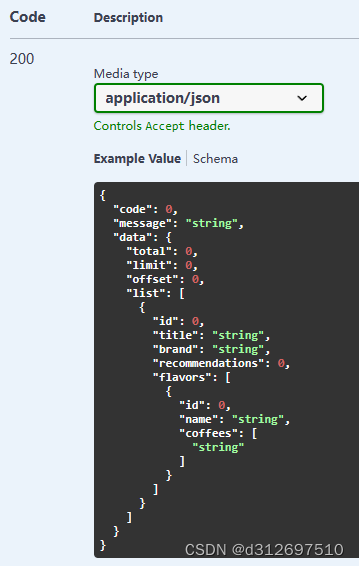
4.2.2 swagger文档的结构
4.3 修改ApiDataResponse装饰器
添加 isPaginated 判断是否是集合数据的结构
完整代码如下:
export function ApiDataResponse<T>(entity: Type<T>, isPaginated = false) {
  const dataSchema = isPaginated
    ? {
        $ref: getSchemaPath(PaginationDto),
        properties: {
          list: {
            type: 'array',
            items: { $ref: getSchemaPath(entity) },
          },
        },
      }
    : {
        properties: {
          object: { $ref: getSchemaPath(entity) },
        },
      };

  return applyDecorators(
    ApiExtraModels(ResponseDto, PaginationDto, entity),
    ApiOkResponse({
      schema: {
        allOf: [
          { $ref: getSchemaPath(ResponseDto) },
          {
            properties: {
              data: dataSchema,
            },
          },
        ],
      },
    }),
  );
}
在控制器中使用
@ApiTags('coffees')
@Controller('coffees')
export class CoffeesController {
  constructor(private readonly coffeesService: CoffeesService) {}

  @ApiDataResponse(Coffee, true)
  @ApiOperation({ description: '获取所有咖啡列表' })
  @Get()
  async findAll(@Query() query: PaginationQueryDto) {}

  @ApiDataResponse(Coffee)
  @ApiOperation({ description: '通过ID查询咖啡' })
  @Get(':id')
  async findOne(@Param('id') id: number) {}
}


 3324
3324


 被折叠的 条评论
为什么被折叠?
被折叠的 条评论
为什么被折叠?
 到【灌水乐园】发言


