


1. Canvas
提供画布组件,用于自定义绘制图形。
接口:
Canvas(context?: CanvasRenderingContext2D)
参数:
| 参数名 | 参数类型 | 必填 | 默认值 | 参数描述 |
|---|---|---|---|---|
| context | 否 | - | 不支持多个Canvas共用一个CanvasRenderingContext2D对象,具体描述见CanvasRenderingContext2D对象。 |
Canvas 组件需要一个 context 控制绘图
2. CanvasRenderingContext2D
使用RenderingContext在Canvas组件上进行绘制,绘制对象可以是矩形、文本、图片等。
接口:
CanvasRenderingContext2D(settings?: RenderingContextSetting)
参数:
| 参数名 | 参数类型 | 必填 | 参数描述 |
|---|---|---|---|
| settings | 否 |
可以传入 settings 参数,是否开启抗锯齿
属性:
方法:
3. RenderingContextSetting
用来配置CanvasRenderingContext2D对象的参数,包括是否开启抗锯齿。
接口:
RenderingContextSettings(antialias?: boolean)
参数:
| 参数名 | 参数类型 | 必填 | 参数描述 |
|---|---|---|---|
| antialias | boolean | 否 | 表明canvas是否开启抗锯齿。 默认值:false |
4. 绘制示例
4.1 画线
在绘制前和绘制后要调用 context.beginPath() 和 context.closePath() 方法,形成封闭路径
@Entry
@Component
struct Index {
  // 开启抗锯齿配置
  private settings: RenderingContextSettings = new RenderingContextSettings(true)
  private context: CanvasRenderingContext2D = new CanvasRenderingContext2D(this.settings)

  build() {
    Column() {
      Canvas(this.context)
        .width('100%')
        .height(360)
        .backgroundColor("#ccc")

      Row() {
        Button("画线")
          .onClick(() => {
            this.context.beginPath() // 开始绘制路径
            this.context.strokeStyle = 'blue' // 描边颜色
            this.context.moveTo(10, 10) // 移动当前点路径到指定点
            this.context.lineTo(150, 150) // 连接当前点到指定点路径
            this.context.stroke() // 边框绘制
            this.context.closePath() // 结束绘制路径

            this.context.beginPath() // 开始绘制路径
            this.context.lineWidth = 4 // 线条宽度
            this.context.strokeStyle = "red" // 描边颜色
            this.context.moveTo(200, 10) // 移动当前点路径到指定点
            this.context.lineTo(50, 100) // 连接当前点到指定点路径
            this.context.stroke() // 边框绘制
            this.context.closePath() // 结束绘制路径
          })
      }

    }
    .width('100%')
    .height('100%')
  }
}
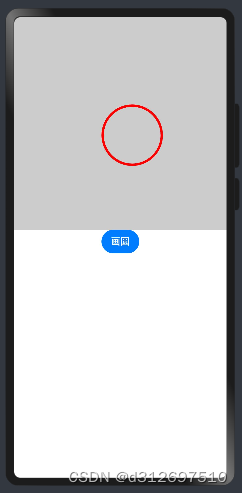
4.2 画圆
@Entry
@Component
struct Index {
  // 开启抗锯齿配置
  private settings: RenderingContextSettings = new RenderingContextSettings(true)
  private context: CanvasRenderingContext2D = new CanvasRenderingContext2D(this.settings)

  build() {
    Column() {
      Canvas(this.context)
        .width('100%')
        .height(360)
        .backgroundColor("#ccc")

      Row() {
        Button("画圆")
          .onClick(() => {
            this.context.beginPath() // 开始绘制路径
            this.context.lineWidth = 4 // 线条宽度
            this.context.strokeStyle = "#f00" // 描边颜色
            this.context.arc(200, 200, 50, 0, 360) // 绘制弧线路径
            this.context.stroke() // 边框绘制
            this.context.closePath() // 结束绘制路径
          })
      }

    }
    .width('100%')
    .height('100%')
  }
}
4.3 画矩形
@Entry
@Component
struct Index {
  // 开启抗锯齿配置
  private settings: RenderingContextSettings = new RenderingContextSettings(true)
  private context: CanvasRenderingContext2D = new CanvasRenderingContext2D(this.settings)

  build() {
    Column() {
      Canvas(this.context)
        .width('100%')
        .height(360)
        .backgroundColor("#ccc")

      Row() {
        Button("画矩形")
          .onClick(() => {
            this.context.beginPath() // 开始绘制路径
            this.context.lineWidth = 4 // 线条宽度
            this.context.strokeStyle = "#ff0" // 描边颜色
            this.context.fillStyle = "#fff" // 填充颜色
            this.context.rect(150, 150, 100, 100) // 绘制矩形路径
            this.context.stroke() // 边框绘制
            this.context.fill() // 对封闭路径进行填充
            this.context.closePath() // 结束绘制路径
          })
      }

    }
    .width('100%')
    .height('100%')
  }
}
4.4 清空画布
@Entry
@Component
struct Index {
  // 开启抗锯齿配置
  private settings: RenderingContextSettings = new RenderingContextSettings(true)
  private context: CanvasRenderingContext2D = new CanvasRenderingContext2D(this.settings)

  build() {
    Column() {
      Canvas(this.context)
        .width('100%')
        .height(360)
        .backgroundColor("#ccc")

      Row() {
        Button("画矩形")
          .onClick(() => {
            this.context.beginPath() // 开始绘制路径
            this.context.lineWidth = 4 // 线条宽度
            this.context.strokeStyle = "#ff0" // 描边颜色
            this.context.fillStyle = "#fff" // 填充颜色
            this.context.rect(150, 150, 100, 100) // 绘制矩形路径
            this.context.stroke() // 边框绘制
            this.context.fill() // 对封闭路径进行填充
            this.context.closePath() // 结束绘制路径
          })
        Button("清空面板")
          .onClick(() => {
            this.context.clearRect(0, 0, 360, 300)
          })
      }

    }
    .width('100%')
    .height('100%')
  }
}
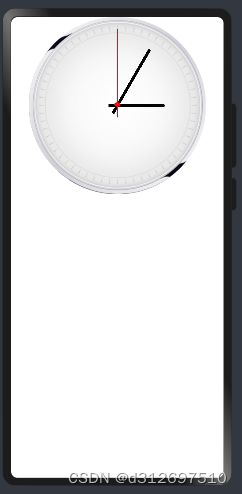
4.5. 绘制时钟
drawImage
drawImage(image: ImageBitmap | PixelMap, dx: number, dy: number): void
drawImage(image: ImageBitmap | PixelMap, dx: number, dy: number, dw: number, dh: number): void
drawImage(image: ImageBitmap | PixelMap, sx: number, sy: number, sw: number, sh: number, dx: number, dy: number, dw: number, dh: number):void
进行图像绘制。
rotate
rotate(angle: number): void
针对当前坐标轴进行顺时针旋转。
旋转的是弧度值,可以通过 Math.PI / 180 * 角度 将角度转换为弧度值。
示例
@Entry
@Component
struct Index {
  // 开启抗锯齿配置
  private settings: RenderingContextSettings = new RenderingContextSettings(true)
  private context: CanvasRenderingContext2D = new CanvasRenderingContext2D(this.settings)
  private clockDial: ImageBitmap = new ImageBitmap('images/clock_dial.png')
  private clockHour: ImageBitmap = new ImageBitmap('images/clock_hour.png')
  private clockMinute: ImageBitmap = new ImageBitmap('images/clock_minute.png')
  private clockSecond: ImageBitmap = new ImageBitmap('images/clock_second.png')

  build() {
    Column() {
      Canvas(this.context)
        .width(300)
        .height(300)
        .onReady(() => {
          // 绘制表盘
          this.context.drawImage(this.clockDial, 0, 0, 300, 300)
          // 移动原点
          this.context.translate(150, 150)

          // 旋转角度,绘制时针
          this.context.rotate(Math.PI / 180 * 90)
          this.context.drawImage(this.clockHour, -2.5, -80, 5, 95)
          this.context.rotate(Math.PI / 180 * -90)

          // 旋转角度,绘制分针
          this.context.rotate(Math.PI / 180 * 30)
          this.context.drawImage(this.clockMinute, -2.5, -110, 5, 125)
          this.context.rotate(Math.PI / 180 * -30)

          // 绘制秒针
          this.context.drawImage(this.clockSecond, -5, -130, 10, 150)
        })
    }
    .width('100%')
    .height('100%')
  }
}


 1106
1106


 被折叠的 条评论
为什么被折叠?
被折叠的 条评论
为什么被折叠?
 到【灌水乐园】发言


