


大家好,我是狼王,一个爱打球的程序员
这是设计模式的第五篇,这篇让我们来认识一下原型模式
1、概述
原型模式是一种创建型设计模式, 使你能够复制已有对象,甚至是复杂对象, 而又无需使代码依赖它们所属的类。
原型模式将克隆过程委派给被克隆的实际对象。模式为所有支持克隆的对象声明了一个通用接口,该接口让你能够克隆对象, 同时又无需将代码和对象所属类耦合。通常情况下, 这样的接口中仅包含一个克隆方法。
2、适用场景
1)需要复制对象,而又想代码独立于这些对象所属的类。
2)只需要获取对象时,减少没必要的对象初始化,只需调用合适的对象的克隆方法。
3、实例
Java 的 Cloneable (克隆) 接口就是立即可用的原型模式。任何类都可通过实现该接口来实现可被克隆的性质。
此处需要区分概念:浅拷贝和深拷贝。后面结合代码对这两个词进行分析。
以下代码,Car的内部属性有Engine,在Car中实现Cloneable接口,重写Object的clone()方法:
@Data
public class Car implements Cloneable{

    private int seats;

    private Engine engine;

    public Car(int seats, Engine engine) {
        this.seats = seats;
        this.engine = engine;
    }

    public void detail() {
        System.out.println("the seats is :" + seats);
        System.out.println("the engine is :" + engine);
    }

    @Override
    public Car clone() throws CloneNotSupportedException{
        return (Car) super.clone();
    }
}
@Data
public class Engine {

    /**
     * 排量
     */
    private final double volume;
    /**
     * 里程
     */
    private double mileage;

    public Engine(double volume, double mileage) {
        this.volume = volume;
        this.mileage = mileage;
    }
}
测试类:
@RunWith(SpringRunner.class)
@SpringBootTest(classes = TestApplication.class)
public class TestDemo {

    @Test
    public void test() throws CloneNotSupportedException {
        Car car = new Car(2, new Engine(3.0, 0));
        Car car1 = car.clone();
        System.out.println("------------打印car------------");
        car.detail();
        System.out.println("------------打印car1------------");
        car1.detail();
        System.out.println("------------修改car的seats打印car------------");
        car.setSeats(4);
        car.detail();
        System.out.println("------------修改car的seats打印car1------------");
        car1.detail();
        System.out.println("------------修改car的Engine打印car------------");
        car.getEngine().setMileage(10000);
        car.detail();
        System.out.println("------------修改car的Engine打印car1------------");
        car1.detail();
    }

}
结果:
------------打印car------------
the seats is :2
the engine is :Engine(volume=3.0, mileage=0.0)
------------打印car1------------
the seats is :2
the engine is :Engine(volume=3.0, mileage=0.0)
------------修改car的seats打印car------------
the seats is :4
the engine is :Engine(volume=3.0, mileage=0.0)
------------修改car的seats打印car1------------
the seats is :2
the engine is :Engine(volume=3.0, mileage=0.0)
------------修改car的Engine打印car------------
the seats is :4
the engine is :Engine(volume=3.0, mileage=10000.0)
------------修改car的Engine打印car1------------
the seats is :2
the engine is :Engine(volume=3.0, mileage=10000.0)
4、分析
分析以上结果:
car1是通过car的clone()方法的得到的,其内部属性都相同。
当修改car的seats时,发现car的改变了,而car1的值没有改变。
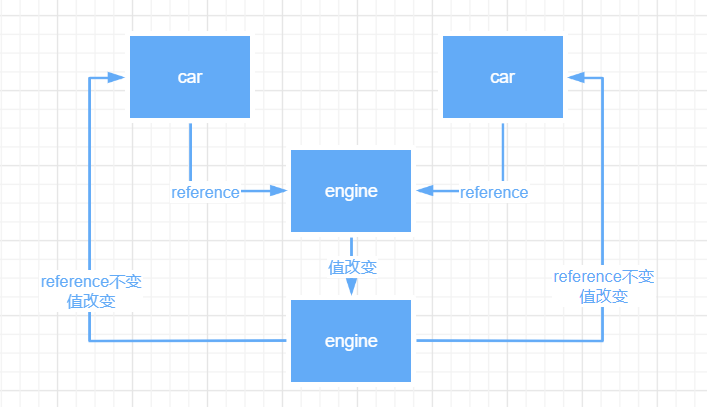
当修改car的Engine属性对象时,car的改变了,而car1的也改变了。
造成car1中的Engine也被修改的原因:值引用和地址引用。
此处涉及到java内存模型的内容,这里先做简单的阐述,解释此问题:
每个Java线程都有一个私有Java虚拟机栈,与该线程同时创建。在虚拟机栈内,每个方法会生成一个栈帧。每个栈帧代表一次次的方法调用,一个方法的执行到执行完成的过程,代表栈帧从入栈到出栈的过程。
栈帧里面包含局部变量表,而局部变量表可以存储两种类型的值,包含原始类型和引用类型。对象中的对象就是在栈帧的局部变量表内存储的引用,这个引用指向堆中对象的指针,而相同的对象在堆中只会存在一个。
当两个对象同时引用一个对象时,实际引用的是堆中的同一个对象,当这个对象的值被修改,则所有引用此对象的对象中的值都会改变。
如何解决以上问题?
上面的方式称作浅拷贝。
实现深拷贝:在Engine中需要实现Cloneable接口,即重写clone方法,在Car的clone方法中,需要调用Engine的clone方法。
@Data
public class Engine implements Cloneable{

    /**
     * 排量
     */
    private final double volume;
    /**
     * 里程
     */
    private double mileage;

    public Engine(double volume, double mileage) {
        this.volume = volume;
        this.mileage = mileage;
    }

    @Override
    public Engine clone() throws CloneNotSupportedException {
        Engine clone = (Engine) super.clone();
        return clone;
    }
}
public class Car implements Cloneable{

    private int seats;

    private Engine engine;

    public Car(int seats, Engine engine) {
        this.seats = seats;
        this.engine = engine;
    }

    public void detail() {
        System.out.println("the seats is :" + seats);
        System.out.println("the engine is :" + engine);
    }

    @Override
    public Car clone() throws CloneNotSupportedException{
        Car car = (Car) super.clone();
        car.engine = engine.clone();
        return car;
    }
}
执行结果:
------------打印car------------
the seats is :2
the engine is :Engine(volume=3.0, mileage=0.0)
------------打印car1------------
the seats is :2
the engine is :Engine(volume=3.0, mileage=0.0)
------------修改car的seats打印car------------
the seats is :4
the engine is :Engine(volume=3.0, mileage=0.0)
------------修改car的seats打印car1------------
the seats is :2
the engine is :Engine(volume=3.0, mileage=0.0)
------------修改car的Engine打印car------------
the seats is :4
the engine is :Engine(volume=3.0, mileage=10000.0)
------------修改car的Engine打印car1------------
the seats is :2
the engine is :Engine(volume=3.0, mileage=0.0)
上述结果中,只有car的engine被修改了,达到了深拷贝的效果。
5、总结
最后总结下上面例子中使用原型模式的优缺点:
优点:
1)克隆对象,不需要关注其相关联的类,比如Car中的Engine。
2)减少反复的初始化代码。
3)对于复杂的对象,相对更加容易生成。
4)可以通过复制对象,来减少继承的关系。
缺点:
注意深、浅拷贝的问题,涉及多层引用的对象时实现较复杂。
乐于输出干货的Java技术公众号:狼王编程。公众号内有大量的技术文章、海量视频资源、精美脑图,不妨来关注一下!回复资料领取大量学习资源和免费书籍!


 988
988

 被折叠的 条评论
为什么被折叠?
被折叠的 条评论
为什么被折叠?
 到【灌水乐园】发言


