


CesiumJS是一个开源、免费的三维地图开发框架,Three.js是一个也开源、免费的三维渲染框架,两者都是基于WebGL技术、使用JavaScript开发的Web前端三维可视化框架,目前在国内外的三维Web开发中使用极为广泛。但Three.js是一个轻量级的跨浏览器JavaScript库,用于在浏览器中创建和显示动画3D计算机图形;而Cesium的可视化内容以地理空间数据为主,如卫星影像、地形、城市级三维模型等,数据量和空间范围都非常大,对数据精度要求更高,并且还具有一系列GIS相关的空间分析功能,但在模型的渲染及可视化方面略逊于Three。
因此,将Cesium的地理数据渲染和GIS功能与Three.js广泛而易用的通用3D API相结合,不仅可以优化模型的渲染精度,也可以加入许多地理信息相关的应用,为新的WebGL体验开启了许多可能性。
目录
1.Cesium+Three实现原理
主要原理:两个框架分成不同的视图层,参考 HTML Canvas 元素,并将它们的控制器组合在同一个坐标系中。
可参考如下官方案例:
 https://cesium.com/blog/2017/10/23/integrating-cesium-with-threejs/
实现步骤:
1)在HTML中设置两个容器分别容纳Cesium和Three(或初始化Cesium容器后将Three容器追加到Cesium后)。
2)使Three产生的场景覆盖Cesium之上( Three.js DOM 元素位于 Cesium 之上),并禁用Three容器的鼠标事件,通过Cesium同步控制Three。
3)并分别对Cesium渲染器和Three渲染器进行初始化,通过禁用Cesium的默认渲染循环,我们可以将其动画帧与Three.js同步。并设置Three场景的渲染器背景为透明,以达成叠加效果。
4)初始化物体并分别加入至各自的场景之中(注意 Three.js 渲染 z-up 而 Cesium 渲染 y-up。)。
5)进行坐标转换,使对象在地球上正确显示。这包括将大地纬度/经度位置转换为笛卡儿XYZ,并使用WGS84区域从左下角到左上角的方向作为向上矢量,使物体指向地球中心。这也可以通过使用本地笛卡尔东北向或东北向下来计算。
6)请求关键帧并循环渲染器。
2.VUE3+Cesium项目创建
项目创建可参考往期内容:
3.导入Three
安装Three相关依赖:
npm install three --save
or
yarn add three
Three初始化可参考往期内容:
4.实现VUE3+Cesium+Three
<template>
  <div id="cesiumContainer" ref="cesiumContainer"></div>
</template>

<script setup>
import { onMounted } from "vue";
import * as Cesium from "cesium";
import "./Widgets/widgets.css";
import * as THREE from "three";
// console.log(flightData);

// 设置cesium的token
Cesium.Ion.defaultAccessToken = "yourToken";
// cesium默认资源路径
window.CESIUM_BASE_URL = "/";
// 设置默认的视角为中国
Cesium.Camera.DEFAULT_VIEW_RECTANGLE = Cesium.Rectangle.fromDegrees(
  // 西边经度
  89.5,
  // 南边维度
  20.4,
  // 东边经度
  110.4,
  // 北边维度
  61.2
);

onMounted(() => {
  main();
});

// 初始化cesium渲染器
// 初始化three渲染器
// 初始化2个库的3D物体
// 循环渲染

// three全局对象
let three = {
  renderer: null,
  camera: null,
  scene: null,
};

// 设置全局cesium对象
let cesium = {
  viewer: null,
};

function main() {
  // 设置北京显示模型的渲染范围
  var minWGS84 = [115.39, 38.9];
  var maxWGS84 = [117.39, 40.9];

  // 设置cesium容器
  var cesiumContainer = document.getElementById("cesiumContainer");

  // three.js物体
  let objects3D = [];
  //封装three物体(使three物体具有经纬度)
  function Object3D(mesh, minWGS84, maxWGS84) {
    this.threeMesh = mesh;//物体
    this.minWGS84 = minWGS84;//范围
    this.maxWGS84 = maxWGS84;//范围
  }

  // 初始化cesium渲染器
  function initCesium() {
    cesium.viewer = new Cesium.Viewer(cesiumContainer, {
      useDefaultRenderLoop: false,
      selectionIndicator: false,
      homeButton: false,
      infoBox: false,
      sceneModePicker: false,
      navigationHelpButton: false,
      animation: false,
      timeline: false,
      fullscreenButton: false,
      baseLayerPicker: false,
      clock: false,
      geocoder: false,
      //     天地图矢量路径图
      imageryProvider: new Cesium.WebMapTileServiceImageryProvider({
        url: "http://t0.tianditu.com/vec_w/wmts?service=wmts&request=GetTile&version=1.0.0&LAYER=vec&tileMatrixSet=w&TileMatrix={TileMatrix}&TileRow={TileRow}&TileCol={TileCol}&style=default&format=tiles&tk=30d07720fa76f07732d83c748bb84211",
        layer: "tdtBasicLayer",
        style: "default",
        format: "image/jpeg",
        tileMatrixSetID: "GoogleMapsCompatible",
      }),
      //cesium中webgl选项
      contextOptions: {
        webgl: {
          //透明度
          alpha: false,
          // 抗锯齿
          antialias: true,
          //深度检测
          depth: true,
        },
      },
    });
    // 地图叠加
    var imageryLayers = cesium.viewer.imageryLayers;
    console.log(imageryLayers);
    var layer = imageryLayers.addImageryProvider(
      new Cesium.WebMapTileServiceImageryProvider({
        url: "http://t0.tianditu.com/img_w/wmts?service=wmts&request=GetTile&version=1.0.0&LAYER=img&tileMatrixSet=w&TileMatrix={TileMatrix}&TileRow={TileRow}&TileCol={TileCol}&style=default&format=tiles&tk=30d07720fa76f07732d83c748bb84211",
        layer: "tdtBasicLayer",
        style: "default",
        format: "image/jpeg",
        tileMatrixSetID: "GoogleMapsCompatible",
      })
    );
    layer.alpha = 0.5;
    // 设置前往地点
    let center = Cesium.Cartesian3.fromDegrees(
      (minWGS84[0] + maxWGS84[0]) / 2,
      (minWGS84[1] + maxWGS84[1]) / 2,
      20000
    );

    // 设置相机飞往该区域
    cesium.viewer.camera.flyTo({
      destination: center,
      duration: 2,
      orientation: {
        heading: Cesium.Math.toRadians(0),
        pitch: Cesium.Math.toRadians(-90),
        roll: 0,
      },
    });
  }
  //初始化Three
  function initThree() {
    // 设置相机配置
    let fov = 45;//视角
    let aspect = window.innerWidth / window.innerHeight;//宽高比例
    let near = 0.1;
    let far = 10 * 1000 * 1000;//视域范围

    // 初始化场景
    three.scene = new THREE.Scene();
    three.camera = new THREE.PerspectiveCamera(fov, aspect, near, far);
    three.renderer = new THREE.WebGLRenderer({
      antialias: true,//抗锯齿
      alpha: true,
    });
    // 设置渲染器大小
    three.renderer.setSize(window.innerWidth, window.innerHeight);

    // 添加环境光
    let ambientLight = new THREE.AmbientLight(0xffffff, 1);
    three.scene.add(ambientLight);
    // 添加three.jscanvas元素到cesium容器
    cesiumContainer.appendChild(three.renderer.domElement);
  }

  // 创建three.js物体
  function createMesh() {
    let geometry = new THREE.BoxBufferGeometry(1, 1, 1);
    let material = new THREE.MeshBasicMaterial({
      color: 0x00ff00,
    });
    let mesh = new THREE.Mesh(geometry, material);

    // 放大物体
    mesh.scale.set(100, 100, 100); // 放大
    mesh.position.set(0, 0, 50); // 平移

    let meshGroup = new THREE.Group();
    meshGroup.add(mesh);
    // 添加至场景
    three.scene.add(meshGroup);
    // 创建3d物体
    let OB3d = new Object3D(
      meshGroup,
      [minWGS84[0], minWGS84[1]],
      [maxWGS84[0], maxWGS84[1]]
    );

    // 添加到3d物体数组
    objects3D.push(OB3d);
  }

  function renderThree() {
    // 设置相机跟cesium保持一致
    three.camera.fov = Cesium.Math.toDegrees(cesium.viewer.camera.frustum.fovy);
    // 声明一个将cesium框架的cartesian3转换为three.js的vector3(笛卡尔坐标转换为三维向量)
    let cartToVec = function (cart) {
      return new THREE.Vector3(cart.x, cart.y, cart.z);
    };
    // 将3D的物体通过经纬度转换成对应的位置
    objects3D.forEach((item, index) => {
      // 通过经纬度获取中心点的位置
      let center = Cesium.Cartesian3.fromDegrees(
        (item.minWGS84[0] + item.maxWGS84[0]) / 2,
        (item.minWGS84[1] + item.maxWGS84[1]) / 2
      );
      item.threeMesh.position.copy(cartToVec(center));

      //计算朝向(切面方向-切线向量)
      //中心高度点
      let centerHeight = Cesium.Cartesian3.fromDegrees(
        (item.minWGS84[0] + item.maxWGS84[0]) / 2,
        (item.minWGS84[1] + item.maxWGS84[1]) / 2,
        1
      );
      //左下
      let bottomLeft = cartToVec(
        Cesium.Cartesian3.fromDegrees(item.minWGS84[0], item.minWGS84[1])
      );
      //左上
      let topLeft = cartToVec(
        Cesium.Cartesian3.fromDegrees(item.minWGS84[0], item.maxWGS84[1])
      );
      //朝向()
      let latDir = new THREE.Vector3()
        .subVectors(bottomLeft, topLeft)
        .normalize();

      // console.log(item);
      //设置查看方向
      item.threeMesh.lookAt(centerHeight.x, centerHeight.y, centerHeight.z);
      //设置朝向
      item.threeMesh.up.copy(latDir);
    });

    //设置摄像机矩阵
    // 设置相机跟cesium保持一致
    three.camera.matrixAutoUpdate = false;//自动更新
    //复制cesium相机矩阵
    let cvm = cesium.viewer.camera.viewMatrix;
    let civm = cesium.viewer.camera.inverseViewMatrix;
    // three相机默认朝向0,0,0
    three.camera.lookAt(0, 0, 0);

    // 设置threejs相机矩阵
    three.camera.matrixWorld.set(
      civm[0],
      civm[4],
      civm[8],
      civm[12],
      civm[1],
      civm[5],
      civm[9],
      civm[13],
      civm[2],
      civm[6],
      civm[10],
      civm[14],
      civm[3],
      civm[7],
      civm[11],
      civm[15]
    );

    three.camera.matrixWorldInverse.set(
      cvm[0],
      cvm[4],
      cvm[8],
      cvm[12],
      cvm[1],
      cvm[5],
      cvm[9],
      cvm[13],
      cvm[2],
      cvm[6],
      cvm[10],
      cvm[14],
      cvm[3],
      cvm[7],
      cvm[11],
      cvm[15]
    );
    //设置宽高比例
    let width = cesiumContainer.clientWidth;
    let height = cesiumContainer.clientHeight;
    three.camera.aspect = width / height;
    //更新相机矩阵
    three.camera.updateProjectionMatrix();
    //设置尺寸大小
    three.renderer.setSize(width, height);
    three.renderer.clear();
    three.renderer.render(three.scene, three.camera);
  }
  function renderCesium() {
    cesium.viewer.render();
  }
  //循环函数,不断请求动画帧渲染
  function loop() {
    requestAnimationFrame(loop);
    // cesium渲染
    renderCesium();
    // three.js渲染
    renderThree();
  }
  //初始化调用
  initCesium();
  initThree();
  createMesh();
  loop();
}
</script>

<style>
* {
  margin: 0;
  padding: 0;
}

#cesiumContainer {
  width: 100vw;
  height: 100vh;
  position: relative;
}

#cesiumContainer>canvas {
  position: absolute;
  top: 0;
  left: 0;
  /* 设置鼠标事件穿透 */
  pointer-events: none;
}
</style>
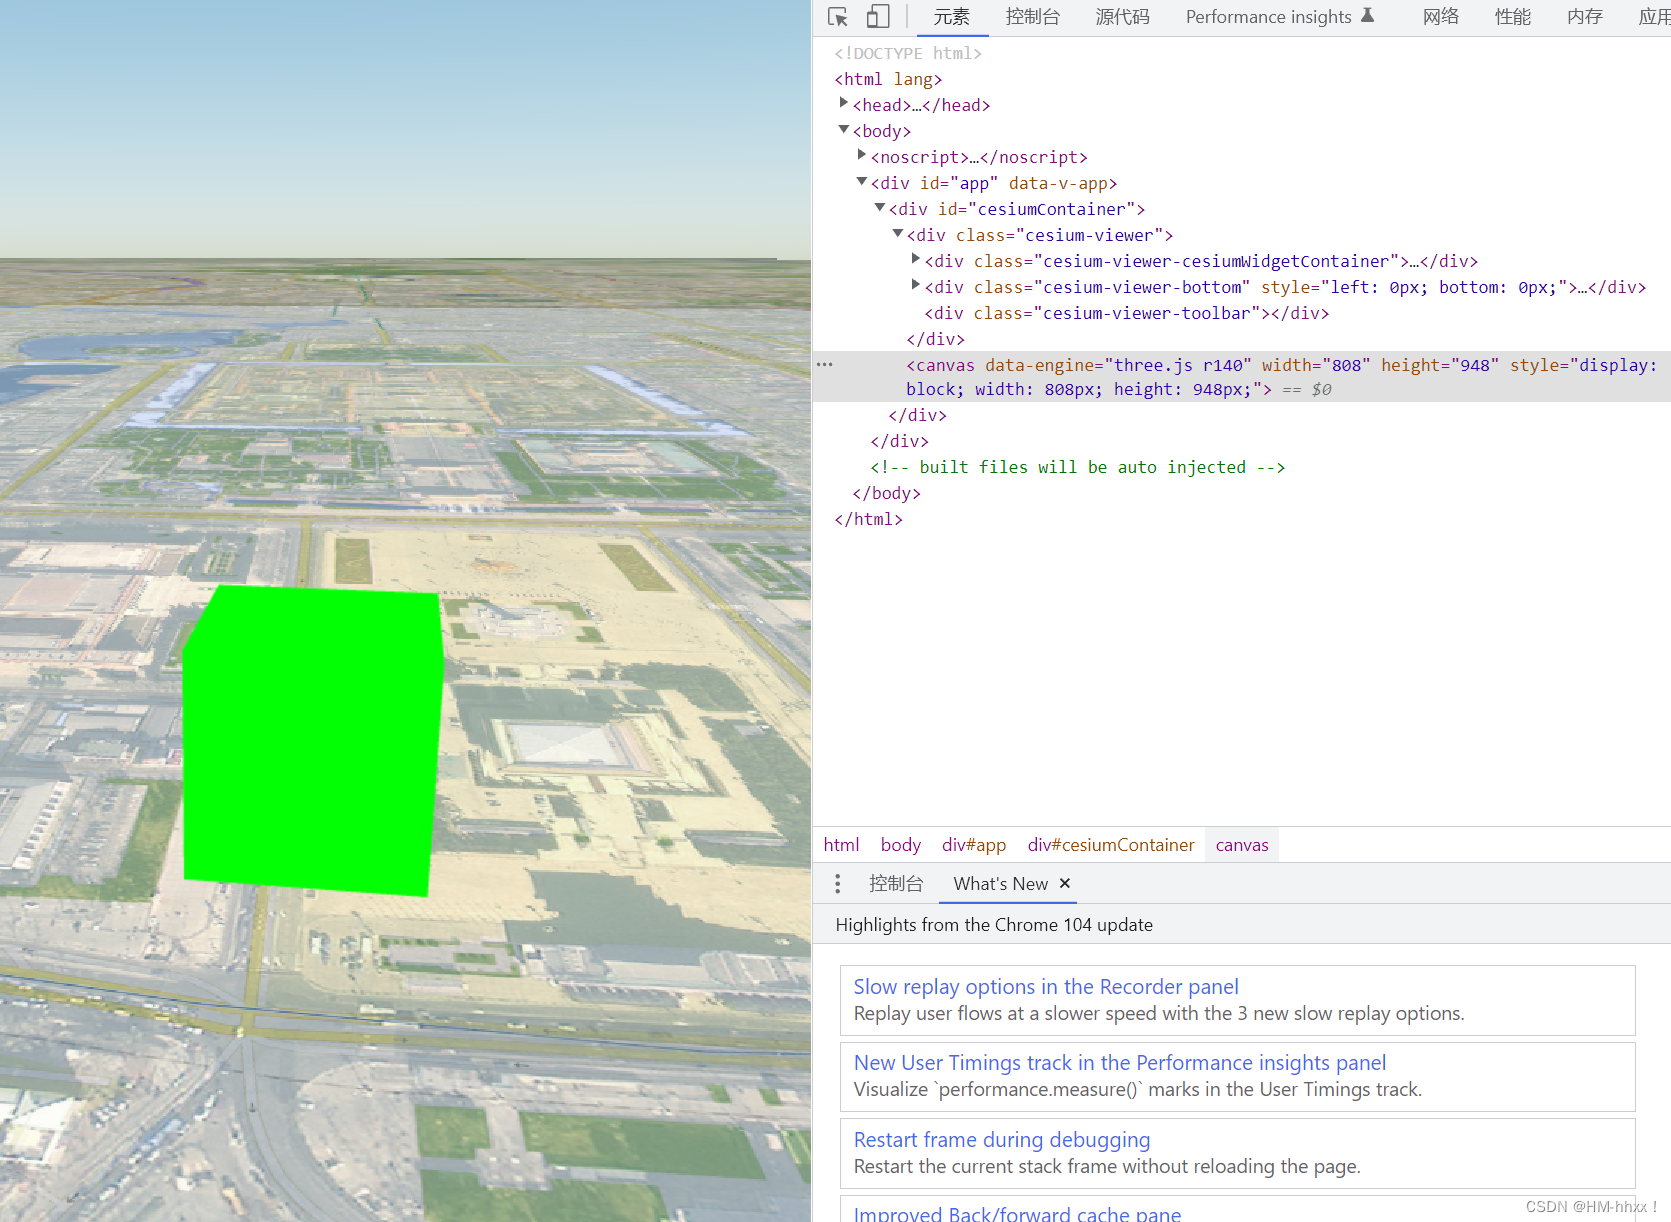
实现效果:


 704
704


 被折叠的 条评论
为什么被折叠?
被折叠的 条评论
为什么被折叠?
 到【灌水乐园】发言


