


数据集:
代码已上传到github:https://github.com/johnwingit/YOLOV1_Pytorch
COCO数据集下载:https://cocodataset.org/#download
代码实现
1.数据预处理
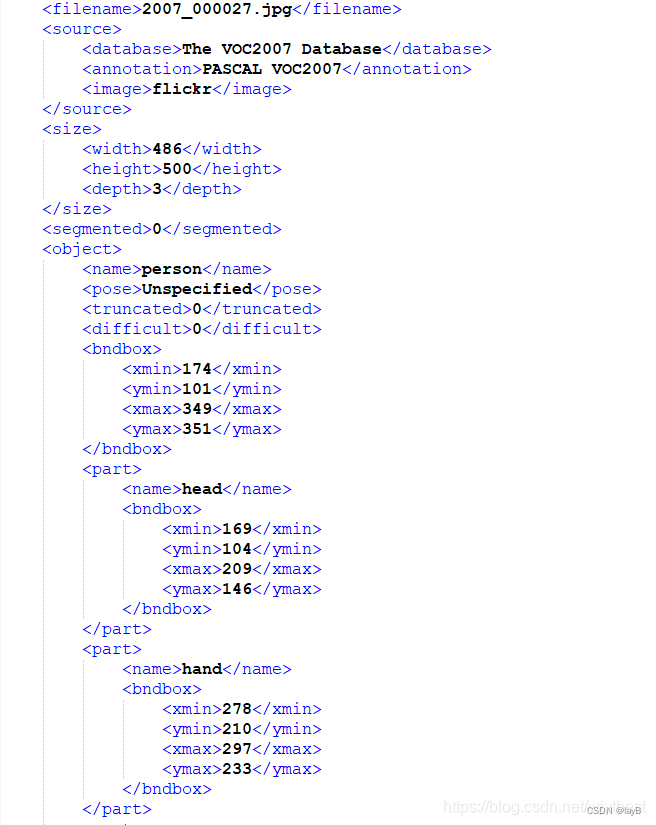
了解数据集后,我们需要将图片对应的xml文件中bounding box的信息提取出来,并转换为我们需要的(cls,x,y,w,h)格式,其中cls是根据物体类别的序号决定的,物体类别排序储存在全局变量CLASSES中,x,y为物体中心点坐标。
CLASSES = ['person', 'bird', 'cat', 'cow', 'dog', 'horse', 'sheep',
           'aeroplane', 'bicycle', 'boat', 'bus', 'car', 'motorbike', 'train',
           'bottle', 'chair', 'dining table', 'potted plant', 'sofa', 'tvmonitor']
- convert()函数:将bbox的左上角点、右下角点坐标的格式,转换为bbox中心点+bbox的w,h的格式,并进行归一化。
def convert(size, box):
    """将bbox的左上角点、右下角点坐标的格式,转换为bbox中心点+bbox的w,h的格式
    并进行归一化"""
    dw = 1. / size[0]  # 归一化的时候就是使用宽度除以整个image_size的宽度
    dh = 1. / size[1]  # 归一化的时候就是使用高度除以整个image_size的高度
    x = (box[0] + box[1]) / 2.0
    y = (box[2] + box[3]) / 2.0
    w = box[1] - box[0]
    h = box[3] - box[2]
    x = x * dw
    w = w * dw
    y = y * dh
    h = h * dh
    return (x, y, w, h)
- convert_annotation()函数:读取Annotations文件夹下的每一个xml文件并调用convert()函数。
def convert_annotation(anno_dir, image_id, labels_dir):
    """把图像image_id的xml文件转换为目标检测的label文件(txt):(class,x,y,w,h)
    其中包含物体的类别,bbox的左上角点坐标以及bbox的宽、高
    并将四个物理量归一化"""
    in_file = open(os.path.join(anno_dir, 'Annotations/%s' % (image_id)))
    image_id = image_id.split('.')[0]
    tree = ET.parse(in_file)
    root = tree.getroot()
    size = root.find('size')
    w = int(size.find('width').text)
    h = int(size.find('height').text)

    for obj in root.iter('object'):
        difficult = obj.find('difficult').text
        cls = obj.find('name').text
        if cls not in GL_CLASSES or int(difficult) == 1:
            continue
        cls_id = GL_CLASSES.index(cls)
        xmlbox = obj.find('bndbox')
	# 获取标注中bbox的数据并以元组方式返回
        points = (float(xmlbox.find('xmin').text), float(xmlbox.find('xmax').text), float(xmlbox.find('ymin').text),
             float(xmlbox.find('ymax').text))
        bb = convert((w, h), points)   #返回(x,y,w,h)
        with open(os.path.join(labels_dir, '%s.txt' % (image_id)), 'a') as out_file:
            out_file.write(str(cls_id) + " " + " ".join([str(a) for a in bb]) + '\n')
注意:
因为标注文件 .xml的object对象可能有些没有difficult的标签,如果需要全部数据集,则需要修改一个地方:
if obj.find('difficult'):
    difficult = int(obj.find('difficult').text)
else:
    difficult = 0
否则,只处理有difficult标签的数据。
- make_label_txt()函数:在当前项目文件夹的labesl文件夹下创造出与图片对应的txt文件,比如图片2007_000027.jpg,就有对应的2007_000027.txt文件,里面储存着图片2007_000027.jpg的所有bbox信息,每行一个。
def make_label_txt(anno_dir, labels_dir):
    """在labels文件夹下创建image_id.txt,对应每个image_id.xml提取出的bbox信息"""
    filenames = os.listdir(os.path.join(anno_dir,'Annotations'))
    for file in filenames:
        convert_annotation(anno_dir, file, labels_dir)
- img_augument()函数:对labels文件中的每个图片进行数据增广,因为数据集内原始图像的尺寸是不定的,所以需要进行适当的padding,将原始图像padding成宽高一致的正方形然后再将Padding后的正方形图像缩放成论文中的输入大小:448x448。同时,对应的bbox数据也进行修改。
def img_augument(img_dir, save_img_dir, labels_dir):
    imgs_list = [x.split('.')[0]+".jpg" for x in os.listdir(labels_dir)]
    for img_name in imgs_list:
        print("process %s"%os.path.join(img_dir, img_name))
        img = cv2.imread(os.path.join(img_dir, img_name))
        h, w = img.shape[0:2]
        input_size = 448  # 输入YOLOv1网络的图像尺寸为448x448
        # 因为数据集内原始图像的尺寸是不定的,所以需要进行适当的padding,将原始图像padding成宽高一致的正方形
        # 然后再将Padding后的正方形图像缩放成448x448
        padw, padh = 0, 0  # 要记录宽高方向的padding具体数值,因为padding之后需要调整bbox的位置信息
        if h > w:
            padw = (h - w) // 2
            img = np.pad(img, ((0, 0), (padw, padw), (0, 0)), 'constant', constant_values=0)
        elif w > h:
            padh = (w - h) // 2
            img = np.pad(img, ((padh, padh), (0, 0), (0, 0)), 'constant', constant_values=0)
        img = cv2.resize(img, (input_size, input_size))
        cv2.imwrite(os.path.join(save_img_dir, img_name), img)
        # 读取图像对应的bbox信息,按1维的方式储存,每5个元素表示一个bbox的(cls,xc,yc,w,h)
        with open(os.path.join(labels_dir,img_name.split('.')[0] + ".txt"), 'r') as f:
            bbox = f.read().split('\n')
        bbox = [x.split() for x in bbox]
        bbox = [float(x) for y in bbox for x in y]
        if len(bbox) % 5 != 0:
            raise ValueError("File:"
                             + os.path.join(labels_dir,img_name.split('.')[0] + ".txt") + "——bbox Extraction Error!")

        # 根据padding、图像增广等操作,将原始的bbox数据转换为修改后图像的bbox数据
        if padw != 0:
            for i in range(len(bbox) // 5):
                bbox[i * 5 + 1] = (bbox[i * 5 + 1] * w + padw) / h
                bbox[i * 5 + 3] = (bbox[i * 5 + 3] * w) / h
                if STATIC_DEBUG:
                    cv2.rectangle(img, (int(bbox[1] * input_size - bbox[3] * input_size / 2),
                                        int(bbox[2] * input_size - bbox[4] * input_size / 2)),
                                  (int(bbox[1] * input_size + bbox[3] * input_size / 2),
                                   int(bbox[2] * input_size + bbox[4] * input_size / 2)), (0, 0, 255))
        elif padh != 0:
            for i in range(len(bbox) // 5):
                bbox[i * 5 + 2] = (bbox[i * 5 + 2] * h + padh) / w
                bbox[i * 5 + 4] = (bbox[i * 5 + 4] * h) / w
                if STATIC_DEBUG:
                    cv2.rectangle(img, (int(bbox[1] * input_size - bbox[3] * input_size / 2),
                                        int(bbox[2] * input_size - bbox[4] * input_size / 2)),
                                  (int(bbox[1] * input_size + bbox[3] * input_size / 2),
                                   int(bbox[2] * input_size + bbox[4] * input_size / 2)), (0, 0, 255))
        # 此处可以写代码验证一下,查看padding后修改的bbox数值是否正确,在原图中画出bbox检验
        if STATIC_DEBUG:
            cv2.imshow("bbox-%d"%int(bbox[0]), img)
            cv2.waitKey(0)
        with open(os.path.join(labels_dir, img_name.split('.')[0] + ".txt"), 'w') as f:
            for i in range(len(bbox) // 5):
                bbox = [str(x) for x in bbox[i*5:(i*5+5)]]
                str_context = " ".join(bbox)+'\n'
                f.write(str_context)
- convert_bbox2labels()函数:将bbox的(cls,x,y,w,h)数据转换为训练时方便计算Loss的数据形式(7,7,5*B+cls_num)
def convert_bbox2labels(bbox):
    """将bbox的(cls,x,y,w,h)数据转换为训练时方便计算Loss的数据形式(7,7,5*B+cls_num)
    注意,输入的bbox的信息是(xc,yc,w,h)格式的,转换为labels后,bbox的信息转换为了(px,py,w,h)格式"""
    gridsize = 1.0/GL_NUMGRID
    labels = np.zeros((7,7,5*GL_NUMBBOX+len(GL_CLASSES)))  # 注意,此处需要根据不同数据集的类别个数进行修改
    for i in range(len(bbox)//5):
        gridx = int(bbox[i*5+1] // gridsize)  # 当前bbox中心落在第gridx个网格,列
        gridy = int(bbox[i*5+2] // gridsize)  # 当前bbox中心落在第gridy个网格,行
        # (bbox中心坐标 - 网格左上角点的坐标)/网格大小  ==> bbox中心点的相对位置
        gridpx = bbox[i * 5 + 1] / gridsize - gridx
        gridpy = bbox[i * 5 + 2] / gridsize - gridy
        # 将第gridy行,gridx列的网格设置为负责当前ground truth的预测,置信度和对应类别概率均置为1   !!!!!!!!出现错误
        labels[gridy, gridx, 0:5] = np.array([gridpx, gridpy, bbox[i * 5 + 3], bbox[i * 5 + 4], 1])
        labels[gridy, gridx, 5:10] = np.array([gridpx, gridpy, bbox[i * 5 + 3], bbox[i * 5 + 4], 1])
        labels[gridy, gridx, 10+int(bbox[i*5])] = 1

    labels = labels.reshape(1, -1)
    return labels
- create_csv_txt()函数:将JPEGImages文件夹内的图片按实际需要处理后,存入save_dir最终得到图片文件夹及所有图片对应的标注(train.csv/test.csv)和图片列表文件(train.txt, test.txt)
def create_csv_txt(img_dir, anno_dir, save_root_dir, train_val_ratio=0.9, padding=10, debug=False):
    """
    TODO:
    将img_dir文件夹内的图片按实际需要处理后,存入save_dir
    最终得到图片文件夹及所有图片对应的标注(train.csv/test.csv)和图片列表文件(train.txt, test.txt)
    """
    labels_dir = os.path.join(anno_dir, "labels")
    if not os.path.exists(labels_dir):
        os.mkdir(labels_dir)
        make_label_txt(anno_dir, labels_dir)
        print("labels done.")
    save_img_dir = os.path.join(os.path.join(anno_dir, "voc2012_forYolov1"), "img")
    if not os.path.exists(save_img_dir):
        os.mkdir(save_img_dir)
        img_augument(img_dir, save_img_dir, labels_dir)
    imgs_list = os.listdir(save_img_dir)
    n_trainval = len(imgs_list)
    shuffle_id = list(range(n_trainval))
    random.shuffle(shuffle_id)
    n_train = int(n_trainval*train_val_ratio)
    train_id = shuffle_id[:n_train]
    test_id = shuffle_id[n_train:]
    traintxt = open(os.path.join(save_root_dir, "train.txt"), 'w')
    traincsv = np.zeros((n_train, GL_NUMGRID*GL_NUMGRID*(5*GL_NUMBBOX+len(GL_CLASSES))),dtype=np.float32)
    for i,id in enumerate(train_id):
        img_name = imgs_list[id]
        img_path = os.path.join(save_img_dir, img_name)+'\n'
        traintxt.write(img_path)
        with open(os.path.join(labels_dir,"%s.txt"%img_name.split('.')[0]), 'r') as f:
            bbox = [float(x) for x in f.read().split()]
            traincsv[i,:] = convert_bbox2labels(bbox)
    np.savetxt(os.path.join(save_root_dir, "train.csv"), traincsv)
    print("Create %d train data." % (n_train))

    testtxt = open(os.path.join(save_root_dir, "test.txt"), 'w')
    testcsv = np.zeros((n_trainval - n_train, GL_NUMGRID*GL_NUMGRID*(5*GL_NUMBBOX+len(GL_CLASSES))),dtype=np.float32)
    for i,id in enumerate(test_id):
        img_name = imgs_list[id]
        img_path = os.path.join(save_img_dir, img_name)+'\n'
        testtxt.write(img_path)
        with open(os.path.join(labels_dir,"%s.txt"%img_name.split('.')[0]), 'r') as f:
            bbox = [float(x) for x in f.read().split()]
            testcsv[i,:] = convert_bbox2labels(bbox)
    np.savetxt(os.path.join(save_root_dir, "test.csv"), testcsv)
    print("Create %d test data." % (n_trainval-n_train))
2. Dateset类构造
class MyDataset(Dataset):
    def __init__(self, dataset_dir, seed=None, mode="train", train_val_ratio=0.9, trans=None):
        """
        :param dataset_dir: 数据所在文件夹
        :param seed: 打乱数据所用的随机数种子
        :param mode: 数据模式,"train", "val", "test"
        :param train_val_ratio: 训练时,训练集:验证集的比例
        :param trans:  数据预处理函数

        TODO:
        1. 读取储存图片路径的.txt文件,并保存在self.img_list中
        2. 读取储存样本标签的.csv文件,并保存在self.label中
        3. 如果mode="train", 将数据集拆分为训练集和验证集,用self.use_ids来保存对应数据集的样本序号。
            注意,mode="train"和"val"时,必须传入随机数种子,且两者必须相同
        4. 保存传入的数据增广函数
        """
        if seed is None:
            seed = random.randint(0, 65536)
        random.seed(seed)
        self.dataset_dir = dataset_dir
        self.mode = mode
        if mode=="val":
            mode = "train"
        img_list_txt = os.path.join(dataset_dir, mode+".txt")  # 储存图片位置的列表
        label_csv = os.path.join(dataset_dir, mode+".csv")  # 储存标签的数组文件
        self.img_list = []
        self.label = np.loadtxt(label_csv)  # 读取标签数组文件
        # 读取图片位置文件
        with open(img_list_txt, 'r') as f:
            for line in f.readlines():
                self.img_list.append(line.strip())
        # 在mode=train或val时, 将数据进行切分
        # 注意在mode="val"时,传入的随机种子seed要和mode="train"相同
        self.num_all_data = len(self.img_list)
        all_ids = list(range(self.num_all_data))
        num_train = int(train_val_ratio*self.num_all_data)
        if self.mode == "train":
            self.use_ids = all_ids[:num_train]
        elif self.mode == "val":
            self.use_ids = all_ids[num_train:]
        else:
            self.use_ids = all_ids

        # 储存数据增广函数
        self.trans = trans

    def __len__(self):
        """获取数据集数量"""
        return len(self.use_ids)

    def __getitem__(self, item):
        """
        TODO:
        1. 按顺序依次取出第item个训练数据img及其对应的样本标签label
        2. 图像数据要进行预处理,并最终转换为(c, h, w)的维度,同时转换为torch.tensor
        3. 样本标签要按需要转换为指定格式的torch.tensor
        """
        id = self.use_ids[item]
        label = torch.tensor(self.label[id, :])
        img_path = self.img_list[id]
        img = Image.open(img_path)
        if self.trans is None:
            trans = transforms.Compose([
                # transforms.Resize((112,112)),
                transforms.ToTensor(),
            ])
        else:
            trans = self.trans
        img = trans(img)  # 图像预处理&数据增广
        # transforms.ToPILImage()(img).show()  # for debug
        # print(label)
        return img, label
3. 网络实现
由于原论文是采用自己设计的20层卷积层先在ImageNet上训练了一周,完成特征提取部分的训练。我们作为学习者而非发明者来说,花一周时间训练实在是太长了。因此,在这里对原论文的结构做一点改变。
YOLOv1的前20层是用于特征提取的,也就是随便替换为一个分类网络(除去最后的全连接层)其实都行。因此,用ResNet34的网络作为特征提取部分。这样做的好处是,pytorch的torchvision中提供了ResNet34的预训练模型,训练集也是ImageNet,等于说有先成训练好的模型可以直接使用,从而免去了特征提取部分的训练时间。然后,除去ResNet34的最后两层,再连接上YOLOv1的最后4个卷积层和两个全连接层,作为我们训练的网络结构。
此外,还进行了一些小调整,比如最后增加了一个Sigmoid层,以及在卷积层后增加了BN层等等。具体代码如下:
class MyNet(nn.Module):
    """
    @ 网络实际名称
    为了和后续接口对齐,此处类名固定为MyNet,具体是什么网络可以写在注释里。
    """
    def __init__(self):
        """
        :param args: 构建网络所需要的参数

        TODO:
        在__init__()函数里,将网络框架搭好,并存在self里
        """
        super(MyNet, self).__init__()
        resnet = tvmodel.resnet34(pretrained=True)  # 调用torchvision里的resnet34预训练模型
        resnet_out_channel = resnet.fc.in_features  # 记录resnet全连接层之前的网络输出通道数,方便连入后续卷积网络中
        self.resnet = nn.Sequential(*list(resnet.children())[:-2])  # 去除resnet的最后两层
        # 以下是YOLOv1的最后四个卷积层
        self.Conv_layers = nn.Sequential(
            nn.Conv2d(resnet_out_channel, 1024, 3, padding=1),
            nn.BatchNorm2d(1024),  # 为了加快训练,这里增加了BN层,原论文里YOLOv1是没有的
            #在卷积神经网络的卷积层之后总会添加BatchNorm2d进行数据的归一化处理,这使得数据在进行Relu之前不会因为数据过大而导致网络性能的不稳定
            nn.LeakyReLU(inplace=True),  #inplace--选择是否进行覆盖运算
            nn.Conv2d(1024, 1024, 3, stride=2, padding=1),
            nn.BatchNorm2d(1024),
            nn.LeakyReLU(inplace=True),
            nn.Conv2d(1024, 1024, 3, padding=1),
            nn.BatchNorm2d(1024),
            nn.LeakyReLU(inplace=True),
            nn.Conv2d(1024, 1024, 3, padding=1),
            nn.BatchNorm2d(1024),
            nn.LeakyReLU(inplace=True),
        )
        # 以下是YOLOv1的最后2个全连接层
        self.Conn_layers = nn.Sequential(
            nn.Linear(GL_NUMGRID * GL_NUMGRID * 1024, 4096),
            nn.LeakyReLU(inplace=True),
            nn.Linear(4096, GL_NUMGRID * GL_NUMGRID * (5*GL_NUMBBOX+len(GL_CLASSES))),
            nn.Sigmoid()  # 增加sigmoid函数是为了将输出全部映射到(0,1)之间,因为如果出现负数或太大的数,后续计算loss会很麻烦
        )
4.开始训练
在服务器上run了135个epoch试验了一下,1080Ti,bathsize=4,最后的avgloss达到0.008。
    def main(self):
        """
        训练接口主函数,完成整个训练流程
        1. 创建训练集和验证集的DataLoader类
        2. 初始化带训练的网络
        3. 选择合适的优化器
        4. 训练并验证指定个epoch,保存其中评价指标最好的模型,并打印训练过程信息
        5. TODO: 可视化训练过程信息
        """
        opts = self.opts
        if not os.path.exists(opts.checkpoints_dir):
            os.mkdir(opts.checkpoints_dir)
        random_seed = opts.random_seed
        train_dataset = MyDataset(opts.dataset_dir, seed=random_seed, mode="train", train_val_ratio=0.9)
        val_dataset = MyDataset(opts.dataset_dir, seed=random_seed, mode="val", train_val_ratio=0.9)
        train_loader = DataLoader(train_dataset, opts.batch_size, shuffle=False, num_workers=0)
        val_loader = DataLoader(val_dataset, batch_size=1, shuffle=False, num_workers=opts.num_workers)
        num_train = len(train_dataset)
        num_val = len(val_dataset)

        if opts.pretrain is None:
            model = MyNet()
        else:
            model = torch.load(opts.pretrain)
        if opts.use_GPU:
            model.to(opts.GPU_id)
        optimizer = torch.optim.SGD(model.parameters(), lr=opts.lr, momentum=0.9, weight_decay=opts.weight_decay)
        # optimizer = torch.optim.Adam(model.parameters(), lr=opts.lr, weight_decay=opts.weight_decay)

        best_metric=1000000
        for e in range(opts.start_epoch, opts.epoch+1):
            t = time.time()
            self.__train(model, train_loader, optimizer, e, num_train, opts)
            t2 = time.time()
            print("Training consumes %.2f second\n" % (t2-t))
            with open(os.path.join(opts.checkpoints_dir, "log.txt"), "a+") as log_file:
                log_file.write("Training consumes %.2f second\n" % (t2-t))
            if e % opts.save_freq==0 or e == opts.epoch+1:
                self.__save_model(model, e, opts)
5.预测
class TestInterface(object):
    """
    网络测试接口,
    main(): 网络测试主函数
    """
    def __init__(self, opts):
        self.opts = opts
        print("=======================Start inferring.=======================")

    def main(self):
        """
        具体测试流程根据不同项目有较大区别,需要自行编写代码,主要流程如下:
        1. 获取命令行参数
        2. 获取测试集
        3. 加载网络模型
        4. 用网络模型对测试集进行测试,得到测试结果
        5. 根据不同项目,计算测试集的评价指标, 或者可视化测试结果
        """
        opts = self.opts
        img_list = os.listdir(opts.dataset_dir)
        trans = transforms.Compose([
            # transforms.Resize((112, 112)),
            transforms.ToTensor(),
        ])
        model = torch.load(opts.weight_path)
        if opts.use_GPU:
            model.to(opts.GPU_id)
        for img_name in img_list:
            img_path = os.path.join(opts.dataset_dir, img_name)
            img = Image.open(img_path).convert('RGB')
            img = trans(img)
            img = torch.unsqueeze(img, dim=0)
            print(img_name, img.shape)
            if opts.use_GPU:
                img = img.to(opts.GPU_id)
            preds = torch.squeeze(model(img), dim=0).detach().cpu()
            preds = preds.permute(1,2,0)
            bbox = labels2bbox(preds)
            draw_img = cv2.imread(img_path)
            self.draw_bbox(draw_img, bbox)

    def draw_bbox(self, img, bbox):
        """
        根据bbox的信息在图像上绘制bounding box
        :param img: 绘制bbox的图像
        :param bbox: 是(n,6)的尺寸,0:4是(x1,y1,x2,y2), 4是conf, 5是cls
        """
        h, w = img.shape[0:2]
        n = bbox.shape[0]
        for i in range(n):
            confidence = bbox[i, 4]
            if confidence<0.2:
                continue
            p1 = (int(w * bbox[i, 0]), int(h * bbox[i, 1]))
            p2 = (int(w * bbox[i, 2]), int(h * bbox[i, 3]))
            cls_name = GL_CLASSES[int(bbox[i, 5])]
            print(cls_name, p1, p2)
            cv2.rectangle(img, p1, p2, COLOR[int(bbox[i, 5])])
            cv2.putText(img, cls_name, p1, cv2.FONT_HERSHEY_SIMPLEX, 0.5, (255, 255, 255))
            cv2.putText(img, str(confidence), (p1[0],p1[1]-10), cv2.FONT_HERSHEY_SIMPLEX, 0.5, (255, 255, 255))
        cv2.imshow("bbox", img)
        cv2.waitKey(0)
参考文章:
https://blog.csdn.net/shuiyixin/article/details/82468870
什么是mAP:https://blog.csdn.net/shuiyixin/article/details/86349643
https://blog.csdn.net/weixin_41424926/article/details/105383064?spm=1001.2014.3001.5501


 3912
3912


 被折叠的 条评论
为什么被折叠?
被折叠的 条评论
为什么被折叠?
 到【灌水乐园】发言


