win10上cmake编译opencv-gpu版本(vs2015 IDE)

14 篇文章 0 订阅
12 篇文章 0 订阅

opencv的GPU版本的编译工作搞了很长时间,总结一下:

tools:

小新锐7000 : windows10 x64
oepncv2.4.13.2 : htps://sourceforge.net/projects/opencvlibrary/files/opencv-win/2.4.13/opencv-2.4.13.2-vc14.exe/download
vs2015 : 使用的oepncv2.4.13.2是针对vc14的,最后选用vs2015,其他的没试过
cmake3.9.6 : https://cmake.org/download/ (对CMakeList.txt配置生成相关编译文件)
cuda8.0 :NVIDIA官网

GPU : NVIDIA GTX1050

注:因为pc配置与环境的多样化,致使opencv的gpu编译出来的变种多样化,在不同配置和环境的机器上无法共用,需要重新编译。

opencv解压之后得到opencv包,现在我们有两个包:
1 opencv文件夹(opencv解压之后的,里面有build和sources两个子文件夹)
2 cuda_vc14文件夹(我们新建的,用来放opencv编译过程生成的文件)

cmake-gui

CMake:
Binaries for compute capabilities 1.3 and 2.0 (controlled by CUDA_ARCH_BIN in CMake)
PTX code for compute capabilities 1.1 and 1.3 (controlled by CUDA_ARCH_PTX in CMake)

NVIDIA* compiler:
1 :
二进制文件 (cubin and fatbin)
2 :
中间代码 (PTX)

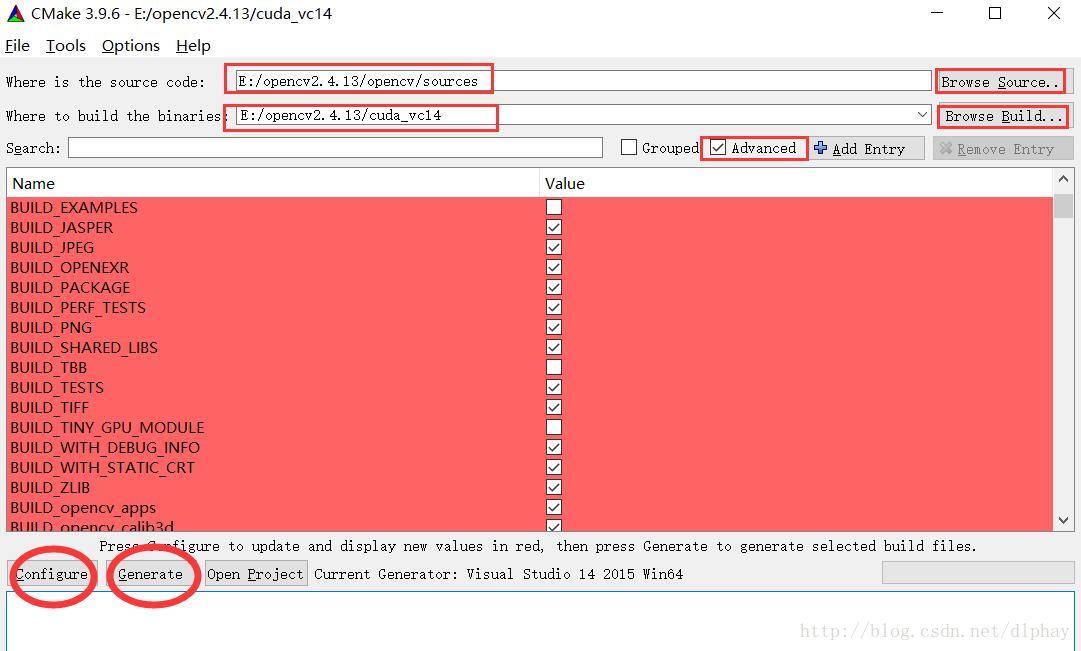
取消选项:BUILD_DOCS, BUILD_EXAMPLES, CUDA_ATTACH_VS_BUILD_RULE_TO_CUDA_FILE, WITH_TBB, WITH_OPENGL(取消这些对后面的gpu使用都不会影响)
选中选项:WITH_CUBLAS, WITH_CUDA(我们主要要用到CUDA的编译器nvcc)

点击Configure,Configure成功之后点击Generate!!!
General configuration for OpenCV 2.4.13.2 =====================================
  Version control:               unknown

  Platform:
    Host:                        Windows 10.0.15063 AMD64
    CMake:                       3.9.6
    CMake generator:             Visual Studio 14 2015 Win64
    CMake build tool:            C:/Program Files (x86)/MSBuild/14.0/bin/MSBuild.exe
    MSVC:                        1900

  C/C++:
    Built as dynamic libs?:      YES
    C++ Compiler:                E:/vs2015/VC/bin/x86_amd64/cl.exe  (ver 19.0.24210.0)
    C++ flags (Release):         /DWIN32 /D_WINDOWS /W4 /GR /EHa  /D _CRT_SECURE_NO_DEPRECATE /D _CRT_NONSTDC_NO_DEPRECATE /D _SCL_SECURE_NO_WARNINGS /Gy /bigobj /Oi  /wd4251 /wd4275 /wd4589 /wd4359 /MP8  /MD /O2 /Ob2 /DNDEBUG  /Zi
    C++ flags (Debug):           /DWIN32 /D_WINDOWS /W4 /GR /EHa  /D _CRT_SECURE_NO_DEPRECATE /D _CRT_NONSTDC_NO_DEPRECATE /D _SCL_SECURE_NO_WARNINGS /Gy /bigobj /Oi  /wd4251 /wd4275 /wd4589 /wd4359 /MP8  /MDd /Zi /Ob0 /Od /RTC1 
    C Compiler:                  E:/vs2015/VC/bin/x86_amd64/cl.exe
    C flags (Release):           /DWIN32 /D_WINDOWS /W3  /D _CRT_SECURE_NO_DEPRECATE /D _CRT_NONSTDC_NO_DEPRECATE /D _SCL_SECURE_NO_WARNINGS /Gy /bigobj /Oi    /MP8  /MD /O2 /Ob2 /DNDEBUG  /Zi
    C flags (Debug):             /DWIN32 /D_WINDOWS /W3  /D _CRT_SECURE_NO_DEPRECATE /D _CRT_NONSTDC_NO_DEPRECATE /D _SCL_SECURE_NO_WARNINGS /Gy /bigobj /Oi    /MP8  /MDd /Zi /Ob0 /Od /RTC1 
    Linker flags (Release):      /machine:x64  /INCREMENTAL:NO  /debug
    Linker flags (Debug):        /machine:x64  /debug /INCREMENTAL 
    ccache:                      NO
    Precompiled headers:         YES

  OpenCV modules:
    To be built:                 core flann imgproc highgui features2d calib3d ml video legacy objdetect photo gpu ocl nonfree contrib stitching superres ts videostab
    Disabled:                    world
    Disabled by dependency:      -
    Unavailable:                 androidcamera dynamicuda java python viz

  Windows RT support:            NO

  GUI: 
    QT:                          NO
    Win32 UI:                    YES
    OpenGL support:              NO
    VTK support:                 NO

  Media I/O: 
    ZLib:                        build (ver 1.2.7)
    JPEG:                        build (ver 62)
    PNG:                         build (ver 1.5.27)
    TIFF:                        build (ver 42 - 4.0.2)
    JPEG 2000:                   build (ver 1.900.1)
    OpenEXR:                     build (ver 1.7.1)

  Video I/O:
    Video for Windows:           YES
    DC1394 1.x:                  NO
    DC1394 2.x:                  NO
    FFMPEG:                      YES (prebuilt binaries)
      avcodec:                   YES (ver 55.18.102)
      avformat:                  YES (ver 55.12.100)
      avutil:                    YES (ver 52.38.100)
      swscale:                   YES (ver 2.3.100)
      avresample:                YES (ver 1.0.1)
    OpenNI:                      NO
    OpenNI PrimeSensor Modules:  NO
    PvAPI:                       NO
    GigEVisionSDK:               NO
    DirectShow:                  YES
    Media Foundation:            NO
    XIMEA:                       NO
    Intel PerC:                  NO

  Other third-party libraries:
    Use IPP:                     NO
    Use Eigen:                   NO
    Use TBB:                     NO
    Use OpenMP:                  NO
    Use GCD                      NO
    Use Concurrency              YES
    Use C=:                      NO
    Use Cuda:                    YES (ver 8.0)
    Use OpenCL:                  YES

  NVIDIA CUDA
    Use CUFFT:                   YES
    Use CUBLAS:                  YES
    USE NVCUVID:                 NO
    NVIDIA GPU arch:             20 21 30 35
    NVIDIA PTX archs:            30
    Use fast math:               NO
    Tiny gpu module:             NO

  OpenCL:
    Version:                     dynamic
    Include path:                E:/opencv2.4.13/opencv/sources/3rdparty/include/opencl/1.2
    Use AMD FFT:                 NO
    Use AMD BLAS:                NO

  Python:
    Interpreter:                 NO

  Java:
    ant:                         NO
    JNI:                         NO
    Java tests:                  NO

  Documentation:
    Build Documentation:         NO
    Sphinx:                      NO
    PdfLaTeX compiler:           NO
    Doxygen:                     NO

  Tests and samples:
    Tests:                       YES
    Performance tests:           YES
    C/C++ Examples:              NO

  Install path:                  E:/opencv2.4.13/cuda_vc14/install

  cvconfig.h is in:              E:/opencv2.4.13/cuda_vc14
-----------------------------------------------------------------

编译 OpenCV.sln

1 以管理员权限运行vs IDE,打开项目OpenCV.sln(在cuda_vc14路径下)
2 Debug X64下:点开在OpenCV解决方案下modules里面的opencv_core、opencv_gpu、ALL_BUILD、INSTALL,分别右击,选择生成(BUILD),
opencv_core --- 3 pass   0 failed
opencv_gpu  --- 18 pass  0 failed
ALL_BUILD   --- 48 pass  2 failed
INSTALL     --- 58 pass  0 failed

3 Relsase X64下:点开在OpenCV解决方案下modules里面的ALL_BUILD、INSTALL,分别右击,选择生成(BUILD)。
ALL_BUILD   --- 66 pass  0 failed
INSTALL     --- 1 pass  0 failed

测试之前的配置

包含目录(VC++目录下) : 
..\opencv2.4.13\cuda_vc14\install\include
..\opencv2.4.13\cuda_vc14\install\include\opencv
..\opencv2.4.13\cuda_vc14\install\include\opencv2
库目录(VC++目录下) :
..\opencv2.4.13\cuda_vc14\install\x64\vc14\lib
..\opencv2.4.13\cuda_vc14\lib\Debug
..\NVIDIA GPU Computing Toolkit\CUDA\v8.0\lib\x64

附加库目录(链接器-常规) :
..\opencv2.4.13\cuda_vc14\install\x64\vc14\bin
..\opencv2.4.13\opencv\build\x64\vc14\bin
..\opencv2.4.13\opencv\build\x86\vc14\bin

lib和dll区别 : http://www.cppblog.com/amazon/archive/2009/09/04/95318.html
(1)lib是编译时用到的,dll是运行时用到的。如果要完成源代码的编译,只需要lib;如果要使动态链接的程序运行起来,只需要dll。
(2)如果有dll文件,那么lib一般是一些索引信息,记录了dll中函数的入口和位置,dll中是函数的具体内容;如果只有lib文件,那么这个lib文件是静态编译出来的,索引和实现都在其中。使用静态编译的lib文件,在运行程序时不需要再挂动态库,缺点是导致应用程序比较大,而且失去了动态库的灵活性,发布新版本时要发布新的应用程序才行。
(3)动态链接的情况下,有两个文件:一个是LIB文件,一个是DLL文件。LIB包含被DLL导出的函数名称和位置,DLL包含实际的函数和数据,应用程序使用LIB文件链接到DLL文件。在应用程序的可执行文件中,存放的不是被调用的函数代码,而是DLL中相应函数代码的地址,从而节省了内存资源。DLL和LIB文件必须随应用程序一起发行,否则应用程序会产生错误。如果不想用lib文件或者没有lib文件,可以用WIN32 API函数LoadLibrary、GetProcAddress装载。

gpu测试

#include <iostream>   
#include "opencv2/core/core.hpp"   
#include "opencv2/features2d/features2d.hpp"   
#include "opencv2/highgui/highgui.hpp"   
#include "opencv2/legacy/legacy.hpp"
#include <iostream>   
#include <vector>   
// GPU
#include "opencv2/gpu/gpu.hpp"
using namespace cv;
using namespace std;
using namespace cv::gpu;
int main()
{
	ORB_GPU orb_gpu;
	vector<KeyPoint> dkeyPoints_1, dkeyPoints_2;
	GpuMat ddescriptors_1, ddescriptors_2;
	Mat des_1, des_2;
	/*
	orb_gpu(dimg_1, GpuMat(), dkeyPoints_1, ddescriptors_1);
	orb_gpu(dimg_2, GpuMat(), dkeyPoints_2, ddescriptors_2);
	ddescriptors_1.download(des_1);
	ddescriptors_2.download(des_2);
	BruteForceMatcher<HammingLUT> matcher;
	vector<DMatch> matches;
	matcher.match(des_1, des_2, matches);
	double max_dist = 0; double min_dist = 100;
	//-- Quick calculation of max and min distances between keypoints   
	for (int i = 0; i < des_1.rows; i++)
	{
		double dist = matches[i].distance;
		if (dist < min_dist) min_dist = dist;
		if (dist > max_dist) max_dist = dist;
	}
	printf("-- Max dist : %f \n", max_dist);
	printf("-- Min dist : %f \n", min_dist);
	//-- Draw only "good" matches (i.e. whose distance is less than 0.6*max_dist )   
	//-- PS.- radiusMatch can also be used here.   
	std::vector< DMatch > good_matches;
	for (int i = 0; i < des_1.rows; i++)
	{
		if (matches[i].distance < 0.6*max_dist)
		{
			good_matches.push_back(matches[i]);
		}
	}

	Mat img_matches;
	drawMatches(img_1, dkeyPoints_1, img_2, dkeyPoints_2,
		good_matches, img_matches, Scalar::all(-1), Scalar::all(-1),
		vector<char>(), DrawMatchesFlags::NOT_DRAW_SINGLE_POINTS);
	imshow("Match", img_matches);
	cvWaitKey();
	imwrite("Match.jpg", img_matches);
	*/
	return 0;
}
速度上的优势:

参考博客:

http://blog.csdn.net/qq_15947787/article/details/78545254

http://blog.csdn.net/u011428870/article/details/50997812

http://blog.csdn.net/qq_15947787/article/details/78534272
  • 4
    点赞
  • 16
    收藏
    觉得还不错? 一键收藏
  • 0
    评论

“相关推荐”对你有帮助么?

  • 非常没帮助
  • 没帮助
  • 一般
  • 有帮助
  • 非常有帮助
提交
评论
添加红包

请填写红包祝福语或标题

红包个数最小为10个

红包金额最低5元

当前余额3.43前往充值 >
需支付:10.00
成就一亿技术人!
领取后你会自动成为博主和红包主的粉丝 规则
hope_wisdom
发出的红包
实付
使用余额支付
点击重新获取
扫码支付
钱包余额 0

抵扣说明:

1.余额是钱包充值的虚拟货币,按照1:1的比例进行支付金额的抵扣。
2.余额无法直接购买下载,可以购买VIP、付费专栏及课程。

余额充值