hue安装
一、编译安装hue
编译相关依赖环境rpm包安装
sudo yum install apache-maven ant asciidoc cyrus-sasl-devel cyrus-sasl-gssapi gcc gcc-c++ krb5-devel libxml2-devel libxslt-devel make mysql mysql-devel openldap-devel python-devel sqlite-devel gmp-devel libffi-devel解压hue源码包
tar –xvf /date/soft/hue-3.11.0.tgz -C /bigdata
mv hue-3.11.0 hue
编译及安装
cd /soft/hue
PREFIX=/bigdata/ make install
二、配置hue
1、修改hadoop配置
修改hadoop中hdfs-site.xml配置添加如下内容,开启web访问:
<property>
   <name>dfs.webhdfs.enabled</name>
   <value>true</value>
</property>
修改配置core-site.xml,添加如下内容,开启代理用户hadoop用户访问权限。
<property>
   <name>hadoop.proxyuser.hadoop.hosts</name>
   <value>*</value>
</property>
<property>
   <name>hadoop.proxyuser.hadoop.groups</name>
   <value>*</value>
</property>
复制hdfs-site.xml和core-site.xml至其他hadoop集群服务器中
scp hdfs-site.xml core-site.xml hadoop@bigdata2:$PWD
scp hdfs-site.xml core-site.xml hadoop@bigdata3:$PWD
scp hdfs-site.xml core-site.xml hadoop@bigdata4:$PWD
2、hue基础配置
cd /bigdata/hue/desktop/conf
vim hue.ini
添加secret_key
secret_key=htbank@20161020buildhue,with==nothing注:secret_key随便填写一个30-60个长度的字符串即可,如果不填写的话Hue会提示错误信息,这个secret_key主要是出于安全考虑用来存储在session store中进行安全验证的。Asia/Shanghai。
修改时区
time_zone=Asia/Shanghai修改访问用户
server_user=hadoop
server_group=bigdata
default_user=hadoop
default_hdfs_superuser=hadoop
server_user 表示启动web服务的用户名
server_group表示启动web服务的用户所属的组
default_user为hue的admin用户,也是代理用户
default_hdfs_superuser表示管理hadoop的admin用户,如果该用户与core-site.xml设置中的用户不一致,将没有访问hdfs的权限。导致hue无法浏览hdfs文件,或无法对hdfs文件进行相关操作。
3、配置hue支持hadoop
修改hadoop配置
[hadoop]

  [[hdfs_clusters]]

    [[[default]]]

      # Enter the filesystem uri
      fs_defaultfs=hdfs://bigdata1:8020

      # Use WebHdfs/HttpFs as the communication mechanism.
      # Domain should be the NameNode or HttpFs host.
      webhdfs_url=http://bigdata1:50070/webhdfs/v1
修改yarn配置
[hadoop]

  [[yarn_clusters]]

    [[[default]]]

      # Enter the host on which you are running the ResourceManager
      resourcemanager_host=bigdata1

      # Whether to submit jobs to this cluster
      submit_to=True

      # URL of the ResourceManager API
      resourcemanager_api_url=http://bigdata1:8088

      # URL of the ProxyServer API
      proxy_api_url=http://bigdata1:8088

      # URL of the HistoryServer API
      history_server_api_url=http://bigdata1:19888
4、切换hue元数据存储至mysql中
1)、mysql环境准备
hue的元数据默认存储在sqllite3中,由于sqllite3属于轻量级数据,适合于测试使用,所以将hue元数据存储至mysql中。
使用root用户登入mysql,创建用户、数据库,用于管理hue的元数据
mysql –uroot –p创建数据库databasename,用于管理hue的元数据:
CREATE DATABASE `databasename` DEFAULT CHARACTER SET utf8 COLLATE utf8_general_ci;创建用户hue,用于hue管理在mysql中的数据:
CREATE USER 'username'@'%' IDENTIFIED BY 'password'; 为用户授权,指定hue用户只有数据库hue_to_mysql的全部权限:
GRANT all ON databasename.* TO 'username'@'%';2)、修改hue配置
vim /bigdata/hue/desktop/conf/hue.ini修改内容具体如下:
[[database]]
    # Database engine is typically one of:
    # postgresql_psycopg2, mysql, sqlite3 or oracle.
    #
    # Note that for sqlite3, 'name', below is a path to the filename. For other backends, it is the database name
    # Note for Oracle, options={"threaded":true} must be set in order to avoid crashes.
    # Note for Oracle, you can use the Oracle Service Name by setting "host=" and "port=" and then "name=<host>:<port>/<service_name>".
    # Note for MariaDB use the 'mysql' engine.
    engine=mysql
    host=bigdata1
    port=3306
    user=username
    password=password
    # Execute this script to produce the database password. This will be used when 'password' is not set.
    ## password_script=/path/script
    name=databasename
    ## options={}
name:为创建存储hue元数据的数据库名称
user:创建的数据库用户名
password:创建该用户名登入数据库的密码
3)、导入元数据
生成元数据
/bigdata/hue/build/env/bin/hue syncdb注:Email address:可以不输入
输入用户名:username
输入密码:password
该用户名和密码用于登入hue,且为超级用户,用于hue的所有权限。
将元数据同步到mysql中:
/bigdata/hue/build/env/bin/hue migrate5、修改hue的日志存储路径
vim $HUE_HOME/desktop/conf/log.conf修改内容如下:
将文件中的所有%LOG_DIR%更改为:
/data/logs/hue6、测试
运行如下命令启动hue:
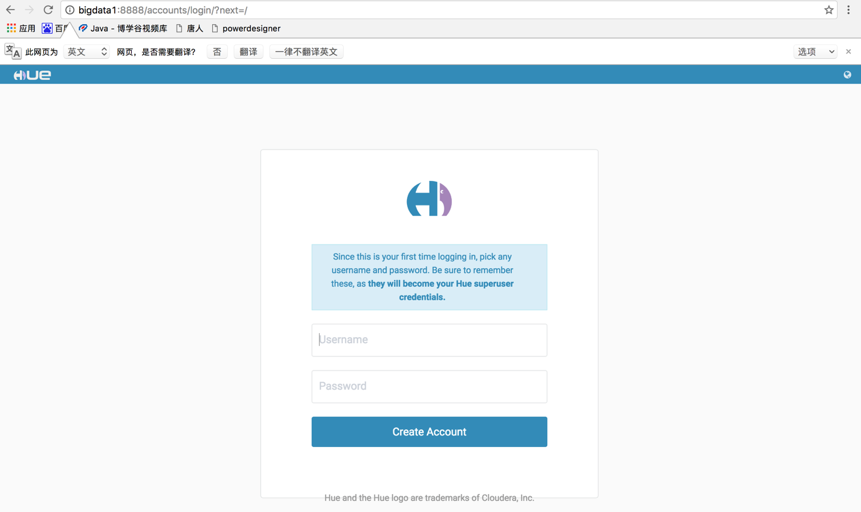
/bigdata/hue/build/env/bin/supervisor在浏览器输入网址:bigdata1:8888如果没有配置hosts,那么使用ip:8888进行访问。进入该页面:
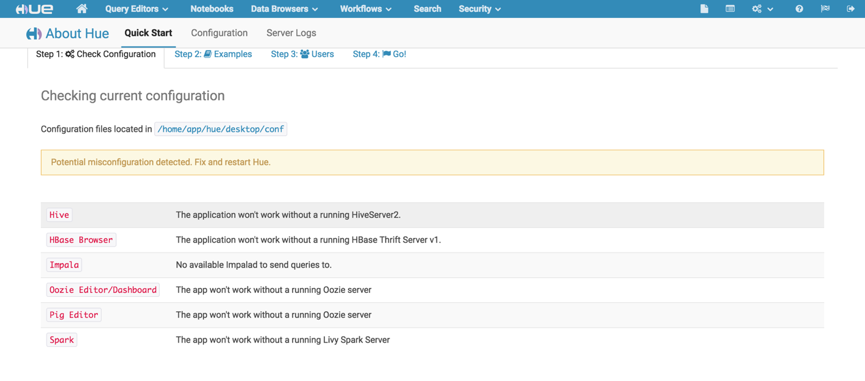
输入上个步骤的用户名以及密码,登入成功,进入该页面:
该页面中显示红色的栏目,表示还未配置,或者未配置成功。那么,接下来将配置hive和spark。由于spark需要依赖livy server,所以先进行livy的编译安装。
hdfs测试

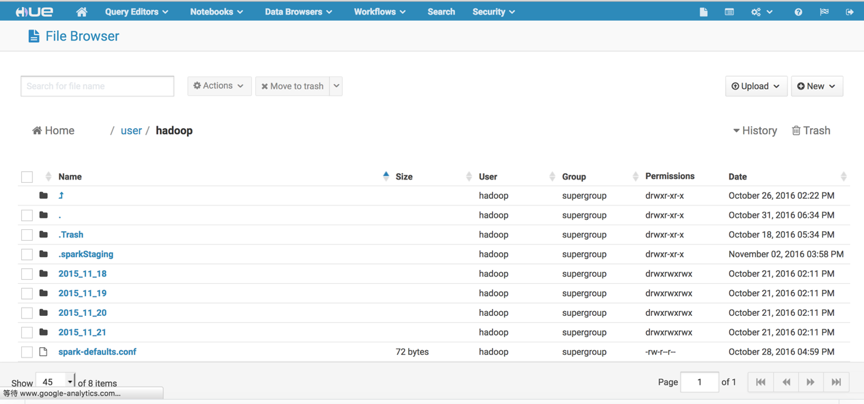
打开右上角的HDFS Browers按钮,便可以对hdfs的文件进行增删等一些列操作。
欢迎拍砖,相互学习,相互进步


 1506
1506

 被折叠的 条评论
为什么被折叠?


