


为何要自建物联网系统
近些年随着物联网产业链的不断完善,越来越多的智能设备接入物联网,各厂商或各平台需要消费者使用不同的应用,入口繁多且不能统一融合,个性化的小众需求未被厂家支持,整体用户体验还有很多需要完善之处,面对企业级物联网需求,米家这种大体量的平台,无法满足企业管理需求,物联网发展空间还很大。
于是市场上出现很多企业,开始提供物联网云端开放API,用于控制企业提供的智能设备,抢占用户入口。有的因为体量太小,导致设备价格过高、云端服务不能长久支持,给使用者带来很大的风险,有的因为体量独大,导致使用门槛过高,动辄两三万的费用才能使用,长期使用更是性价比不高。
自行搭建物联网系统,才是中小企业长远发展的选择,一方面满足企业自身的个性需求,不断迭代升级,在使用中完善,另一方面可避开长期使用第三方提供的云端API导致的风险。企业只要寻找市场上开放的智能设备,接入自建的物联网系统就好。
客户自行搭建MQTT服务
方式一:使用EMQX搭建MQTT服务自建平台
EMQX支持搭建大规模分布式 MQTT 消息服务器。
高效可靠连接海量物联网设备,实时处理分发消息与事件流数据,助力构建关键业务的物联网与云应用。
下载地址 产品概览 | EMQX 5.0 文档
方式二:使用阿里云物联网平台MQTT服务自建平台
阿里云物联网平台适合快速开发物联网项目,提供了全面的设备连接与管理服务,开发者只需简单配置,即可快速上手搭建自己的物联网应用。
详细请参考 设备快速接入阿里云MQTT (v.smart-bird.cn)
基于阿里云MQTT搭建业务系统
添加 maven 引用
pom.xml
        <!-- 阿里云物联网平台,云端SDK(原版) -->
		<!-- https://mvnrepository.com/artifact/com.aliyun/aliyun-java-sdk-iot -->
		<!-- 新版IoT Java SDK的Maven依赖坐标 -->
		<dependency>
			<groupId>com.aliyun</groupId>
			<artifactId>aliyun-java-sdk-iot</artifactId>
			<version>7.52.0</version>
		</dependency>
		<!--阿里云Java SDK公共包Maven依赖坐标-->
		<dependency>
			<groupId>com.aliyun</groupId>
			<artifactId>aliyun-java-sdk-core</artifactId>
			<version>4.6.3</version>
		</dependency>


		<!-- amqp 1.0 qpid client -->
		<dependency>
			<groupId>org.apache.qpid</groupId>
			<artifactId>qpid-jms-client</artifactId>
			<version>0.57.0</version>
		</dependency>
创建IoTServer用于服务端控制设备
IotServer.java
package com.geek.open.office.server;

import com.aliyuncs.DefaultAcsClient;
import com.aliyuncs.exceptions.ClientException;
import com.aliyuncs.exceptions.ServerException;
import com.aliyuncs.iot.model.v20180120.PubRequest;
import com.aliyuncs.iot.model.v20180120.PubResponse;
import com.aliyuncs.profile.DefaultProfile;
import com.aliyuncs.profile.IClientProfile;
import com.geek.open.common.core.ResultException;
import com.geek.open.common.core.ResultValue;
import com.geek.open.office.core.IClient;
import com.geek.open.office.entity.Device;
import com.geek.open.office.entity.DeviceCommand;
import com.geek.open.office.entity.OfficeConfig;
import com.geek.open.office.services.DeviceCommandService;
import com.geek.open.office.services.DeviceService;
import com.geek.open.office.services.OfficeConfigService;
import org.apache.commons.codec.binary.Base64;
import org.springframework.beans.factory.annotation.Autowired;
import org.springframework.stereotype.Service;
import org.springframework.web.bind.annotation.PathVariable;


@Service
public class IotServer {

    @Autowired
    private OfficeConfigService officeConfigService;

    @Autowired
    private DeviceService deviceService;

    @Autowired
    private DeviceCommandService deviceCommandService;

    /**
     * 执行命令
     * @param productKey
     * @param deviceName
     * @param commandName
     * @return
     */
    public ResultValue executeCommand(String productKey, String deviceName, String commandName)
    {

        Device device = deviceService.getValueByProductDeviceName(productKey,deviceName);
        if(device!=null)
        {
            OfficeConfig officeConfig = officeConfigService.getValueBySpace(device.spaceId);
            if(officeConfig!=null)
            {
                // device -> deviceCommand -> topic -> pub
                DeviceCommand deviceCommand = deviceCommandService.getValueByType(device.spaceId,device.brandCode,device.typeCode,commandName);
                if(deviceCommand!=null)
                {
                    String topic = "/"+officeConfig.productKey+"/"+device.deviceName+"/user/get";
                    return pub(officeConfig.accessKey,officeConfig.productKey,topic,deviceCommand.commandContent);
                }
                else
                {
                    throw new ResultException("缺少指令"+commandName+"的配置!");
                }
            }
            else
            {
                throw new ResultException("缺少OfficeConfig初始化信息!");
            }
        }
        else
        {
            throw new ResultException("没有找到Device!");
        }


    }


    public ResultValue pub(String accessKey, String productKey, String topic, String message)
    {
        IClient iClient = getIClient(accessKey);
        if(iClient!=null)
        {
            PubRequest request = new PubRequest();
            request.setIotInstanceId("");
            request.setProductKey(productKey);
            request.setMessageContent(Base64.encodeBase64String(message.getBytes()));
            request.setTopicFullName(topic);
            request.setQos(0); //目前支持QoS0和QoS1。
            try
            {
                PubResponse response = iClient.client.getAcsResponse(request);
                System.out.println("getSuccess = " + response.getSuccess());
                System.out.println("getCode = " + response.getCode());
                System.out.println("getErrorMessage = " + response.getErrorMessage());
                return new ResultValue();
            }
            catch (ServerException e)
            {
                //e.printStackTrace();
                throw  new ResultException(e.getErrMsg());
            }
            catch (ClientException e)
            {
                //System.out.println("ErrCode:" + e.getErrCode());
                //System.out.println("ErrMsg:" + e.getErrMsg());
                //e.printStackTrace();
                throw  new ResultException(e.getErrMsg());
            }
        }
        else
        {
            throw  new ResultException("iClient is null !");
        }

    }


    private IClient getIClient(String accessKey)
    {
        OfficeConfig config = officeConfigService.getValueByAccessKey(accessKey);
        if(config!=null)
        {
            IClientProfile profile = DefaultProfile.getProfile(config.regionId, config.accessKey, config.accessSecret);
            DefaultAcsClient acsClient = new  DefaultAcsClient(profile); //初始化SDK客户端。
            IClient iClient = new IClient();
            iClient.accessKey = config.accessKey;
            iClient.accessSecret = config.accessSecret;
            iClient.regionId = config.regionId;
            iClient.client = acsClient;
            return iClient;
        }
        else
        {
            throw  new ResultException("根据accessKey未能查询到OfficeConfig!");
        }
    }

}
创建AMQP用于服务端订阅设备消息
AmqpClientServer.java
package com.geek.open.office.server;
import java.net.URI;
import java.util.*;
import java.util.concurrent.ExecutorService;
import java.util.concurrent.LinkedBlockingQueue;
import java.util.concurrent.ThreadPoolExecutor;
import java.util.concurrent.TimeUnit;
import javax.crypto.Mac;
import javax.crypto.spec.SecretKeySpec;
import javax.jms.Connection;
import javax.jms.ConnectionFactory;
import javax.jms.Destination;
import javax.jms.JMSException;
import javax.jms.Message;
import javax.jms.MessageConsumer;
import javax.jms.MessageListener;
import javax.jms.MessageProducer;
import javax.jms.Session;
import javax.naming.Context;
import javax.naming.InitialContext;
import com.geek.open.common.core.DateTime;
import com.geek.open.common.core.Util;
import com.geek.open.office.entity.Device;
import com.geek.open.office.entity.WorkConsumer;
import com.geek.open.office.services.DeviceService;
import com.geek.open.office.services.WorkConsumerService;
import org.apache.commons.codec.binary.Base64;
import org.apache.qpid.jms.JmsConnection;
import org.apache.qpid.jms.JmsConnectionListener;
import org.apache.qpid.jms.message.JmsInboundMessageDispatch;
import org.slf4j.Logger;
import org.slf4j.LoggerFactory;
import org.springframework.beans.factory.annotation.Autowired;
import org.springframework.stereotype.Service;
@Service
public class AmqpClientServer {
private final Logger logger = LoggerFactory.getLogger(AmqpClientServer.class);
/**
* 工程代码泄露可能会导致 AccessKey 泄露,并威胁账号下所有资源的安全性。以下代码示例使用环境变量获取 AccessKey 的方式进行调用,仅供参考
*/
private String accessKey = "***********";
private String accessSecret = "********************";
private String consumerGroupId = "*******************";
//iotInstanceId:实例ID。若是2021年07月30日之前(不含当日)开通的公共实例,请填空字符串。
private String iotInstanceId = "";
//控制台服务端订阅中消费组状态页客户端ID一栏将显示clientId参数。
//建议使用机器UUID、MAC地址、IP等唯一标识等作为clientId。便于您区分识别不同的客户端。
private String clientId = "***************";
//${YourHost}为接入域名,请参见AMQP客户端接入说明文档。
private String host = "*************.iot-amqp.cn-shanghai.aliyuncs.com";
//${uid}.iot-amqp.${YourRegionId}.aliyuncs.com
//
// 指定单个进程启动的连接数
// 单个连接消费速率有限,请参考使用限制,最大64个连接
// 连接数和消费速率及rebalance相关,建议每500QPS增加一个连接
private int connectionCount = 4;
@Autowired
private WorkConsumerService workConsumerService;
@Autowired
private DeviceService deviceService;
//业务处理异步线程池,线程池参数可以根据您的业务特点调整,或者您也可以用其他异步方式处理接收到的消息。
private final ExecutorService executorService = new ThreadPoolExecutor(
Runtime.getRuntime().availableProcessors(),
Runtime.getRuntime().availableProcessors() * 2, 60, TimeUnit.SECONDS,
new LinkedBlockingQueue(50000));
public void init() throws Exception {
List<Connection> connections = new ArrayList<>();
//参数说明,请参见AMQP客户端接入说明文档。
for (int i = 0; i < connectionCount; i++) {
long timeStamp = System.currentTimeMillis();
//签名方法:支持hmacmd5、hmacsha1和hmacsha256。
String signMethod = "hmacsha1";
//userName组装方法,请参见AMQP客户端接入说明文档。
String userName = clientId + "-" + i + "|authMode=aksign"
+ ",signMethod=" + signMethod
+ ",timestamp=" + timeStamp
+ ",authId=" + accessKey
+ ",iotInstanceId=" + iotInstanceId
+ ",consumerGroupId=" + consumerGroupId
+ "|";
//计算签名,password组装方法,请参见AMQP客户端接入说明文档。
String signContent = "authId=" + accessKey + "×tamp=" + timeStamp;
String password = doSign(signContent, accessSecret, signMethod);
String connectionUrl = "failover:(amqps://" + host + ":5671?amqp.idleTimeout=80000)"
+ "?failover.reconnectDelay=30";
Hashtable<String, String> hashtable = new Hashtable<>();
hashtable.put("connectionfactory.SBCF", connectionUrl);
hashtable.put("queue.QUEUE", "default");
hashtable.put(Context.INITIAL_CONTEXT_FACTORY, "org.apache.qpid.jms.jndi.JmsInitialContextFactory");
Context context = new InitialContext(hashtable);
ConnectionFactory cf = (ConnectionFactory)context.lookup("SBCF");
Destination queue = (Destination)context.lookup("QUEUE");
// 创建连接。
Connection connection = cf.createConnection(userName, password);
connections.add(connection);
((JmsConnection)connection).addConnectionListener(myJmsConnectionListener);
// 创建会话。
// Session.CLIENT_ACKNOWLEDGE: 收到消息后,需要手动调用message.acknowledge()。
// Session.AUTO_ACKNOWLEDGE: SDK自动ACK(推荐)。
Session session = connection.createSession(false, Session.AUTO_ACKNOWLEDGE);
connection.start();
// 创建Receiver连接。
MessageConsumer consumer = session.createConsumer(queue);
consumer.setMessageListener(messageListener);
}
/*
logger.info("amqp demo is started successfully, and will exit after 60s ");
// 结束程序运行
Thread.sleep(60 * 1000);
logger.info("run shutdown");
connections.forEach(c-> {
try {
c.close();
} catch (JMSException e) {
logger.error("failed to close connection", e);
}
});
executorService.shutdown();
if (executorService.awaitTermination(10, TimeUnit.SECONDS)) {
logger.info("shutdown success");
} else {
logger.info("failed to handle messages");
}*/
}
private MessageListener messageListener = new MessageListener() {
@Override
public void onMessage(final Message message) {
try {
//1.收到消息之后一定要ACK。
// 推荐做法:创建Session选择Session.AUTO_ACKNOWLEDGE,这里会自动ACK。
// 其他做法:创建Session选择Session.CLIENT_ACKNOWLEDGE,这里一定要调message.acknowledge()来ACK。
// message.acknowledge();
//2.建议异步处理收到的消息,确保onMessage函数里没有耗时逻辑。
// 如果业务处理耗时过程过长阻塞住线程,可能会影响SDK收到消息后的正常回调。
executorService.submit(new Runnable() {
@Override
public void run() {
processMessage(message);
}
});
} catch (Exception e) {
logger.error("submit task occurs exception ", e);
}
}
};
/**
* 在这里处理您收到消息后的具体业务逻辑。
*/
private void processMessage(Message message) {
try {
byte[] body = message.getBody(byte[].class);
String content = new String(body);
String topic = message.getStringProperty("topic");
String messageId = message.getStringProperty("messageId");
long generateTime = message.getLongProperty("generateTime");
logger.info("receive message"
+ ",\n topic = " + topic
+ ",\n messageId = " + messageId
+ ",\n generateTime = " + generateTime
+ ",\n content = " + content);
//Arrays.stream(topic.split("/")).toList();
String[] info = topic.split("/");
String productKey = info[1];
String deviceName = info[2];
Device device = deviceService.getValueByProductDeviceName(productKey,deviceName);
if(device!=null)
{
DateTime time = new DateTime(Util.longToDate(generateTime));
//业务从这里开始
WorkConsumer consumer = new WorkConsumer();
consumer.spaceId = device.spaceId;
consumer.deviceId = device.id;
consumer.productKey = productKey;
consumer.deviceName = deviceName;
consumer.topic = topic;
consumer.messageId = messageId;
consumer.generateTime = generateTime;
consumer.content = content;
consumer.messageTime = time.date;
consumer.messageYear = time.year;
consumer.messageMonth = time.month;
consumer.messageDay = time.day;
consumer.messageHour = time.hour;
consumer.createTime = new Date();
workConsumerService.addRecord(consumer);
}
} catch (Exception e) {
logger.error("processMessage occurs error ", e);
}
}
private JmsConnectionListener myJmsConnectionListener = new JmsConnectionListener() {
/**
* 连接成功建立。
*/
@Override
public void onConnectionEstablished(URI remoteURI) {
logger.info("onConnectionEstablished, remoteUri:{}", remoteURI);
}
/**
* 尝试过最大重试次数之后,最终连接失败。
*/
@Override
public void onConnectionFailure(Throwable error) {
logger.error("onConnectionFailure, {}", error.getMessage());
}
/**
* 连接中断。
*/
@Override
public void onConnectionInterrupted(URI remoteURI) {
logger.info("onConnectionInterrupted, remoteUri:{}", remoteURI);
}
/**
* 连接中断后又自动重连上。
*/
@Override
public void onConnectionRestored(URI remoteURI) {
logger.info("onConnectionRestored, remoteUri:{}", remoteURI);
}
@Override
public void onInboundMessage(JmsInboundMessageDispatch envelope) {}
@Override
public void onSessionClosed(Session session, Throwable cause) {}
@Override
public void onConsumerClosed(MessageConsumer consumer, Throwable cause) {}
@Override
public void onProducerClosed(MessageProducer producer, Throwable cause) {}
};
/**
* 计算签名,password组装方法,请参见AMQP客户端接入说明文档。
*/
private String doSign(String toSignString, String secret, String signMethod) throws Exception {
SecretKeySpec signingKey = new SecretKeySpec(secret.getBytes(), signMethod);
Mac mac = Mac.getInstance(signMethod);
mac.init(signingKey);
byte[] rawHmac = mac.doFinal(toSignString.getBytes());
return Base64.encodeBase64String(rawHmac);
}
}
创建Consumer记录消息消费日志
WorkConsumerServer.java
package com.geek.open.office.server;

import com.geek.open.common.core.*;
import com.geek.open.common.entity.UnionUser;
import com.geek.open.office.config.MybatisPlusTableMonth;
import com.geek.open.office.entity.WorkConsumer;
import com.geek.open.office.services.WorkConsumerService;
import com.geek.open.office.view.EchartNode;
import org.springframework.beans.factory.annotation.Autowired;
import org.springframework.stereotype.Service;
import org.springframework.web.bind.annotation.PathVariable;
import org.springframework.web.bind.annotation.RequestParam;

import java.text.SimpleDateFormat;
import java.util.Date;
import java.util.List;

@Service
public class WorkConsumerServer {

    /**
     * 按日分表需要明确是哪天
     */
    private DateTime today;

    @Autowired
    private WorkConsumerService workConsumerService;

    /**
     * 自动构建为系统时间当月
     */
    public WorkConsumerServer()
    {
        setTime(new DateTime());
    }

    /**
     * 如果不调用,则默认为系统时间的当月
     * @param today
     */
    public void setTime(DateTime today)
    {
        this.today = today;
        String append =  new SimpleDateFormat("yyyyMM").format(today.date);
        MybatisPlusTableMonth.setAppend(append);
    }

    /**
     * 创建数据库的表,如果未设置时间,默认为系统时间当月
     * 如系统时间为2023-01-01 12:00:00 那么创建的表名为 work_consumer_202301
     * 建议由定时任务,每月1日0点0分0秒创建
     */
    public void createTable()
    {
        try {
            workConsumerService.createTable();
        }
        catch (Exception e)
        {

        }
    }

    /**
     * 获取某个时间段的日志
     * @param deviceId
     * @param beginTime
     * @param endTime
     * @return
     */
    public List<WorkConsumer> getListByDeviceTime(int deviceId, DateTime beginTime,DateTime endTime)
    {
        if(beginTime.year == endTime.year && beginTime.month == endTime.month)
        {
            setTime(beginTime);
            return workConsumerService.getListByDeviceTime(deviceId,beginTime.date,endTime.date);
        }
        else
        {
            throw  new ResultException("不允许跨越查询!");
        }

    }

    /**
     * 获得某月的每天某个小时段的消费记录
     * @param deviceId
     * @param year
     * @param month
     * @param hour
     * @return
     */
    public List<WorkConsumer> getListByDeviceTime(int deviceId,int year,int month,int hour)
    {
        DateTime time = new DateTime(year,month,1);
        setTime(time);
        return workConsumerService.getMonthHourList(deviceId,year,month,hour);
    }


    /**
     * 获得分页列表
     * @param today
     * @param spaceId
     * @param deviceId
     * @param pageIndex
     * @param keyword
     * @return
     */
    public ResultValue<PageResult<WorkConsumer>> getPageResult(DateTime today, int spaceId,int deviceId, int pageIndex, String keyword)
    {
        //指向分月表
        setTime(today);

        Page page = new Page();
        page.table = "work_consumer";
        page.where = " where spaceId="+spaceId+" ";
        if(deviceId>0)
        {
            page.where += " and deviceId="+deviceId+" ";
        }
        if (keyword != null && !keyword.isEmpty()) {
            page.where += " and (content like '%" + keyword + "%' or deviceName like '%" + keyword + "%' ) ";
        }
        page.orderby = " order by id desc ";
        page.pageIdex = pageIndex;
        page.pageSize = 10;

        return new ResultValue<PageResult<WorkConsumer>>(workConsumerService.getPageResult(page))
                .Detail("keyword=" + keyword);

    }


}
创建IoTController提供前端应用API
IotController.java
package com.geek.open.office.controllers;

import com.geek.open.common.core.ResultException;
import com.geek.open.common.core.ResultValue;
import com.geek.open.common.entity.UnionUser;
import com.geek.open.office.entity.Device;
import com.geek.open.office.entity.DeviceCommand;
import com.geek.open.office.entity.OfficeConfig;
import com.geek.open.office.server.IotServer;
import com.geek.open.office.server.OAuth2FeignServer;
import com.geek.open.office.services.DeviceCommandService;
import com.geek.open.office.services.DeviceService;
import com.geek.open.office.services.OfficeConfigService;
import org.springframework.beans.factory.annotation.Autowired;
import org.springframework.web.bind.annotation.*;

@RestController
@RequestMapping("/api/iot")
public class IotController extends OAuth2FeignServer {

    @Autowired
    private IotServer iotServer;

    @Autowired
    private DeviceService deviceService;

    @Autowired
    private DeviceCommandService deviceCommandService;

    @Autowired
    private OfficeConfigService officeConfigService;

    /**
     * 智能插座、智能开关 - 执行指令,如:通电、断电、功率查询、电压查询、累计用电查询
     * @return
     */
    @GetMapping("/command/{deviceName}/{commandName}")
    @ResponseBody
    public ResultValue command(@PathVariable String deviceName, @PathVariable String commandName)
    {
        UnionUser unionUser = getUnionUserCheckSpace();
        Device device = deviceService.getValueByDeviceName(unionUser.spaceId,deviceName);
        if(device!=null)
        {
            OfficeConfig officeConfig = officeConfigService.getValueBySpace(device.spaceId);
            if(officeConfig!=null)
            {
                // device -> deviceCommand -> topic -> pub
                DeviceCommand deviceCommand = deviceCommandService.getValueByType(device.spaceId,device.brandCode,device.typeCode,commandName);
                if(deviceCommand!=null)
                {
                    String topic = "/"+officeConfig.productKey+"/"+device.deviceName+"/user/get";
                    return iotServer.pub(officeConfig.accessKey,officeConfig.productKey,topic,deviceCommand.commandContent);
                }
                else
                {
                    throw new ResultException("缺少指令"+commandName+"的配置!");
                }
            }
            else
            {
                throw new ResultException("缺少OfficeConfig初始化信息!");
            }
        }
        else
        {
            throw new ResultException("没有找到Device!");
        }
    }


}
使用智能设备接入物联网系统
推荐GeekOpen智能设备,全部是通过安全认证的成品,有着严格的生产流程与测试要求,并开放设备所有功能。软件工程师可全面掌控设备,支持连接到客户自建MQTT或TCP服务,支持本地组网、云端组网,所有设备已在大量的项目实战中得到软件开发者验证,设备安全稳定可靠。
查看设备更多详细参数
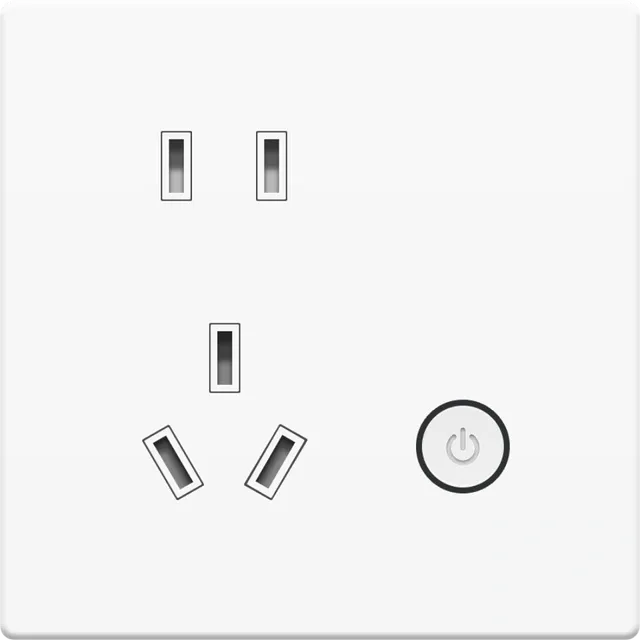 |  |
| 智能插座-10A 客户自建MQTT/TCP服务连接通信 | 智能插座-16A 客户自建MQTT/TCP服务连接通信 |
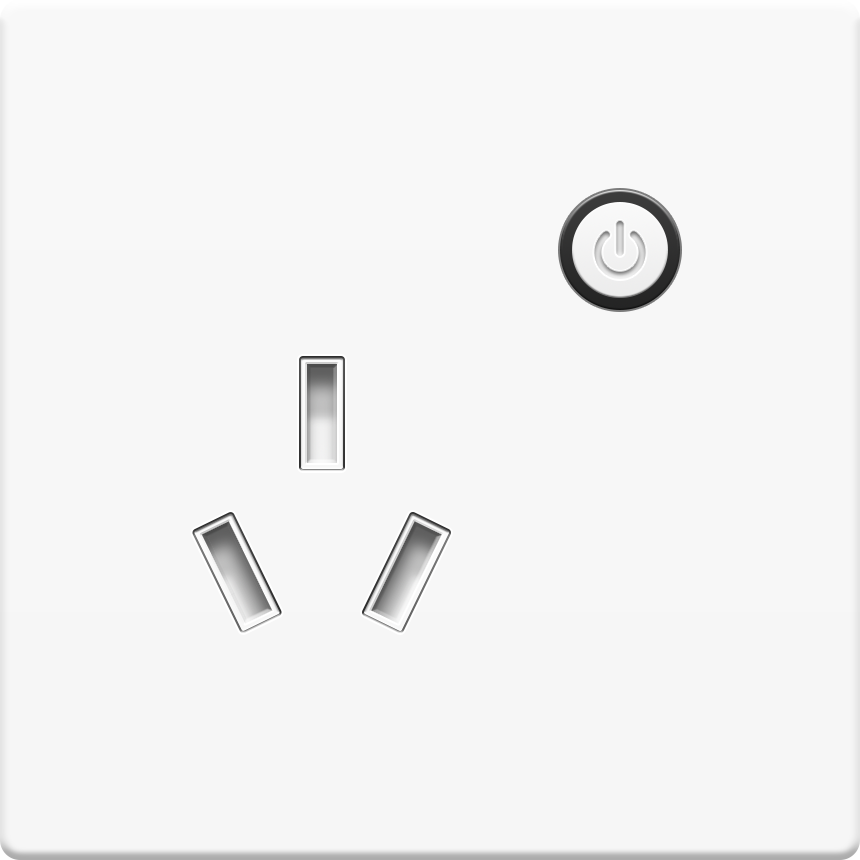
 | 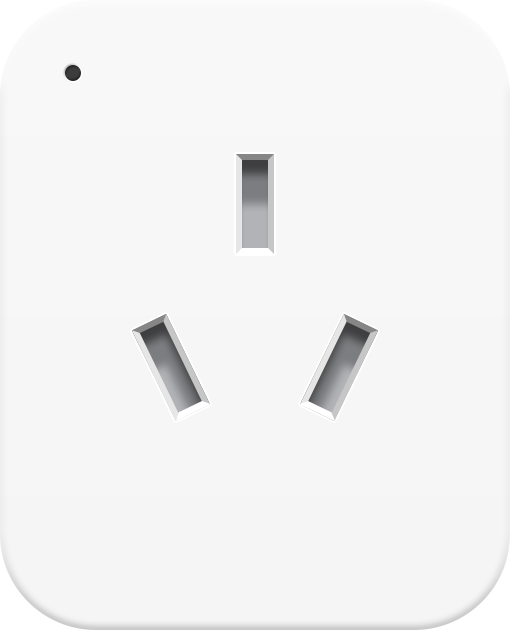 |
| 智能插座转换器-10A 客户自建MQTT/TCP服务连接通信 | 智能插座转换器-16A 客户自建MQTT/TCP服务连接通信 |
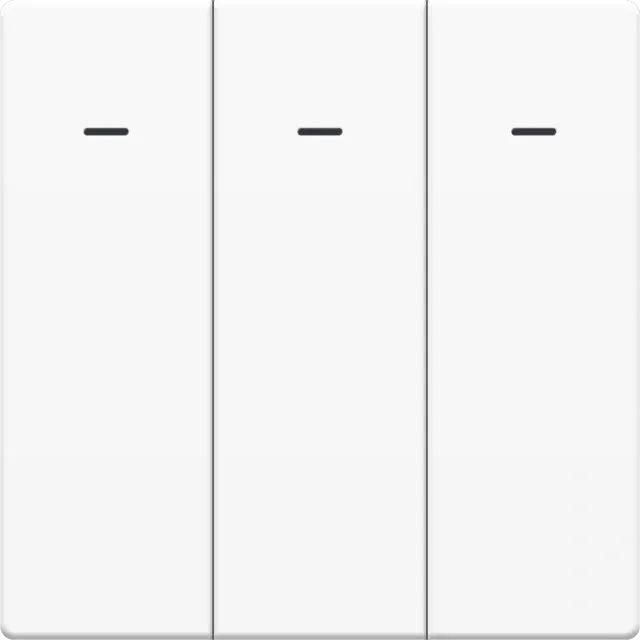 |  |
| 智能开关-10A 客户自建MQTT/TCP服务连接通信 | 小型智能通断器-10A 客户自建MQTT/TCP服务连接通信 电流/电压/累计用电实时查询 AC110v-250v宽电压输入,2500w负载 |
设备自定义设置 MQTT 参数
长按设备功能键,进入配网模式,电脑连接设备热点,浏览器打开 http://192.168.4.1 ,进入GeekOpen配网界面,点击 “自定义设置”按钮 → 然后选择"MQTT"选项卡,然后填写MQTT相关参数保存即可。
 | 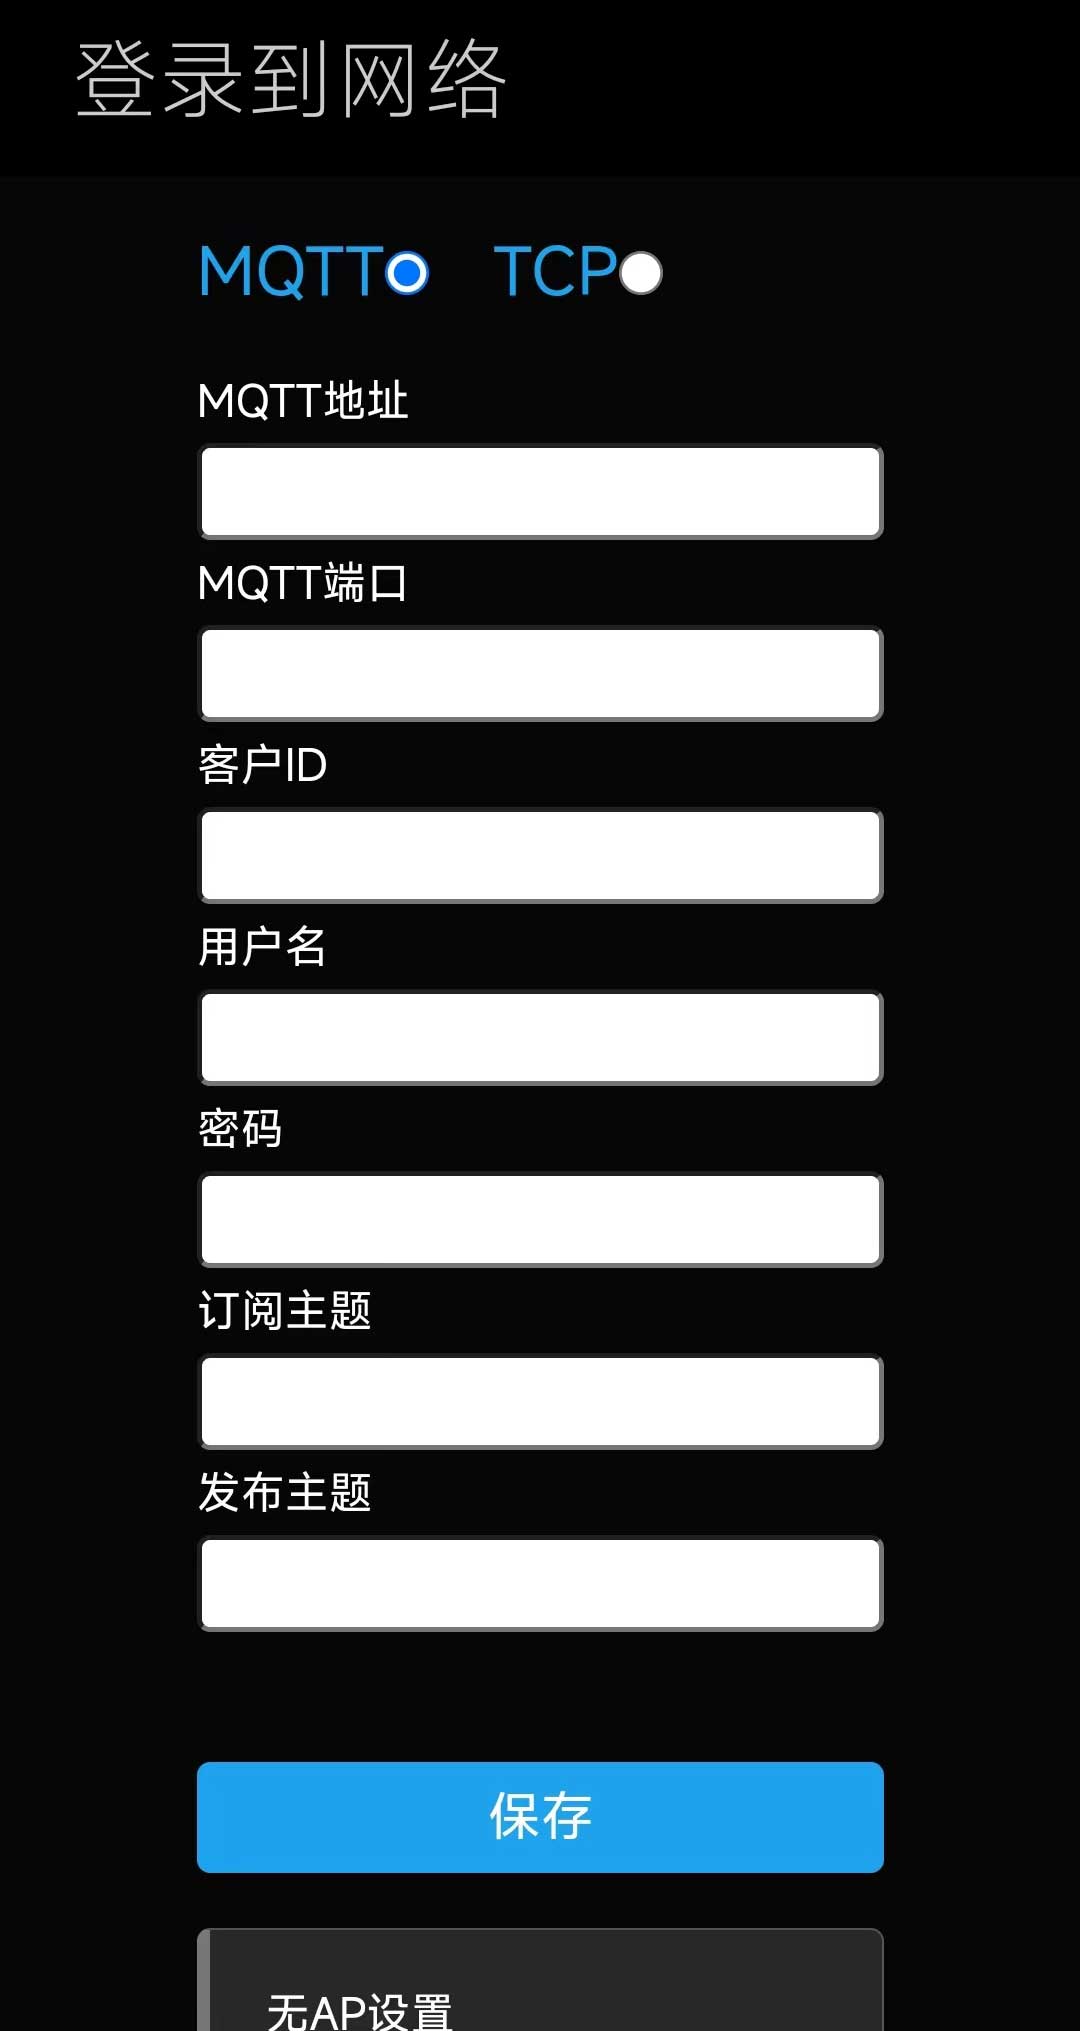 |
以阿里云为例
阿里云物联网平台 - 设备MQTT参数:
{
"clientId":"a18VyElLe8c.a4cf12be81a8|securemode=2,signmethod=hmacsha256,timestamp=1709274050367|", // 客户ID
"username":"a4cf12be81a8&a18VyElLe8c", // 用户名
"mqttHostUrl":"a18VyElLe8c.iot-as-mqtt.cn-shanghai.aliyuncs.com", // MQTT地址
"passwd":"2bc7a7b7a3f13d1c39f11e4c6b6593d5c5c7f67....", // 密码
"port":1883 //MQTT端口
}
阿里云物联网平台 - 产品自定义Topic:
/a18VyElLe8c/${deviceName}/user/get //发布主题
/a18VyElLe8c/${deviceName}/user/update //订阅主题
设备指令/MQTT协议
1. 获取设备状态信息
向主题 /${appId}/${deviceKey}/${deviceMAC}/publish 发布以下数据:
{
"type":"info"
}
| 字段 | 属性 | 备注 |
| type | String | 获取设备基本信息固定传"info" |
设备向主题 /${appId}/${deviceKey}/${deviceMAC}/subscribe 返回以下数据:
{
"mac": "4CEBD60BFD62",
"type": "Breaker-1",
"version": "2.0.0",
"key": 1,
"wifiLock": 0,
"keyLock": 0,
"ip": "192.168.122.119",
"ssid": "shodan1q"
}
| 字段 | 属性 | 备注 |
| mac | String | 设备MAC,唯一标识 |
| type | String | 获取设备基本信息固定传"info" |
| version | String | 当前固件版本号 |
| key | int | 插设备通断电状态,0:断电,1:通电 |
| wifiLock | int | 配网锁,0:关闭,1:开启 |
| keyLock | int | 按键锁,0:关闭,1:开启 |
| ip | String | 设备连接WIFI后获取的IP |
| ssid | String | 设备当前连接的WIFI名称 |
2. 获取插座电量信息
向主题 /${appId}/${deviceKey}/${deviceMAC}/publish 发布以下数据:
{
"type":"statistic"
}
| 字段 | 属性 | 备注 |
| type | String | 获取设备电量信息固定传"statistic" |
设备向主题 /${appId}/${deviceKey}/${deviceMAC}/subscribe 返回以下数据:
{
"voltage": 226.024,
"current": 15.027,
"power": 2921.511,
"energy": 25.047
}
| 字段 | 属性 | 备注 |
| voltage | float | 当前电压,单位V,保留三位小数 |
| current | float | 当前电流,单位A,保留三位小数 |
| power | float | 当前功率,单位W,保留三位小数 |
| energy | float | 累计用电量,单位KW*H,保留三位小数,断电后不会归零,重置后会归零 |
3. 控制插座通电断电
向主题 /${appId}/${deviceKey}/${deviceMAC}/publish 发布以下数据:
{
"type":"event",
"key":0
}
| 字段 | 属性 | 备注 |
| type | String | 控制设备开关固定传"event" |
| key | int | 控制设备通电 0:断电,1:通电 |
4. 设置Wifi配网锁
向主题 /${appId}/${deviceKey}/${deviceMAC}/publish 发布以下数据:
{
"type":"setting",
"wifiLock":0
}
| 字段 | 属性 | 备注 |
| type | String | 设备设置固定传"setting" |
| wifiLock | int | 配网锁 0:关闭,1:开启 |
5. 设置按键控制锁
向主题 /${appId}/${deviceKey}/${deviceMAC}/publish 发布以下数据:
{
"type":"setting",
"keyLock":0
}
| 字段 | 属性 | 备注 |
| type | String | 设备设置固定传"setting" |
| keyLock | String | 按键锁 0:关闭,1:开启 |
6. 设备软重启
向主题 /${appId}/${deviceKey}/${deviceMAC}/publish 发布以下数据:
{
"type":"setting",
"system":"restart"
}
| 字段 | 属性 | 备注 |
| type | String | 设备设置固定传"setting" |
| system | String | 设备软重启固定传"restart" |
7. 重置/恢复出厂设置
恢复出厂设置后配网信息和自定义信息都会清空!
向主题 /${appId}/${deviceKey}/${deviceMAC}/publish 发布以下数据:
{
"type":"setting",
"system":"reset"
}
| 字段 | 属性 | 备注 |
| type | String | 设备设置固定传"setting" |
| system | String | 设备回复出厂设置固定传"reset" |
8. 自定义MQTT
设备支持自定义MQTT,注意:在通过MQTT自定义MQTT信息后,需要将设备断电重启或者向设备发送重启命令才可生效。
向主题 /${appId}/${deviceKey}/${deviceMAC}/publish 发布以下数据:
{
"type":"custom",
"protocol":"mqtt",
"server": "192.168.0.195",
"port":"1883",
"clientId":"custum",
"username": "username",
"password": "password",
"publish": "/topic/qos0",
"subcribe": "/topic/qos1"
}
| 字段 | 属性 | 备注 |
| type | String | 设备自定义固定传"custom" |
| protocol | String | MQTT协议固定传"mqtt" |
| server | String | 自定义MQTT服务器地址 |
| port | String | 自定义MQTT服务器端口 |
| clientId | String | 自定义MQTT客户端ID 注意:不可重复 |
| username | String | 自定义MQTT服务器用户名 |
| password | String | 自定义MQTT服务器密码 |
| publish | String | 自定义MQTT发布主题 注意:不可重复 |
| subcribe | String | 自定义MQTT订阅主题 注意:不可重复 |
设备向主题 /${appId}/${deviceKey}/${deviceMAC}/subscribe 返回以下数据:
{
"protocol": "mqtt",
"server": "192.168.0.195",
"port": "1883",
"clientId": "custum",
"username": "username",
"password": "password",
"publish": "/topic/qos0",
"subcribe": "/topic/qos1"
}
9. 自定义TCP
设备支持通过MQTT方式自定义TCP信息,注意:通过MQTT自定义TCP信息后,需要将设备断电重启或者向设备发送重启命令才可生效。
向主题 /${appId}/${deviceKey}/${deviceMAC}/publish 发布以下数据:
{
"type":"custom",
"protocol": "tcp",
"server": "192.168.0.129",
"port":"4444"
}
| 字段 | 属性 | 备注 |
| type | String | 设备自定义固定传"custom" |
| protocol | String | TCP协议固定传"tcp" |
| server | String | 自定义TCP服务器地址 |
| port | String | 自定义TCP服务器端口 |
设备向主题 /${appId}/${deviceKey}/${deviceMAC}/subscribe 返回以下数据:
{
"protocol":"tcp",
"server": "192.168.0.129",
"port":"4444"
}
其它参考信息
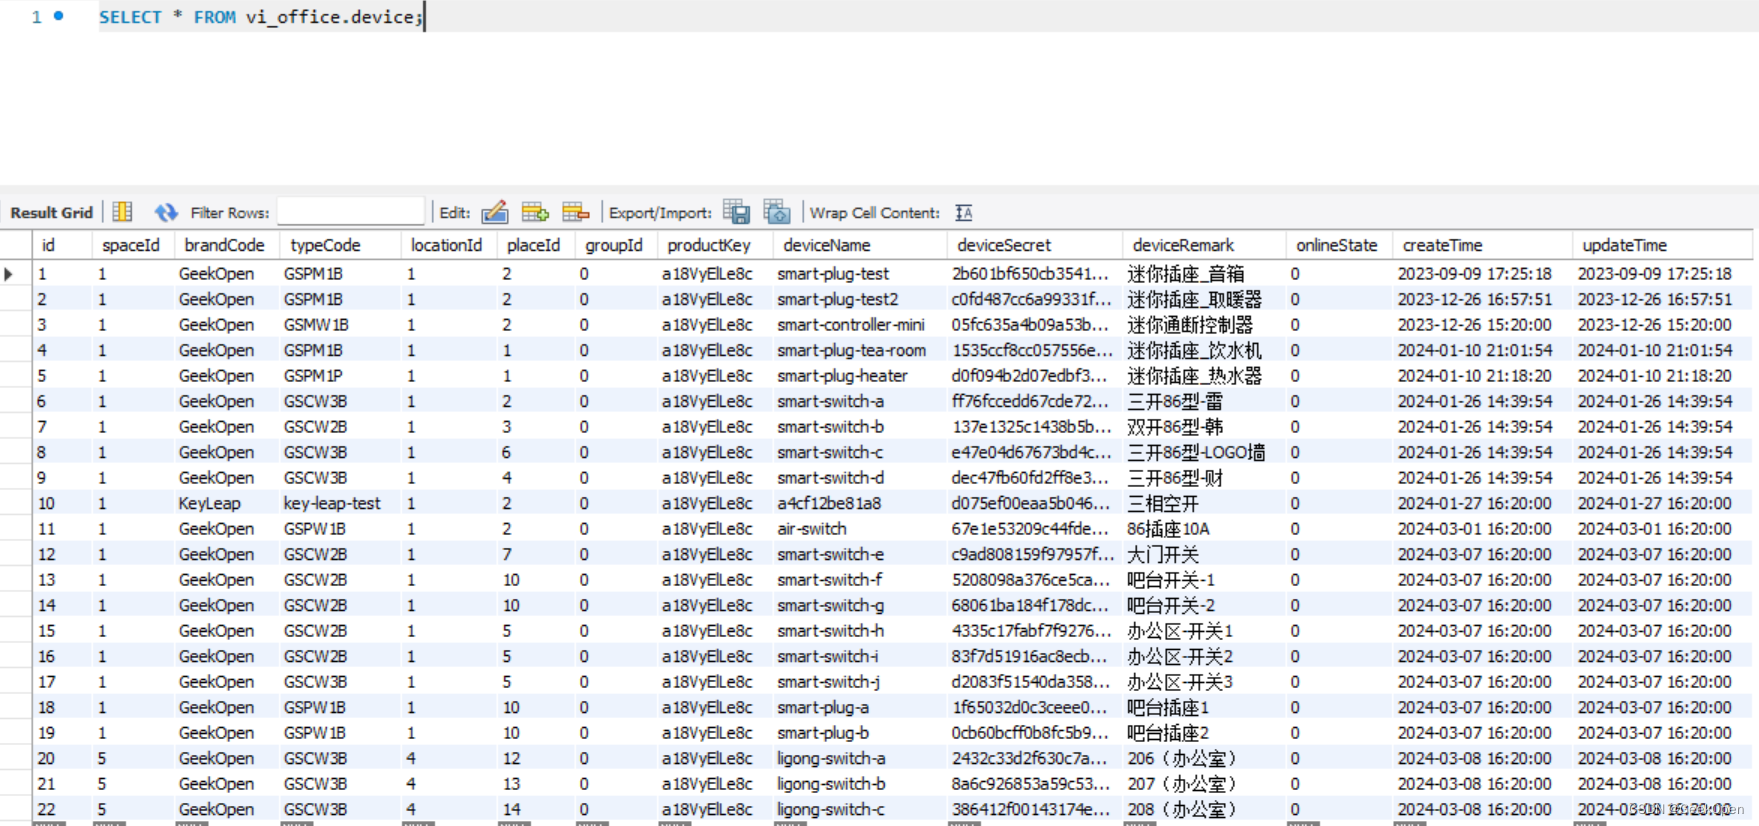
device 表
用于记录设备连接MQTT的相关信息
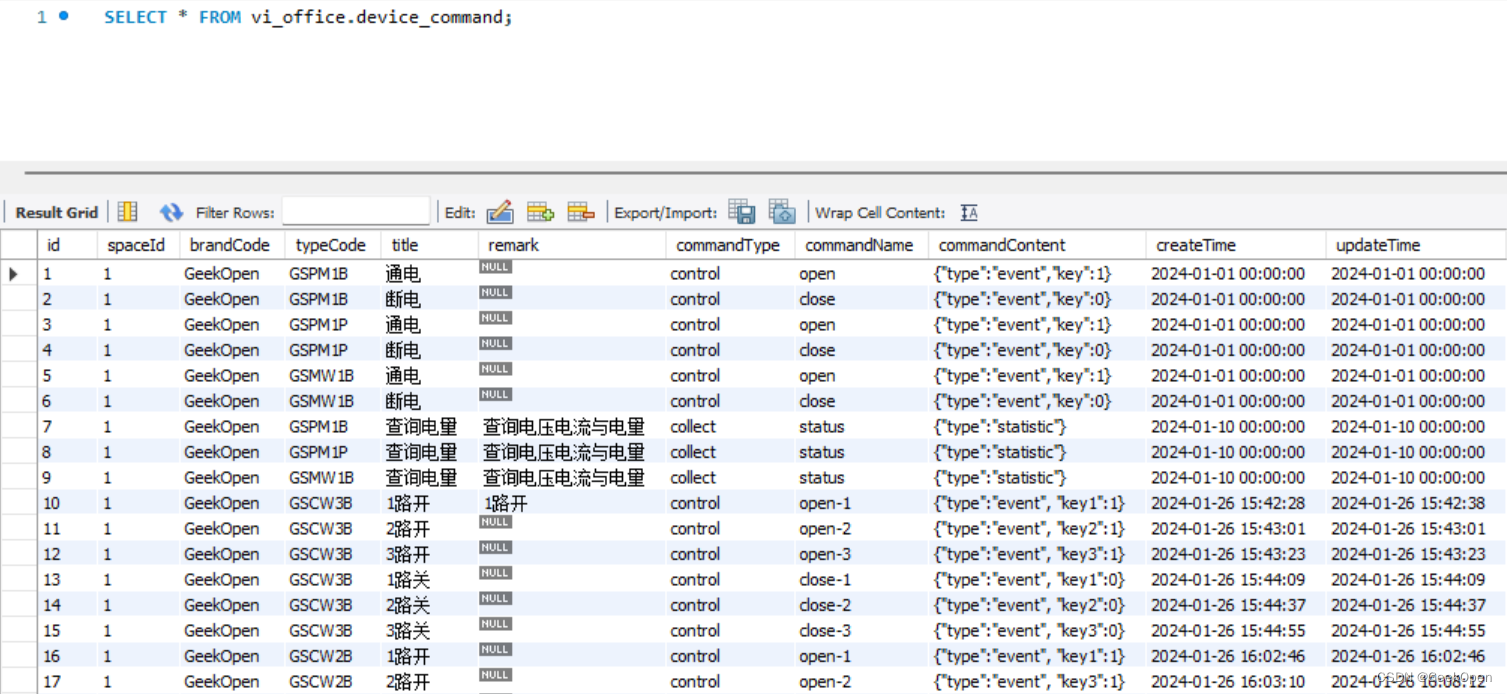
device_command 表
用于自定义指令定义,可以将不同厂商的指令统一管理
device_command_rename 表
用于个性化指令名称

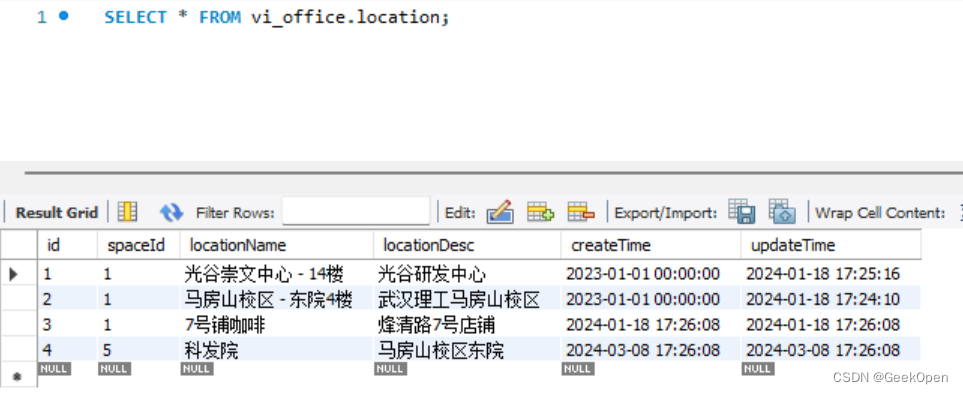
location表
用于记录不同的地点
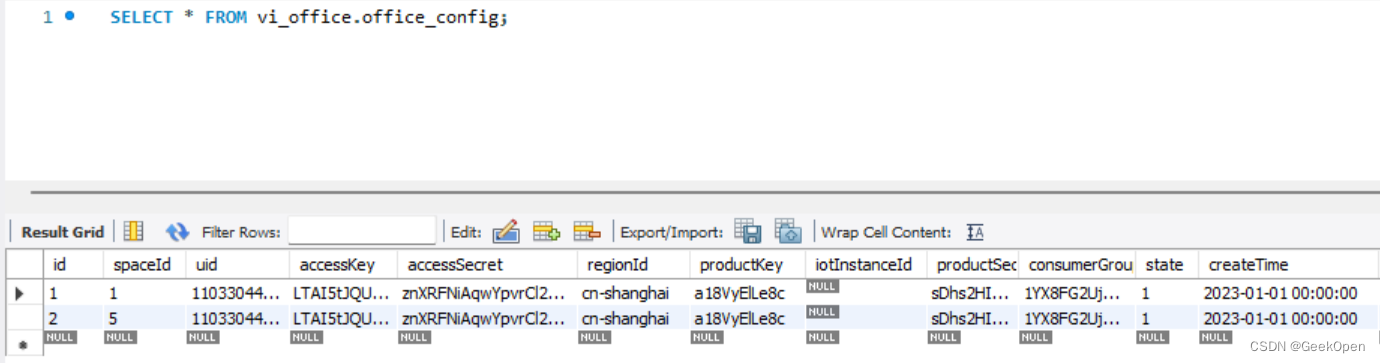
office_config表
用于记录MQTT的授权信息
定时采集设备数据
package com.geek.open.office.server;


import com.geek.open.office.config.GeekOpenConfig;
import com.geek.open.office.entity.TimeTask;
import com.geek.open.office.services.TimeTaskService;
import org.springframework.beans.factory.annotation.Autowired;
import org.springframework.context.annotation.Configuration;
import org.springframework.scheduling.TaskScheduler;
import org.springframework.scheduling.annotation.EnableScheduling;
import org.springframework.scheduling.annotation.SchedulingConfigurer;
import org.springframework.scheduling.config.CronTask;
import org.springframework.scheduling.config.ScheduledTaskRegistrar;
import org.springframework.scheduling.config.Task;
import org.springframework.scheduling.config.TriggerTask;
import org.springframework.scheduling.support.CronTrigger;

import javax.annotation.PostConstruct;
import java.time.LocalDateTime;
import java.util.ArrayList;
import java.util.HashMap;
import java.util.List;
import java.util.concurrent.ConcurrentHashMap;
import java.util.concurrent.ScheduledFuture;

/**
 * 数据库配置定时任务
 */
@Configuration      // 1.主要用于标记配置类,兼备Component的效果。
@EnableScheduling   // 2.开启定时任务
public class TimeTaskConfig implements SchedulingConfigurer {
    private static ScheduledTaskRegistrar taskRegistrar;

    @Autowired
    private TimeTaskService timeTaskService;

    @Autowired
    private TimeTaskServer timeTaskServer;

    @Autowired
    private GeekOpenConfig geekOpenConfig;


    @Override
    public void configureTasks(ScheduledTaskRegistrar taskRegistrar) {
        if(geekOpenConfig.timeTask)
        {
            taskRegistrar.setTriggerTasksList(getTriggerTaskList());
            TimeTaskConfig.taskRegistrar = taskRegistrar;
        }
        else
        {
            System.out.print("可能因为是开发模式,定时任务不被启用!");
        }

    }

    /**
     * 更新运行的任务,总是取消所有再重新添加任务
     */
    public void  updateTask()
    {
        //取消当前所有任务
        taskRegistrar.getScheduledTasks().forEach(v->{
            v.cancel();
        });
        //重新查询出所有任务并设置
        taskRegistrar.setTriggerTasksList(getTriggerTaskList());
        //让设置生效
        taskRegistrar.afterPropertiesSet();
        System.out.println("smartbird --> taskRegistrar.getTriggerTaskList().size() = "+taskRegistrar.getTriggerTaskList().size());
    }

    /**
     * 从数据库获得任务并设定需要执行的代码
     * @return
     */
    public   List<TriggerTask>  getTriggerTaskList()
    {
        List<TriggerTask> triggerTaskList = new ArrayList<>();
        List<TimeTask> timeTaskList = timeTaskService.getRunList();
        if(timeTaskList.size()>0)
        {
            for(int i=0;i<timeTaskList.size();i++)
            {
                TimeTask timeTask = timeTaskList.get(i);
                TriggerTask triggerTask = new TriggerTask(
                        ()->{
                            //需要执行的任务
                            System.out.println("geekopen --> "+timeTask.taskName+" cron="+timeTask.cron+" deviceName="+timeTask.deviceName+" commandName="+timeTask.commandName+"-- 执行动态定时任务时间: " + LocalDateTime.now());
                            timeTaskServer.executeTask(timeTask);
                        },
                        triggerContext -> {
                            //设定的Cron表达式
                            return  new CronTrigger(timeTask.cron).nextExecutionTime(triggerContext);
                        }
                );
                triggerTaskList.add(triggerTask);
            }
        }
        else
        {
            System.out.print("数据库中没有可用的TimeTask记录!");
        }

        return  triggerTaskList;
    }


}
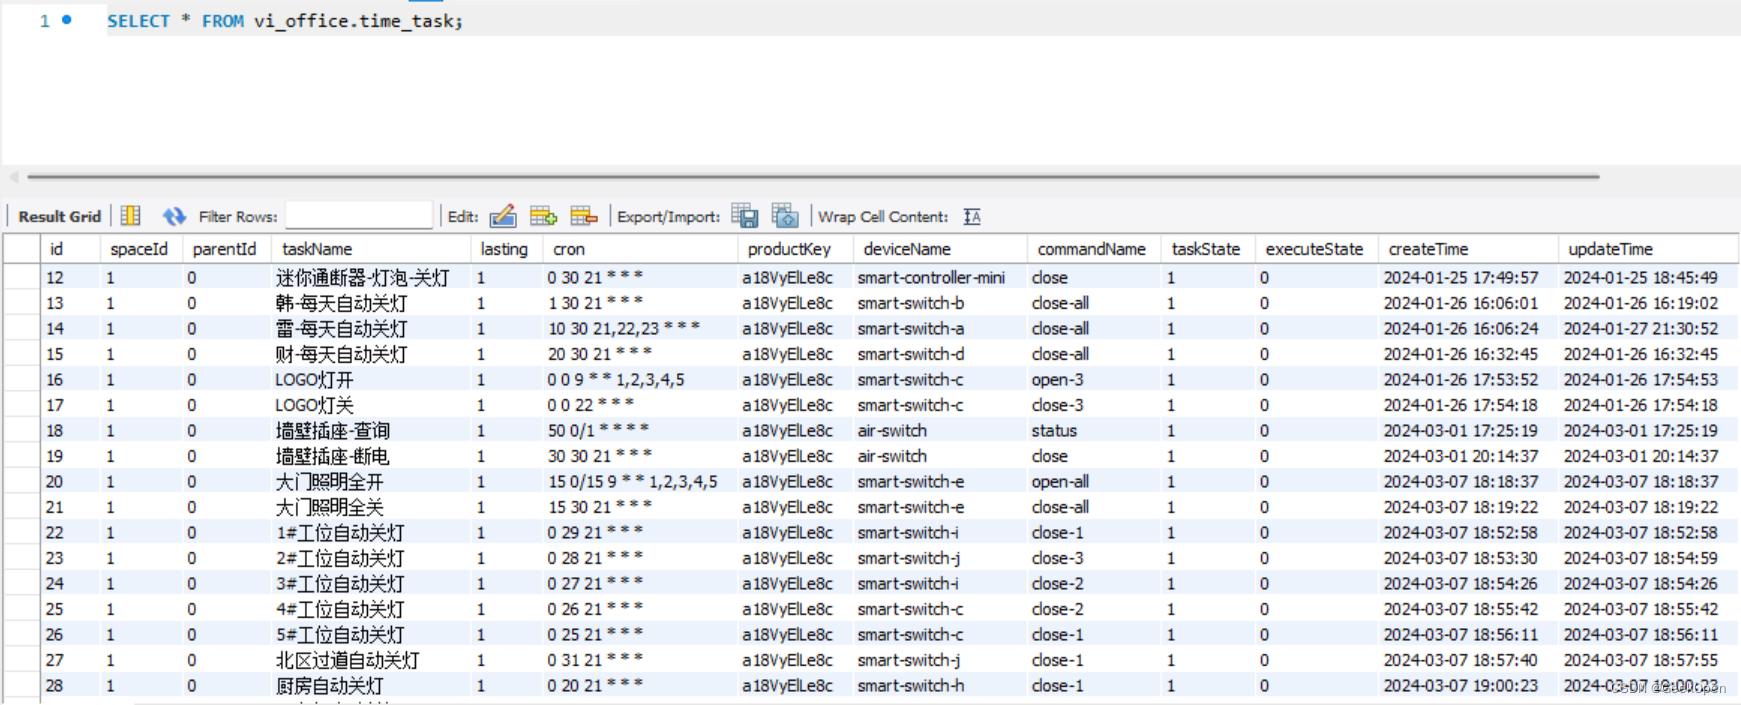
time_task表
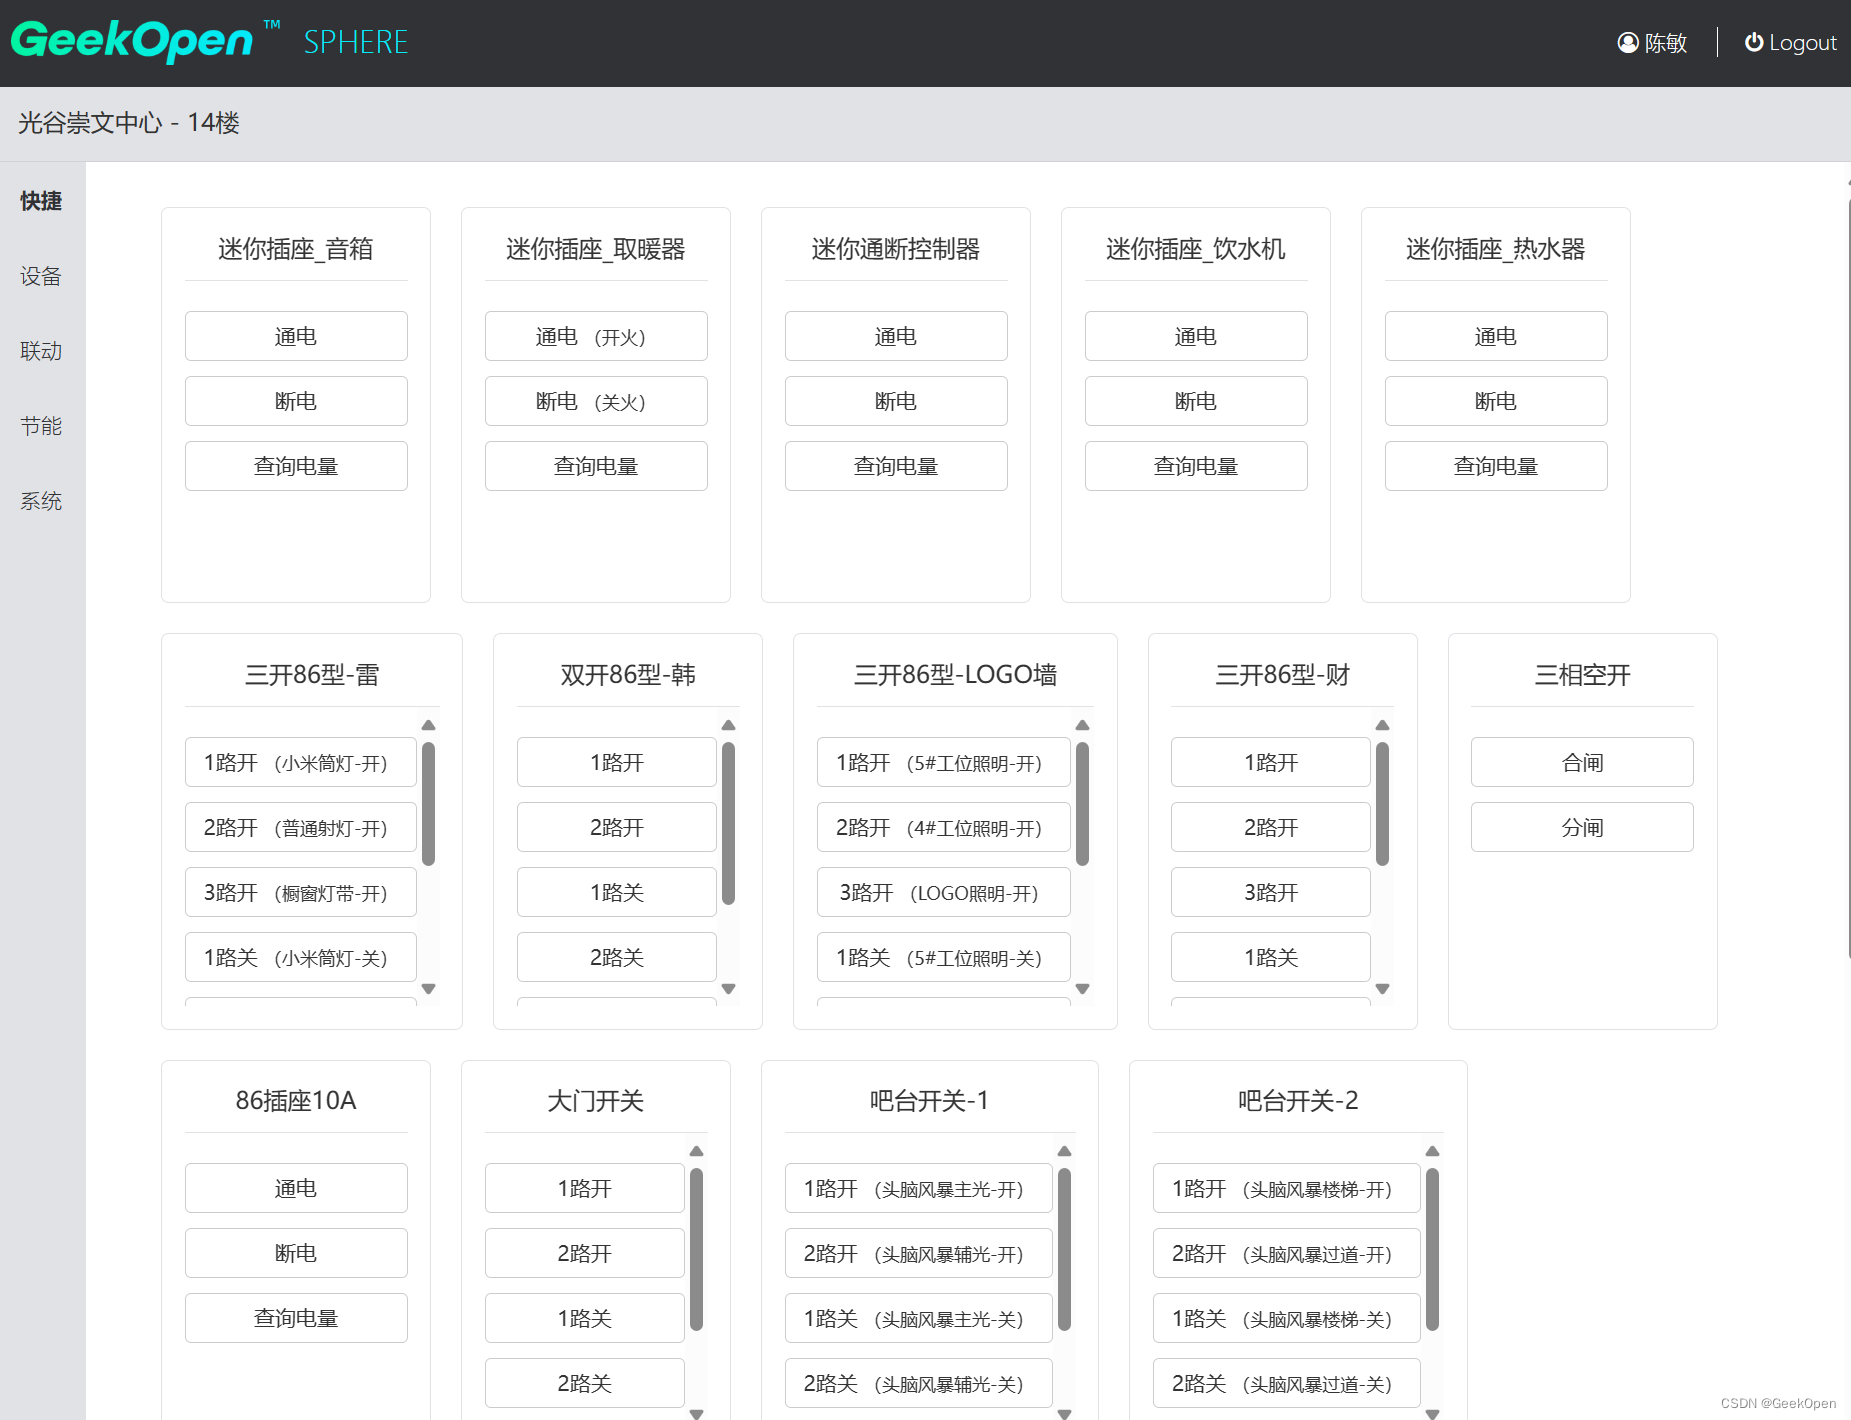
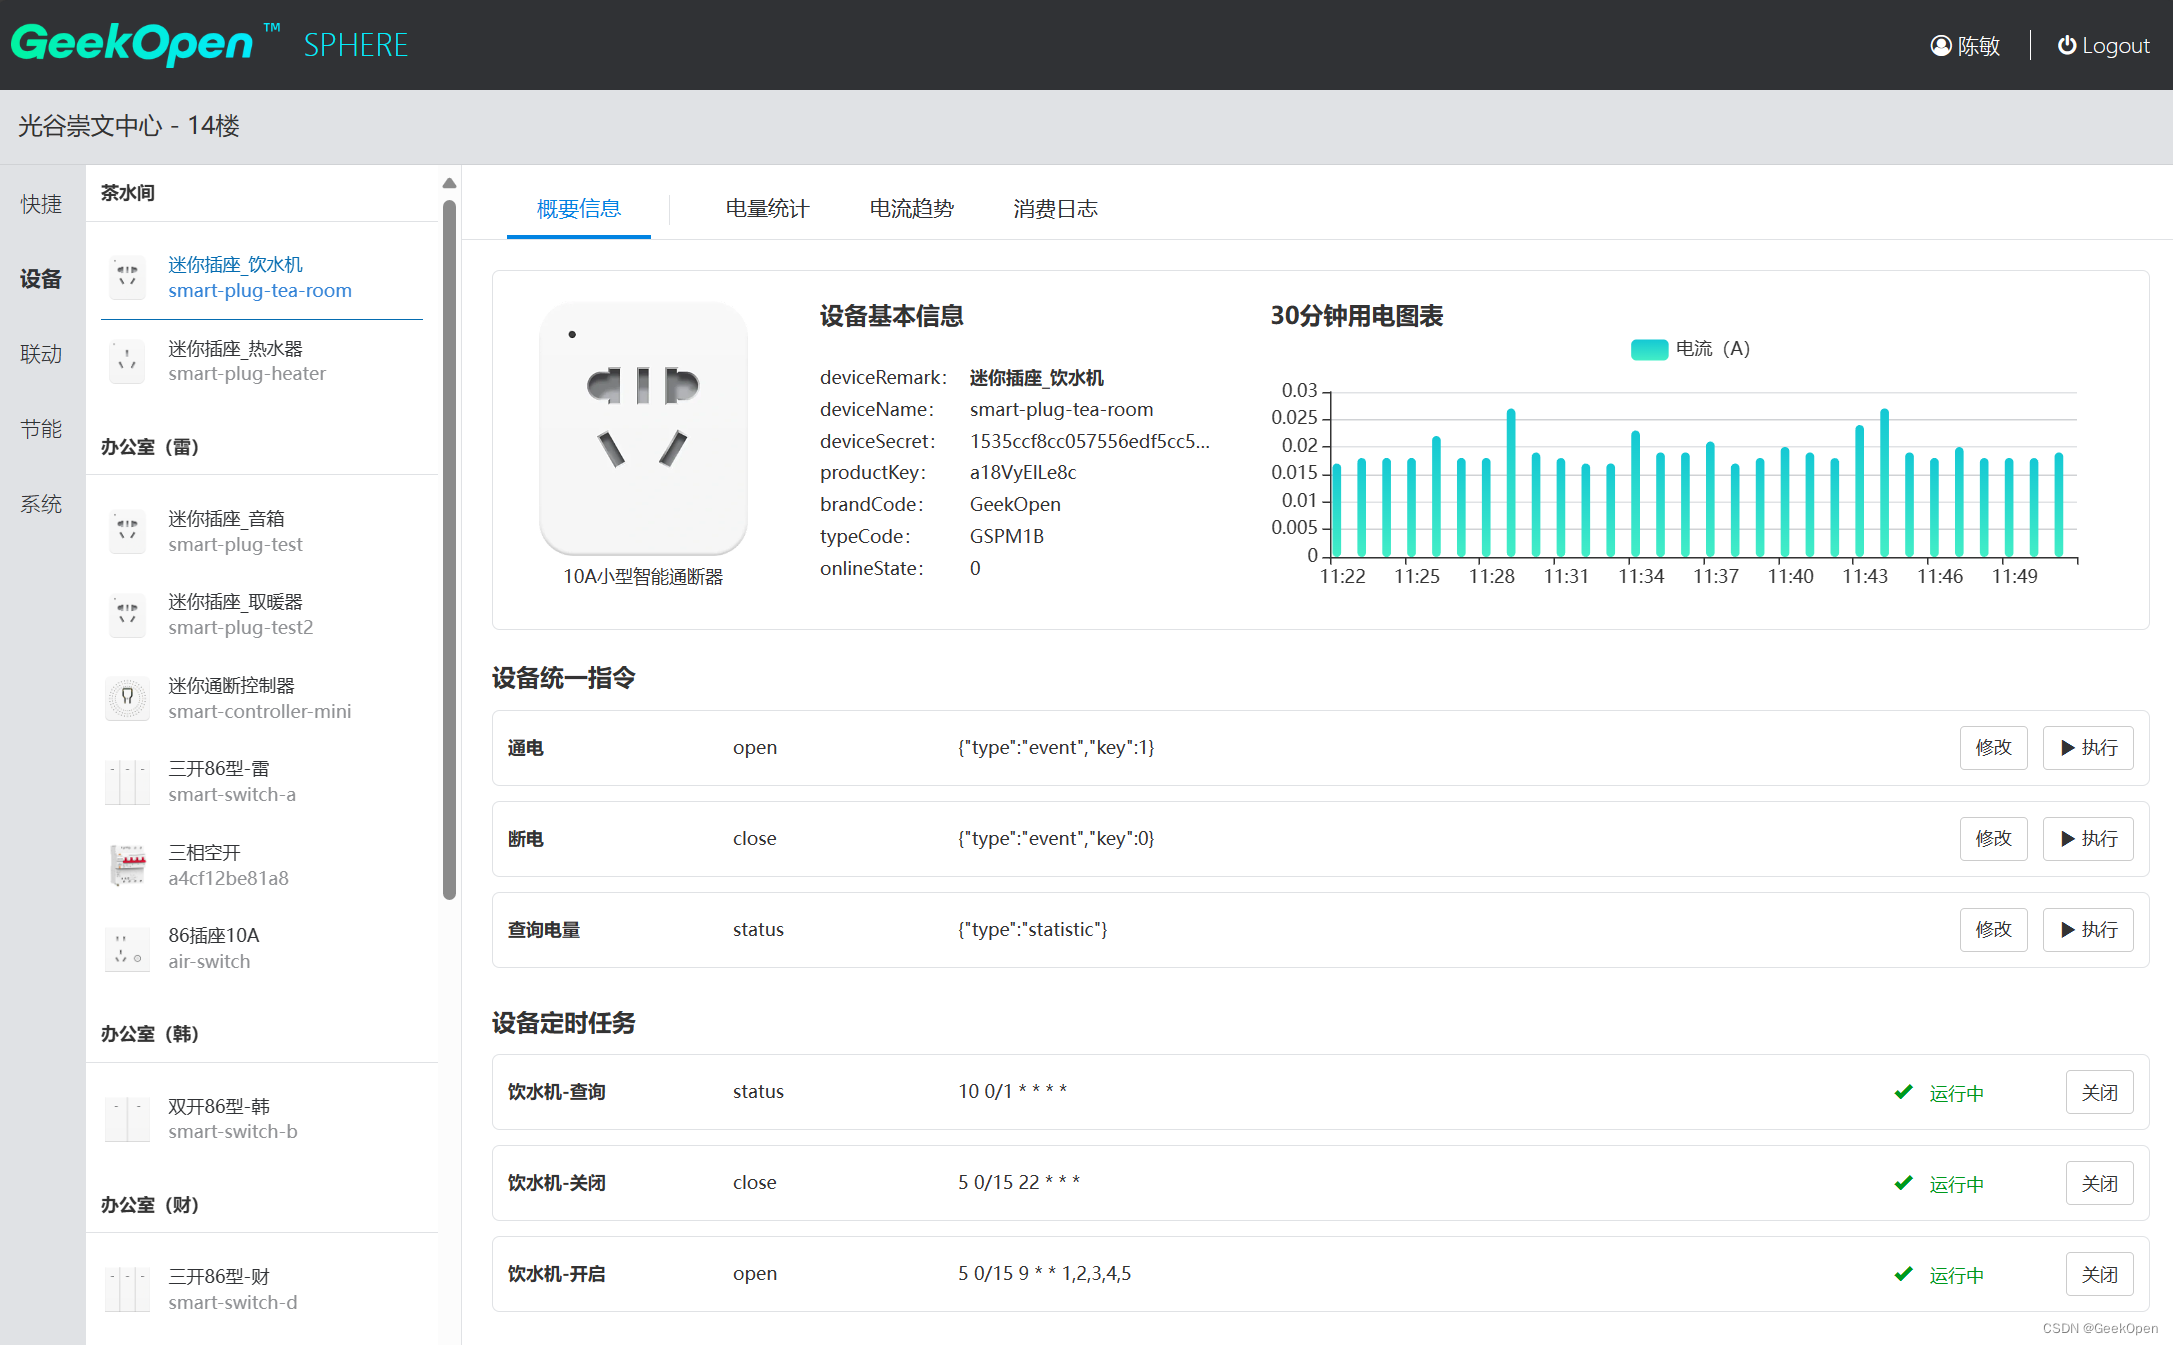
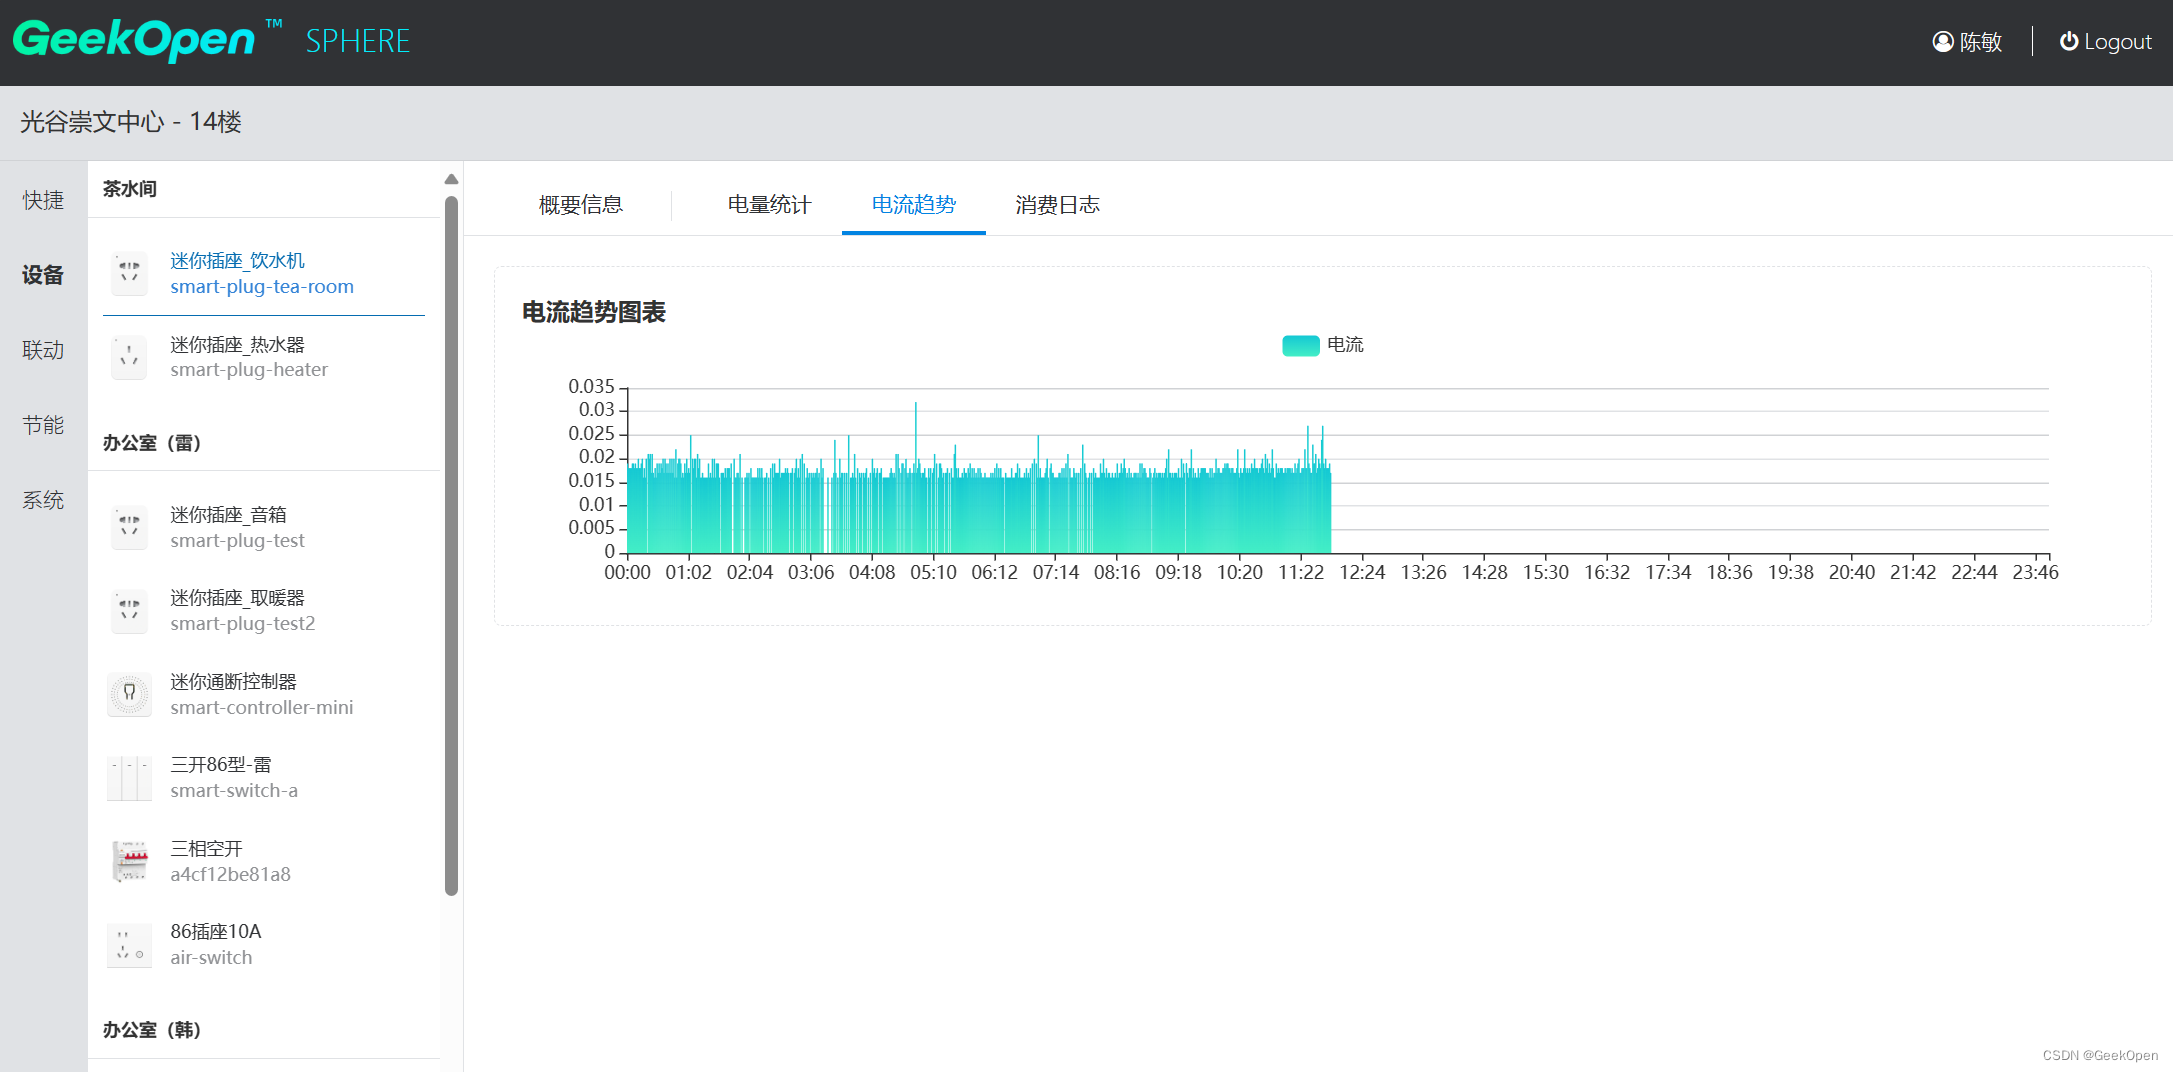
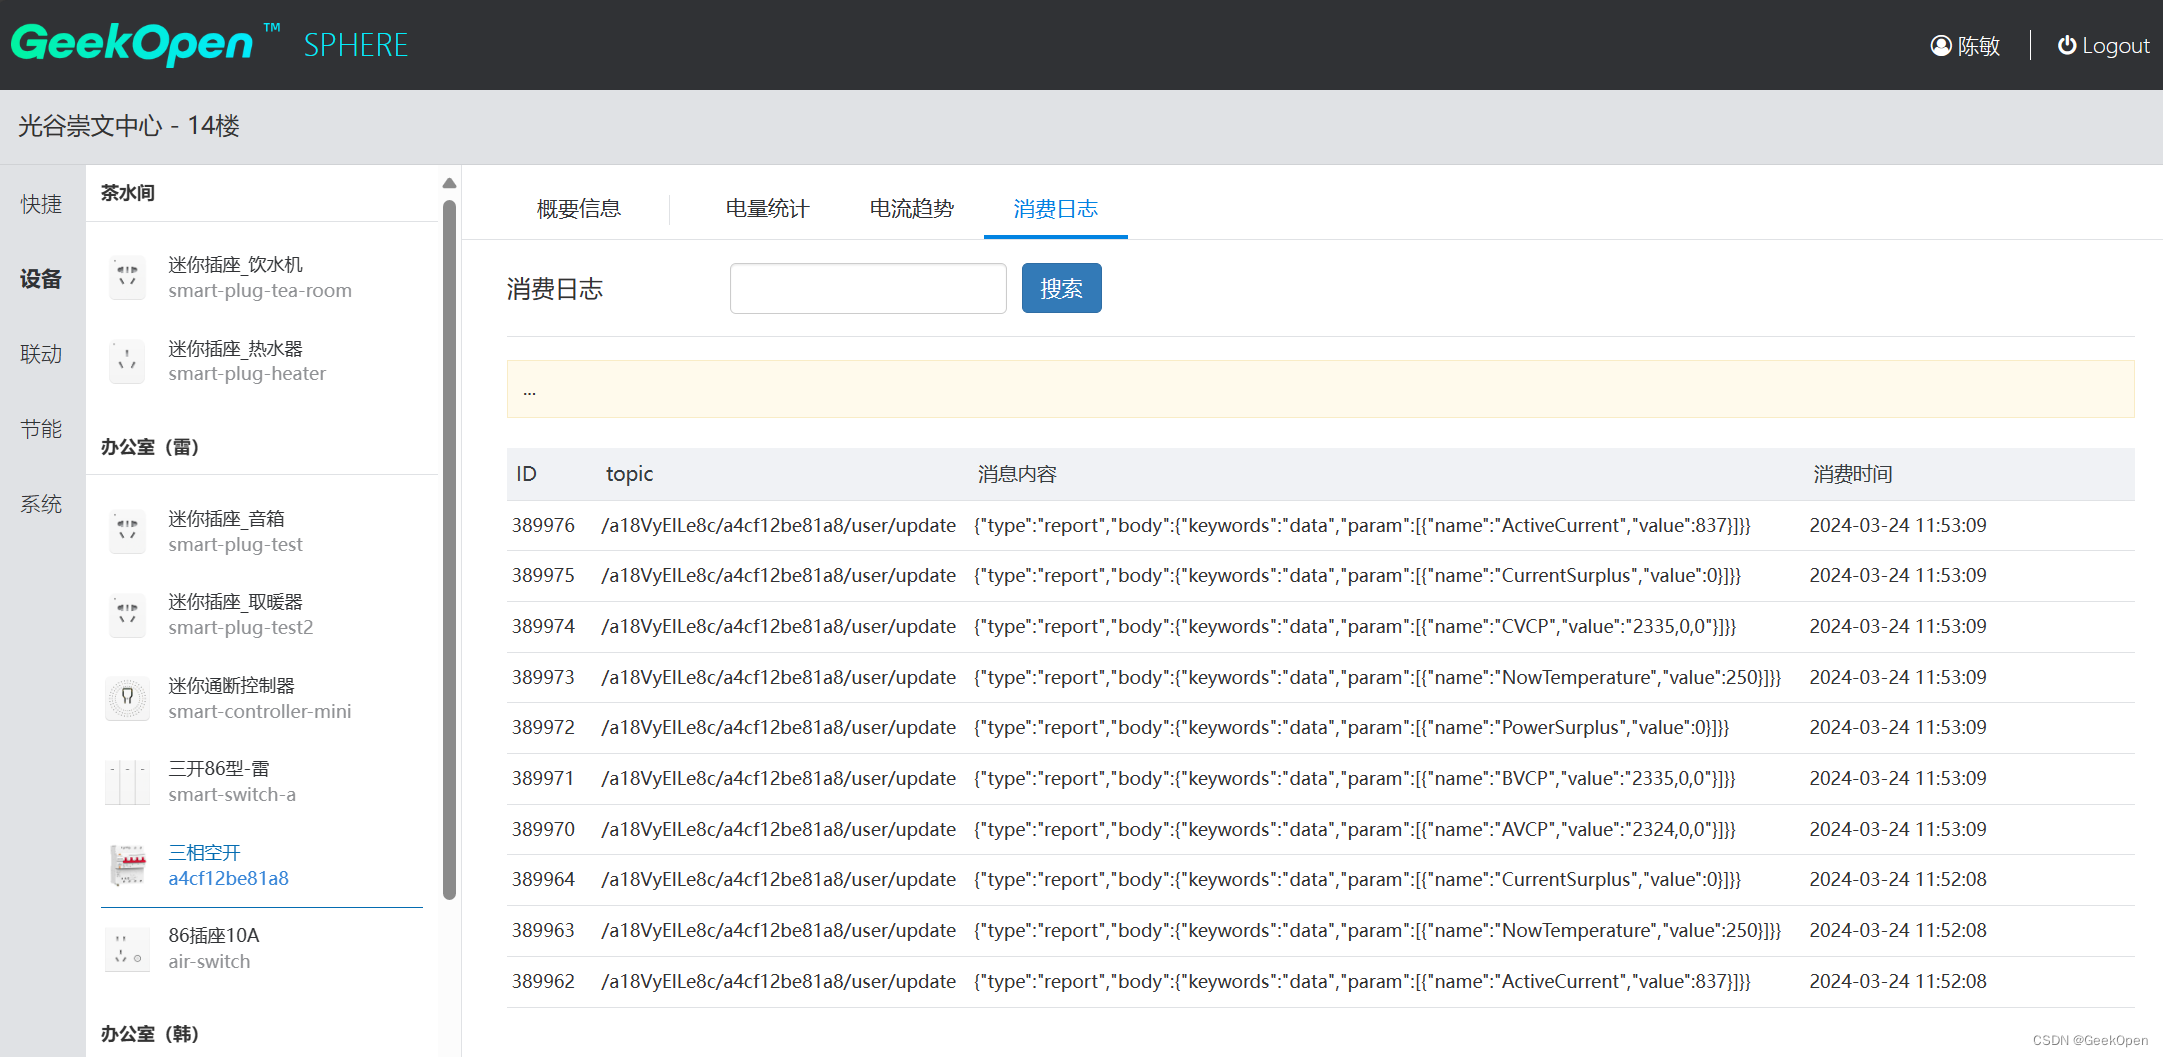
前端参考界面
开发者可根据企业需求自定义开发业务
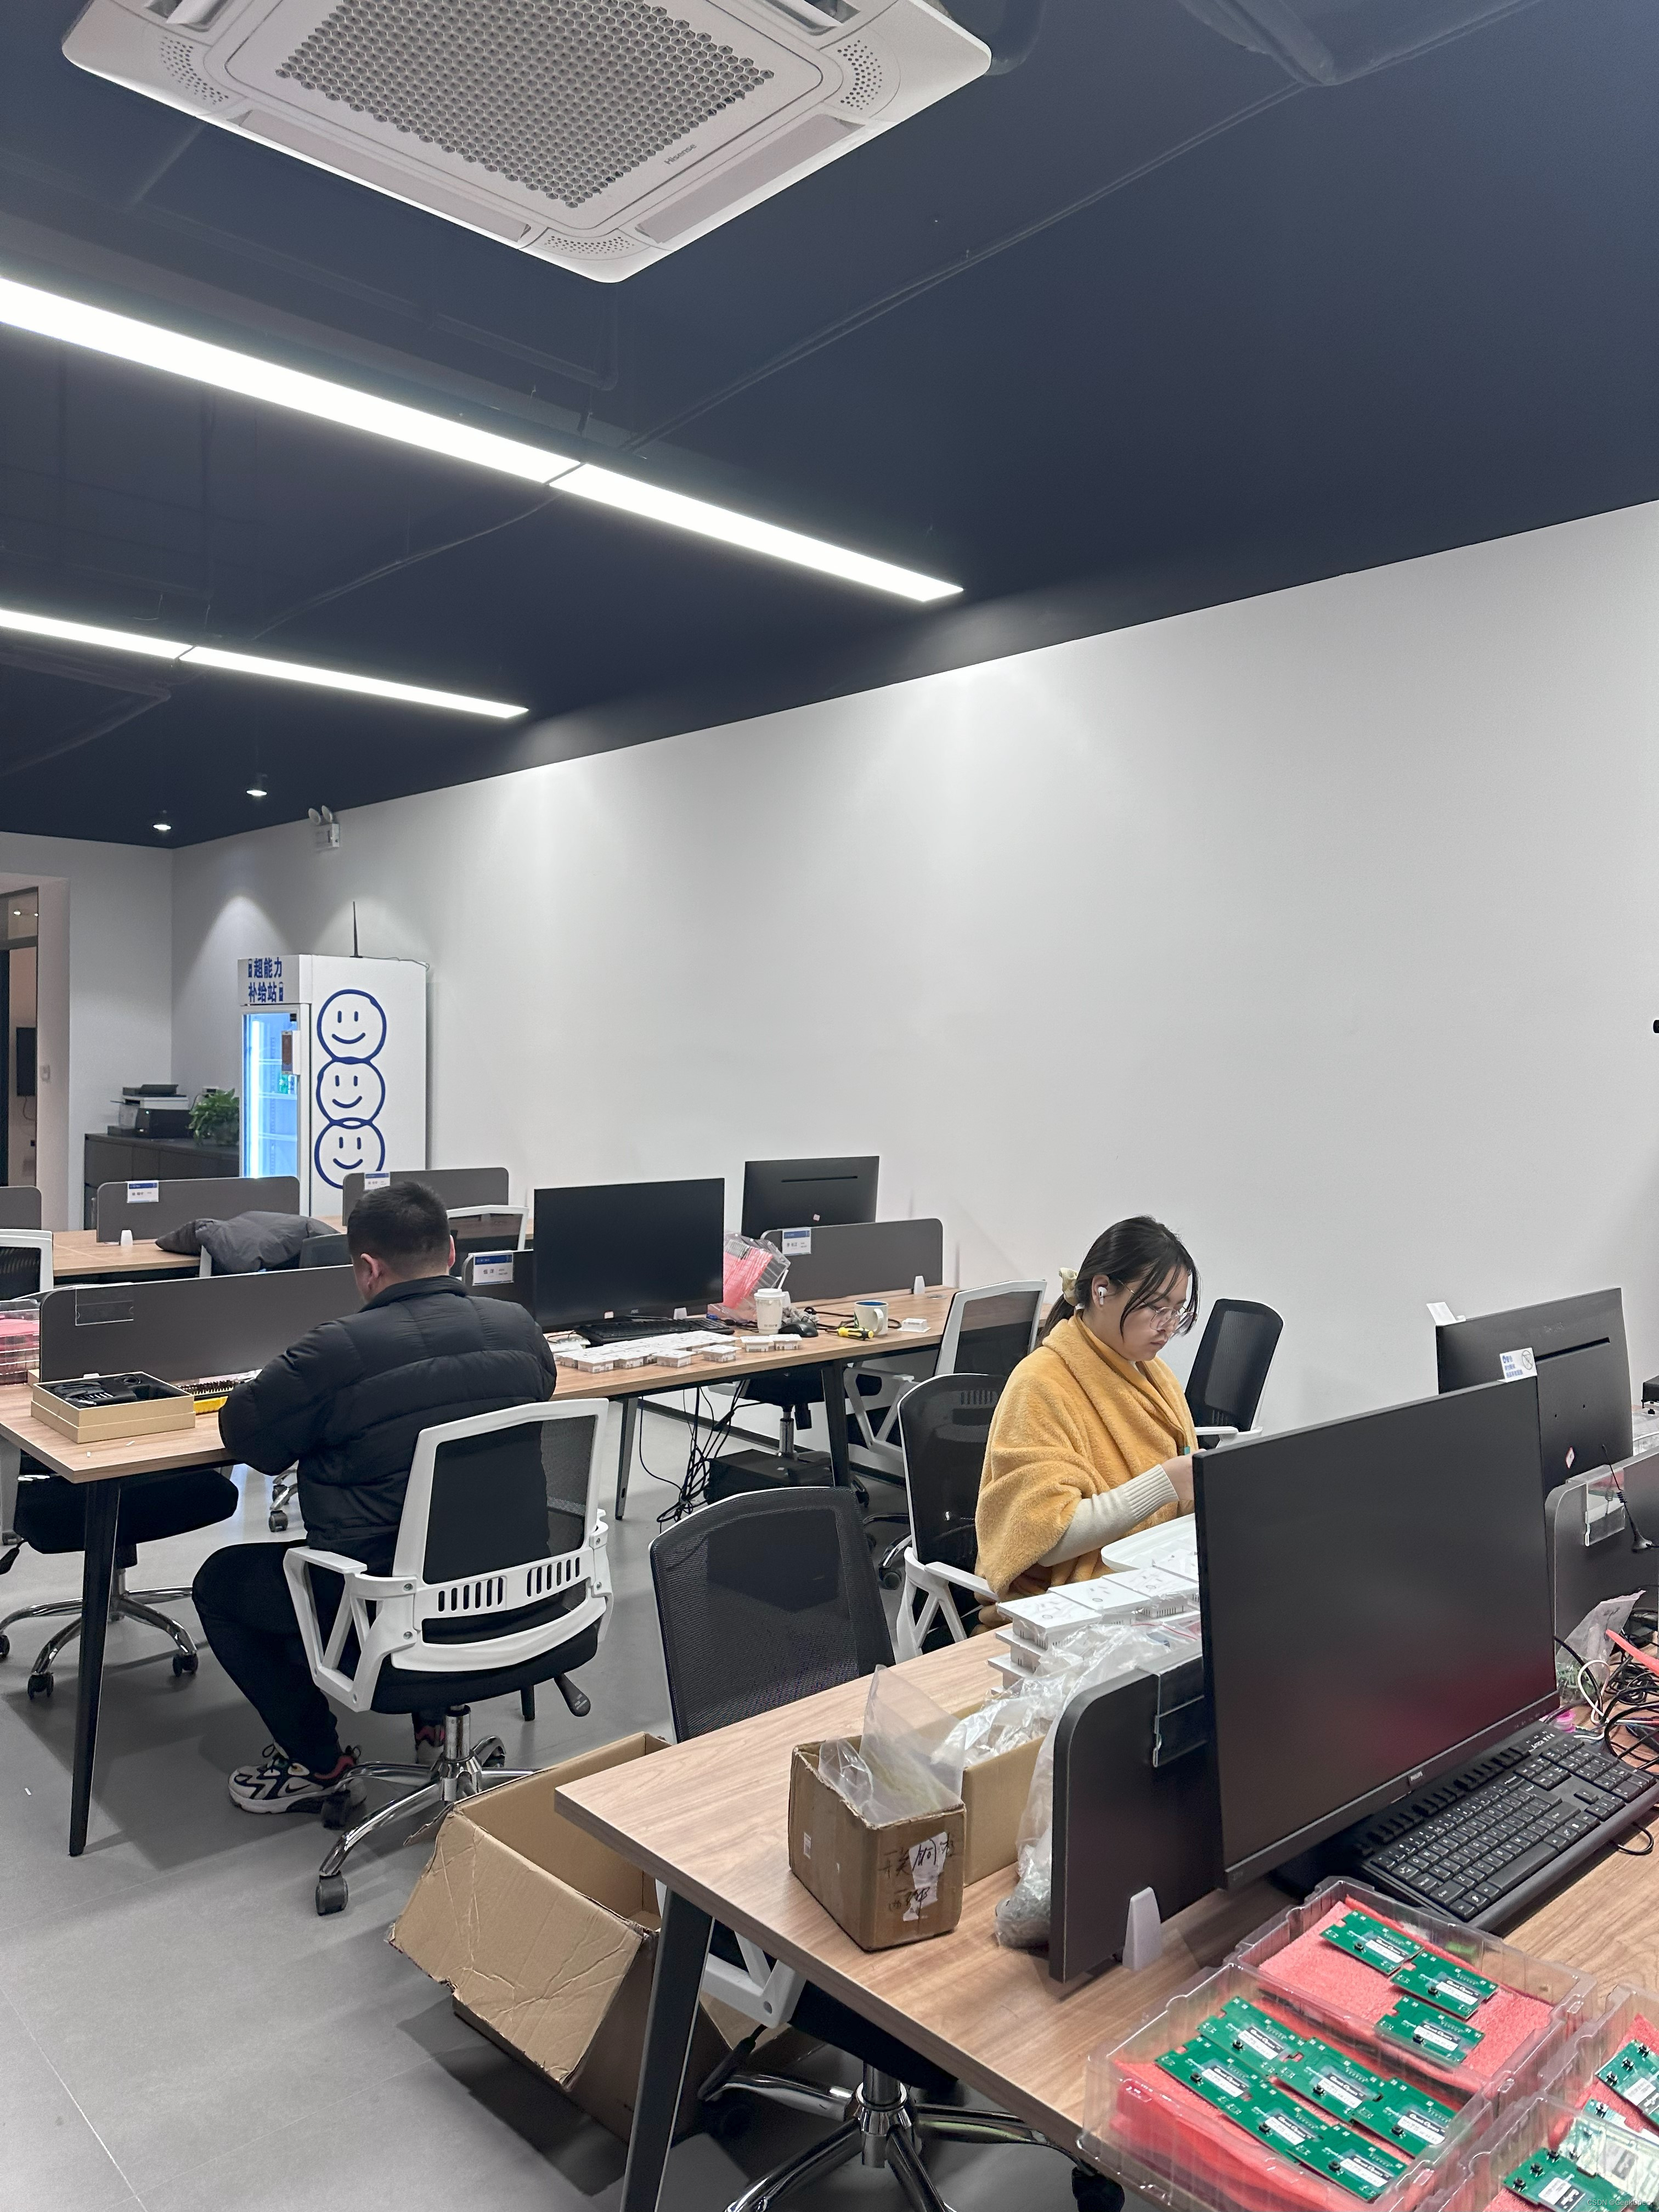
物联网软件工程师的日常


关于GeekOpen
武汉智鸟科技有限责任公司成立于2020年,专注为开发者提供商用智能设备与物联网基础系统,在物联网场景下帮助客户降低自研风险,节省项目费用,为开发者在创新、创业、商用各阶段提供成熟的技术服务 —— 以开发者为核心,助力项目落地。
公司拥有一支十几人的软硬件研发团队,目前仍处于初创阶段,潜心研发,倾听开发者反馈,并一直在完善优化产品与服务,提供PCB设计研发、嵌入式开发、工业设计、结构设计、物联网系统、物联网应用、现场实施等全栈技术支持。
GeekOpen服务优势
20年软件与硬件从业经验,5年IoT行业经验核心团队,成熟的软硬件,核心供应链资源,3000+客户服务经验。
全品类智能家居开放硬件
高性价比智能联网模块,极度友好的软件二次开发接口,提供MQTT与TCP两种协议;高性能、高可靠性、高可扩展性的物联网云,可快速接入第三方智能云平台;可直接使用标准APP,开发零投入。
快速反应,样品验证
多条标准化产线,助力快速打样,快速验证,快速出货;通过 ISO9001 国际质量体系认证,使时效和品质达到空前的平衡。可按照客户的需求定制开发硬件、固件、软件,周期仅需1-3个月。
针对软件工程师极度友好
DOCS资料库、论坛、邮件等多平台提供技术服务,完整的API接口,多样的SDK包,极大缩短集成时间,助力产品批量生产、迅速落地,提供技术支持,包含流行的各种开发语言,如Java、C、Python、Go、Node、C#、Php等。
开放平台共赢思维
专注智能设备开放的同时,也将整个生态伙伴资源共享开放,无论是GeekOpen的上游或是下游企业与个人,都可以使用我们的共享开放平台,帮助解决项目中的各种技术问题,或是为所合作伙伴提供各种商业机会。
一站式服务能力
丰富的物联网项目经验,深度理解互联网与物联网,超过20年工作经验的软件工程师与硬件工程师,深度融合,保障客户智能设备创意得以实现,硬件稳定耐用,软件接口标准可靠!
全栈工程师团队
多名全站工程师,从前期需求沟通到产品设计与开发,能够客户保持全面沟通,让产品最贴近客户预期,帮客户省去自研从方案选择到成品生产测试的各种风险!


 6639
6639

 被折叠的 条评论
为什么被折叠?
被折叠的 条评论
为什么被折叠?
 到【灌水乐园】发言


