


 本文详细介绍了如何使用Orchestrator这款开源工具管理MySQL主从复制拓扑,包括主机规划、搭建一主二从集群、部署orchestrator集群、VIP切换以及orchestrator-client的使用。重点展示了如何通过raft协议实现高可用和故障恢复。
一、Orchestrator简介
Orchestrator是一款开源(go编写)的MySQL复制拓扑管理工具,支持MySQL主从复制拓扑关系的调整、主库故障自动切换(包括备库升级为主库和vip切换)、手动主从切换等功能。
提供Web界面展示MySQL集群的拓扑关系及状态,可以更改MySQL实例的部分配置信息,也提供命令行和api接口。
是一款与MHA类似的mysql主从管理工具,相比于MHA,orchestrator有web界面展示主从复制拓扑图,而且MHA
管理节点的单点问题,orchestrator也能通过raft协议避免(将orchestrator服务部署在所有mysql主从服务器上)
二、主机规划
| ip | hostname | 主从角色 | 占用端口 |
| 172.16.84.150/22 | master1 | 主 | 3306,3000 |
| 172.16.84.151/22 | master2 | 从1 | 3306,3000 |
| 172.16.84.152/22 | slave | 从2 | 3306,3000 |
三、搭建一主二从mysql集群
详见
https://www.yuque.com/sipc/database/gdv0ww#GCoOA
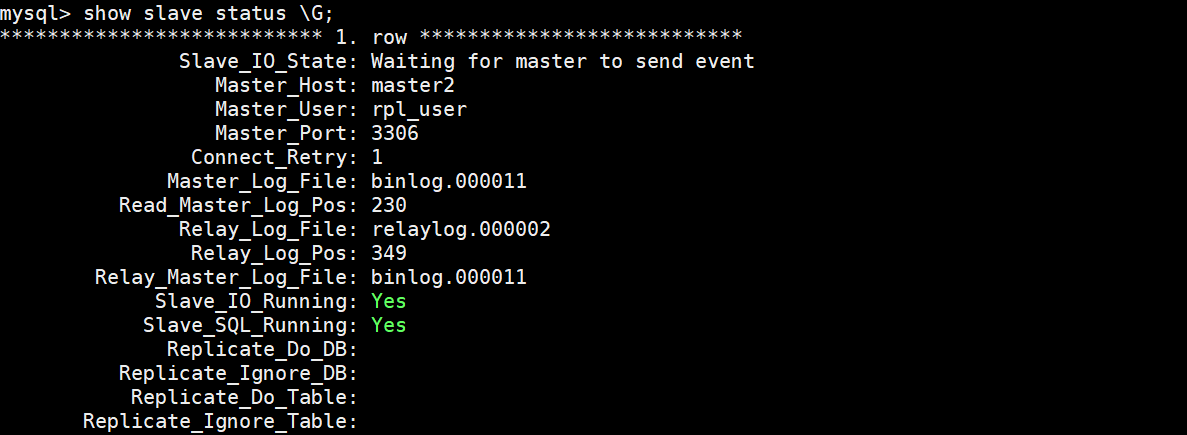
配置两个从节点同步时,执行如下:
change master to master_host='master1',master_port=3306,master_user='rpl_user',master_password='****',master_auto_position=1,MASTER_HEARTBEAT_PERIOD=2,MASTER_CONNECT_RETRY=1,MASTER_RETRY_COUNT=86400;
MASTER_RETRY_COUNT: 如果达到这个次数,一旦主库恢复,需要手动start slave,不会自动恢复
四、部署orchestrator集群
1、三台节点配置/etc/hosts和免密
cat /etc/hosts
172.16.84.150 master1
172.16.84.151 master2
172.16.84.152 slave
ssh-copy-id master1
ssh-copy-id master2
ssh-copy-id slave
2、安装orchestrator服务端
rpm -ivh jq-1.6-2.el7.x86_64.rpm
rpm -ivh oniguruma-6.8.2-1.el7.x86_64.rpm
rpm -ivh orchestrator-3.2.3-1.x86_64.rpm
CREATE USER 'orchestrator'@'172.16.%' IDENTIFIED BY '****';
GRANT SUPER, PROCESS, REPLICATION SLAVE, RELOAD ON *.* TO 'orchestrator'@'172.16.%';
GRANT SELECT ON mysql.slave_master_info TO 'orchestrator'@'172.16.%';
3、配置orchestrator文件
修改配置文件/usr/local/orchestrator/orchestrator-sqlite.conf.json:
"MySQLTopologyUser": "orchestrator",
"MySQLTopologyPassword": "****",
"SQLite3DataFile": "/usr/local/orchestrator/orchestrator.sqlite3",
"DefaultInstancePort": 3306,
"RecoverMasterClusterFilters": [
"*"
],
"RecoverIntermediateMasterClusterFilters": [
"*"
],
"PostFailoverProcesses": [
"echo `date +'%Y-%m-%d %T'`,'(for all types) Recovered from {failureType} on {failureCluster}. Failed: {failedHost}:{failedPort}; Successor: {successorHost}:{successorPort}' >> /tmp/recovery.log",
"/usr/local/orchestrator/orch_hook.sh {failureType} {failureClusterAlias} {failedHost} {successorHost} >> /tmp/orch.log"
],
添加raft配置到orchestrator-sqlite.conf.json,实现orchestrator高可用(RaftBind每台机器设为本机ip):
"RaftEnabled":true,
"RaftDataDir":"/usr/local/orchestrator",
"RaftBind":"172.16.84.151",
"DefaultRaftPort":10008,
"RaftNodes":[
"172.16.84.150",
"172.16.84.151",
"172.16.84.152"
]
4、配置vip脚本
/usr/local/orchestrator/orch_hook.sh为启停vip的脚本路径,172.16.84.149为vip,标红的每台不同,内容如下
root@master1[/soft]# cat /usr/local/orchestrator/orch_hook.sh
#!/bin/bash
isitdead=$1
cluster=$2
oldmaster=$3
newmaster=$4
mysqluser="orchestrator"
export MYSQL_PWD="*****"
logfile="/var/log/orch_hook.log"
if [[ $isitdead == "DeadMaster" ]]; then
array=( eth0 "172.16.84.149" root "172.16.84.150")
interface=${array[0]}
IP=${array[1]}
user=${array[2]}
if [ ! -z ${IP} ] ; then
echo $(date)
echo "Revocering from: $isitdead"
echo "New master is: $newmaster"
echo "/usr/local/orchestrator/orch_vip.sh -d 1 -n $newmaster -i ${interface} -I ${IP} -u ${user} -o $oldmaster" | tee $logfile
/usr/local/orchestrator/orch_vip.sh -d 1 -n $newmaster -i ${interface} -I ${IP} -u ${user} -o $oldmaster
else
echo "Cluster does not exist!" | tee $logfile
fi
elif [[ $isitdead == "DeadIntermediateMasterWithSingleSlaveFailingToConnect" ]]; then
array=( eth0 "172.16.84.149" root "172.16.84.150")
interface=${array[0]}
IP=${array[3]}
user=${array[2]}
slavehost=`echo $5 | cut -d":" -f1`
echo $(date)
echo "Revocering from: $isitdead"
echo "New intermediate master is: $slavehost"
echo "/usr/local/orchestrator/orch_vip.sh -d 1 -n $slavehost -i ${interface} -I ${IP} -u ${user} -o $oldmaster" | tee $logfile
/usr/local/orchestrator/orch_vip.sh -d 1 -n $slavehost -i ${interface} -I ${IP} -u ${user} -o $oldmaster
elif [[ $isitdead == "DeadIntermediateMaster" ]]; then
array=( eth0 "172.16.84.149" root "172.16.84.150")
interface=${array[0]}
IP=${array[3]}
user=${array[2]}
slavehost=`echo $5 | sed -E "s/:[0-9]+//g" | sed -E "s/,/ /g"`
showslave=`mysql -h$newmaster -u$mysqluser -sN -e "SHOW SLAVE HOSTS;" | awk '{print $2}'`
newintermediatemaster=`echo $slavehost $showslave | tr ' ' '\n' | sort | uniq -d`
echo $(date)
echo "Revocering from: $isitdead"
echo "New intermediate master is: $newintermediatemaster"
echo "/usr/local/orchestrator/orch_vip.sh -d 1 -n $newintermediatemaster -i ${interface} -I ${IP} -u ${user} -o $oldmaster" | tee $logfile
/usr/local/orchestrator/orch_vip.sh -d 1 -n $newintermediatemaster -i ${interface} -I ${IP} -u ${user} -o $oldmaster
fi
附上orch_vip.sh脚本
📎orchestrator-sqlite.conf.json
scp /usr/local/orchestrator/orch_vip.sh master2:/usr/local/orchestrator/
scp /usr/local/orchestrator/orch_vip.sh slave:/usr/local/orchestrator/
scp /usr/local/orchestrator/orch_hook.sh master2:/usr/local/orchestrator/
scp /usr/local/orchestrator/orch_hook.sh slave:/usr/local/orchestrator/
scp /usr/local/orchestrator/orchestrator-sqlite.conf.json master2:/usr/local/orchestrator/
scp /usr/local/orchestrator/orchestrator-sqlite.conf.json slave:/usr/local/orchestrator/
master1上添加vip
ip address add 172.16.84.149 dev eth0
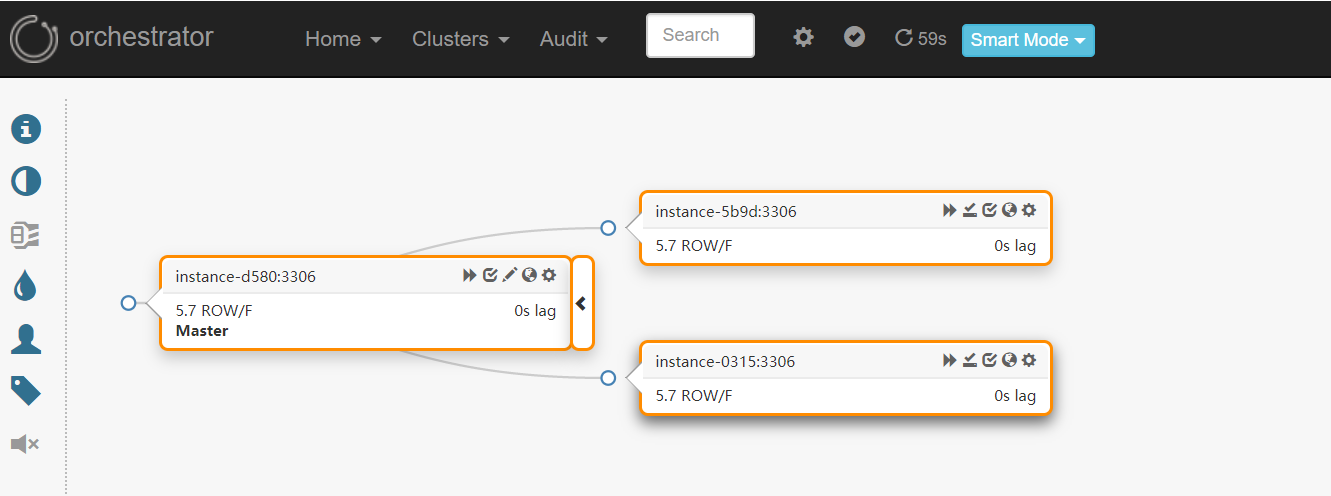
5、三个节点依次启动orchestrator
cd /usr/local/orchestrator && nohup ./orchestrator --config=./orchestrator-sqlite.conf.json http &
会自动识别master1、master2、slave的三节点orchestrator集群,拓扑图如下:
Orchestrator节点能够选择具有仲裁的领导者(leader),如有3个orch节点,其中一个可以成为leader(3节点仲裁大小为2,5节点仲裁大小为3),只允许leader进行修改;
每个MySQL拓扑服务器将由三个不同的orchestrator节点独立访问,在正常情况下,三个节点将看到或多或少相同的拓扑图,但他们每个都会独立分析写入其自己的专用后端数据库服务器:
所有更改都必须通过leader;
在启用raft模式上使用orchestrator-client,orchestrator-client可以安装在没有orchestrator上的服务器;
单个orchestrator节点的故障不会影响orchestrator的可用性,在3节点设置上,最多一个服务器可能会失败;在5节点设置上,2个节点可能会失败;
Orchestrator节点异常关闭,然后再启动,它将重新加入Raft组,并接收遗漏的任何事件,只要有足够的Raft记录;
要加入比日志保留允许的更长/更远的orchestrator节点或者数据库完全为空的节点,需要从另一个活动节点克隆后端DB
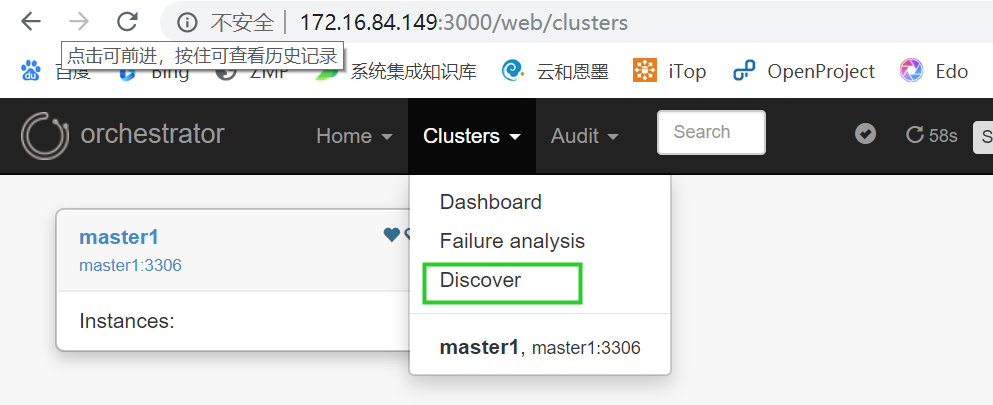
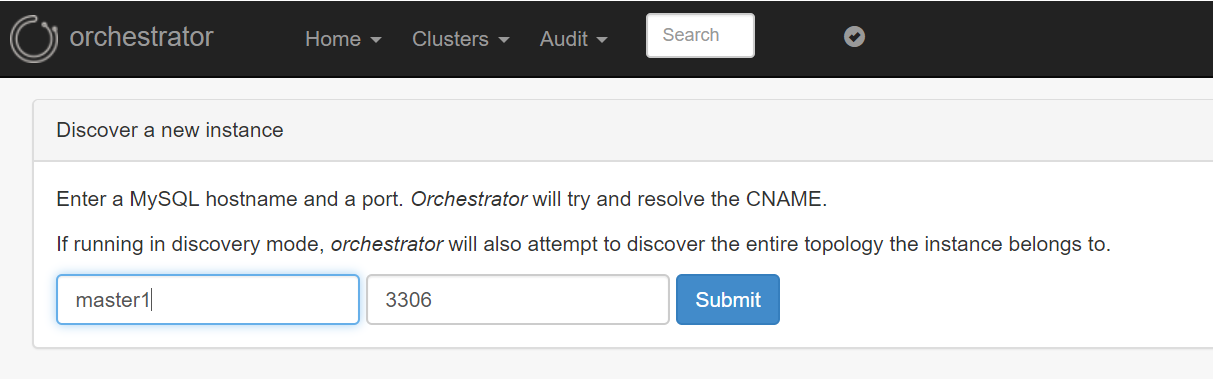
五、安装orchestrator client
因为配置了Raft,有多个Orchestrator,所以需要ORCHESTRATOR_API的环境变量,orchestrator-client会自动选择leader,添加下面到/root/.bash_profile
export ORCHESTRATOR_API="master1:3000/api master2:3000/api slave:3000/api"
安装client(三个节点都要安装):
rpm -ivh orchestrator-client-3.2.3-1.x86_64.rpm
六、常用命令
--查看当前的leader节点:
root@master1[/usr/local/orchestrator]# orchestrator-client -c raft-leader
172.16.84.150:10008
--查看当前orchestrator集群是否完整:
root@master1[/usr/local/orchestrator]# orchestrator-client -c raft-health
healthy
--查看集群所有成员:
root@master1[/usr/local/orchestrator]# orchestrator-client -c topology -i master1:3306
master1:3306 [0s,ok,5.7.31-34-log,rw,ROW,>>,GTID,semi:master]
+ master2:3306 [0s,ok,5.7.31-34-log,ro,ROW,>>,GTID,semi:replica]
+ slave:3306 [0s,ok,5.7.31-34-log,ro,ROW,>>,GTID,semi:replica]
root@master1[/usr/local/orchestrator]# orchestrator-client -c which-cluster-instances -i master1:3306
master1:3306
master2:3306
slave:3306
--查看成员所属的master:
root@master1[/usr/local/orchestrator]# orchestrator-client -c which-master -i master1:3306
:0
root@master1[/usr/local/orchestrator]# orchestrator-client -c which-master -i master2:3306
master1:3306
root@master1[/usr/local/orchestrator]# orchestrator-client -c which-master -i slave:3306
master1:3306
--修改某节点的主节点
root@master1[/usr/local/orchestrator]# orchestrator-client -c relocate -i slave:3306 -d master2:3306
root@master1[/usr/local/orchestrator]# orchestrator-client -c which-master -i slave:3306
master2:3306
root@master1[/usr/local/orchestrator]# orchestrator-client -c stop-replica -i master2:3306
master2:3306
root@master1[/usr/local/orchestrator]# orchestrator-client -c topology -i master1:3306
master1:3306 [0s,ok,5.7.31-34-log,rw,ROW,>>,GTID,semi:master]
- master2:3306 [null,nonreplicating,5.7.31-34-log,ro,ROW,>>,GTID]
+ slave:3306 [0s,ok,5.7.31-34-log,ro,ROW,>>,GTID,semi:replica]
--集群的主节点切换
orchestrator-client -c graceful-master-takeover -a master1:3306 -d master2:3306
/tmp/recovery.log显示主节点切换成master2:3306:
2020-11-30 19:02:19,Planned takeover about to take place on master1:3306. Master will switch to read_only
2020-11-30 19:02:19,Detected DeadMaster on master1:3306. Affected replicas: 1
2020-11-30 19:02:19,Will recover from DeadMaster on master1:3306
2020-11-30 19:02:19,(for all types) Recovered from DeadMaster on master1:3306. Failed: master1:3306; Successor: master2:3306
2020-11-30 19:02:24 ,Planned takeover complete
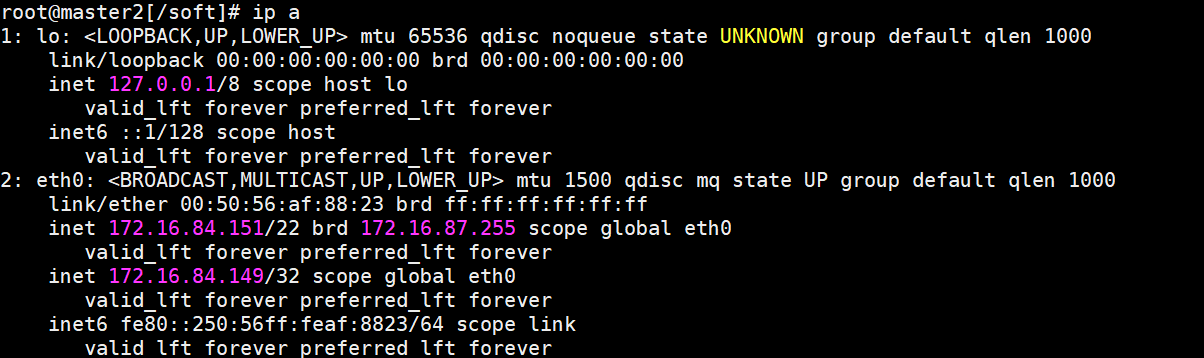
/var/log/orch_hook.log显示vip切换到master2上:
/usr/local/orchestrator/orch_vip.sh -d 1 -n master2 -i eth0 -I 172.16.84.149 -u root -o master1
root@master2[/usr/local/orchestrator]# ip a
1: lo: <LOOPBACK,UP,LOWER_UP> mtu 65536 qdisc noqueue state UNKNOWN group default qlen 1000
link/loopback 00:00:00:00:00:00 brd 00:00:00:00:00:00
inet 127.0.0.1/8 scope host lo
valid_lft forever preferred_lft forever
inet6 ::1/128 scope host
valid_lft forever preferred_lft forever
2: eth0: <BROADCAST,MULTICAST,UP,LOWER_UP> mtu 1500 qdisc mq state UP group default qlen 1000
link/ether 00:50:56:af:88:23 brd ff:ff:ff:ff:ff:ff
inet 172.16.84.151/22 brd 172.16.87.255 scope global eth0
valid_lft forever preferred_lft forever
inet 172.16.84.149/32 scope global eth0
valid_lft forever preferred_lft forever
inet6 fe80::250:56ff:feaf:8823/64 scope link
valid_lft forever preferred_lft forever
此时master1需要手动start slave,使master1成为从节点
--设置slave:3306为failover优先的主节点,也可设为must_not,即永远无法成为主节点
orchestrator-client -c register-candidate -i slave:3306 --promotion-rule prefer
prefer --比较喜欢
neutral --中立(默认)
prefer_not --比较不喜欢
must_not --拒绝
--强制failover,原主节点与其他两节点分离,vip漂移,slave主节点变化
root@master1[/usr/local/orchestrator]# orchestrator-client -c force-master-failover -i master1:3306
master2:3306
root@master1[/usr/local/orchestrator]# orchestrator-client -c topology -i master1
master1:3306 [0s,ok,5.7.31-34-log,ro,ROW,>>,GTID,semi:master,downtimed]
root@master1[/usr/local/orchestrator]# orchestrator-client -c topology -i master2
master2:3306 [0s,ok,5.7.31-34-log,rw,ROW,>>,GTID,semi:master]
+ slave:3306 [0s,ok,5.7.31-34-log,ro,ROW,>>,GTID,semi:master,semi:replica]
root@master2[/soft]# orchestrator-client -c clusters
master1:3306
master2:3306
--恢复原主节点为从节点:
change master to master_host='master2',master_port=3306,master_user='rpl_user',master_password='****',MASTER_AUTO_POSITION=1,MASTER_HEARTBEAT_PERIOD=2,MASTER_CONNECT_RETRY=1,MASTER_RETRY_COUNT=86400;
set global read_only =on; --或者orchestrator-client -c set-read-only -i master1
start slave;
--查看当前集群
root@master1[/usr/local/orchestrator]# orchestrator-client -c clusters
master2:3306
参考文档:


 45
45

 被折叠的 条评论
为什么被折叠?
被折叠的 条评论
为什么被折叠?
 到【灌水乐园】发言


