


文章目录
- 问题一:python: can't open file 'argparse_learning_1.py': [Errno 2] No such file or directory
- 问题二:ModuleNotFoundError: No module named 'torch'
- 问题三:OSError: [WinError 126] 找不到指定的模块。 Error loading "E:\ANACONDA\envs\pytorch\lib\site-packages\torch\lib\caffe2_detectron_ops_gpu.dll" or one of its dependencies.
- 问题四:OSError: [WinError 126] 找不到指定的模块。 Error loading "E:\ANACONDA\envs\pytorch\lib\site-packages\torch\lib\caffe2_detectron_ops.dll" or one of its dependencies.
- 问题五: raise ReadTimeoutError(self._pool, None, "Read timed out.")
- 问题六:WARNING: Retrying (Retry(total=4, connect=None, read=None, redirect=None, status=None)) after connection broken by 'ReadTimeoutError("HTTPSConnectionPool(host='files.pythonhosted.org', port=443): Read timed out. (read timeout=15)",)': /packages/d8/e1/da6daa7676e779edc8de06cdbde20b7a9d6dfabd91ad35d9df1e3e28e44c/intel_openmp-2022.1.0-py2.py3-none-win_amd64.whl
- 问题七:ModuleNotFoundError: No module named 'matplotlib'
- 问题八: verbose = matplotlib.verbose AttributeError: module 'matplotlib' has no attribute 'verbose'
- **题外话:**
- 问题九:Could not find a version that satisfies the requirement opencv-python>=4.1.1 (from versions: none) No matching distribution found for opencv-python>=4.1.1
- 问题十:WARNING: Ignore distutils configs in setup.cfg due to encoding errors.
- 问题十一:An HTTP error occurred when trying to retrieve this URL. HTTP errors are often intermittent, and a simple retry will get you on your way. SSLError(MaxRetryError('HTTPSConnectionPool(host=\'pypi.tuna.tsinghua.edu.cn\', port=443): Max retries exceeded with url: /simple/win-64/repodata.json (Caused by SSLError(SSLError("bad handshake: Error([(\'SSL routines\', \'ssl3_get_server_certificate\', \'certificate verify failed\')],)",),))',),)
- 问题十二:WARNING: NMS time limit 0.330s exceeded
- 问题十三:TypeError: attempt_load() got an unexpected keyword argument 'map_location'
- 问题十四:distutils.errors.DistutilsError: Command '['E:\\ANACONDA\\envs\\pytorch\\python.exe', '-m', 'pip', '--disable-pip-version-check', 'wheel', '--no-deps', '-w', 'C:\\Users\\Asus\\AppData\\Local\\Temp\\tmpnf90ichf', '--quiet', 'pytest-runner']' returned non-zero exit status 1.
- 问题十五:ERROR: pip's dependency resolver does not currently take into account all the packages that are installed. This behaviour is the source of the following dependency conflicts. tensorboard 2.9.1 requires grpcio>=1.24.3, but you have grpcio 1.18.0 which is incompatible.
- 问题十六:RuntimeError: Given groups=1, weight of size [64, 3, 3, 3], expected input[1, 64, 64, 3] to have 3 channels, but got 64 channels instead
- 问题十七:RuntimeError: Input type (torch.cuda.ByteTensor) and weight type (torch.cuda.FloatTensor) should be the same
- 问题十八:TypeError: can't convert cuda:0 device type tensor to numpy. Use Tensor.cpu() to copy the tensor to host memory first.
- 问题十九:TypeError: conv2d() received an invalid combination of arguments - got (Tensor, Parameter, Parameter, tuple, tuple, tuple, int), but expected one of:
- 问题二十:RuntimeError: Input type (torch.cuda.ByteTensor) and weight type (torch.cuda.FloatTensor) should be the same
- 问题二十一:RuntimeError: shape '[-1, 25088]' is invalid for input of size 2048
- 问题二十二:RuntimeError: view size is not compatible with input tensor's size and stride (at least one dimension spans across two contiguous subspaces). Use .reshape(...) instead
- 问题二十三:RuntimeError: "nll_loss_forward_reduce_cuda_kernel_2d_index" not implemented for 'Int'
- 问题二十四:RuntimeError: CUDA error: CUBLAS_STATUS_ALLOC_FAILED when calling `cublasCreate(handle)`
- 问题二十五:cv2.error: OpenCV(4.6.0) D:\a\opencv-python\opencv-python\opencv\modules\highgui\src\window.cpp:967: error: (-215:Assertion failed) size.width>0 && size.height>0 in function 'cv::imshow'
- 问题二十六:TypeError: Expected Ptr<cv::UMat> for argument mat
进入虚拟环境的方法(如果之前已经创建好了):
在命令提示符窗口输入
conda activate pytorch
这里pytorch是我创建的那个虚拟环境的名字。(后面就不解释pytorch代表什么了)
问题一:python: can’t open file ‘argparse_learning_1.py’: [Errno 2] No such file or directory
python: can't open file 'argparse_learning_1.py': [Errno 2] No such file or directory
附图:

**可能的原因:**不在命令行显示的路径下
**解决方法:**转到该路径下

问题二:ModuleNotFoundError: No module named ‘torch’
ModuleNotFoundError: No module named 'torch'
可能的原因:
1.你没有下载并搭建pytorch
2.你创建了一个虚拟环境,然后把pytorch安装搭建在虚拟环境里,又没有将pytorch加载到pycharm。如果你搭建了,但是又搭建错了(错了,又没有完全错),就会导致问题三、问题四。
**解决方法:**没下载安装pytorch的就下载安装,安装好出现这个问题的去pycharm里进行相应的配置。(要注意pytorch下载安装到了哪,比如我这是在"E:\ANACONDA\envs\pytorch",那配置时就用"E:\ANACONDA\envs\pytorch\python.exe",而不是其他地方的python.exe)
正确的做法:
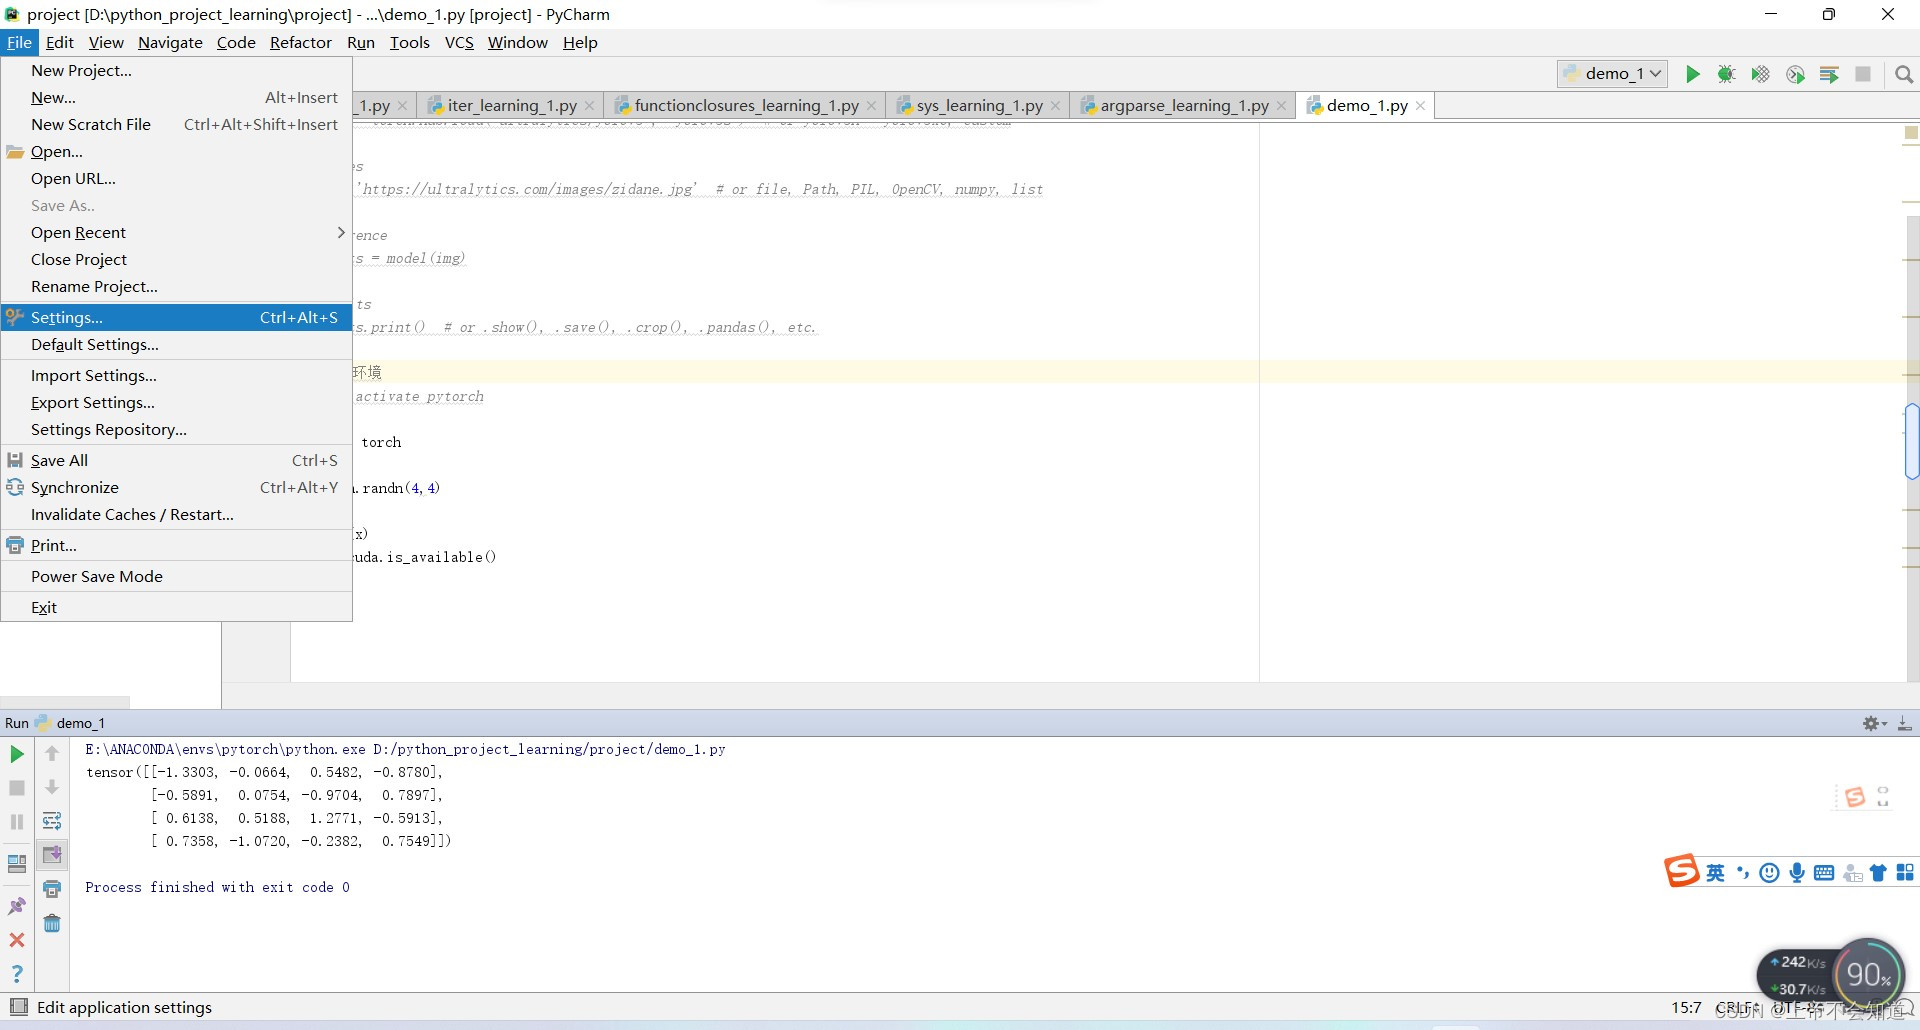
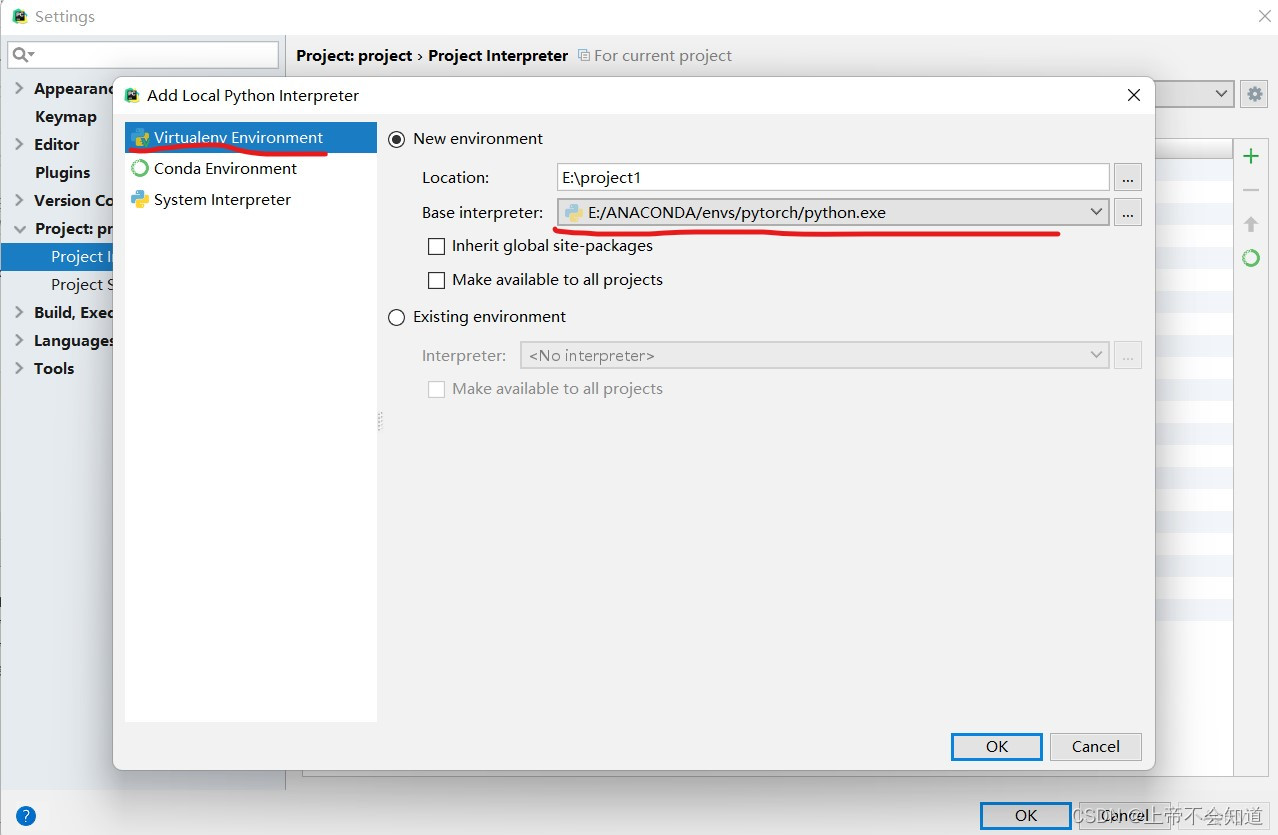
第一步,点开上面的File,再点击settings
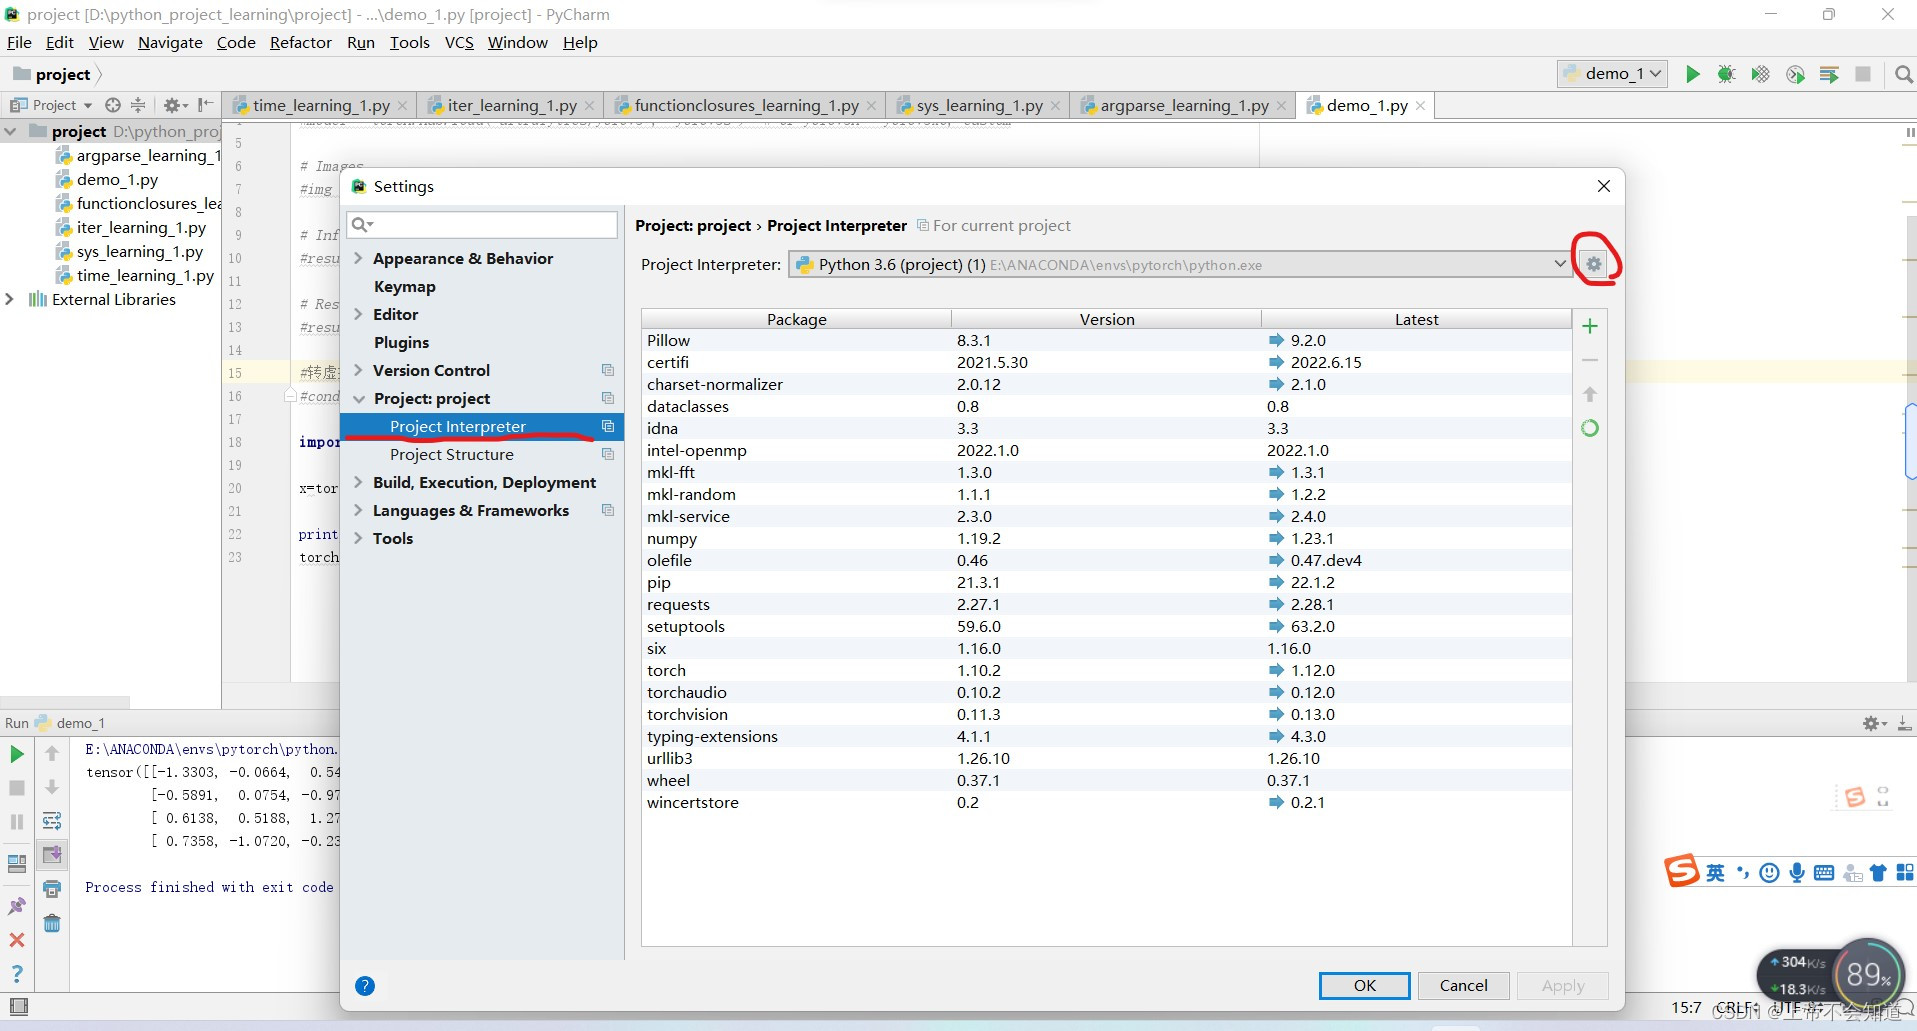
第二步,点击project:project里面的project Interpreter,再点击右边的小齿轮
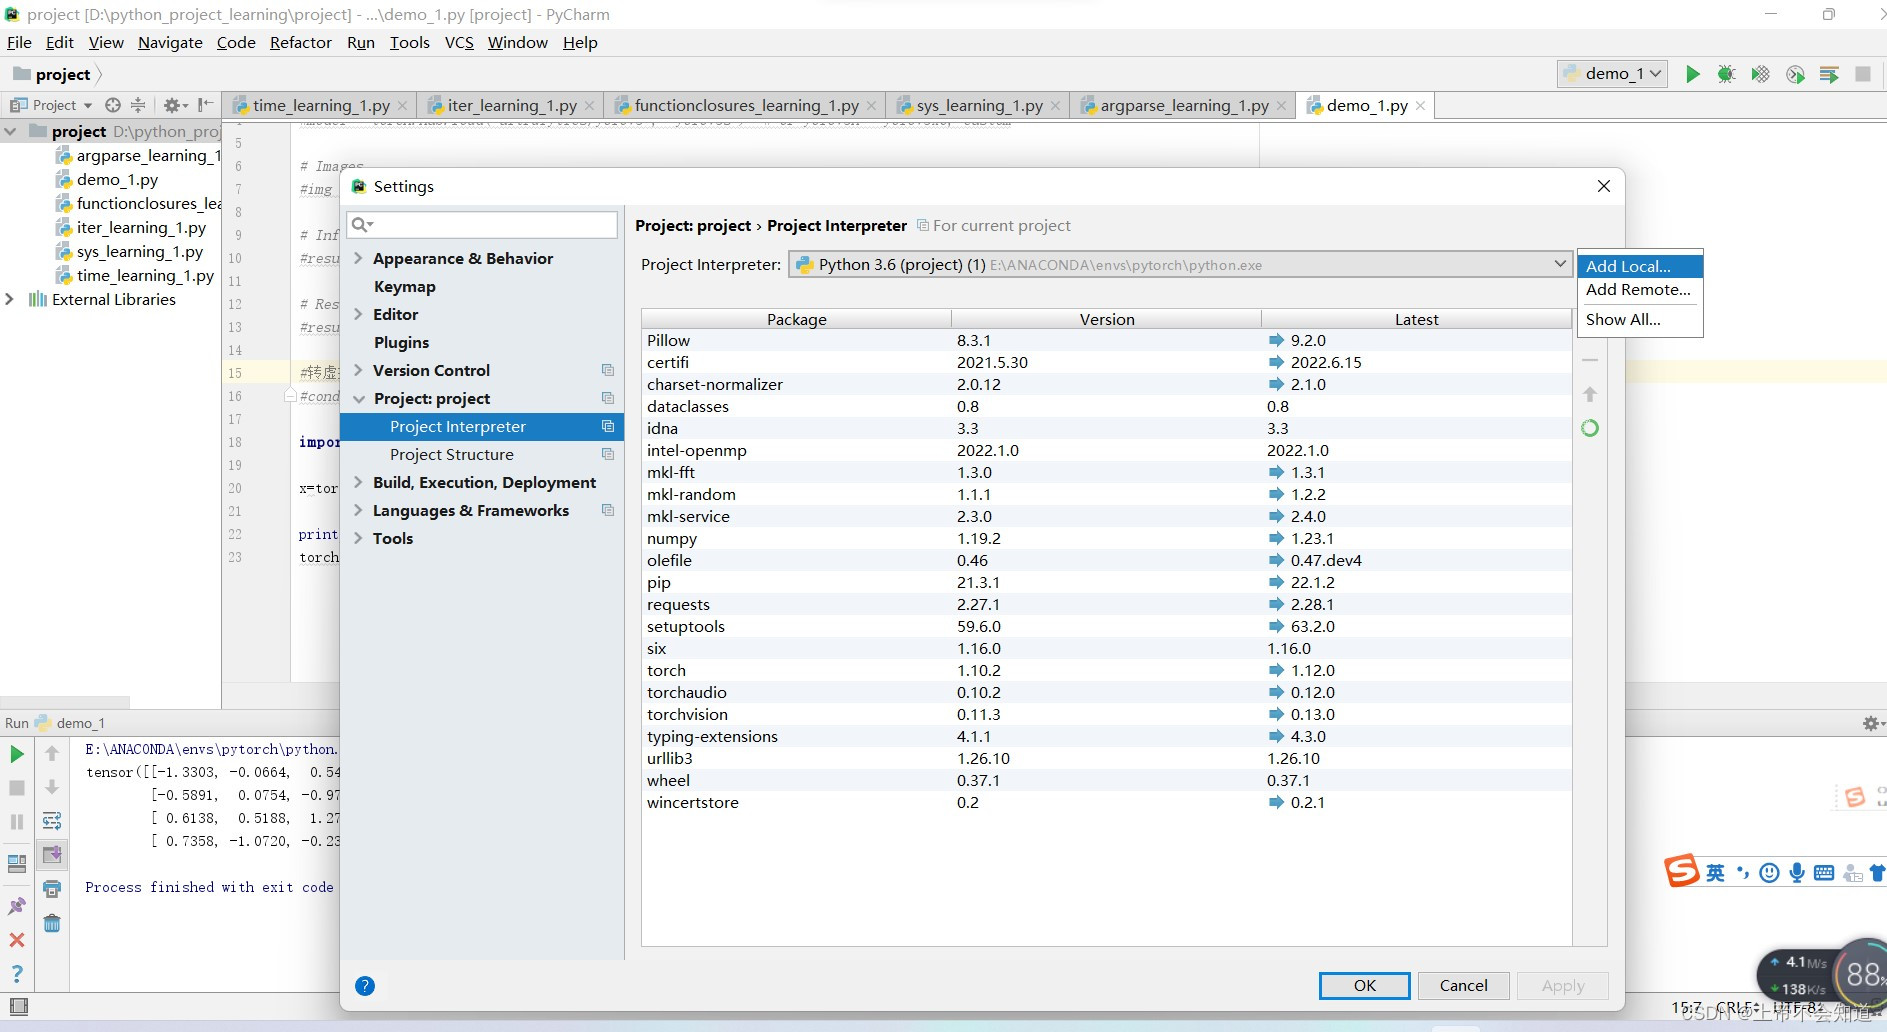
第三步,点击add local
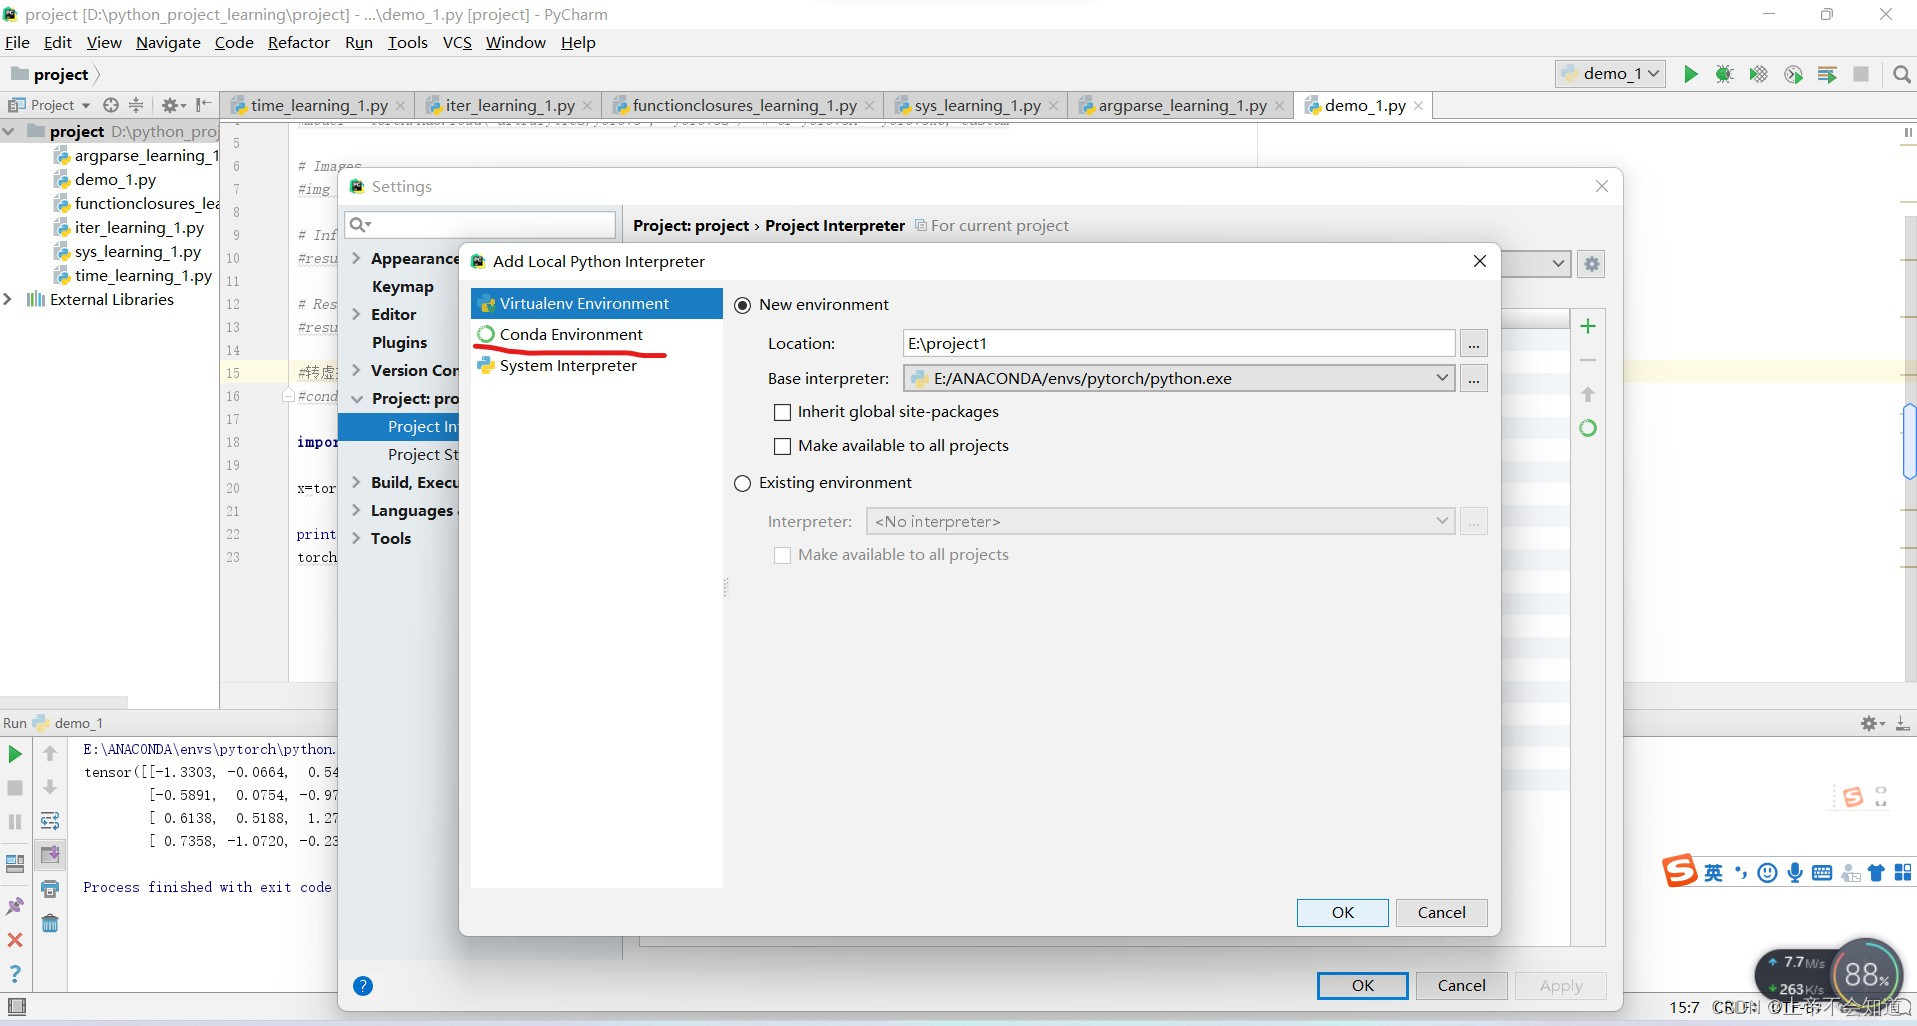
第四步,点击第二行的canda environment
第五步,点击下面的圆圈
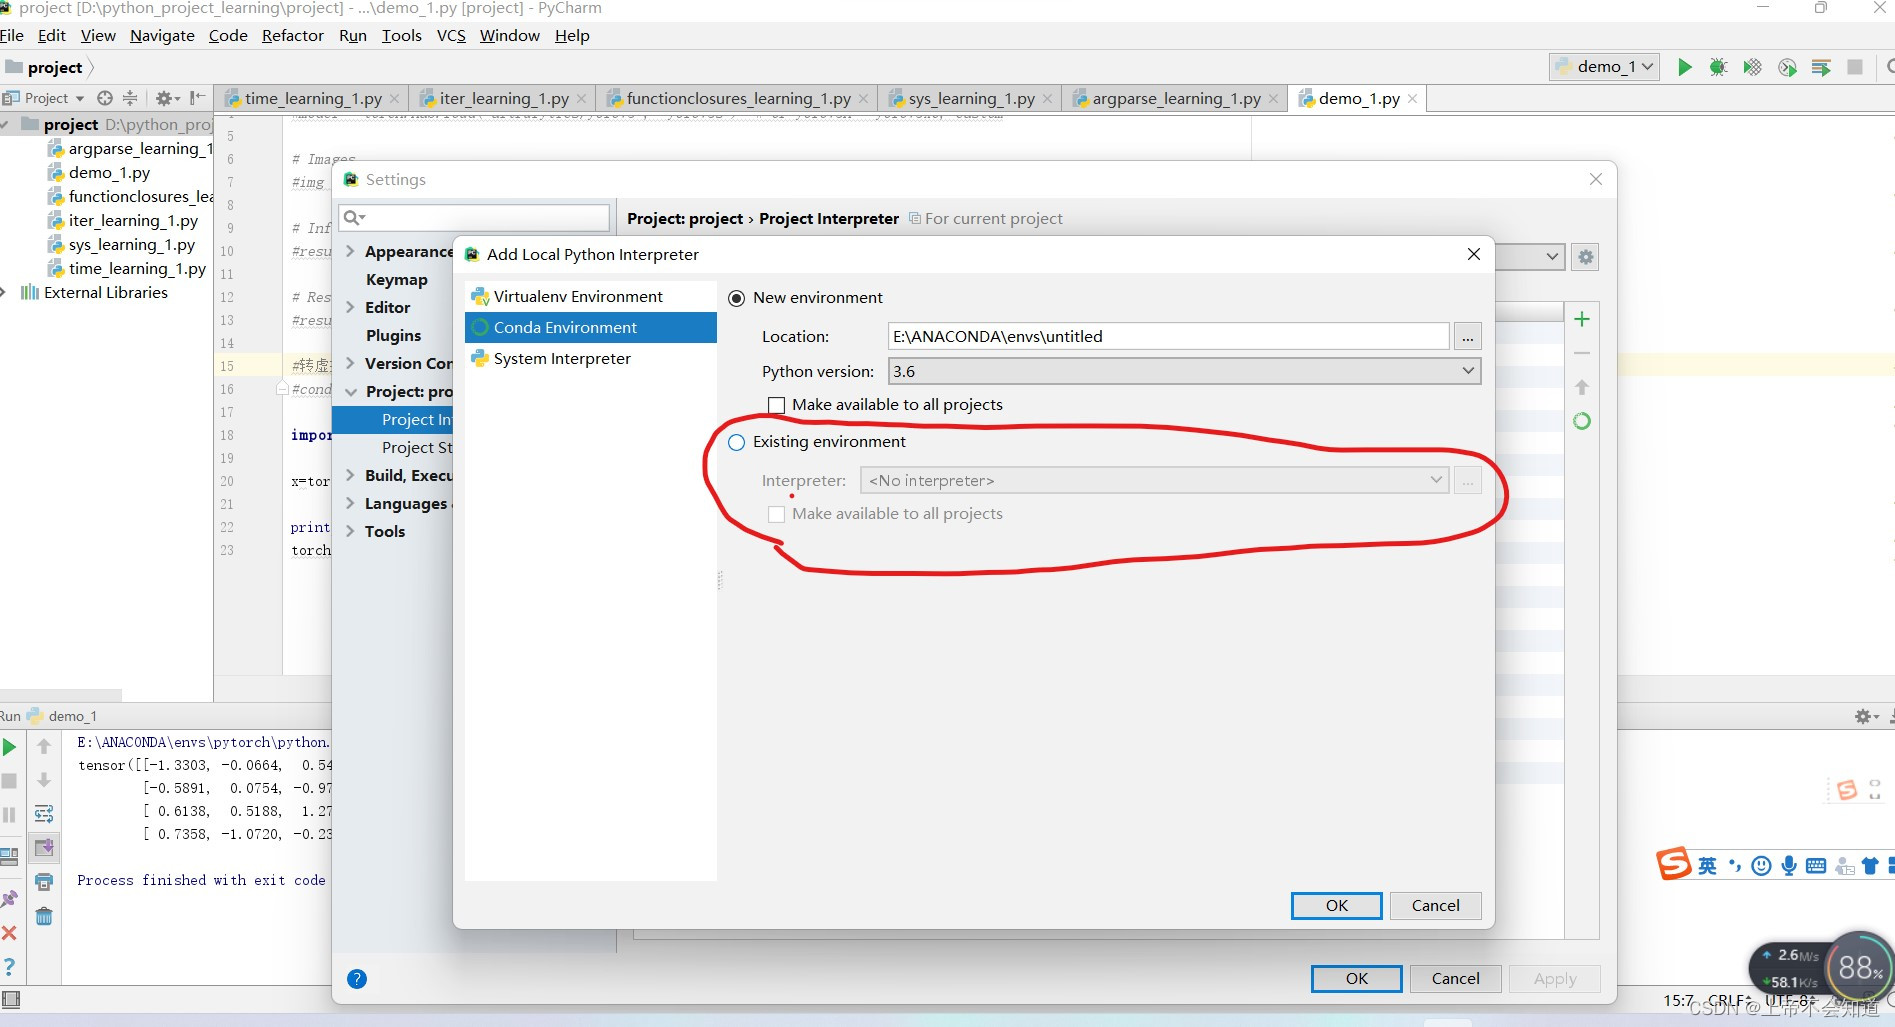
第六步,点击右边的省略号
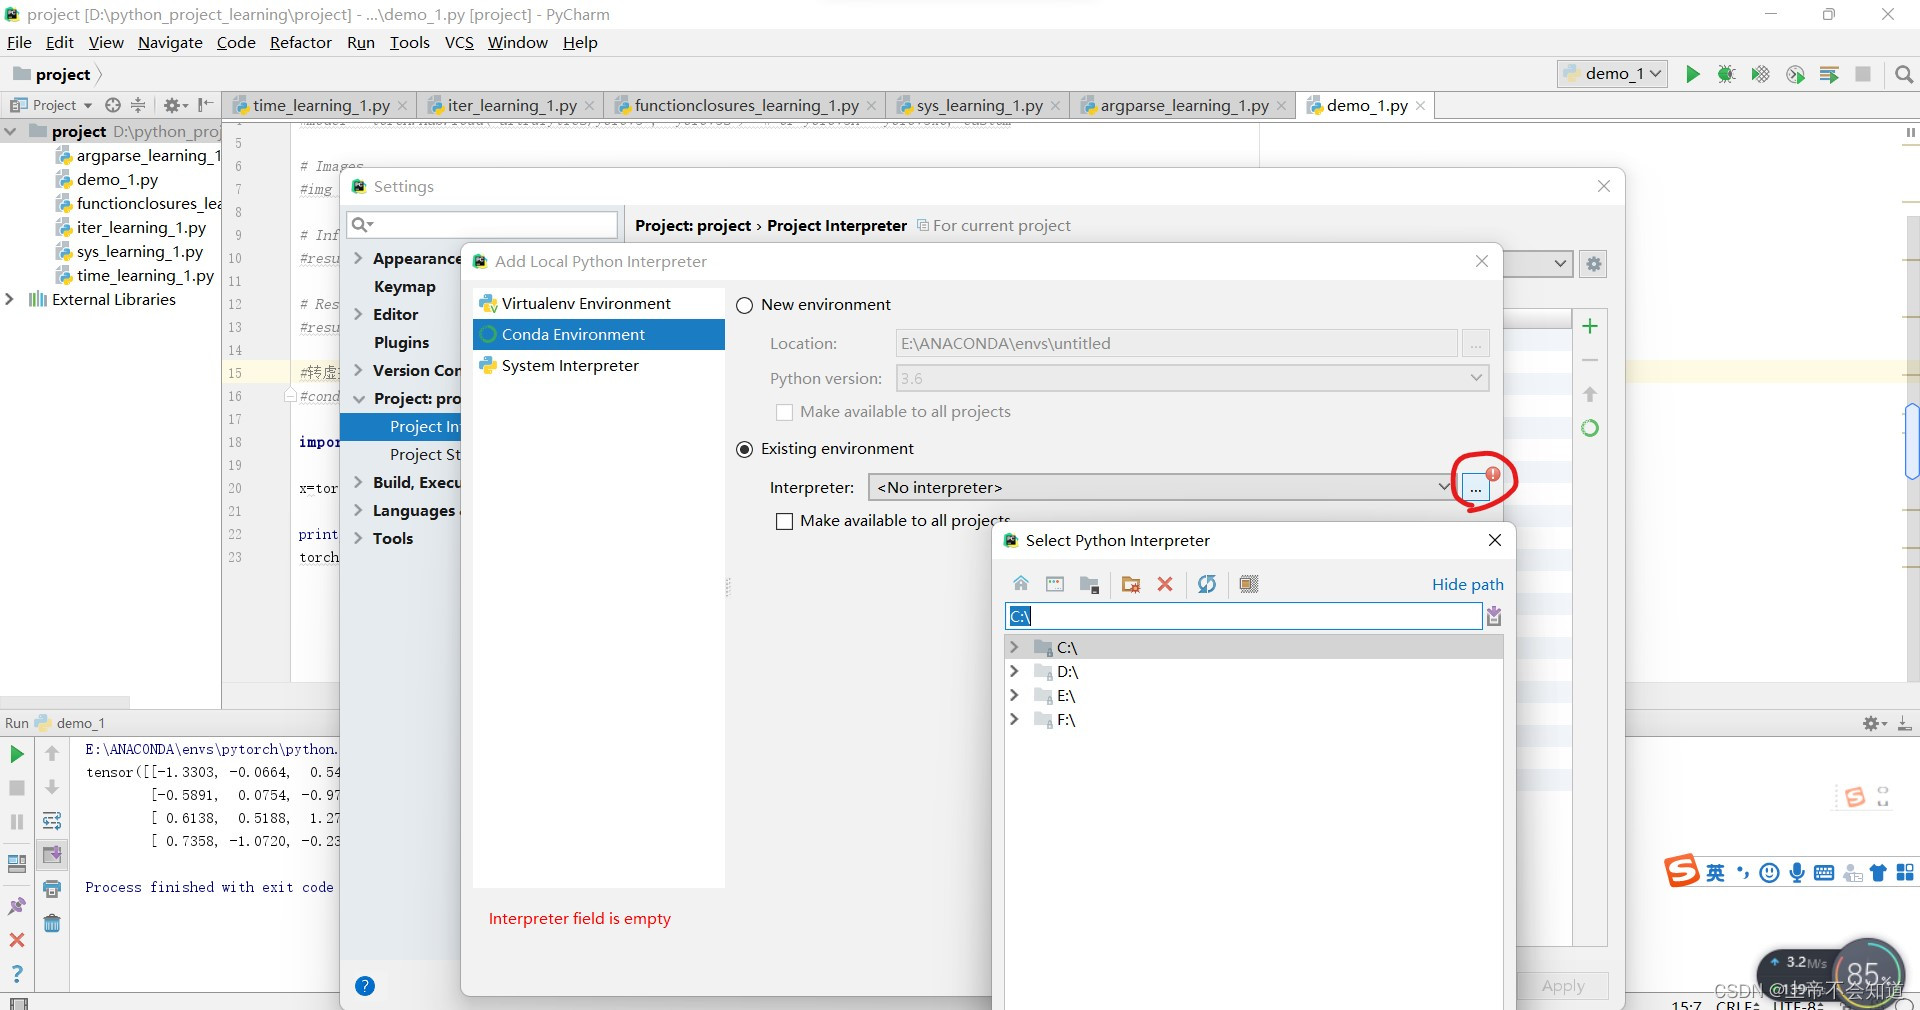
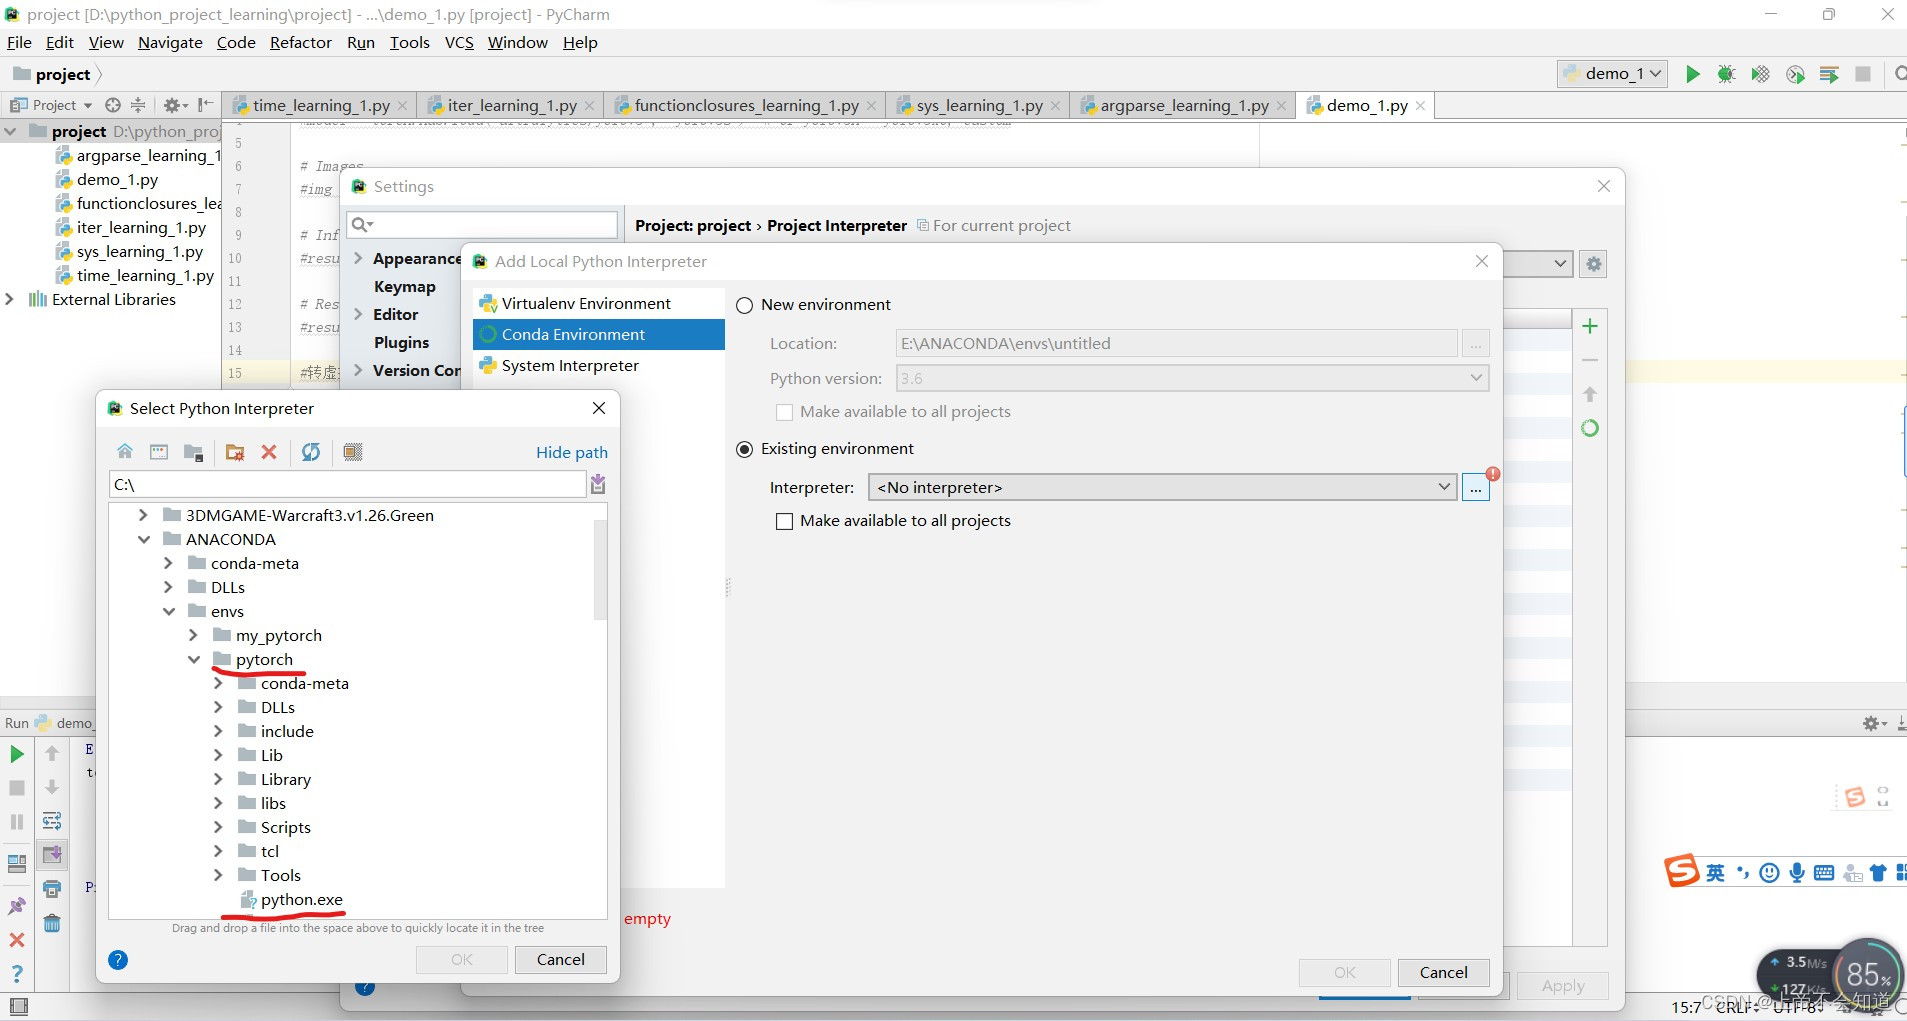
第七步,选择你安装的pytorch路径下的python.exe
第八步,点击ok

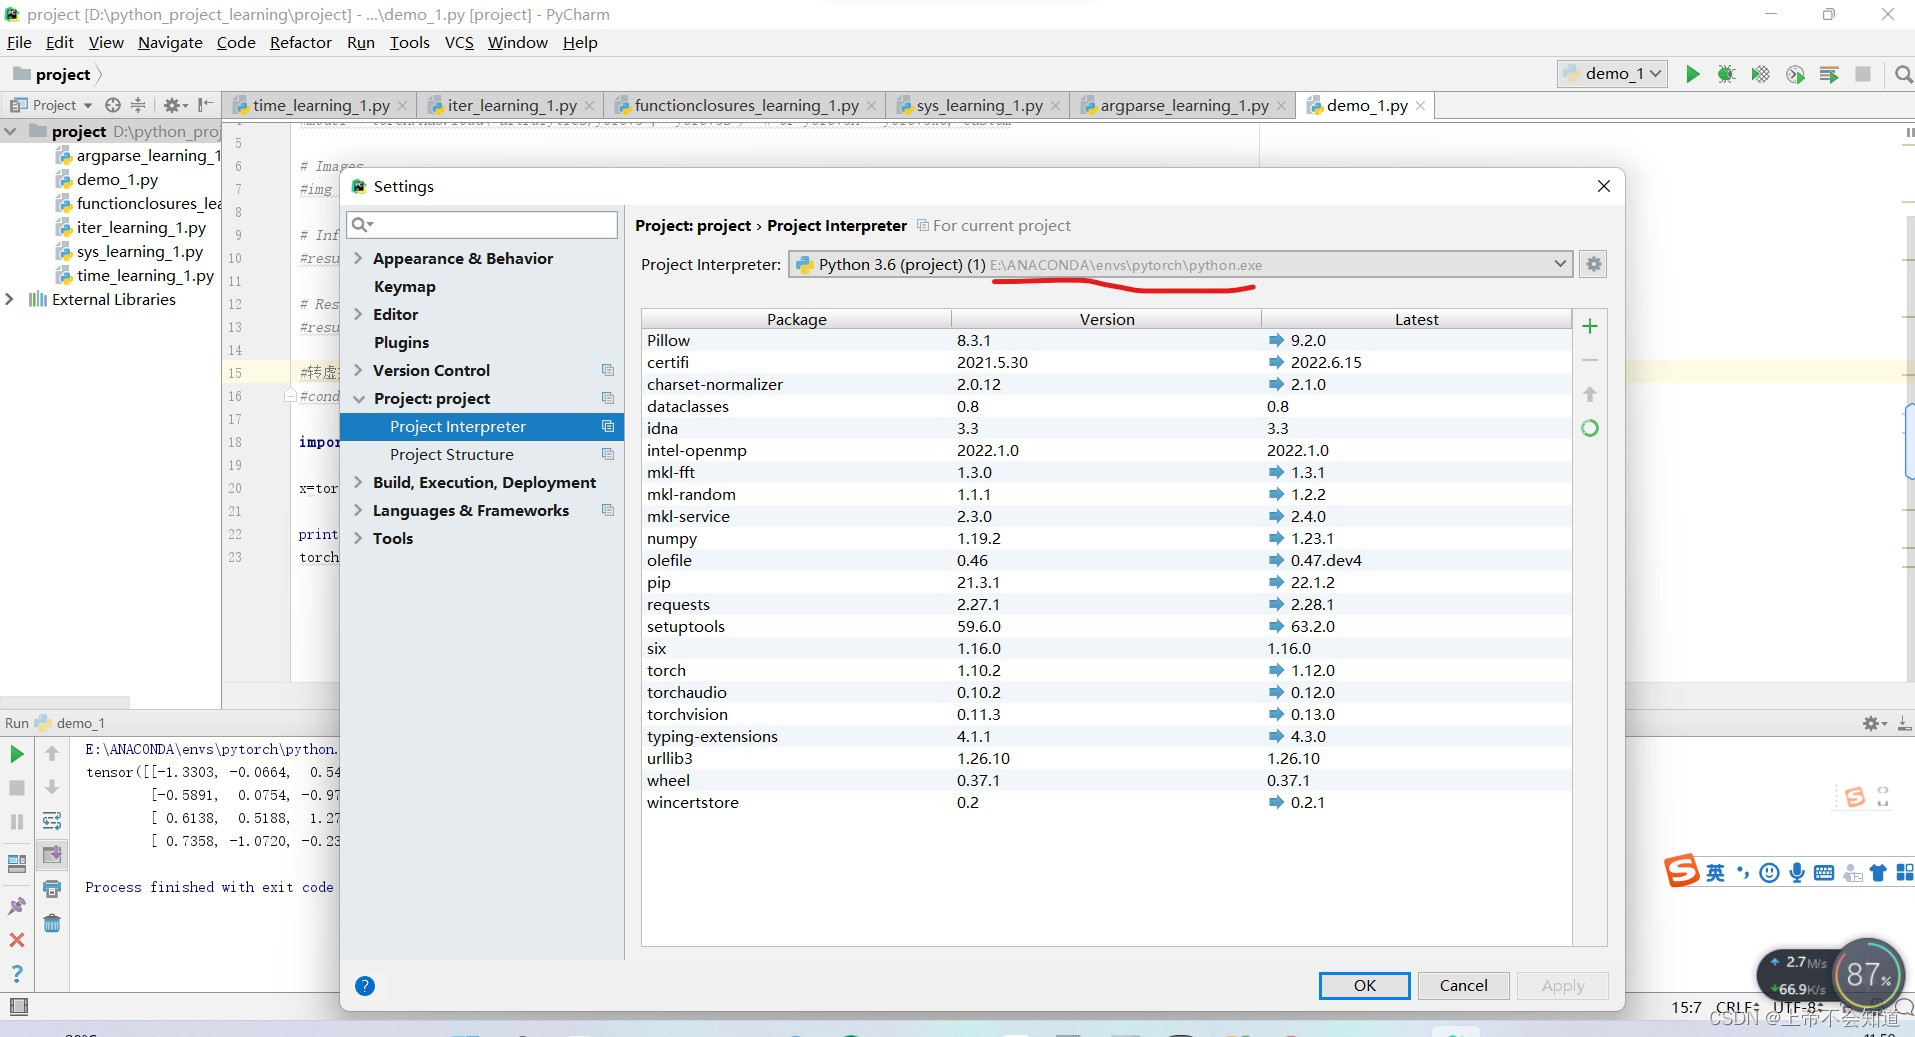
第九步,点击ok一路退出,在路过下面这个界面时,能看到划红线部分的路径是你刚刚选的(这里不用做其他的操作,只是告诉你有这么一回事),继续点击ok
最后,试一下下面的代码
import torch
x=torch.randn(4,4)
print (x)
torch.cuda.is_available()
输出没问题,大概长下面这样,就说明弄好了。
E:\ANACONDA\envs\pytorch\python.exe D:/python_project_learning/project/demo_1.py
tensor([[-1.3303, -0.0664,  0.5482, -0.8780],
    [-0.5891,  0.0754, -0.9704,  0.7897],
    [ 0.6138,  0.5188,  1.2771, -0.5913],
    [ 0.7358, -1.0720, -0.2382,  0.7549]])

Process finished with exit code 0
错误的做法案例:
只改了这里,即便将其改为pytorch下的python.exe也没用,会导致报错问题三、问题四。
问题三:OSError: [WinError 126] 找不到指定的模块。 Error loading “E:\ANACONDA\envs\pytorch\lib\site-packages\torch\lib\caffe2_detectron_ops_gpu.dll” or one of its dependencies.
OSError: [WinError 126] 找不到指定的模块。 Error loading "E:\ANACONDA\envs\pytorch\lib\site-packages\torch\lib\caffe2_detectron_ops_gpu.dll" or one of its dependencies.
可能的原因:
1.在该路径下找不到该dll文件,可能是未安装cudatoolkit。
2.没有在pycharm里配置pytorch环境,或配置错误。
解决方法:
方法一:
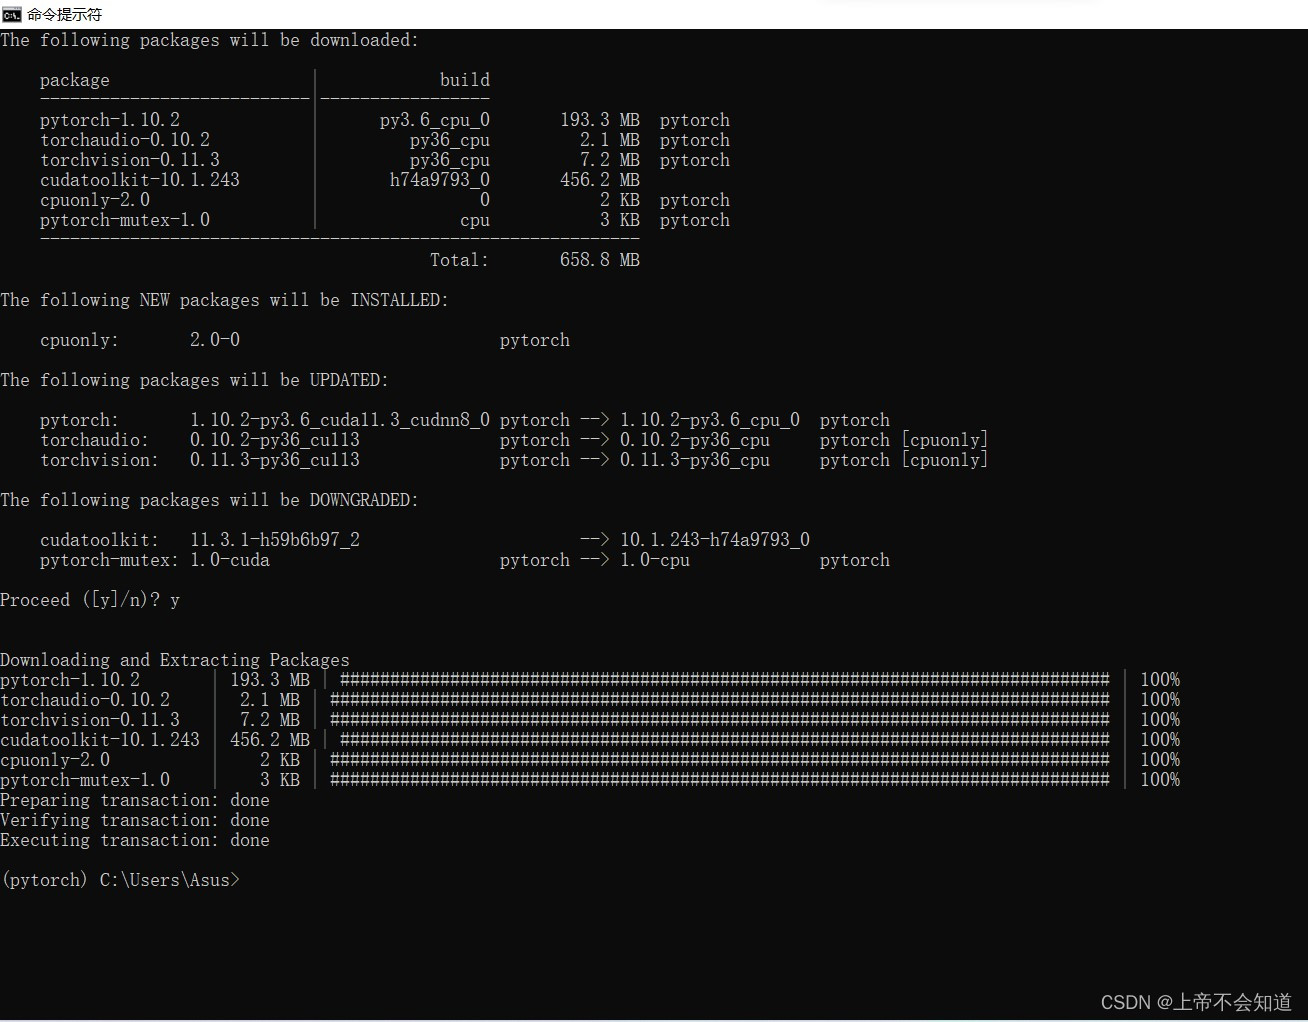
把缺少的cudatoolkit和其他包重新安装,百度一下该dll文件在哪里可以下载,并将其下载好后放进该路径下。
或在命令提示符窗口输入命令
conda install pytorch torchvision torchaudio cudatoolkit=10.1 -c pytorch
如果用本地镜像源,就删除后面的 ‘-c pytorch’
以下为操作时大概会出现的样子

方法二:
在pycharm里配置pytorch环境。
问题四:OSError: [WinError 126] 找不到指定的模块。 Error loading “E:\ANACONDA\envs\pytorch\lib\site-packages\torch\lib\caffe2_detectron_ops.dll” or one of its dependencies.
OSError: [WinError 126] 找不到指定的模块。 Error loading "E:\ANACONDA\envs\pytorch\lib\site-packages\torch\lib\caffe2_detectron_ops.dll" or one of its dependencies.
可能的原因:
1.该包没安装。
2.没有在pycharm里配置pytorch环境,或配置错误。
解决方法:
方法一:
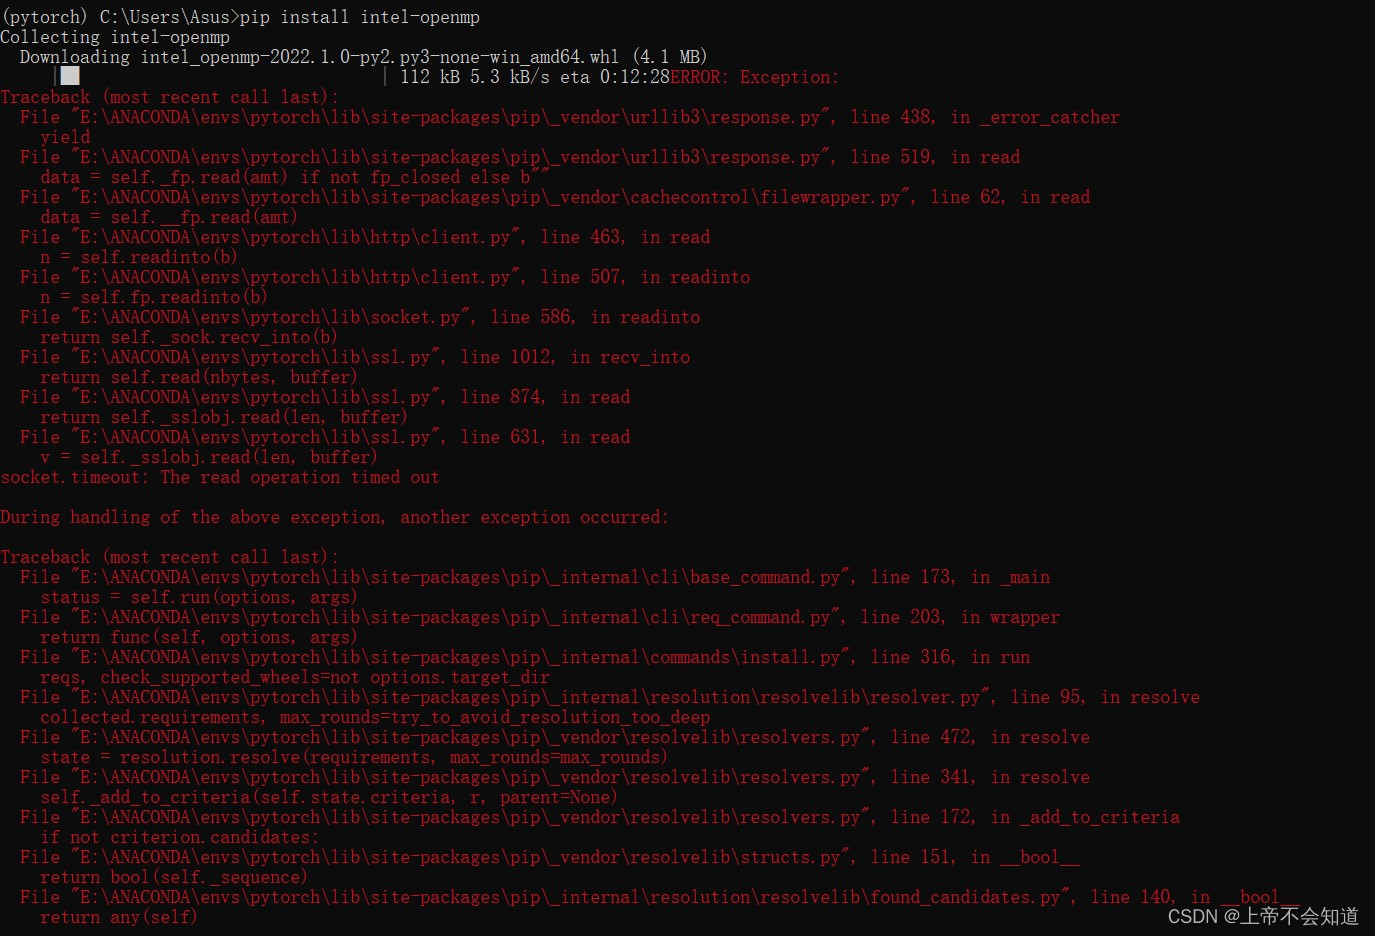
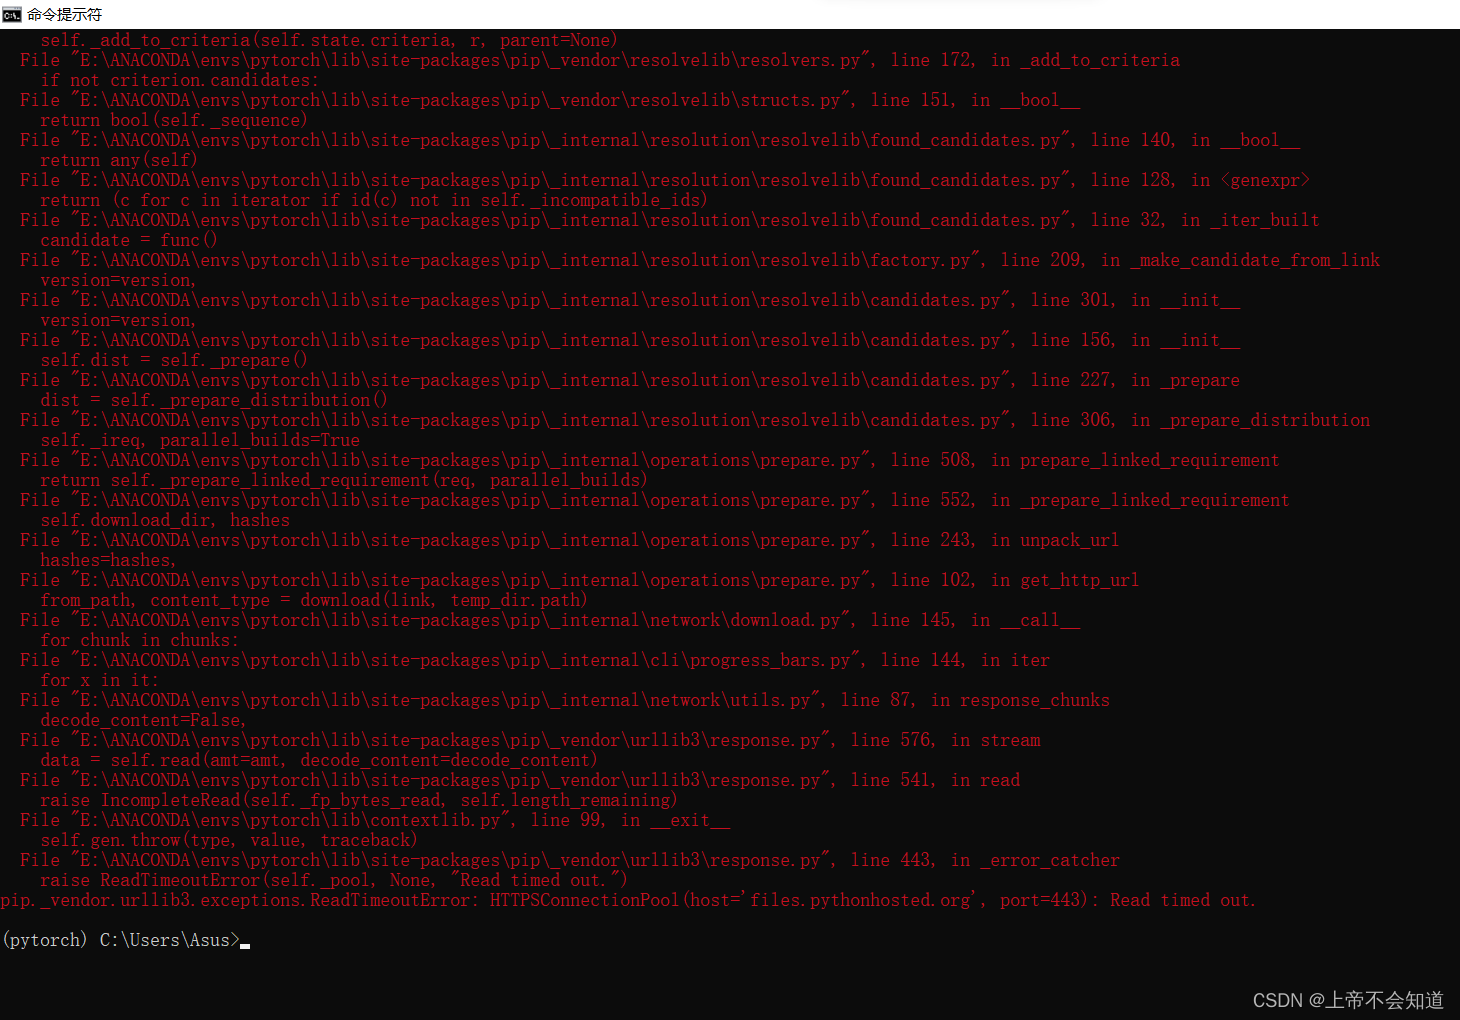
安装一个包
pip install intel-openmp
但事实证明这不行,即便是网上大佬的操作,在我这还是出问题了,我安装不了,报错为问题五、问题六。随后问题五、问题六解决,但这个问题还在。(对一些人是有用的,但对我这里确实有些遗憾)
方法二:
在pycharm里配置pytorch环境。
于是开始考虑配置问题,由于我是成功之后重新模拟的步骤回顾,所以截图上没有显示报错。
第一步,点开上面的File,再点击settings
第二步,点击project:project里面的project Interpreter,再点击右边的小齿轮
第三步,点击add local
第四步,点击第二行的canda environment
第五步,点击下面的圆圈
第六步,点击右边的省略号
第七步,选择你安装的pytorch路径下的python.exe
第八步,点击ok
第九步,点击ok一路退出,在路过下面这个界面时,能看到划红线部分的路径是你刚刚选的,而红线前面的名称是新建的(这里不用做其他的操作,只是告诉你有这么一回事),继续点击ok
于是,试一下下面的代码
import torch
x=torch.randn(4,4)
print (x)
torch.cuda.is_available()
输出没问题,大概长下面这样,就说明弄好了。
E:\ANACONDA\envs\pytorch\python.exe D:/python_project_learning/project/demo_1.py
tensor([[-1.3303, -0.0664,  0.5482, -0.8780],
    [-0.5891,  0.0754, -0.9704,  0.7897],
    [ 0.6138,  0.5188,  1.2771, -0.5913],
    [ 0.7358, -1.0720, -0.2382,  0.7549]])

Process finished with exit code 0
问题五: raise ReadTimeoutError(self._pool, None, “Read timed out.”)
raise ReadTimeoutError(self._pool, None, "Read timed out.")
解决方法:
1.更换安装源
pip install -i https://pypi.douban.com/simple <需要安装的包>
例如:
pip install -i https://pypi.douban.com/simple requests

问题五解决,但问题四没有因此解决。
2.下载离线包,下载好后放到pip.exe所在的Scripts/文件目录下,这个时候再运行
问题六:WARNING: Retrying (Retry(total=4, connect=None, read=None, redirect=None, status=None)) after connection broken by ‘ReadTimeoutError(“HTTPSConnectionPool(host=‘files.pythonhosted.org’, port=443): Read timed out. (read timeout=15)”,)’: /packages/d8/e1/da6daa7676e779edc8de06cdbde20b7a9d6dfabd91ad35d9df1e3e28e44c/intel_openmp-2022.1.0-py2.py3-none-win_amd64.whl
使用pip安装包时会出现无法下载的问题,或者pip直接无反应
WARNING: Retrying (Retry(total=4, connect=None, read=None, redirect=None, status=None)) after connection broken by 'ReadTimeoutError("HTTPSConnectionPool(host='files.pythonhosted.org', port=443): Read timed out. (read timeout=15)",)': /packages/d8/e1/da6daa7676e779edc8de06cdbde20b7a9d6dfabd91ad35d9df1e3e28e44c/intel_openmp-2022.1.0-py2.py3-none-win_amd64.whl
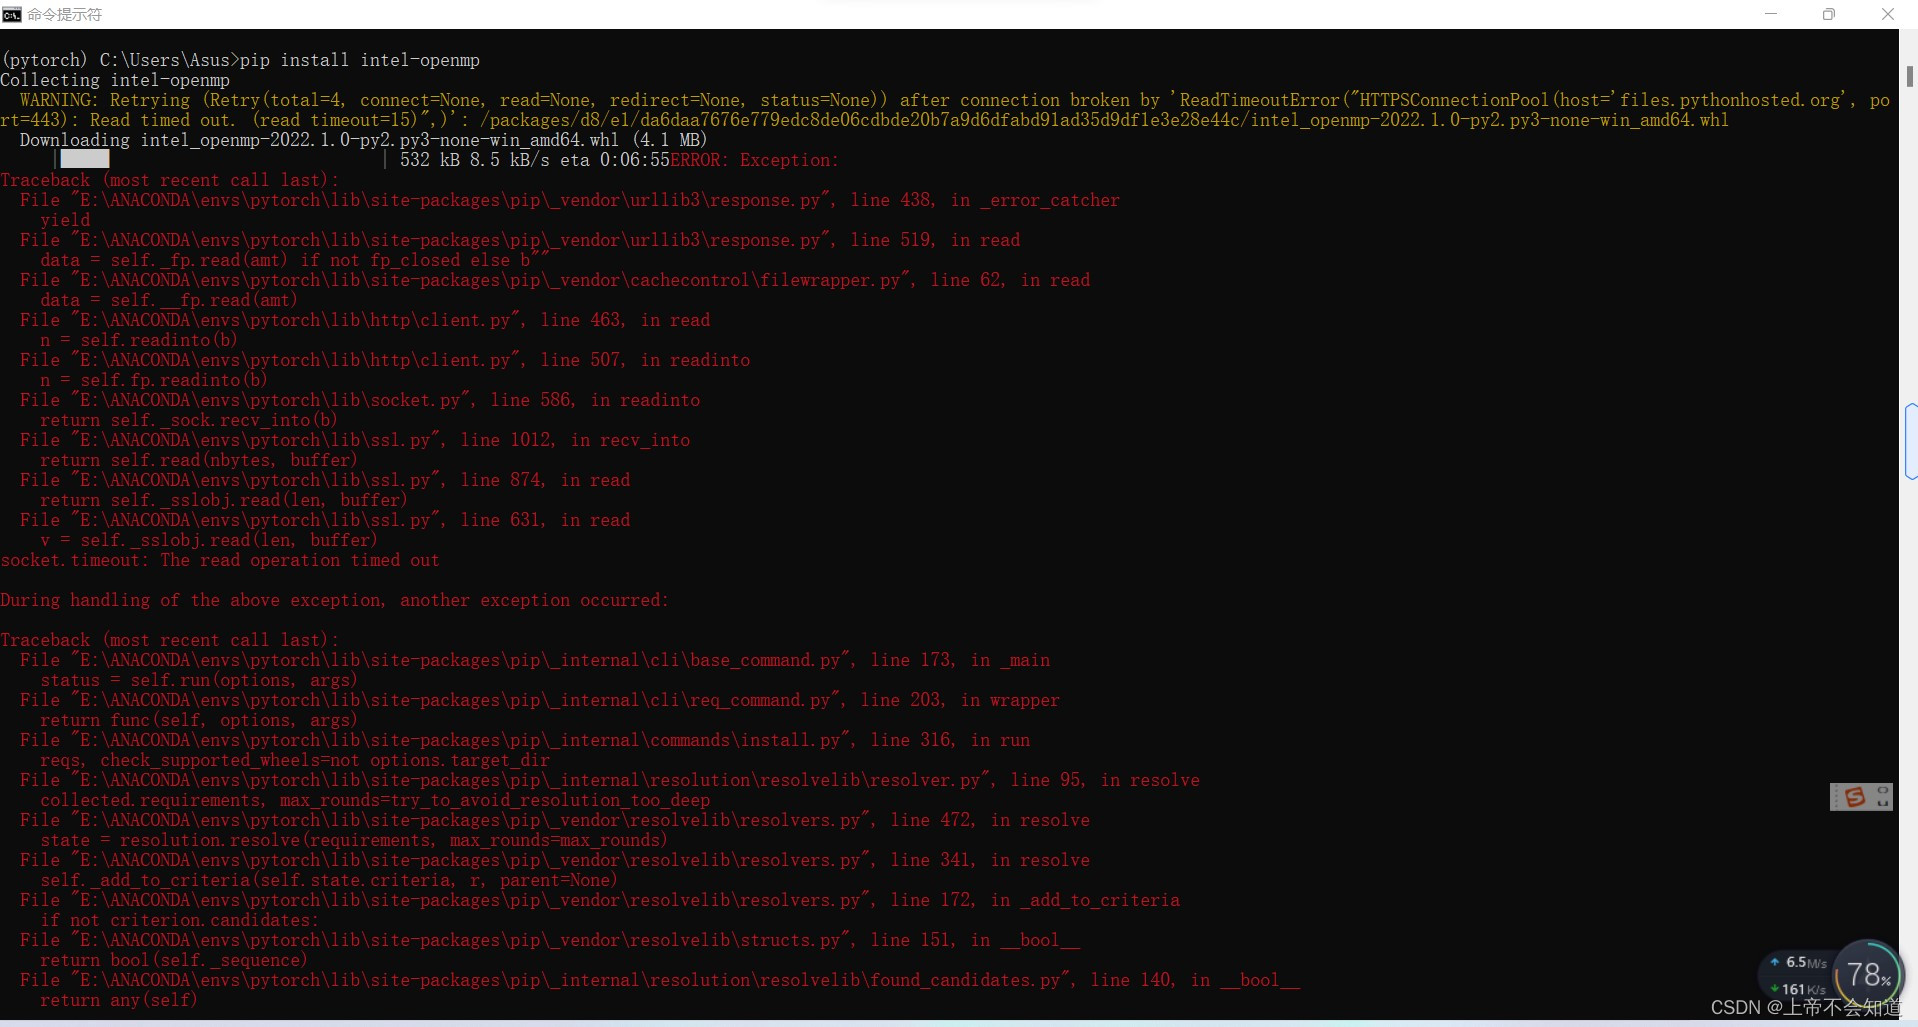
可能的原因:
pip时各种关卡限制了它的网速,导致连接超时
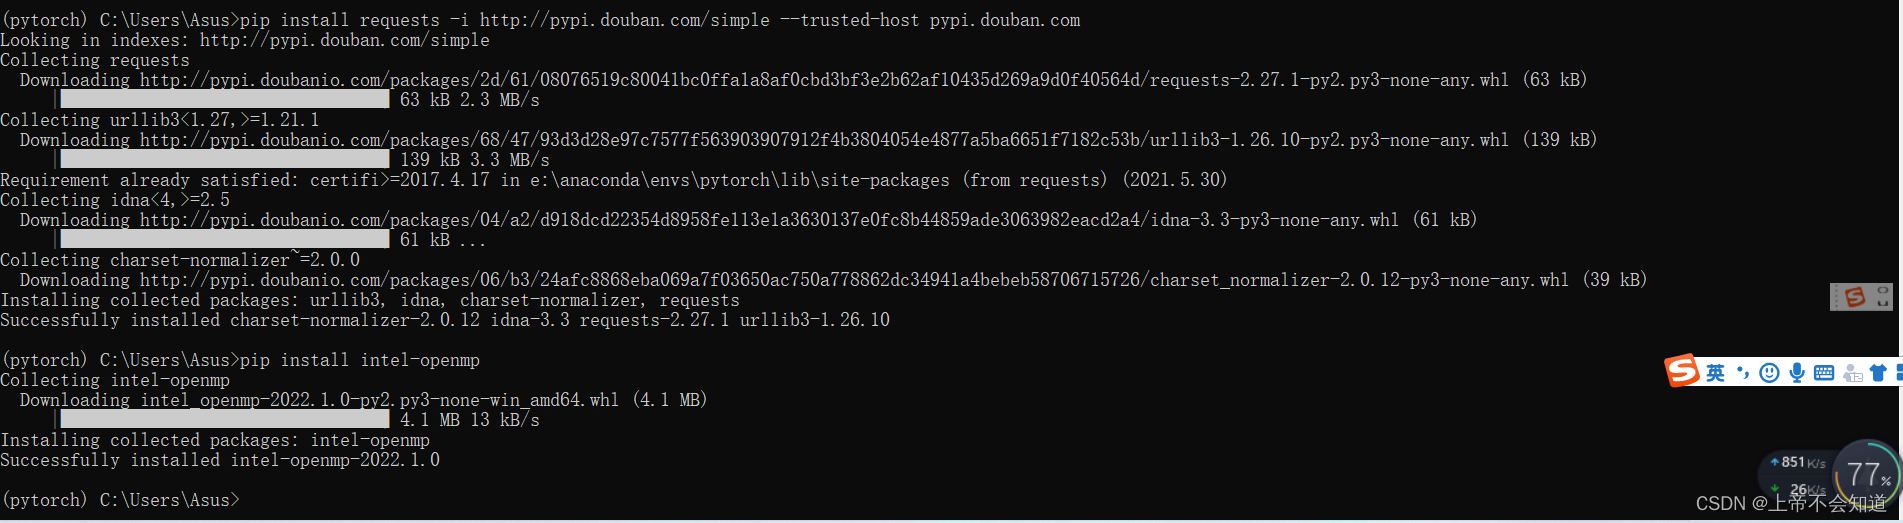
解决方法:
在 pip命令后自己设定收集源(-i +url),
例如使用豆瓣源
pip install requests -i http://pypi.douban.com/simple --trusted-host pypi.douban.com
或者
pip3 install numpy scipy matplotlib -i https://pypi.tuna.tsinghua.edu.cn/simple
附一些国内的pip源:
清华大学 https://pypi.tuna.tsinghua.edu.cn/simple/

中国科学技术大学 http://pypi.mirrors.ustc.edu.cn/simple/

中国科技大学 https://pypi.mirrors.ustc.edu.cn/simple/

阿里云 http://mirrors.aliyun.com/pypi/simple/

豆瓣(douban) http://pypi.douban.com/simple/
问题六解决,但问题四没有因此解决。
问题七:ModuleNotFoundError: No module named ‘matplotlib’
报错如下
ModuleNotFoundError: No module named 'matplotlib'
且出现下图的情况

命令提示符窗口输入“pip install matplotlib”,显示如下

在pycharm配置里如下

可能的原因:
造成这种情况可能是pycharm的配置环境为虚拟空间,而该虚拟空间里没安装matplotlib
解决方法:
在命令提示符窗口进入当初创建的虚拟环境,然后进行pip
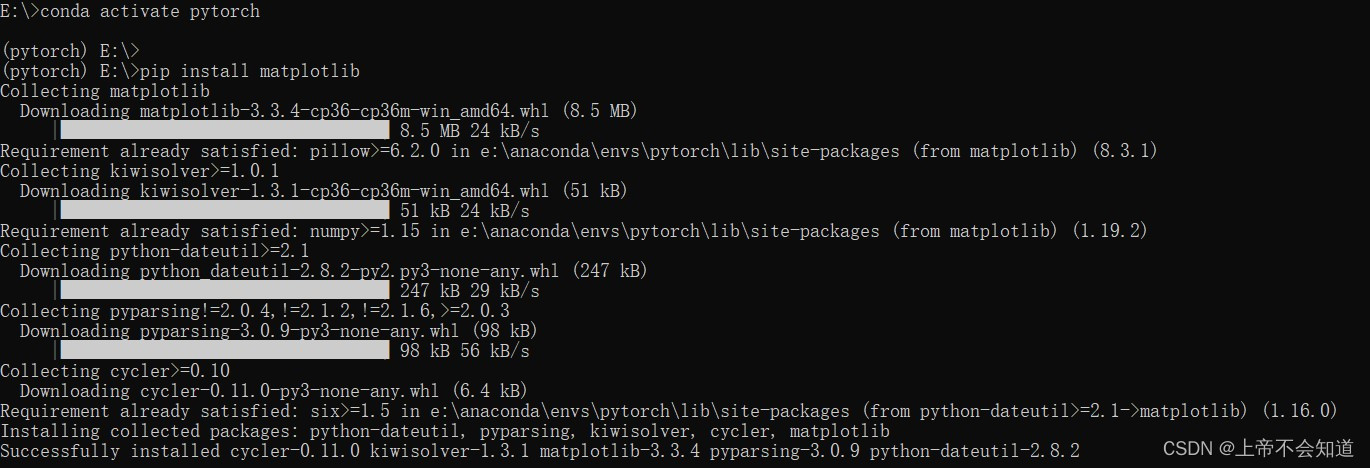
其中,下面这行命令的用意是进入我当初创建的虚拟环境pytorch,pytorch是我创建时命名的环境名。
conda activate pytorch
下面这行的用意是下载matplotlib
pip install matplotlib
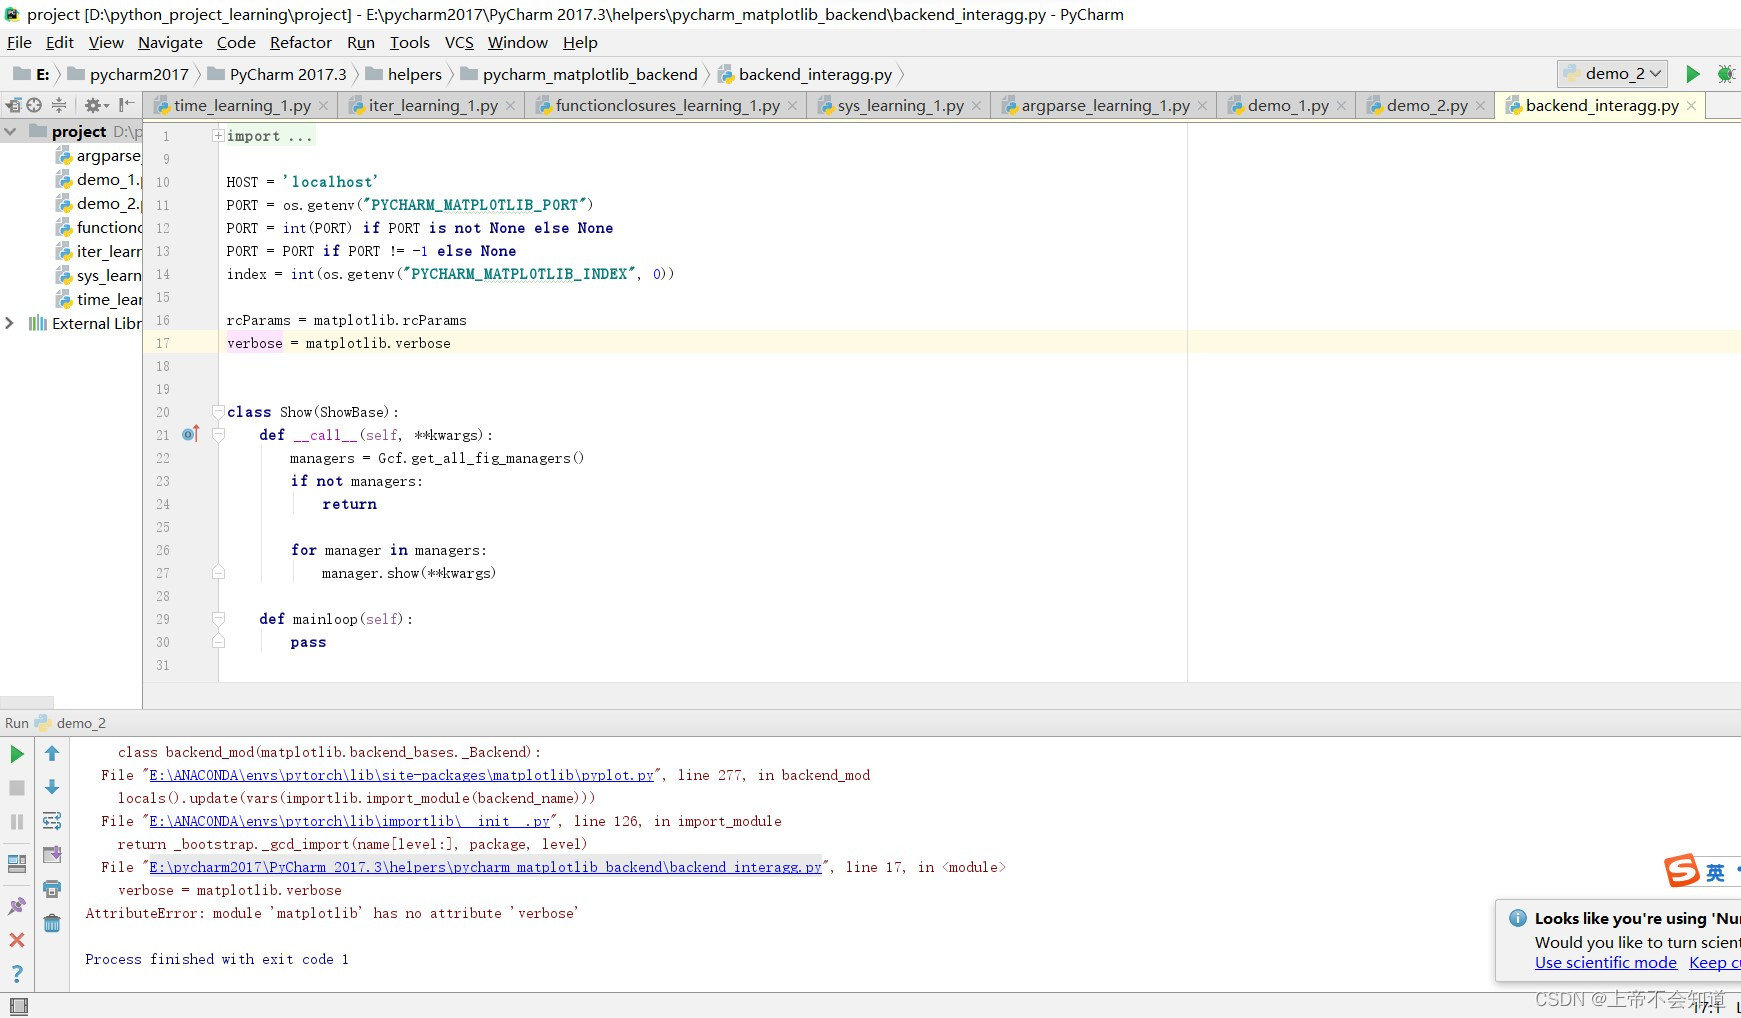
问题八: verbose = matplotlib.verbose AttributeError: module ‘matplotlib’ has no attribute ‘verbose’
E:\ANACONDA\envs\pytorch\python.exe D:/python_project_learning/project/demo_2.py
Traceback (most recent call last):
  File "D:/python_project_learning/project/demo_2.py", line 2, in <module>
from matplotlib import pyplot as plt
  File "E:\ANACONDA\envs\pytorch\lib\site-packages\matplotlib\pyplot.py", line 2336, in <module>
switch_backend(rcParams["backend"])
  File "E:\ANACONDA\envs\pytorch\lib\site-packages\matplotlib\pyplot.py", line 276, in switch_backend
class backend_mod(matplotlib.backend_bases._Backend):
  File "E:\ANACONDA\envs\pytorch\lib\site-packages\matplotlib\pyplot.py", line 277, in backend_mod
locals().update(vars(importlib.import_module(backend_name)))
  File "E:\ANACONDA\envs\pytorch\lib\importlib\__init__.py", line 126, in import_module
return _bootstrap._gcd_import(name[level:], package, level)
  File "E:\pycharm2017\PyCharm 2017.3\helpers\pycharm_matplotlib_backend\backend_interagg.py", line 17, in <module>
verbose = matplotlib.verbose
AttributeError: module 'matplotlib' has no attribute 'verbose'

Process finished with exit code 1
可能的原因:
具体不好说,可能是因为python3里verbose中的v是大写的V。
解决方法:
方法一:
点击报错最后一行的那个文件,将里面的verbose = matplotlib.verbose改成verbose = matplotlib.Verbose
(有些人改完就好了,也有些改了还是不行)
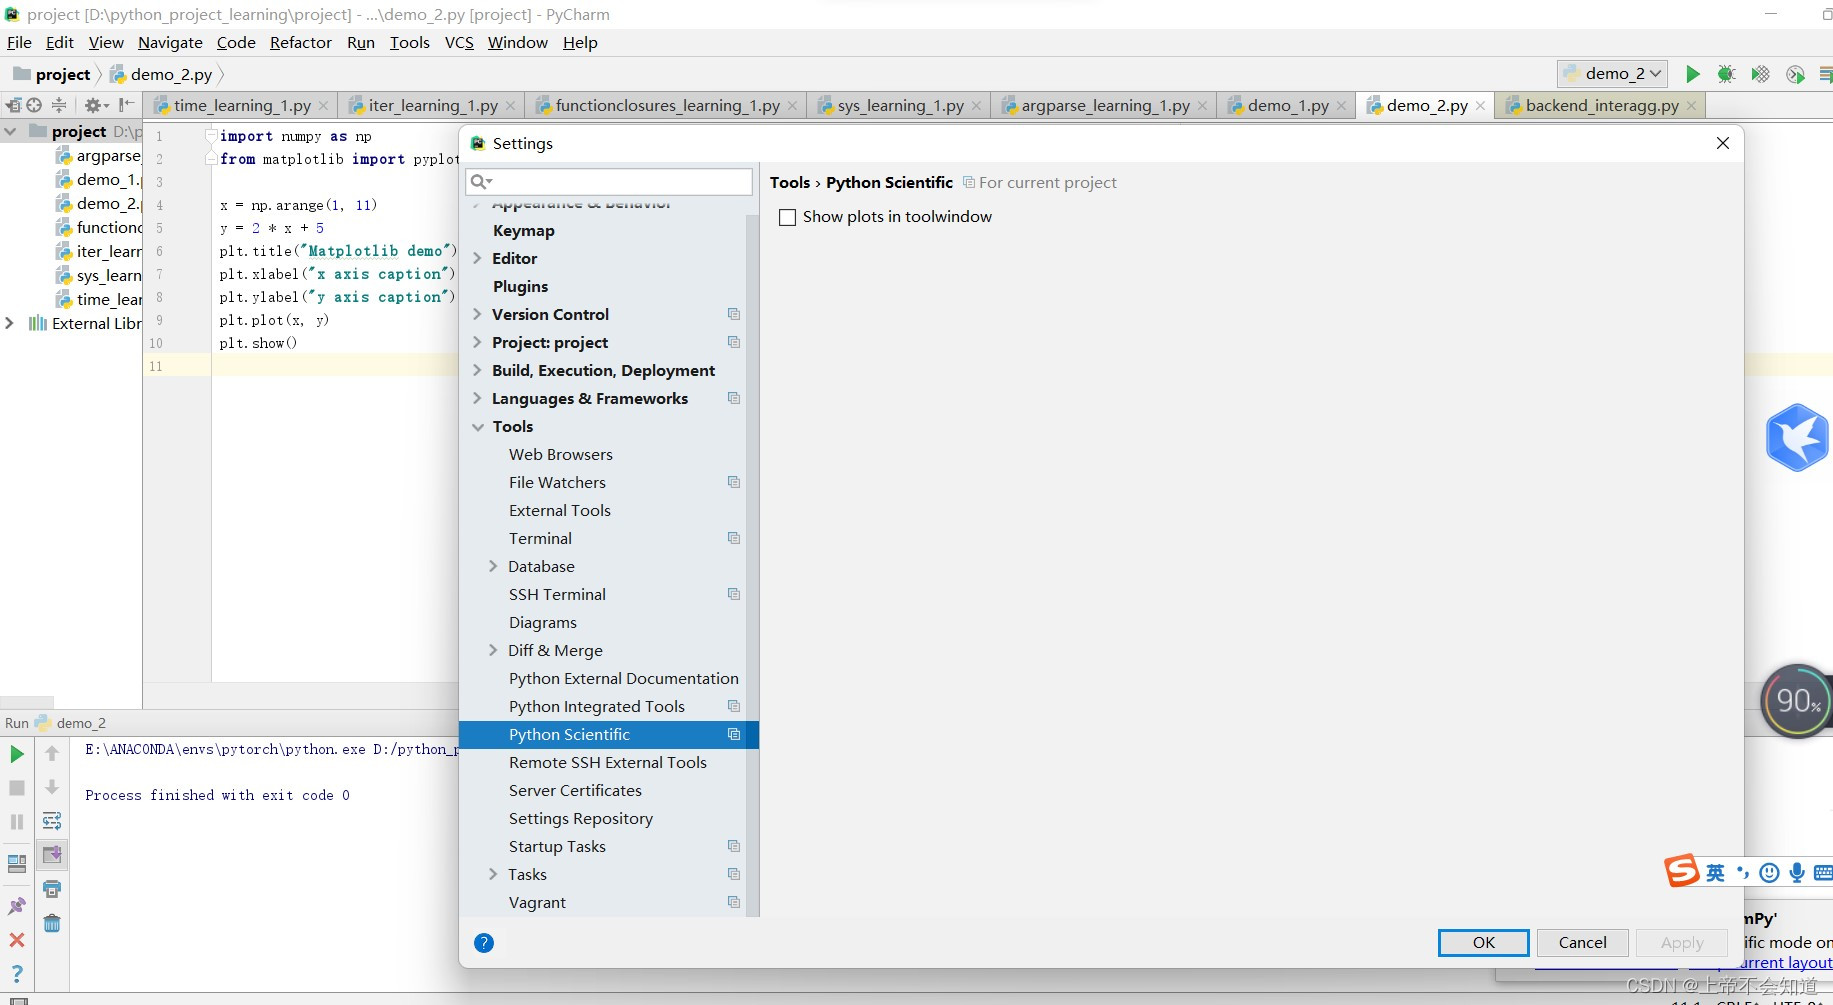
方法二:
将File——》settings——》Tools——》Python Scientific里的√去掉
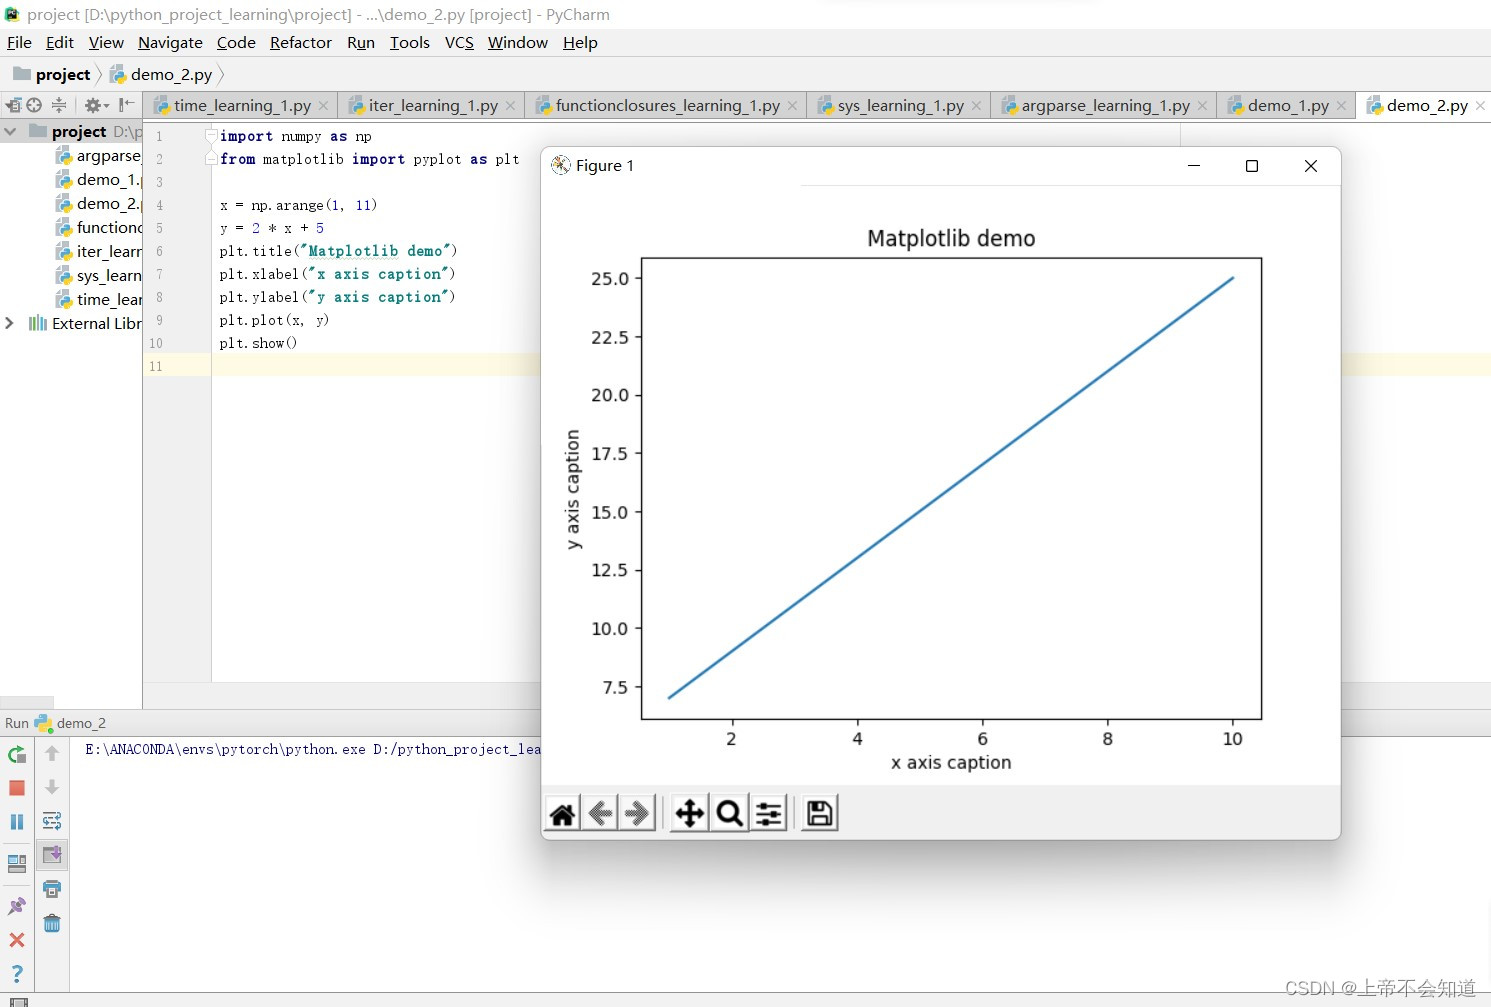
附上一段用来测试弄好了没得代码:
import numpy as np
from matplotlib import pyplot as plt

x = np.arange(1, 11)
y = 2 * x + 5
plt.title("Matplotlib demo")
plt.xlabel("x axis caption")
plt.ylabel("y axis caption")
plt.plot(x, y)
plt.show()
完成后输出如下图:
题外话:
直到最后完成了,我还是没能在pycharm的配置里找到matplotlib,我也不知道这是什么原因
不过不管是什么原因,我大概对这个有了一些浅薄的认知:
在这个页面进行操作,搜索你要安装的库,比如你要安装numpy,直接搜索numpy,再点击左下角的install package即可下载包,而下载的安装包大概是在你当前项目配置的环境对应的导入包文件夹里。
相应的,竟然我们有些人这个页面是白的,没有办法进行操作,但我们只要达成一样的结果就行——把我们要安装的包放进导入包文件夹site-packages里。
也就是说这里,想要给pycharm配置相应的安装包,其实是有两种不同的方式的。
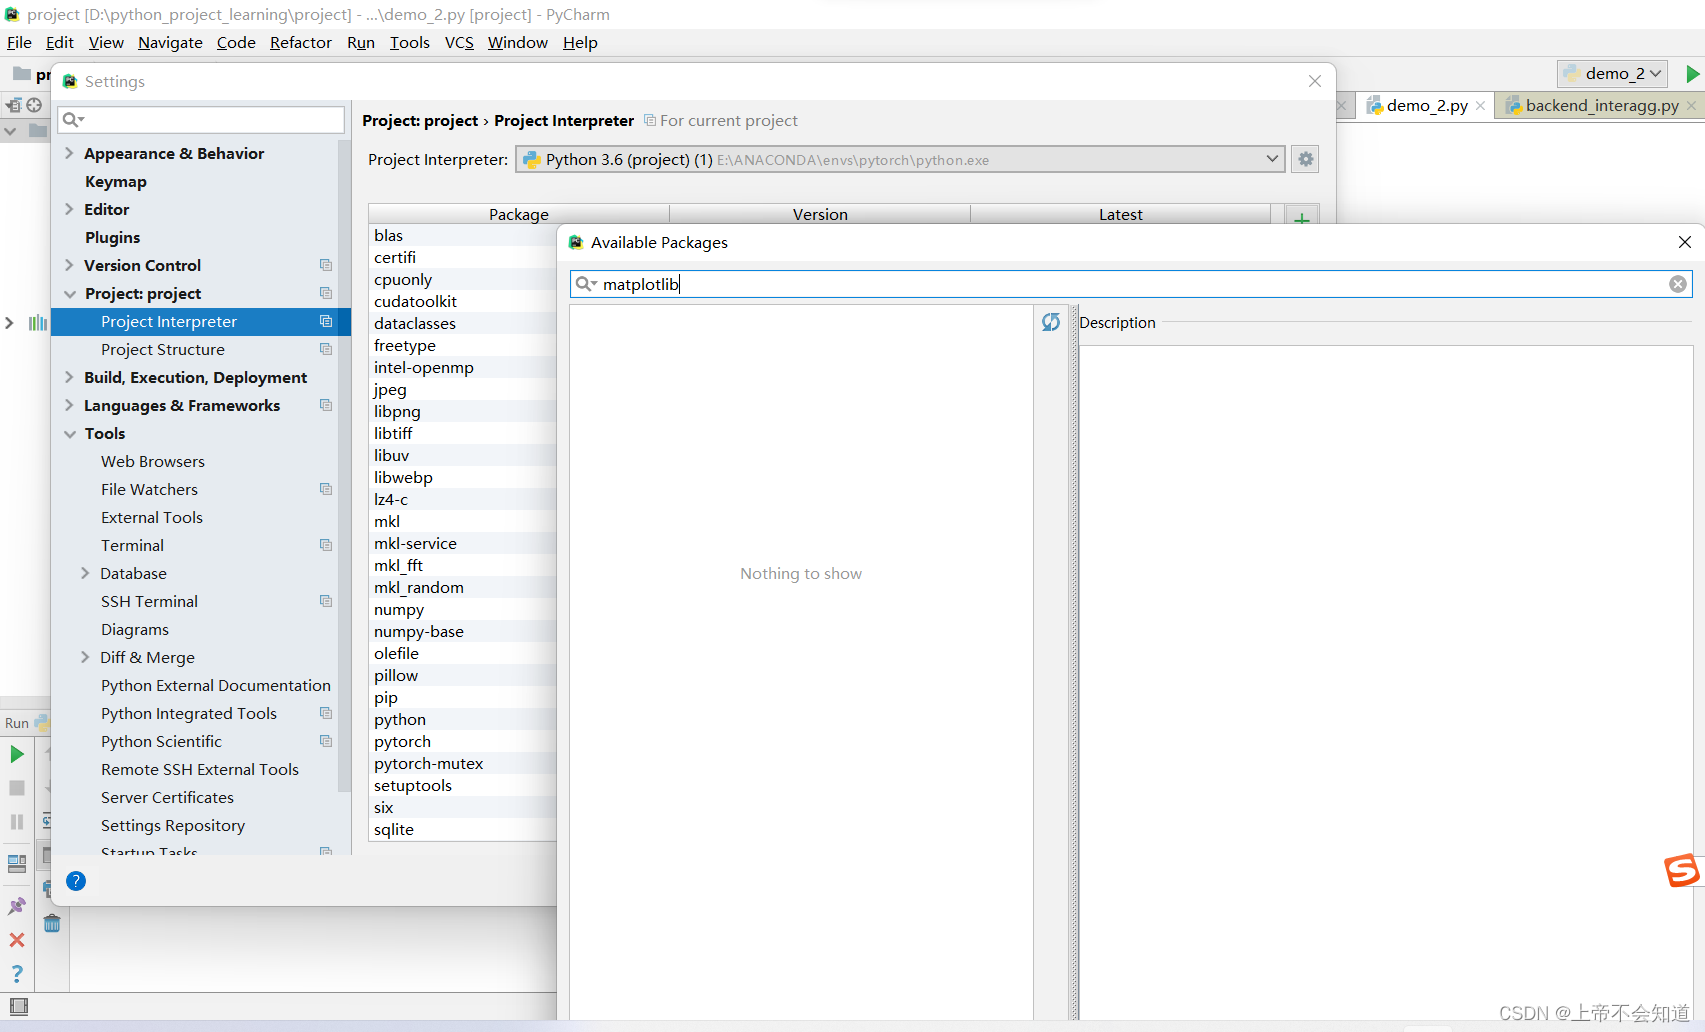
其一:
settings—project interpreter—+号键—搜索numpy并安装
其二:
pip install --target=E:\ANACONDA\envs\pytorch\Lib\site-packages numpy -i https://pypi.tuna.tsinghua.edu.cn/simple
E:\ANACONDA\envs\pytorch\Lib\site-packages是该环境(我的这个虚拟环境名为pytorch)下site-packages文件夹的位置,该文件夹下面就是存放我们各种安装包的地方
-i https://pypi.tuna.tsinghua.edu.cn/simple是指定了下载来源,不加这一段也可以,就是容易引发上面的问题五,这一段是可以改的,下载来源有很多,自己挑着改就行
(如果这里方法二你那里报错的话,可以把Python Scientific里的√去掉——详情见问题八方法二)
numpy 就是我这里要弄的安装包,也就是想给pycharm配置上的东西。
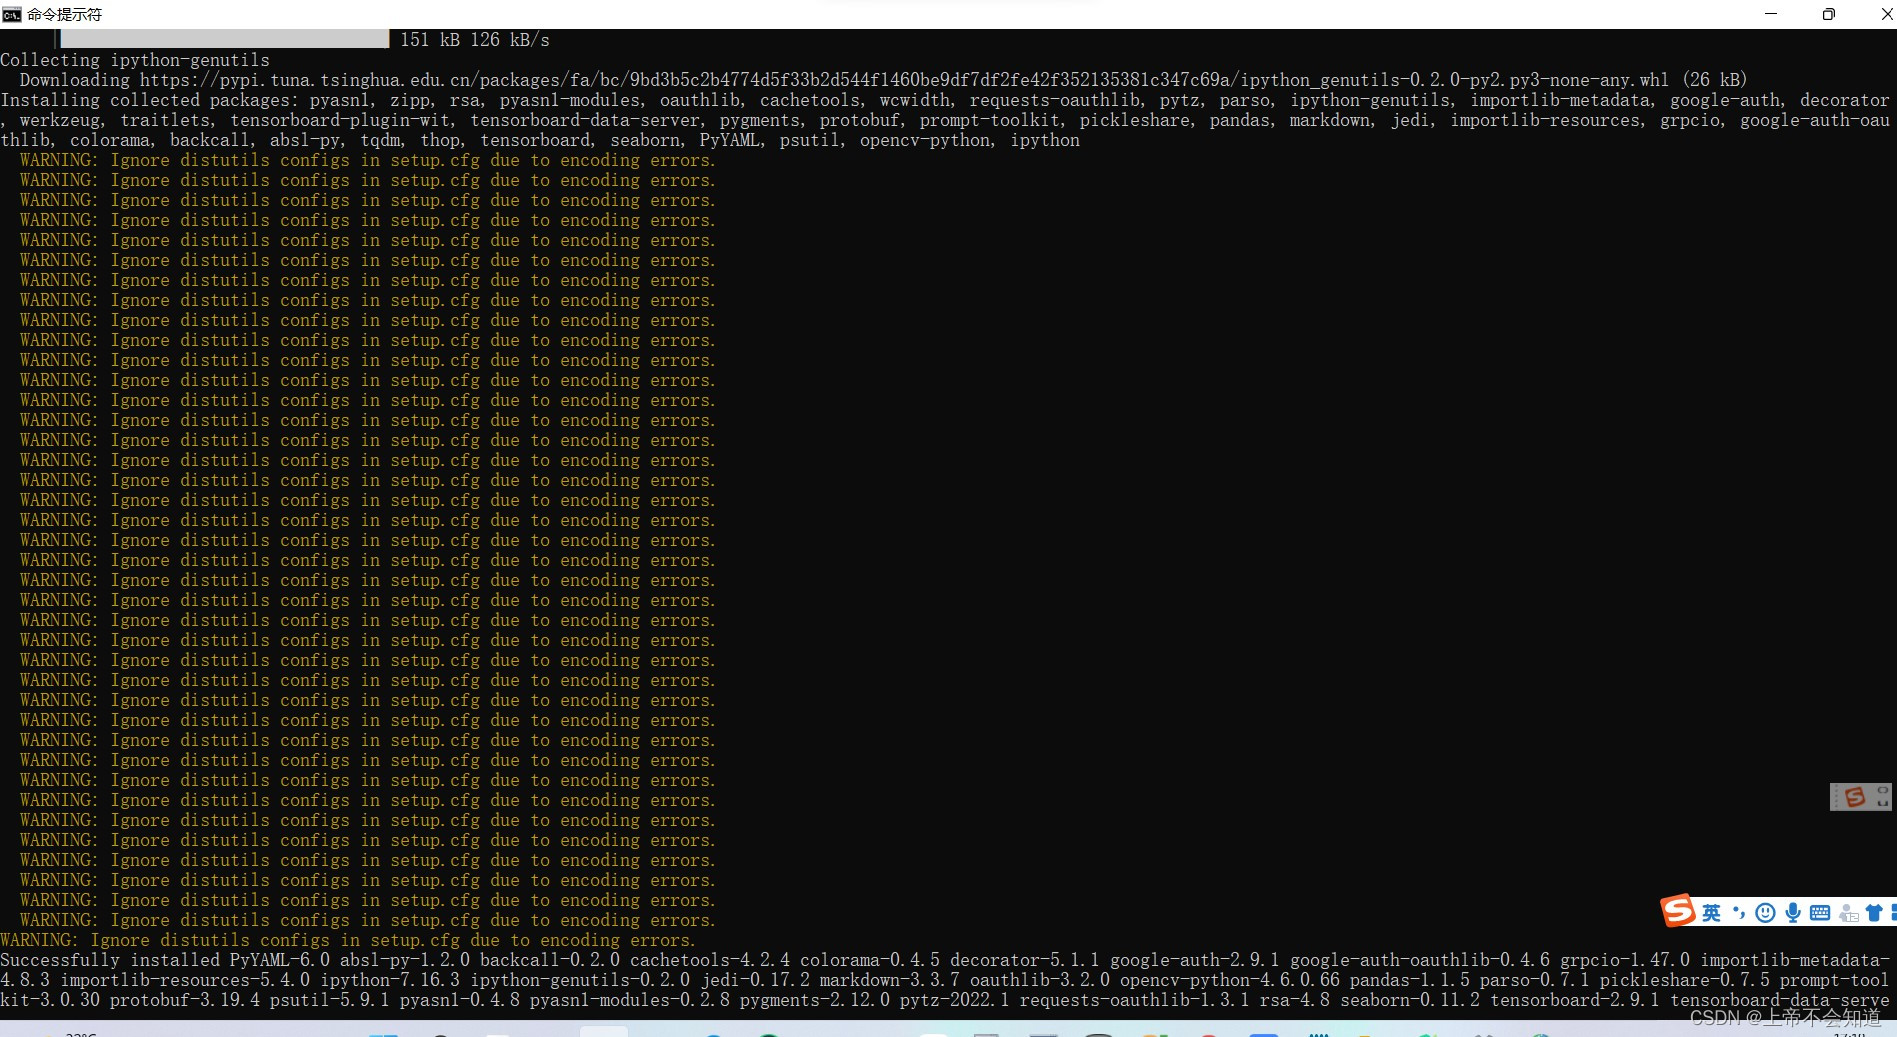
我试了一下,第二种方法确实是可以的,虽然我第一种方法的那个页面依旧nothing show。
附图两张:


第一张图的
upgrade to force replacement
意思是upgrade to force replacement前面显示的那个路径指定的文件有新版本了,如果你运行没问题的话,可以不用管,有问题的话,就进行相应更新
问题九:Could not find a version that satisfies the requirement opencv-python>=4.1.1 (from versions: none) No matching distribution found for opencv-python>=4.1.1
报错如下
ERROR: Could not find a version that satisfies the requirement opencv-python>=4.1.1 (from versions: none)
ERROR: No matching distribution found for opencv-python>=4.1.1

可能的原因:
可能是python国内网络不稳定,然后直接导致报错(应该不是下载的安装包之间存在冲突什么的,不需要把大量的时间花在配置各种各样的环境。)
解决方法:
原本的
python -m pip install -r requirements.txt -i https://pypi.tuna.tsinghua.edu.cn/simple
改成
python -m pip install -r requirements.txt -i https://pypi.tuna.tsinghua.edu.cn/simple --trusted-host tuna.tsinghua.edu.cn
其实最好应该是改成这样,但我没试过,改成第二条那样就能用了,干脆就没继续搞
python -m pip install -r requirements.txt -i https://pypi.tuna.tsinghua.edu.cn/simple --trusted-host pypi.tuna.tsinghua.edu.cn
附图一张:

问题十:WARNING: Ignore distutils configs in setup.cfg due to encoding errors.
报错如下
WARNING: Ignore distutils configs in setup.cfg due to encoding errors.
可能的原因:
未设置全为UTF-8
解决方法:
设置全为UTF-8
第一步,在开始搜索框输入“更改国家或地区”,点击“回车”
第二步,点击管理语言设置
第三步,点击更改系统区域设置
第四步,在“beta版:使用Unicode UTF-8 提供全球语言支持”的选项打钩
第五步,点击“现在重新启动”按钮即可把系统默认编码设为UTF-8
问题十一:An HTTP error occurred when trying to retrieve this URL. HTTP errors are often intermittent, and a simple retry will get you on your way. SSLError(MaxRetryError(‘HTTPSConnectionPool(host=‘pypi.tuna.tsinghua.edu.cn’, port=443): Max retries exceeded with url: /simple/win-64/repodata.json (Caused by SSLError(SSLError(“bad handshake: Error([(‘SSL routines’, ‘ssl3_get_server_certificate’, ‘certificate verify failed’)],)”,),))’,),)
报错如下
An HTTP error occurred when trying to retrieve this URL.
HTTP errors are often intermittent, and a simple retry will get you on your way.
SSLError(MaxRetryError('HTTPSConnectionPool(host=\'pypi.tuna.tsinghua.edu.cn\', port=443): Max retries exceeded with url: /simple/win-64/repodata.json (Caused by SSLError(SSLError("bad handshake: Error([(\'SSL routines\', \'ssl3_get_server_certificate\', \'certificate verify failed\')],)",),))',),)
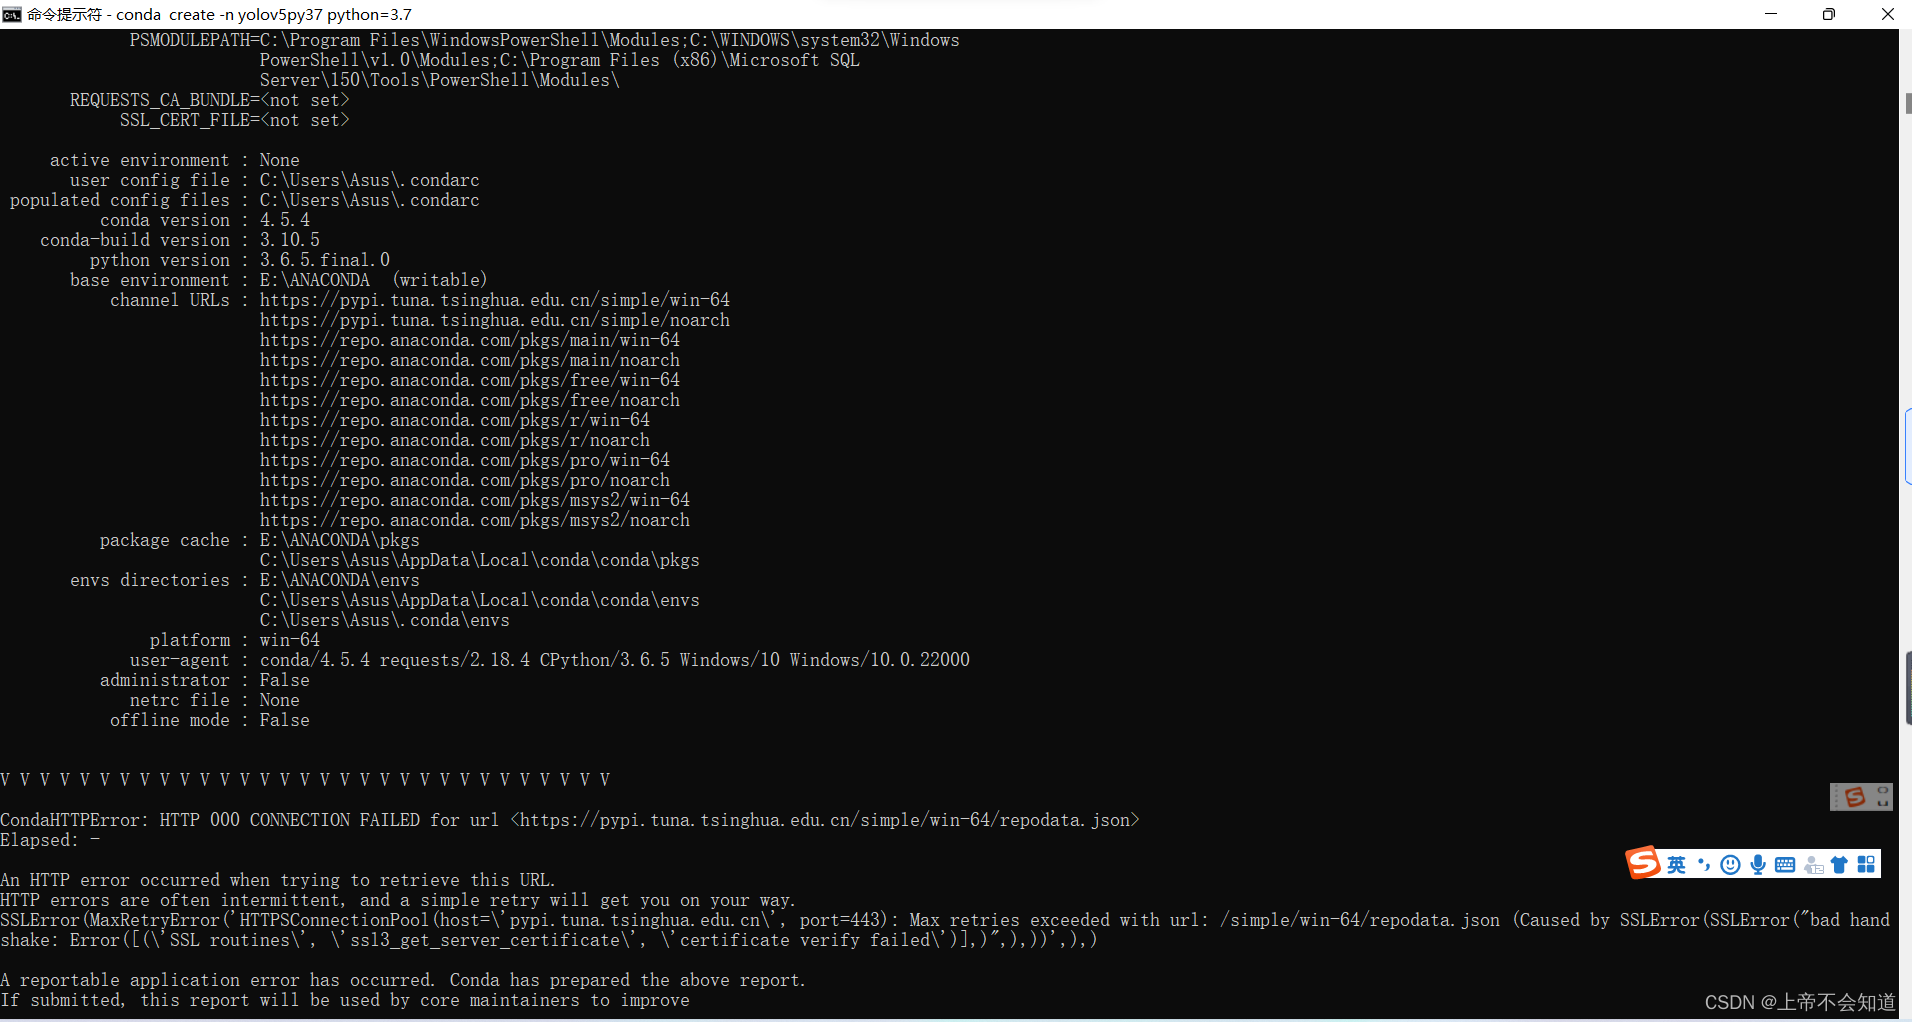
可能的原因:
可能是源的问题,下载的话,存在一些问题,跟上面提到的差不多,可以试试改成镜像(我还没试过,只能说先押后处理)
解决方法:
试试改成镜像网站(我没解决,知道的大佬务必跟我说一下)
问题十二:WARNING: NMS time limit 0.330s exceeded
WARNING: NMS time limit 0.330s exceeded
其实这也不能算是错误,在训练的早期阶段发出警告是很正常的,机器学习嘛,也不能指望它一下子就能准确预测得到合适的结果,初期基本随机,就会出现这个,经过一些训练时期,学习一段时间后,这个自然就没了。
问题十三:TypeError: attempt_load() got an unexpected keyword argument ‘map_location’
这个是我在搞yolov5时报的错,
TypeError: attempt_load() got an unexpected keyword argument 'map_location'
可能的原因:
错误代码
model = attempt_load(weights, map_location=device)
这在原来旧的版本里其实不算错,能正常运行,但是在当前新版本已经对这个进行了修改,再更以前一样使用就会报错,就像上面的那个一样,
当前新版本该函数定义如下:
def attempt_load(weights, device=None, inplace=True, fuse=True):
解决方法:
在yolov5/models/experimental.py可以看到
def attempt_load(weights, device=None, inplace=True, fuse=True):
from models.yolo import Detect, Model

# Loads an ensemble of models weights=[a,b,c] or a single model weights=[a] or weights=a
model = Ensemble()
for w in weights if isinstance(weights, list) else [weights]:
    ckpt = torch.load(attempt_download(w), map_location=device)
    ckpt = (ckpt.get('ema') or ckpt['model']).float()  # FP32 model
    model.append(ckpt.fuse().eval() if fuse else ckpt.eval())  # fused or un-fused model in eval mode

# Compatibility updates
for m in model.modules():
    t = type(m)
    if t in (nn.Hardswish, nn.LeakyReLU, nn.ReLU, nn.ReLU6, nn.SiLU, Detect, Model):
        m.inplace = inplace  # torch 1.7.0 compatibility
        if t is Detect and not isinstance(m.anchor_grid, list):
            delattr(m, 'anchor_grid')
            setattr(m, 'anchor_grid', [torch.zeros(1)] * m.nl)
    elif t is Conv:
        m._non_persistent_buffers_set = set()  # torch 1.6.0 compatibility
    elif t is nn.Upsample and not hasattr(m, 'recompute_scale_factor'):
        m.recompute_scale_factor = None  # torch 1.11.0 compatibility

if len(model) == 1:
    return model[-1]  # return model
print(f'Ensemble created with {weights}\n')
for k in 'names', 'nc', 'yaml':
    setattr(model, k, getattr(model[0], k))
model.stride = model[torch.argmax(torch.tensor([m.stride.max() for m in model])).int()].stride  # max stride
assert all(model[0].nc == m.nc for m in model), f'Models have different class counts: {[m.nc for m in model]}'
return model  # return ensemble
以此来确定自己的是不是当前新版本,并通过该定义可以知道,解决方法就是将 ‘map_location=’ 位置更改为 ‘device=’
问题十四:distutils.errors.DistutilsError: Command ‘[‘E:\ANACONDA\envs\pytorch\python.exe’, ‘-m’, ‘pip’, ‘–disable-pip-version-check’, ‘wheel’, ‘–no-deps’, ‘-w’, ‘C:\Users\Asus\AppData\Local\Temp\tmpnf90ichf’, ‘–quiet’, ‘pytest-runner’]’ returned non-zero exit status 1.
完整的报错如下
 ERROR: Command errored out with exit status 1:
 command: 'E:\ANACONDA\envs\pytorch\python.exe' -c 'import io, os, sys, setuptools, tokenize; sys.argv[0] = '"'"'C:\\Users\\Asus\\AppData\\Local\\Temp\\pip-install-afq4k_r6\\onnx_c69059ce86ce4499930e809a97cfd2b2\\setup.py'"'"'; __file__='"'"'C:\\Users\\Asus\\AppData\\Local\\Temp\\pip-install-afq4k_r6\\onnx_c69059ce86ce4499930e809a97cfd2b2\\setup.py'"'"';f = getattr(tokenize, '"'"'open'"'"', open)(__file__) if os.path.exists(__file__) else io.StringIO('"'"'from setuptools import setup; setup()'"'"');code = f.read().replace('"'"'\r\n'"'"', '"'"'\n'"'"');f.close();exec(compile(code, __file__, '"'"'exec'"'"'))' egg_info --egg-base 'C:\Users\Asus\AppData\Local\Temp\pip-pip-egg-info-4h3xz25a'
     cwd: C:\Users\Asus\AppData\Local\Temp\pip-install-afq4k_r6\onnx_c69059ce86ce4499930e809a97cfd2b2\
Complete output (32 lines):
ERROR: Could not find a version that satisfies the requirement pytest-runner (from versions: none)
ERROR: No matching distribution found for pytest-runner
Traceback (most recent call last):
  File "E:\ANACONDA\envs\pytorch\lib\site-packages\setuptools\installer.py", line 75, in fetch_build_egg
    subprocess.check_call(cmd)
  File "E:\ANACONDA\envs\pytorch\lib\subprocess.py", line 311, in check_call
    raise CalledProcessError(retcode, cmd)
subprocess.CalledProcessError: Command '['E:\\ANACONDA\\envs\\pytorch\\python.exe', '-m', 'pip', '--disable-pip-version-check', 'wheel', '--no-deps', '-w', 'C:\\Users\\Asus\\AppData\\Local\\Temp\\tmpnf90ichf', '--quiet', 'pytest-runner']' returned non-zero exit status 1.

The above exception was the direct cause of the following exception:

Traceback (most recent call last):
  File "<string>", line 1, in <module>
  File "C:\Users\Asus\AppData\Local\Temp\pip-install-afq4k_r6\onnx_c69059ce86ce4499930e809a97cfd2b2\setup.py", line 354, in <module>
    "backend-test-tools = onnx.backend.test.cmd_tools:main",
  File "E:\ANACONDA\envs\pytorch\lib\site-packages\setuptools\__init__.py", line 152, in setup
    _install_setup_requires(attrs)
  File "E:\ANACONDA\envs\pytorch\lib\site-packages\setuptools\__init__.py", line 147, in _install_setup_requires
    dist.fetch_build_eggs(dist.setup_requires)
  File "E:\ANACONDA\envs\pytorch\lib\site-packages\setuptools\dist.py", line 809, in fetch_build_eggs
    replace_conflicting=True,
  File "E:\ANACONDA\envs\pytorch\lib\site-packages\pkg_resources\__init__.py", line 768, in resolve
    replace_conflicting=replace_conflicting
  File "E:\ANACONDA\envs\pytorch\lib\site-packages\pkg_resources\__init__.py", line 1051, in best_match
    return self.obtain(req, installer)
  File "E:\ANACONDA\envs\pytorch\lib\site-packages\pkg_resources\__init__.py", line 1063, in obtain
    return installer(requirement)
  File "E:\ANACONDA\envs\pytorch\lib\site-packages\setuptools\dist.py", line 877, in fetch_build_egg
    return fetch_build_egg(self, req)
  File "E:\ANACONDA\envs\pytorch\lib\site-packages\setuptools\installer.py", line 77, in fetch_build_egg
    raise DistutilsError(str(e)) from e
distutils.errors.DistutilsError: Command '['E:\\ANACONDA\\envs\\pytorch\\python.exe', '-m', 'pip', '--disable-pip-version-check', 'wheel', '--no-deps', '-w', 'C:\\Users\\Asus\\AppData\\Local\\Temp\\tmpnf90ichf', '--quiet', 'pytest-runner']' returned non-zero exit status 1.

可能的原因:
后面那一长串的报错可能是由
ERROR: Could not find a version that satisfies the requirement pytest-runner (from versions: none)
ERROR: No matching distribution found for pytest-runner
引起的,由于没有找到适配这个版本的pytest-runner包,导致后面报了一长串的错。
解决方法:
把这个包领出来单独下载
pip install pytest-runner
安装成功后,再继续安装之前那些报错的包,问题解决。猜测可能是那些安装不成功的包和这个第三方库之间有依赖,所以这个不成功其他的都会报错。(这么改了之后,至少我确实没有再报这个错,报其他错应该不是这个的锅,这个问题确实算解决了的)


问题十五:ERROR: pip’s dependency resolver does not currently take into account all the packages that are installed. This behaviour is the source of the following dependency conflicts. tensorboard 2.9.1 requires grpcio>=1.24.3, but you have grpcio 1.18.0 which is incompatible.
报错如下
ERROR: pip's dependency resolver does not currently take into account all the packages that are installed. This behaviour is the source of the following dependency conflicts.
tensorboard 2.9.1 requires grpcio>=1.24.3, but you have grpcio 1.18.0 which is incompatible.
可能的原因:
错误:pip 的依赖解析器当前不考虑所有已安装的包。 此行为是以下依赖冲突的根源。
tensorboard 2.9.1 需要 grpcio>=1.24.3,但是你有不兼容的 grpcio 1.18.0。
解决方法:
如果是报没安装,可以直接下载安装
如果是像这样版本不对,可以试试换一个这个包grpcio的版本,如下
pip install --target=E:\ANACONDA\envs\pytorch\Lib\site-packages --upgrade protobuf==3.9.2 -i http://pypi.mirrors.ustc.edu.cn/simple/ --trusted-host pypi.mirrors.ustc.edu.cn
问题十六:RuntimeError: Given groups=1, weight of size [64, 3, 3, 3], expected input[1, 64, 64, 3] to have 3 channels, but got 64 channels instead
报错如下
RuntimeError: Given groups=1, weight of size [64, 3, 3, 3], expected input[1, 64, 64, 3] to have 3 channels, but got 64 channels instead
可能的原因:
1.你图片数据的通道数跟你现在要传递进去的权重(参数)的通道数不一样,可能是你前面图片数据的通道数或者后面的权重数搞错了,两者不一致。
2.如果你是在搭建训练模型(步骤代码自己写的那种),那出现这个错误的一种可能是你没有转换格式(NCHW和NHWC)。
NCHW代表的是[N C H W]
NHWC代表的是[N H W C]
N代表数量, C代表channel,H代表高度,W代表宽度.
像我这里,一开始读取出tensor图片数据后没有进行格式转换,此时我的这个数据是NHWC,也就是1 64 64 3,而模型权重要求的格式是NCHW,也就是1 3 64 64,所以这里才会认为我给他传递了个64通道的,但其实不是,我传递给他的就是3通道的,但是因为没转换格式,以至于他把tensor图片数据的宽认定为通道了。
解决方法:
第一种情况的话,检查之前数据的通道数和后面的权重的通道数(或者说参数的通道数)有没有你意料之外的情况,也就是传着传着到后面数据的通道数已经不是你计划中的那种。这种情况得你自己一步步检查修改。如果都没问题,那就让之前的数据的通道和权重的通道数改成一致。
第二种情况的话,转换格式。两种方法自己看情况用,主要是看你到底错在哪里。
问题十七:RuntimeError: Input type (torch.cuda.ByteTensor) and weight type (torch.cuda.FloatTensor) should be the same
报错如下
RuntimeError: Input type (torch.cuda.ByteTensor) and weight type (torch.cuda.FloatTensor) should be the same
1.可能的原因上面写的很清楚了,字节张量代入值跟浮动张量权重参数值是不符合的
2.第二种情况,如果你之前碰到了本文问题十六又乱改,直接硬来把权重参数的通道数改得和报错提示的通道数一样,也会报这个错
解决方法:
1.第一种情况,将对应的torch.tensor()改为torch.FloatTensor()就可以了,例如torch.FloatTensor([img])
2.第二种情况,具体的解决办法,回头是岸,去看看本文问题十六是怎么解决的吧
问题十八:TypeError: can’t convert cuda:0 device type tensor to numpy. Use Tensor.cpu() to copy the tensor to host memory first.
报错如下
TypeError: can't convert cuda:0 device type tensor to numpy. Use Tensor.cpu() to copy the tensor to host memory first.
可能的原因:
字面意思,TypeError:无法将 cuda:0 设备类型张量转换为 numpy。 首先使用 Tensor.cpu() 将张量复制到主机内存。
解决方法:
方法1、点击进入lib/python3.7/site-packages/torch/tensor.py修改源代码,
def __array__(self, dtype=None):
    if dtype is None:
        return self.numpy()
    else:
        return self.numpy().astype(dtype, copy=False)
将self.numpy()改成self.cpu().numpy()
将self.numpy().astype(dtype,copy=False)改成self.cpu().numpy().astype(dtype,copy=False)
方法2、举个例子,
将t_img=tf.transpose(t_img, [0, 3, 1, 2])改成t_img=tf.transpose(t_img.cpu(), [0, 3, 1, 2])
其中t_img是个张量
问题十九:TypeError: conv2d() received an invalid combination of arguments - got (Tensor, Parameter, Parameter, tuple, tuple, tuple, int), but expected one of:
- (Tensor input, Tensor weight, Tensor bias, tuple of ints stride, tuple of ints padding, tuple of ints dilation, int groups)
didn’t match because some of the arguments have invalid types: (Tensor, !Parameter!, !Parameter!, !tuple!, !tuple!, !tuple!, int) - (Tensor input, Tensor weight, Tensor bias, tuple of ints stride, str padding, tuple of ints dilation, int groups)
didn’t match because some of the arguments have invalid types: (Tensor, !Parameter!, !Parameter!, !tuple!, !tuple!, !tuple!, int)
报错如下
TypeError: conv2d() received an invalid combination of arguments - got (Tensor, Parameter, Parameter, tuple, tuple, tuple, int), but expected one of:
 * (Tensor input, Tensor weight, Tensor bias, tuple of ints stride, tuple of ints padding, tuple of ints dilation, int groups)
  didn't match because some of the arguments have invalid types: (Tensor, !Parameter!, !Parameter!, !tuple!, !tuple!, !tuple!, int)
* (Tensor input, Tensor weight, Tensor bias, tuple of ints stride, str padding, tuple of ints dilation, int groups)
  didn't match because some of the arguments have invalid types: (Tensor, !Parameter!, !Parameter!, !tuple!, !tuple!, !tuple!, int)
可能的原因:
在搭建训练模型的过程中,数据的格式应该与权重的格式一致,权重为gpu格式,那前面的数据也要用gpu格式。出现这个报错的可能的原因是你在之前报错了本篇问题十八,然后直接在tensor后面加了.cpu(),再用这个张量数据(cpu)直接传进训练模型(gpu)那一块,就会报这个错
问题二十:RuntimeError: Input type (torch.cuda.ByteTensor) and weight type (torch.cuda.FloatTensor) should be the same
报错如下
RuntimeError: Input type (torch.cuda.ByteTensor) and weight type (torch.cuda.FloatTensor) should be the same
可能的原因:
没有改变张量的格式
解决方法:
原
t_img = t_img.transpose(1, 3).transpose(2, 3)
改成
t_img = t_img.transpose(1, 3).transpose(2, 3)
t_img=t_img.float()
其中t_img是一个保存图片数据的张量
问题二十一:RuntimeError: shape ‘[-1, 25088]’ is invalid for input of size 2048
报错如下:
RuntimeError: shape '[-1, 25088]' is invalid for input of size 2048
可能的原因:
输入的图片的尺寸跟模型需要的预测输入的尺寸不对。比如,模型结构在搭建时预测输入图片的尺寸时(224,224),但是你输入进模型的那个图片数据的尺寸为(64,64),由此会报这个错
解决方法:
把前面图片数据的尺寸改成模型想要的(224,224)就行。这个具体的尺寸得看你们自己具体情况。
问题二十二:RuntimeError: view size is not compatible with input tensor’s size and stride (at least one dimension spans across two contiguous subspaces). Use .reshape(…) instead
报错如下:
RuntimeError: view size is not compatible with input tensor's size and stride (at least one dimension spans across two contiguous subspaces). Use .reshape(...) instead
可能的原因:
view()需要Tensor中的元素地址是连续的,但也可能会出现Tensor不连续的情况
解决方法:
用 .contiguous() 将其在内存中变成连续分布,
将
x=x.view(-1,25088)
改成
x = x.contiguous().view(-1, 25088)
问题二十三:RuntimeError: “nll_loss_forward_reduce_cuda_kernel_2d_index” not implemented for ‘Int’
报错如下
RuntimeError: "nll_loss_forward_reduce_cuda_kernel_2d_index" not implemented for 'Int'
可能的原因:
在loss计算时报错类型不匹配,我这里时t_labels类型不匹配,t_labels时int类型,但是就像这个报错所说的一样,int不行
解决方法:
将
loss = get_loss(outputs, t_labels).to(device)
改成
loss = get_loss(outputs, t_labels.long().cuda()).to(device)
其中get_loss 是损失函数,get_loss = nn.CrossEntropyLoss()
问题二十四:RuntimeError: CUDA error: CUBLAS_STATUS_ALLOC_FAILED when calling cublasCreate(handle)
报错如下
Traceback (most recent call last):
 File "I:/Chen/Datasets/vgg_cat_dog/train.py", line 155, in <module>
loss.backward()
 File "C:\DevelopmentTools\python\lib\site-packages\torch\_tensor.py", line 307, in backward
torch.autograd.backward(self, gradient, retain_graph, create_graph, inputs=inputs)
  File "C:\DevelopmentTools\python\lib\site-packages\torch\autograd\__init__.py", line 156, in backward
allow_unreachable=True, accumulate_grad=True)  # allow_unreachable flag
RuntimeError: CUDA error: CUBLAS_STATUS_ALLOC_FAILED when calling `cublasCreate(handle)`
可能的原因:
第一种情况,标签越界了,你有5个标签,结果你的模型全连接层那边的参数让模型收缩为两类nn.Linear(4096,2)
第二种情况,你弄了两标签,然后全连接层那边如下
#猫狗检测,两类
nn.Linear(4096,2)
目标类别(或者说节点)收缩为两类(他会从0开始算:0,1),而你给的标签分别为1、2的话,也会报这个错。
解决方法:
第一种情况要修改nn.Linear(4096,2)第二个参数,将2改成你要的类别数,
第二种情况,把标签改成从0开始
问题二十五:cv2.error: OpenCV(4.6.0) D:\a\opencv-python\opencv-python\opencv\modules\highgui\src\window.cpp:967: error: (-215:Assertion failed) size.width>0 && size.height>0 in function ‘cv::imshow’
报错如下
Traceback (most recent call last):
  File "D:/python_learning/车牌检测与识别/demo.py", line 13, in <module>
cv2.imshow("3", img)  # 显示图片
cv2.error: OpenCV(4.6.0) D:\a\opencv-python\opencv-python\opencv\modules\highgui\src\window.cpp:967: error: (-215:Assertion failed) size.width>0 && size.height>0 in function 'cv::imshow'
可能的原因:
你的图片路径里有中文。如:
import cv2

if __name__ == "__main__":
# 读取一张图片
import cv2
img = cv2.imread("C://Users//Administrator//Desktop//车牌//3.jpg")  # 读取指定位置的一副图片
cv2.namedWindow("3")  # 初始化一个名为3的窗口
cv2.imshow("3", img)  # 显示图片
cv2.waitKey(0)  # 等待键盘触发事件,释放窗口
解决方法:
将路径中的中文改掉,换一个英文的文件名。如:
import cv2

if __name__ == "__main__":
# 读取一张图片
import cv2
img = cv2.imread("C://Users//Administrator//Desktop//car//3.jpg")  # 读取指定位置的一副图片
cv2.namedWindow("3")  # 初始化一个名为3的窗口
cv2.imshow("3", img)  # 显示图片
cv2.waitKey(0)  # 等待键盘触发事件,释放窗口
问题二十六:TypeError: Expected Ptrcv::UMat for argument mat
报错如下
Traceback (most recent call last):
  File "D:/python_learning/车牌检测与识别/蓝牌白字/main.py", line 50, in <module>
img_characterSegment=characterSegment_content.characterSegment_dispose(img_copy,rect)
  File "D:\python_learning\车牌检测与识别\蓝牌白字\characterSegment_content.py", line 55, in characterSegment_dispose
cv2.imshow("img_licence_plate_rectify_binary", img_licence_plate_rectify_binary)
TypeError: Expected Ptr<cv::UMat> for argument 'mat'
可能的原因:
二值化时没有接收threshold的第一个返回值“阈值”。
解决方法:
将
img_licence_plate_rectify_binary=cv2.threshold(img_licence_plate_rectify_gray,0,255,cv2.THRESH_BINARY_INV | cv2.THRESH_OTSU)
改为
ret,img_licence_plate_rectify_binary=cv2.threshold(img_licence_plate_rectify_gray,0,255,cv2.THRESH_BINARY_INV | cv2.THRESH_OTSU)


 420
420


 被折叠的 条评论
为什么被折叠?
被折叠的 条评论
为什么被折叠?
 到【灌水乐园】发言


