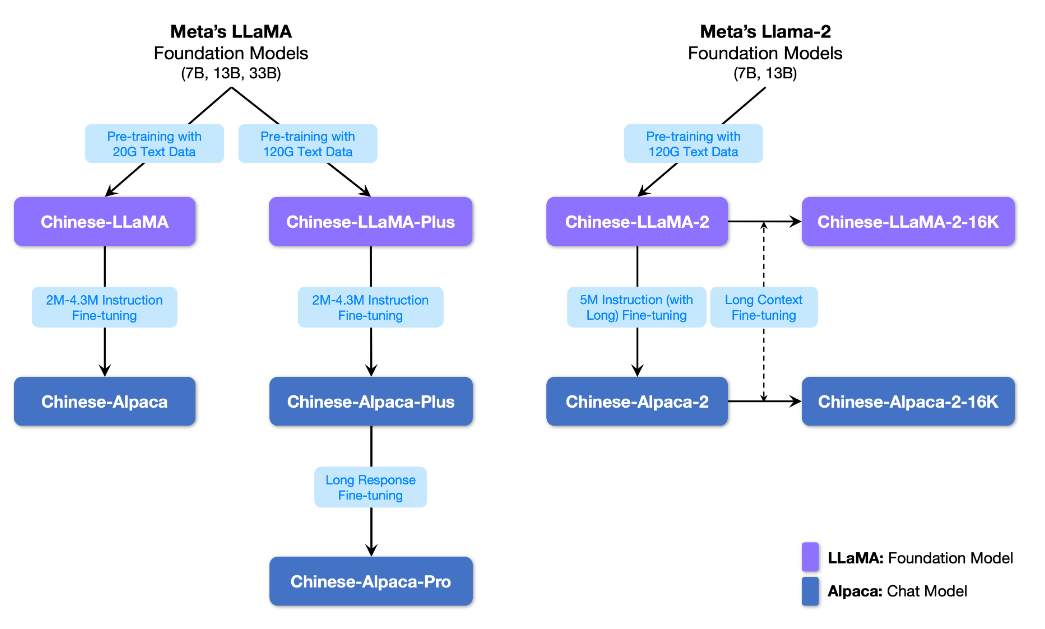
项目地址: https://github.com/ymcui/Chinese-LLaMA-Alpaca
模型词表扩充
由于LLaMA 原生仅支持 Latin 或 Cyrillic 语系,对于中文支持不是特别理想,并不像ChatGLM 和 Bloom 原生支持中文。但由于LLaMA模型在英文上的效果本身还是不错的,因此使用模型词表扩充(中文词表),配合二次预训练及微调的方式,来提升LLaMA模型在中文上的效果是一种可以尝试的方案。
原版LLaMA模型的词表大小是32K,中文token比较少(只有几百个)。可以在中文语料库上训练一个中文tokenizer模型,然后将中文 tokenizer 与 LLaMA 原生的 tokenizer 进行合并,通过组合它们的词汇表,最终获得一个合并后的 tokenizer 模型。
对原版LLaMA模型的32K的词表,扩充20K中文词表。
代码地址:https://github.com/ymcui/Chinese-LLaMA-Alpaca/blob/main/scripts/merge_tokenizer/merge_tokenizers.py
运行代码前需要配置好加载LLaMA模型的环境,下载好LLaMA模型(中文词表模型代码中已经提供了。
# 下载Chinese-LLaMA-Alpaca官网代码
git clone https://github.com/ymcui/Chinese-LLaMA-Alpaca.git
# 下载llama-7b-hf模型
git lfs clone https://huggingface.co/yahma/llama-7b-hf
运行合并词表的文件
python merge_tokenizers.py \
  --llama_tokenizer_dir '/data/sim_chatgpt/llama-7b-hf' \
  --chinese_sp_model_file './chinese_sp.model'
- llama_tokenizer_dir:指向存放原版LLaMA tokenizer的目录。
- chinese_sp_model_file:指向用sentencepiece训练的中文词表文件。
代码注释:
import os
from transformers import LlamaTokenizer
from sentencepiece import sentencepiece_model_pb2 as sp_pb2_model
import sentencepiece as spm
import argparse
os.environ["PROTOCOL_BUFFERS_PYTHON_IMPLEMENTATION"] = "python"

# 创建一个ArgumentParser对象
parser = argparse.ArgumentParser()
parser.add_argument('--llama_tokenizer_dir', default=r'L:/20230902_Llama1/llama-7b-hf', type=str, required=True) # 添加参数
parser.add_argument('--llama_tokenizer_dir', default=None, type=str, required=True)
parser.add_argument('--chinese_sp_model_file', default='./chinese_sp.model', type=str)
# 解析参数
args = parser.parse_args()
# 这里是LLaMA tokenizer的路径
llama_tokenizer_dir = args.llama_tokenizer_dir
# 这里是Chinese tokenizer的路径
chinese_sp_model_file = args.chinese_sp_model_file

# 加载tokenizer
# 加载LLaMA tokenizer
llama_tokenizer = LlamaTokenizer.from_pretrained(llama_tokenizer_dir)
# 定义Chinese tokenizer
chinese_sp_model = spm.SentencePieceProcessor()
# 加载Chinese tokenizer
chinese_sp_model.Load(chinese_sp_model_file)
# 定义LLaMA tokenizer的sentencepiece model
llama_spm = sp_pb2_model.ModelProto()
# 从LLaMA tokenizer中加载sentencepiece model
llama_spm.ParseFromString(llama_tokenizer.sp_model.serialized_model_proto())
# 定义Chinese tokenizer的sentencepiece model
chinese_spm = sp_pb2_model.ModelProto()
# 从Chinese tokenizer中加载sentencepiece model
chinese_spm.ParseFromString(chinese_sp_model.serialized_model_proto())

# 输出tokens的信息
# 两个tokenizer的词表大小;输出为32000、20000
print(len(llama_tokenizer), len(chinese_sp_model))
 # LLaMA tokenizer的special tokens;输出为['']
print(llama_tokenizer.all_special_tokens)
# LLaMA tokenizer的special tokens对应的id;输出为[0]
print(llama_tokenizer.all_special_ids)
# LLaMA tokenizer的special tokens;输出为{'bos_token': '', 'eos_token': '', 'unk_token': ''}
print(llama_tokenizer.special_tokens_map)


# 将Chinese tokenizer的词表添加到LLaMA tokenizer中(合并过程)
# LLaMA tokenizer的词表
llama_spm_tokens_set = set(p.piece for p in llama_spm.pieces)
# LLaMA tokenizer的词表大小;输出为32000
print(len(llama_spm_tokens_set))
# LLaMA tokenizer的词表大小;输出为Before:32000
print(f"Before:{len(llama_spm_tokens_set)}")
# 遍历Chinese tokenizer的词表
for p in chinese_spm.pieces:
    # Chinese tokenizer的词
    piece = p.piece
    # 如果Chinese tokenizer的词不在LLaMA tokenizer的词表中
    if piece not in llama_spm_tokens_set:
        # 创建一个新的sentencepiece
        new_p = sp_pb2_model.ModelProto().SentencePiece()
        # 设置sentencepiece的词
        new_p.piece = piece
        # 设置sentencepiece的score
        new_p.score = 0
        # 将sentencepiece添加到LLaMA tokenizer的词表中
        llama_spm.pieces.append(new_p)
# LLaMA tokenizer的词表大小;输出为New model pieces: 49953
print(f"New model pieces: {len(llama_spm.pieces)}")

# 保存LLaMA tokenizer
# 这里是保存LLaMA tokenizer的路径
output_sp_dir = 'merged_tokenizer_sp'
# 这里是保存Chinese-LLaMA tokenizer的路径
output_hf_dir = 'merged_tokenizer_hf'
# 创建保存LLaMA tokenizer的文件夹
os.makedirs(output_sp_dir, exist_ok=True)
with open(output_sp_dir + '/chinese_llama.model', 'wb') as f:
    f.write(llama_spm.SerializeToString())
# 创建LLaMA tokenizer
tokenizer = LlamaTokenizer(vocab_file=output_sp_dir + '/chinese_llama.model')
# 保存Chinese-LLaMA tokenizer
tokenizer.save_pretrained(output_hf_dir)
print(f"Chinese-LLaMA tokenizer has been saved to {output_hf_dir}")

# 测试tokenizer
# LLaMA tokenizer
llama_tokenizer = LlamaTokenizer.from_pretrained(llama_tokenizer_dir)
# Chinese-LLaMA tokenizer
chinese_llama_tokenizer = LlamaTokenizer.from_pretrained(output_hf_dir)
 # LLaMA tokenizer的special tokens;输出为['<s>', '</s>', '<unk>']
print(tokenizer.all_special_tokens)
# LLaMA tokenizer的special tokens对应的id;输出为[0, 1, 2]
print(tokenizer.all_special_ids)
print(tokenizer.special_tokens_map)  # LLaMA tokenizer的special tokens;输出为{'bos_token': '<s>', 'eos_token': '</s>', 'unk_token': '<unk>'}
text = '''白日依山尽,黄河入海流。欲穷千里目,更上一层楼。
The primary use of LLaMA is research on large language models, including'''
print("Test text:\n", text)
print(f"Tokenized by LLaMA tokenizer:{llama_tokenizer.tokenize(text)}")
# 输出结果
# Tokenized by LLaMA tokenizer:['▁', '白', '日', '<0xE4>', '<0xBE>', '<0x9D>', '山', '<0xE5>', '<0xB0>', '<0xBD>', ',', '黄', '河', '入', '海', '流', '。', '<0xE6>', '<0xAC>', '<0xB2>', '<0xE7>', '<0xA9>', '<0xB7>', '千', '里', '目', ',', '更', '上', '一', '<0xE5>', '<0xB1>', '<0x82>', '<0xE6>', '<0xA5>', '<0xBC>', '。', '<0x0A>', 'The', '▁primary', '▁use', '▁of', '▁L', 'La', 'MA', '▁is', '▁research', '▁on', '▁large', '▁language', '▁models', ',', '▁including']
print(f"Tokenized by Chinese-LLaMA tokenizer:{chinese_llama_tokenizer.tokenize(text)}")
# 输出结果
# Tokenized by Chinese-LLaMA tokenizer:['▁白', '日', '依', '山', '尽', ',', '黄河', '入', '海', '流', '。', '欲', '穷', '千里', '目', ',', '更', '上', '一层', '楼', '。', '<0x0A>', 'The', '▁primary', '▁use', '▁of', '▁L', 'La', 'MA', '▁is', '▁research', '▁on', '▁large', '▁language', '▁models', ',', '▁including']
模型列表

微调chinese-alpaca
本项目基于中文数据
- 开源了使用中文文本数据预训练的中文LLaMA大模型(7B、13B)
- 开源了进一步经过指令精调的中文Alpaca大模型(7B、13B)
使用text-generation-webui搭建界面
接下来以 text-generation-webui 工具为例,介绍无需合并模型即可进行本地化部署的详细步骤。
1、先新建一个conda环境。
conda create -n textgen python=3.10
conda activate textgen
pip install torch torchvision torchaudio
2、下载chinese-alpaca-lora-7b权重:https://drive.google.com/file/d/1JvFhBpekYiueWiUL3AF1TtaWDb3clY5D/view?usp=sharing
# 克隆text-generation-webui
git clone https://github.com/oobabooga/text-generation-webui
cd text-generation-webui
pip install -r requirements.txt

# 将下载后的lora权重放到loras文件夹下
ls loras/chinese-alpaca-lora-7b
adapter_config.json  adapter_model.bin  special_tokens_map.json  tokenizer_config.json  tokenizer.model
三种方式下载
- 通过transformers-cli下载HuggingFace格式的llama-7B模型文件
transformers-cli download decapoda-research/llama-7b-hf --cache-dir ./llama-7b-hf
- 通过snapshot_download下载:
pip install huggingface_hub
python
from huggingface_hub import snapshot_download
snapshot_download(repo_id="decapoda-research/llama-7b-hf", cache_dir="./llama-7b-hf")
- 通过git命令进行下载(需要提前安装git-lfs)
git clone https://huggingface.co/decapoda-research/llama-7b-hf
我这里用的第二种。
# 将HuggingFace格式的llama-7B模型文件放到models文件夹下
ls models/llama-7b-hf
pytorch_model-00001-of-00002.bin pytorch_model-00002-of-00002.bin config.json pytorch_model.bin.index.json generation_config.json
# 复制lora权重的tokenizer到models/llama-7b-hf下
cp loras/chinese-alpaca-lora-7b/tokenizer.model ~/text-generation-webui/models/llama-7b-hf/models--decapoda-research--llama-7b-hf/snapshots/5f98eefcc80e437ef68d457ad7bf167c2c6a1348/

cp loras/chinese-alpaca-lora-7b/special_tokens_map.json ~/text-generation-webui/models/llama-7b-hf/models--decapoda-research--llama-7b-hf/snapshots/5f98eefcc80e437ef68d457ad7bf167c2c6a1348/

cp loras/chinese-alpaca-lora-7b/tokenizer_config.json ~/text-generation-webui/models/llama-7b-hf/models--decapoda-research--llama-7b-hf/snapshots/5f98eefcc80e437ef68d457ad7bf167c2c6a1348/
# 修改/modules/LoRA.py文件,大约在第28行
shared.model.resize_token_embeddings(len(shared.tokenizer))
shared.model = PeftModel.from_pretrained(shared.model, Path(f"{shared.args.lora_dir}/{lora_names[0]}"), **params)
# 接下来就可以愉快的运行了,参考https://github.com/oobabooga/text-generation-webui/wiki/Using-LoRAs
# python server.py --model llama-7b-hf --lora chinese-alpaca-lora-7b
# 使用int8
python server.py --model llama-7b-hf/models--decapoda-research--llama-7b-hf/snapshots/5f98eefcc80e437ef68d457ad7bf167c2c6a1348/ --lora chinese-alpaca-lora-7b --load-in-8bit
报错
RuntimeError: Error(s) in loading state_dict for PeftModelForCausalLM:
size mismatch for base_model.model.model.embed_tokens.weight: copying a param with shape torch.Size([49954, 4096]) from checkpoint, the shape in current model is torch.Size([32000, 4096]).
size mismatch for base_model.model.lm_head.weight: copying a param with shape torch.Size([49954, 4096]) from checkpoint, the shape in current model is torch.Size([32000, 4096]).
解决(用下面代码进行替换):
shared.model.resize_token_embeddings(49954)
assert shared.model.get_input_embeddings().weight.size(0) == 49954
shared.model = PeftModel.from_pretrained(shared.model, Path(f"{shared.args.lora_dir}/{lora_names[0]}"), **params)
设置下对外开放
To create a public link, set share=True in launch().
实验效果:生成的中文较短
示例:
below is an instruction rthat destribes a task.
write a response that appropriately conpletes the request.
### Instruction:
我得了流感,请帮我写一封请假条
### Response:

部署llama.cpp
下载合并后的模型权重:
- Colab notebook:https://colab.research.google.com/drive/1Eak6azD3MLeb-YsfbP8UZC8wrL1ddIMI?usp=sharing
- 或者notebook/文件夹下的ipynb文件:https://github.com/ymcui/Chinese-LLaMA-Alpaca/blob/main/notebooks/convert_and_quantize_chinese_llama.ipynb
将合并后的模型权重下载到本地,然后传到服务器上。
# 下载项目
git clone https://github.com/ggerganov/llama.cpp
# 编译
cd llama.cpp && make
# 建一个文件夹
cd llama.cpp && mkdir zh-models && mkdir 7B
将alpaca-combined下的文件都放到7B目录下后,执行下面的操作
mv llama.cpp/zh-models/7B/tokenizer.model llama.cpp/zh-models/
ls llama.cpp/zh-models/
会显示:7B tokenizer.model
执行转换过程
python convert.py zh-models/7B/
会生成ggml-model-f16.bin
将FP16模型量化为4-bit
我们进一步将FP16模型转换为4-bit量化模型。
./quantize ./zh-models/7B/ggml-model-f16.bin ./zh-models/7B/ggml-model-q4_0.bin 2
可按需使用
./main -m ./zh-models/7B/ggml-model-f16.bin --color -f ./prompts/alpaca.txt -p "详细介绍一下北京的名胜古迹:" -n 512


 648
648


 被折叠的 条评论
为什么被折叠?


