


1. i2ctools工具的获取与安装方法
i2ctools工具的下载与编译_绿白尼的博客-CSDN博客
2. 确认系统是否已安装i2c驱动
ls /dev/i2c*
如果系统下可看到/dev/i2c-0 等I2C总线设备,证明系统已默认安装i2c驱动,否则未安装。
loongnix20.3/loongnix20.4/loongnix20.5系统内核中I2c驱动默认编译成模块,当需要访问/dev/i2c-*总线设备时,可手动加载i2c内核模块。
uname  -a

Linux loongson-pc 4.19.0-loongson-3 #1 SMP 4.19.190.8.11 Tue Jun 20 11:20:22 UTC 2023 UTC 2023 loongarch64 loongarch64 loongarch64 GNU/Linux
通过上述指令确认内核版本,找到对应版本的i2c驱动模块并加载。
insmod /lib/modules/4.19.0-19-loongson-3/kernel/drivers/i2c/i2c-dev.ko加载后,/dev/下可见i2c-0 、i2c-1、i2c-2、i2c-3、i2c-4、i2c-5、i2c-6、i2c-7 总线设备
3. 查看某I2c总线识别到几个设备
i2cdetect -r -y 5
root@loongson-pc:/home/loongson/i2c-tools-4.3# i2cdetect  -r -y 5
    0  1  2 3  4  5  6  7  8  9  a  b  c  d  e  f
00:                        -- -- -- -- -- -- -- --
10:-- 11 -- -- -- -- -- -- -- -- -- -- -- -- -- --
20:-- -- -- -- -- -- -- -- -- -- -- -- -- -- -- --
30:-- -- -- -- -- -- -- -- -- -- -- -- -- -- -- --
40:-- -- -- -- -- -- -- -- -- -- -- -- -- -- -- --
50:50 -- -- -- -- -- -- -- -- -- -- -- -- -- -- --
60:-- -- -- -- -- -- -- -- -- -- -- -- -- -- -- --
70:-- -- -- -- -- -- -- --
root@loongson-pc:/home/loongson/i2c-tools-4.3#
上述 i2c-5总线上共找到两个设备,设备ID分别为0x11和0x50。
4. 读、写8位寄存器地址的I2C设备寄存器
用i2cdump查看某I2c设备的所有寄存器的值,
i2cdump -f -y 5 0x11 //查看总线i2c-5上设备ID为0x11的所有寄存器
i2cget -f -y 5 0x11 0x1b //读某个寄存器值 (读取i2c-5上0x11器件的0x1b寄存器值)
i2cset -f -y 5 0x11 0x1b 0xaa //写某个寄存器值 (将寄存器0x1b配置为0xaa)
5. 读、写8位寄存器地址的I2C设备的指针寄存器
当读取指针寄存器时(2字节数据),上述各指令后需加w参数。
MODE is one of:
-
b ( byte , default)
-
w (word data)
i2cset -f -y -a 8 0x40 0x24 w //读取i2c总线8,ID为0x40,寄存器偏移为0x24的值。
0x0bb8 //返回值。
6. 读、写16位寄存器地址的I2C设备寄存器
上述i2cget、i2cset、i2cdump仅能支持8位寄存器地址,当想读写16位的寄存器地址的器件必须使用i2ctransfer。
读寄存器:
i2ctransfer -f -y 6 w2@0x50 0x00 0x00 r128
读取6号总线上设备地址为0x50 ,寄存器地址为0x00 0x10( 即0x10寄存器) 开始的128个寄存器
写寄存器:
I2ctransfer -f -y 6 w3@0x50 0x00 0x14 0xa1 //往0x14寄存器写入值0xa1。
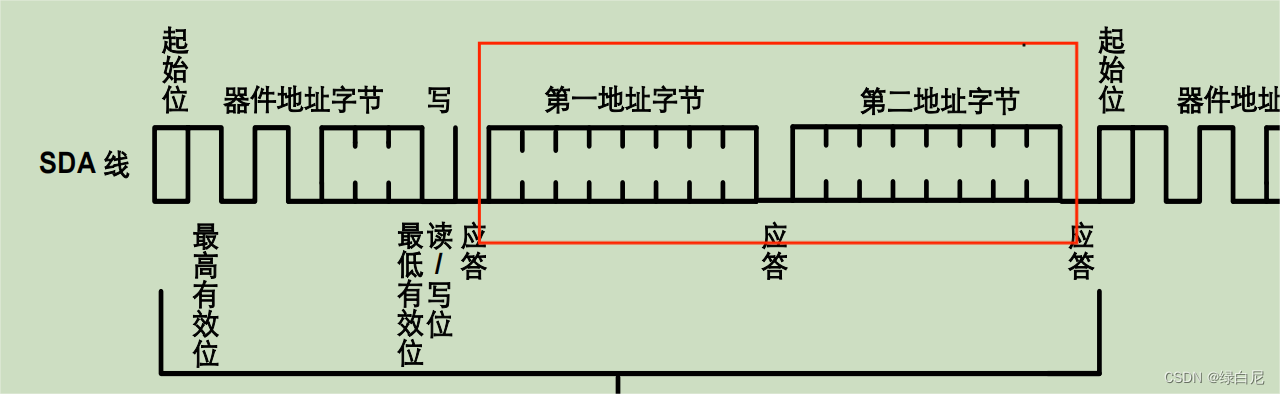
使用16位寄存器地址的I2C设备一般是大容量的EEPROM,容量比较大,所以寻址所用的地址位宽比较大。
16位寄存器地址的i2c设备随机读的时序如下:可以看到寄存器地址位占据2个Byte位。


 680
680


 被折叠的 条评论
为什么被折叠?
被折叠的 条评论
为什么被折叠?
 到【灌水乐园】发言


