


合并数据集
1、训练数据集:
paste /root/cxm/transformer_code/mindspore_transformer/MIT_mixed_augm/train/tgt-test.txt /root/cxm/transformer_code/mindspore_transformer/MIT_mixed_augm/train/src-test.txt > /root/cxm/transformer_code/mindspore_transformer/MIT_mixed_augm/train/train.all
2、测试数据集:
paste /root/cxm/transformer_code/mindspore_transformer/MIT_mixed_augm/test/tgt1.txt /root/cxm/transformer_code/mindspore_transformer/MIT_mixed_augm/test/src1.txt > /root/cxm/transformer_code/mindspore_transformer/MIT_mixed_augm/test/test.all
合并的数据集中源数据和目标数据用一个tab隔开

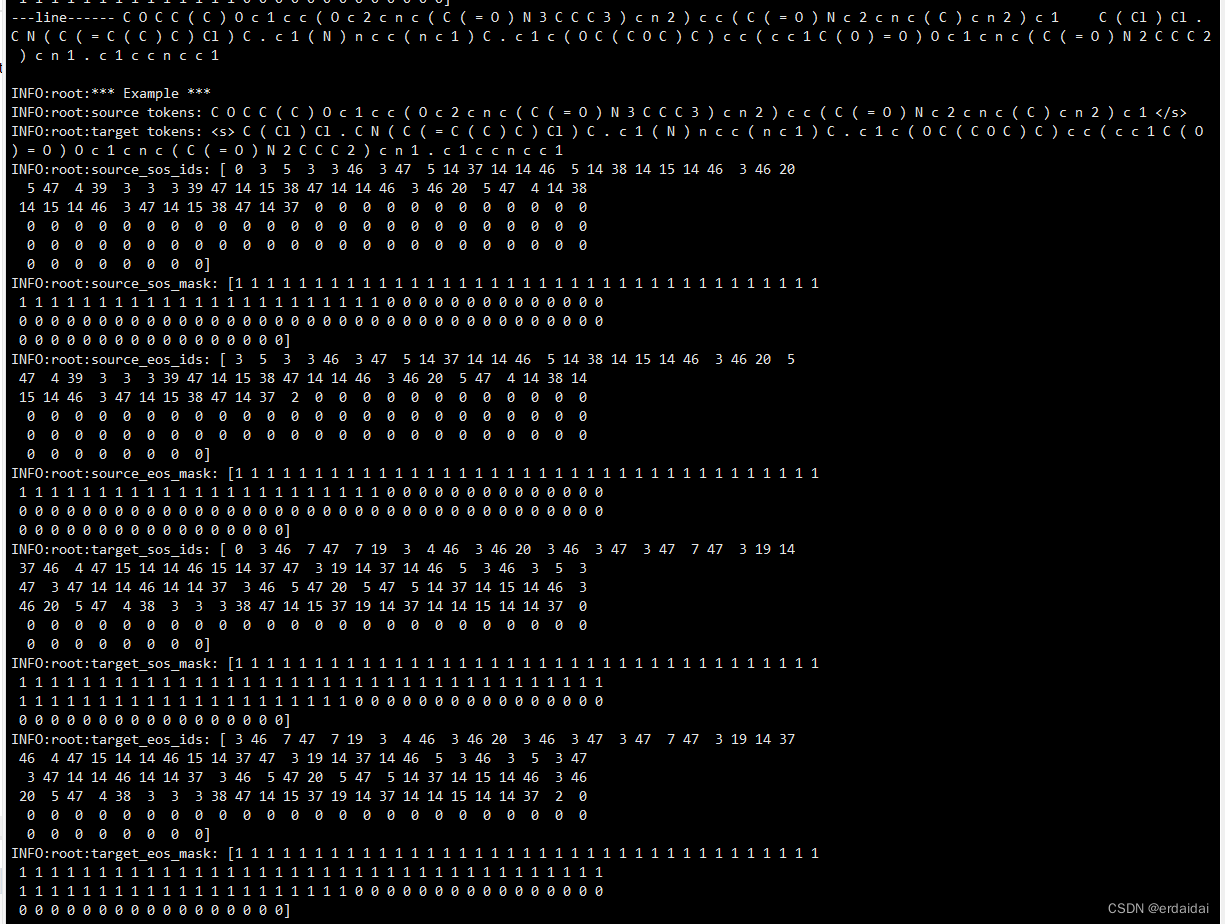
创建mindrecord格式数据集
1、训练数据
python create_data.py --input_file /root/cxm/transformer_code/mindspore_transformer/MIT_mixed_augm/train/train.all --vocab_file /root/cxm/transformer_code/mindspore_transformer/MIT_mixed_augm/voca.txt --output_file /root/cxm/transformer_code/mindspore_transformer/MIT_mixed_augm/train/trian_mind --max_seq_length 128

2、测试数据
python create_data.py --input_file /root/cxm/transformer_code/mindspore_transformer/MIT_mixed_augm/test/test.all --vocab_file /root/cxm/transformer_code/mindspore_transformer/MIT_mixed_augm/voca.txt --output_file /root/cxm/transformer_code/mindspore_transformer/MIT_mixed_augm/test/test_mind --max_seq_length 128
训练模型
bash scripts/run_standalone_train.sh GPU 0 10000 1 /root/cxm/transformer_code/mindspore_transformer/MIT_mixed_augm/train/trian_mind

测试模型
bash scripts/run_eval.sh GPU 0 /root/cxm/transformer_code/mindspore_transformer/MIT_mixed_augm/test/test_mind /root/cxm/transformer_code/mindspore_transformer/run_standalone_train/models/checkpoint_path/ckpt_0/transformer-2_2.ckpt ./default_config_large_gpu.yaml

将预测的ids 转换成序列
bash scripts/process_output.sh /root/cxm/transformer_code/mindspore_transformer/MIT_mixed_augm/test/src1.txt /root/cxm/transformer_code/mindspore_transformer/output_eval.txt /root/cxm/transformer_code/mindspore_transformer/MIT_mixed_augm/voca.txt
同时会生成forbleu文件,以便用BLEU评估。
BLEU 评估
perl multi-bleu.perl /root/cxm/transformer_code/mindspore_transformer/MIT_mixed_augm/test/src1.txt.forbleu < /root/cxm/transformer_code/mindspore_transformer/output_eval.txt.forbleu

代码调试中的改动
1、train.py
- 第一块
ms.set_context(enable_graph_kernel=True, graph_kernel_flags=“–enable_parallel_fusion”) ==> ms.set_context(enable_graph_kernel=False, graph_kernel_flags=“–enable_parallel_fusion”)
其他说明:
mindspore1.8.1需要对应cuda11.1,cuDNN 1x。
原以为改变cuda版本能解决这个报错的问题,最后还是不行,但是这个enable_graph_kernel也不影响训练。
- 第二块
# ckpt_config = CheckpointConfig(save_checkpoint_steps=dataset.get_dataset_size(),
               #                                keep_checkpoint_max=config.save_checkpoint_num)
更改为:
ckpt_config = CheckpointConfig(save_checkpoint_steps=config.save_checkpoint_steps,
                                          keep_checkpoint_max=config.save_checkpoint_num)
让其根据步骤保存训练模型。
2、run_standalone_train.sh
删除 > log.txt 2>&1 & (命令行直接输出日志)
3、create_data.py main()中
    # for i in config.bucket:
    #     if config.num_splits == 1:
    #         output_file_name = output_file
    #     else:
    #         output_file_name = output_file + '_' + str(i) + '_'
    #     writer = FileWriter(output_file_name, config.num_splits, overwrite=True)
    #     data_schema = {"source_sos_ids": {"type": "int64", "shape": [-1]},
    #                    "source_sos_mask": {"type": "int64", "shape": [-1]},
    #                    "source_eos_ids": {"type": "int64", "shape": [-1]},
    #                    "source_eos_mask": {"type": "int64", "shape": [-1]},
    #                    "target_sos_ids": {"type": "int64", "shape": [-1]},
    #                    "target_sos_mask": {"type": "int64", "shape": [-1]},
    #                    "target_eos_ids": {"type": "int64", "shape": [-1]},
    #                    "target_eos_mask": {"type": "int64", "shape": [-1]}
    #                    }
    #     writer.add_schema(data_schema, "tranformer")
    #     features_ = feature_dict[i]
    #     logging.info("Bucket length %d has %d samples, start writing...", i, len(features_))
    #
    #     for item in features_:
    #         writer.write_raw_data([item])
    #         total_written += 1
    #     writer.commit()
更改为:
data_schema = {"source_sos_ids": {"type": "int64", "shape": [-1]},
                   "source_sos_mask": {"type": "int64", "shape": [-1]},
                   "source_eos_ids": {"type": "int64", "shape": [-1]},
                   "source_eos_mask": {"type": "int64", "shape": [-1]},
                   "target_sos_ids": {"type": "int64", "shape": [-1]},
                   "target_sos_mask": {"type": "int64", "shape": [-1]},
                   "target_eos_ids": {"type": "int64", "shape": [-1]},
                   "target_eos_mask": {"type": "int64", "shape": [-1]}
                   }
    if config.num_splits == 1:
        output_file_name = output_file
        writer = FileWriter(output_file_name, config.num_splits, overwrite=True)
        writer.add_schema(data_schema, "tranformer")
        for i in config.bucket:
            features_ = feature_dict[i]
            logging.info("Bucket length %d has %d samples, start writing...", i, len(features_))
            # print('----features_----', features_)
            for item in features_:
                # print('-----[item]-----', [item])
                writer.write_raw_data([item])
                total_written += 1
        writer.commit()

    else:
        for i in config.bucket:
            output_file_name = output_file + '_' + str(i) + '_'
            writer = FileWriter(output_file_name, config.num_splits, overwrite=True)
            writer.add_schema(data_schema, "tranformer")
            features_ = feature_dict[i]
            logging.info("Bucket length %d has %d samples, start writing...", i, len(features_))
            for item in features_:
                writer.write_raw_data([item])
                total_written += 1
            writer.commit()
原因是 writer.commit()在for循环内的话,相当于每一个bucket 都会提交一次文件的写入,然后后面的提交会覆盖前面的提交,最后得到的写入文件只有一个,即最后一个bucket的数据问价。这样显然丢失了前面的数据。
为了保证创建数据处理方式的多样性,把处理方式分成两个,没有bucket分区的,只提交一次写入文件;相反,有分区的,则会对应多个写入文件。
4、dataset.py
增加了数据处理方式
   def batch_all(dataset_path):

        ds = de.MindDataset(dataset_path,
                            columns_list=["source_eos_ids", "source_eos_mask",
                                          "target_sos_ids", "target_sos_mask",
                                          "target_eos_ids", "target_eos_mask"],
                            shuffle=(do_shuffle == "true"), num_shards=rank_size, shard_id=rank_id)

        type_cast_op = de.transforms.transforms.TypeCast(ms.int32)
        ds = ds.map(operations=type_cast_op, input_columns="source_eos_ids")
        ds = ds.map(operations=type_cast_op, input_columns="source_eos_mask")
        ds = ds.map(operations=type_cast_op, input_columns="target_sos_ids")
        ds = ds.map(operations=type_cast_op, input_columns="target_sos_mask")
        ds = ds.map(operations=type_cast_op, input_columns="target_eos_ids")
        ds = ds.map(operations=type_cast_op, input_columns="target_eos_mask")

        ds = ds.batch(config.batch_size, drop_remainder=True)
        return ds
相对应
    if config.num_splits == 1:
        ds = batch_all(dataset_path)
    else:
        for i, _ in enumerate(bucket_boundaries):
            bucket_len = bucket_boundaries[i]
            ds_per = batch_per_bucket(bucket_len, dataset_path)

            if i == 0:
                ds = ds_per
            else:
                ds = ds + ds_per
    ds = ds.shuffle(ds.get_dataset_size())
    ds.channel_name = 'transformer'
这分情况读取数据,避免没有bucket设置的时候出错(输入的data_path只有一个,bucket是多个)。
踩坑
1、当用到 bucket ,且其值是一个数组,比如[32, 48, 64, 128]。当将训练数据或者测试数据转换成 mindrecord 数据时,每条数据的source_id 等属性长度是不一样的,这就会导致模型训练好,在测试阶段会报错:输入数据和shape不一致。
解决:
bucket直接不用取多值,不分区,直接取一个最大值,比如 [128]。统一数据的属性大小都是128。
2、mindspore 版本和cuda 版本不对应。
解决:
mindspore1.8.1需要对应cuda11.1,cuDNN 1x。
3、由于我的数据集比较大(八十万样例),因此batch_size不能设置过大,目前位置,超过64不能运行,即超出内存。


 被折叠的 条评论
为什么被折叠?
被折叠的 条评论
为什么被折叠?
 到【灌水乐园】发言


