


1. svg在html中使用
1.<embed src="circle1.svg" type="image/svg+xml" />
2.<object data="circle1.svg" type="image/svg+xml"></object>
3.<iframe src="circle1.svg"></iframe>
4.<svg xmlns="http://www.w3.org/2000/svg" version="1.1">
   	<circle cx="100" cy="50" r="40" stroke="black" stroke-width="2" fill="red" />
  </svg>
2.svg使用
1.矩形–rect
<!doctype html>
<html>
	<body>
	       <svg xmlns="http://www.w3.org/2000/svg" version="1.1">
		       <rect x="20" y="20" rx="20" ry="20" width="150" height="100" style="fill:#00adff;stroke-width:4;stroke:#ffb519;fill-opacity: 0.5;stroke-opacity: 0.5" />
		    </svg>
	</body>
</html>
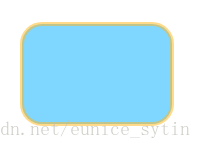
rect: 矩形标签;width:宽;height:高;rx,ry:可以生成圆角;style:css属性
css属性 fill:填充颜色;stroke-width:边框宽度;stroke:边框颜色;opacity:设置颜色透明度
2.圆形–cicle
<circle cx="100" cy="50" r="40" stroke="#00adff" stroke-width="2" fill="#ffb519" />
cicle:圆形标签;cx,cy:圆点x,y坐标,默认为0,0;r:圆的半径

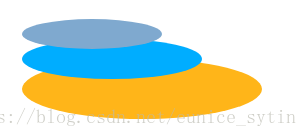
3.椭圆–ellipse
<ellipse cx="150" cy="100" rx="120" ry="30" style="fill:#ffb519" />
<ellipse cx="120" cy="70" rx="90" ry="20" style="fill:#00adff" />
<ellipse cx="100" cy="45" rx="70" ry="15" style="fill:#7fa9cf" />
ellipse:椭圆标签;cx,cy:椭圆中心的坐标;rx,ry:水平,垂直半径
4.线–line
<line x1="0" y1="0" x2="100" y2="100" style="stroke:#00adff;stroke-width:2" />
line:线标签;x1,y1:线开始坐标;x2,y2:线结束坐标

5.多边形–polygon
<polygon points="100,10 40,180 190,60 10,60 160,180" style="fill:#ffb519;stroke:#00adff;stroke-width:5;fill-rule:evenodd;"/>
polygon:多边形标签;points:各个角的坐标,角用空格隔开,x,y坐标用逗号隔开

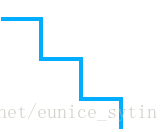
6.曲线–polyline
<polyline points="0,40 40,40 40,80 80,80 80,120 120,120 120,160" style="fill:white;stroke:#00adff;stroke-width:4" />
polyline :曲线标签;points:各个点的坐标,点用空格隔开,x,y坐标用逗号隔开
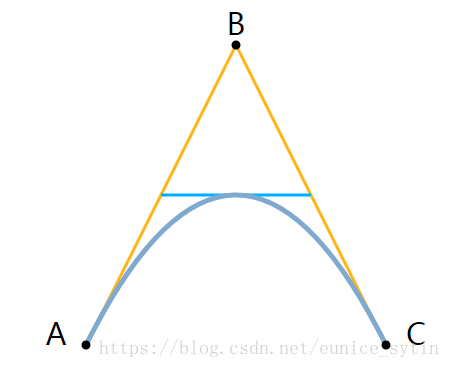
7.路径–path
<path id="lineAB" d="M 100 350 l 150 -300" stroke="red"
  stroke-width="3" fill="none" />
  <path id="lineBC" d="M 250 50 l 150 300" stroke="red"
  stroke-width="3" fill="none" />
  <path d="M 175 200 l 150 0" stroke="green" stroke-width="3"
  fill="none" />
  <path d="M 100 350 q 150 -300 300 0" stroke="blue"
  stroke-width="5" fill="none" />
  <!-- Mark relevant points -->
  <g stroke="black" stroke-width="3" fill="black">
    <circle id="pointA" cx="100" cy="350" r="3" />
    <circle id="pointB" cx="250" cy="50" r="3" />
    <circle id="pointC" cx="400" cy="350" r="3" />
  </g>
  <!-- Label the points -->
  <g font-size="30" font="sans-serif" fill="black" stroke="none"
  text-anchor="middle">
    <text x="100" y="350" dx="-30">A</text>
    <text x="250" y="50" dy="-10">B</text>
    <text x="400" y="350" dx="30">C</text>
  </g>
M:移动
L:画线
H:水平画线
V:垂直画线
Z:结束
A:弧线
C:三次贝塞尔
T:两次贝塞尔
由于路径比较复杂,这里就不展开描述
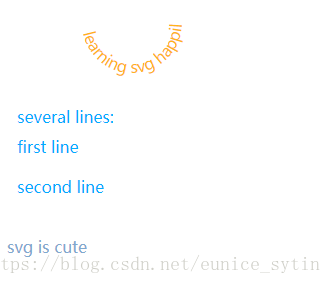
8.文本–text
//1.文本按画的路径走
<defs>
  <path id="path1" d="M75,20 a1,1 0 0,0 100,0" />
</defs>
<text x="10" y="100" style="fill:#ffb519;">
    <textpath xlink:href="#path1">learning svg happily</textpath>
</text>
//2.元素可以安排任何分小组与<tspan> 元素的数量
<text x="10" y="120" style="fill:#00adff;">several lines:
    <tspan x="10" y="150">first line</tspan>
    <tspan x="10" y="190">second line</tspan>
</text>
//3.作为链接文本( <a> 元素)
<a xlink:href="http://www.w3schools.com/svg/" target="_blank">
    <text x="0" y="250" fill="#7fa9cf">svg is cute</text>
</a>
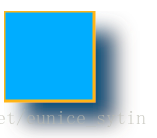
9.滤镜–fegaussianblur
<defs>
 <filter id="f1" x="0" y="0">
        <fegaussianblur in="SourceGraphic" stddeviation="15" />
    </filter>
</defs>
<rect width="90" height="90" stroke="#00adff" stroke-width="3" fill="#ffb519" filter="url(#f1)" />
元素id属性定义一个滤镜的唯一名称
元素定义模糊效果
in="SourceGraphic"这个部分定义了由整个图像创建效果
stddeviation属性定义模糊量

10.阴影–feOffset
<defs>
<filter id="f1" x="0" y="0" width="200%" height="200%">
    <feOffset result="offOut" in="SourceGraphic" dx="20" dy="20" />
    <feColorMatrix result="matrixOut" in="offOut" type="matrix" values="0.2 0 0 0 0 0 0.2 0 0 0 0 0 0.2 0 0 0 0 0 1 0" />
    <feGaussianBlur result="blurOut" in="matrixOut" stdDeviation="10" />
    <feBlend in="SourceGraphic" in2="blurOut" mode="normal" />
</filter>
</defs>
<rect width="90" height="90" stroke="#ffb519" stroke-width="3" fill="#00adff" filter="url(#f1)" />
标签使用必需的id属性来定义向图形应用哪个滤镜
偏移一个矩形(带)
混合偏移图像顶部(含)
元素的stdDeviation属性定义了模糊量
过滤器是用来转换偏移的图像使之更接近黑色的颜色。 '0.2’矩阵的三个值都获取乘以红色,绿色和蓝色通道。降低其值带来的颜色至黑色(黑色为0)
11.线性渐变–linearGradient
<defs>
<linearGradient id="grad1" x1="0%" y1="0%" x2="100%" y2="0%">
       <stop offset="0%" style="stop-color:#00adff" />
       <stop offset="100%" style="stop-color:#ffb519" />
   </linearGradient>
</defs>
<ellipse cx="200" cy="70" rx="85" ry="55" fill="url(#grad1)" />
<text fill="#ffffff" font-size="45" font-family="Verdana" x="140" y="86">LOVE</text>
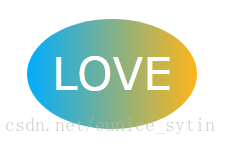
标签的id属性可为渐变定义一个唯一的名称
标签的X1,X2,Y1,Y2属性定义渐变开始和结束位置
渐变的颜色范围可由两种或多种颜色组成。每种颜色通过一个
填充属性把 ellipse 元素链接到此渐变
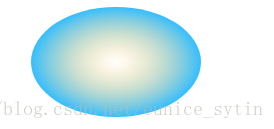
12.放射性渐变–radialGradien
<defs>
   <radialGradient id="grad2" cx="50%" cy="50%" r="50%" fx="50%" fy="50%">
       <stop offset="0%" style="stop-color:#ffb519;stop-opacity:0" />
       <stop offset="100%" style="stop-color:#00adff;stop-opacity:0.8" />
   </radialGradient>
</defs>
<ellipse cx="200" cy="70" rx="85" ry="55" fill="url(#grad2)" />
标签的 id 属性可为渐变定义一个唯一的名称
CX,CY和r属性定义的最外层圆和Fx和Fy定义的最内层圆
渐变颜色范围可以由两个或两个以上的颜色组成。每种颜色用一个
填充属性把ellipse元素链接到此渐变


 9128
9128


 被折叠的 条评论
为什么被折叠?
被折叠的 条评论
为什么被折叠?
 到【灌水乐园】发言


