


yolact windows10 环境配置详细过程
一、下载yolact
1.使用git 命令下载
git clone https://github.com/dbolya/yolact.git   //下载yolact
cd yolact  //进入yolact
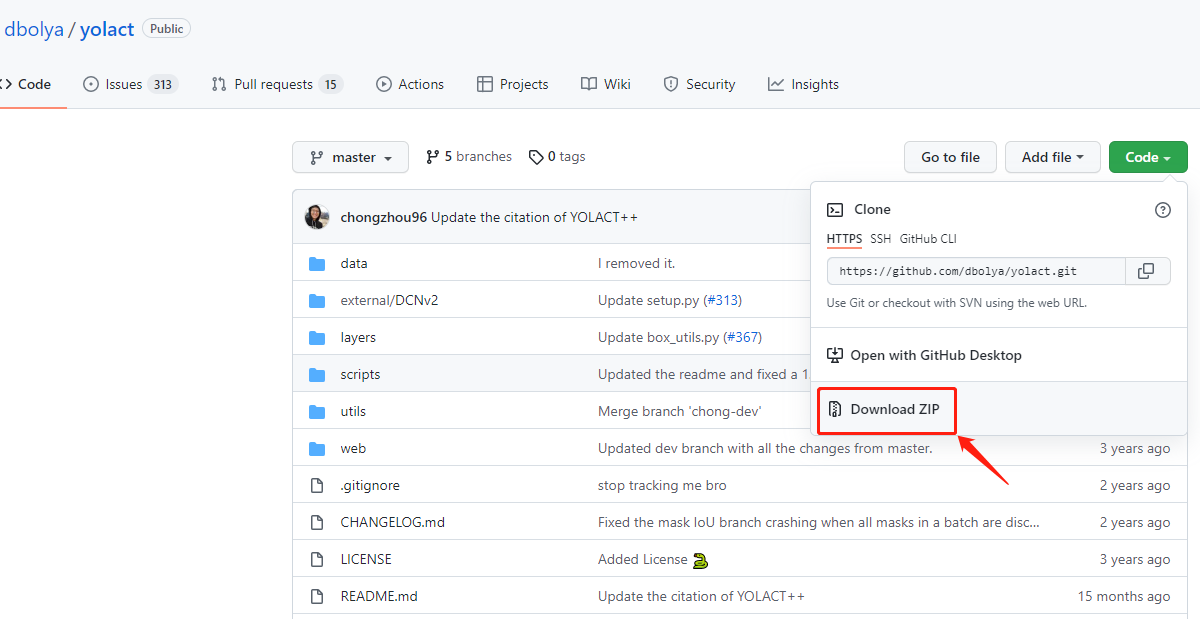
2.进入github 手动下载yolact,点击【Code】选择Download ZIP,即可下载。
二、创建环境
1.在【开始】菜单栏打开Anaconda Prompt ,进入base环境
2.创建yolact 环境
conda create -n yolact python=3.7 //环境名为yolact ,python版本选择3.7
3.在Proceed ([y]/n)? 中输入y,创建环境
The following NEW packages will be INSTALLED:

  ca-certificates    pkgs/main/win-64::ca-certificates-2021.10.26-haa95532_2
  certifi            pkgs/main/win-64::certifi-2021.10.8-py37haa95532_0
  openssl            pkgs/main/win-64::openssl-1.1.1l-h2bbff1b_0
  pip                pkgs/main/win-64::pip-21.2.4-py37haa95532_0
  python             pkgs/main/win-64::python-3.7.11-h6244533_0
  setuptools         pkgs/main/win-64::setuptools-58.0.4-py37haa95532_0
  sqlite             pkgs/main/win-64::sqlite-3.37.0-h2bbff1b_0
  vc                 pkgs/main/win-64::vc-14.2-h21ff451_1
  vs2015_runtime     pkgs/main/win-64::vs2015_runtime-14.27.29016-h5e58377_2
  wheel              pkgs/main/noarch::wheel-0.37.0-pyhd3eb1b0_1
  wincertstore       pkgs/main/win-64::wincertstore-0.2-py37haa95532_2


Proceed ([y]/n)? y

Preparing transaction: done
Verifying transaction: done
Executing transaction: done
4.使用conda activate yolact 激活环境
conda activate yolact //激活yolact 环境
5.安装需要的依赖项
pip install cython //需要先安装这个包
pip install opencv-python pillow pycocotools matplotlib
conda install cudatoolkit=10.2.89 //根据自己的显卡来安装对应的cudatoolkit
conda install cudnn=7.6.5 //根据自己的显卡来安装对应的cudnn
安装pytorch,进入官网选择pytorch =1.8 版本,CUDA 10.2的命令安装pytorch
# ROCM 4.0.1 (Linux only)
pip install torch==1.8.1+rocm4.0.1 torchvision==0.9.1+rocm4.0.1 torchaudio==0.8.1 -f https://download.pytorch.org/whl/torch_stable.html

# ROCM 3.10 (Linux only)
pip install torch==1.8.1+rocm3.10 torchvision==0.9.1+rocm3.10 torchaudio==0.8.1 -f https://download.pytorch.org/whl/torch_stable.html

# CUDA 11.1
pip install torch==1.8.1+cu111 torchvision==0.9.1+cu111 torchaudio==0.8.1 -f https://download.pytorch.org/whl/torch_stable.html

# CUDA 10.2  //选择这条命令
pip install torch==1.8.1+cu102 torchvision==0.9.1+cu102 torchaudio==0.8.1 -f https://download.pytorch.org/whl/torch_stable.html

# CUDA 10.1
pip install torch==1.8.1+cu101 torchvision==0.9.1+cu101 torchaudio==0.8.1 -f https://download.pytorch.org/whl/torch_stable.html

# CPU only
pip install torch==1.8.1+cpu torchvision==0.9.1+cpu torchaudio==0.8.1 -f https://download.pytorch.org/whl/torch_stable.html
6.测试cuda 是否正确安装
输入python
Python 3.7.11 (default, Jul 27 2021, 09:42:29) [MSC v.1916 64 bit (AMD64)] :: Anaconda, Inc. on win32
Type "help", "copyright", "credits" or "license" for more information.
>>> import torch  //导入torch
>>> print(torch.cuda.is_available())   //测试cuda 是否可用
True   //输出True表示可用
>>>
7.使用yolact ++ ,需要编译DCNv2
下载最新版本的DCNv2,https://github.com/jinfagang/DCNv2_latest放入到yolact/external/DCNv2 文件里面
进入DCNv2文件内,输入python setup.py build develop进行编译
python setup.py build develop
.....
Installed m:\fenge\yolact_tutorials\yolact-master\external\dcnv2
Processing dependencies for DCNv2==0.1
Finished processing dependencies for DCNv2==0.1
三、 测试环境
1.官网提供Image 和 Video 的命令,如下所示
Image
# Display qualitative results on the specified image.
python eval.py --trained_model=weights/yolact_base_54_800000.pth --score_threshold=0.15 --top_k=15 --image=my_image.png

# Process an image and save it to another file.
python eval.py --trained_model=weights/yolact_base_54_800000.pth --score_threshold=0.15 --top_k=15 --image=input_image.png:output_image.png

# Process a whole folder of images.
python eval.py --trained_model=weights/yolact_base_54_800000.pth --score_threshold=0.15 --top_k=15 --images=path/to/input/folder:path/to/output/folder
Video
# Display a video in real-time. "--video_multiframe" will process that many frames at once for improved performance.
# If you want, use "--display_fps" to draw the FPS directly on the frame.
python eval.py --trained_model=weights/yolact_base_54_800000.pth --score_threshold=0.15 --top_k=15 --video_multiframe=4 --video=my_video.mp4

# Display a webcam feed in real-time. If you have multiple webcams pass the index of the webcam you want instead of 0.
python eval.py --trained_model=weights/yolact_base_54_800000.pth --score_threshold=0.15 --top_k=15 --video_multiframe=4 --video=0

# Process a video and save it to another file. This uses the same pipeline as the ones above now, so it's fast!
python eval.py --trained_model=weights/yolact_base_54_800000.pth --score_threshold=0.15 --top_k=15 --video_multiframe=4 --video=input_video.mp4:output_video.mp4
Me
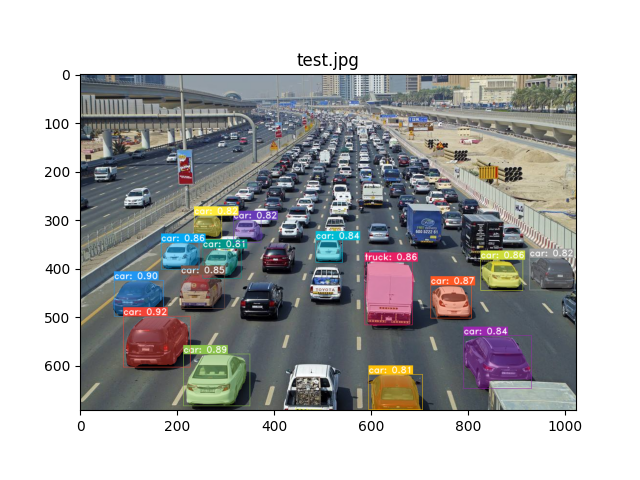
python eval.py --trained_model=weights/yolact_plus_resnet50_54_800000.pth --score_threshold=0.15 --top_k=15 --image=test.jpg

#--trained_model=weights/yolact_plus_resnet50_54_800000.pth  //模型路径
#--score_threshold=0.15  //置信度阈值
#--top_k=15 //返回大于置信度的最大数量(从高到低顺序排列)
#--image=test.jpg  //图片路径


 733
733


 被折叠的 条评论
为什么被折叠?
被折叠的 条评论
为什么被折叠?
 到【灌水乐园】发言


