


这次学习的地址是http://eyehere.net/2011/python-pygame-novice-professional-5/#comment-354
英语水平急剧降低,我还是把学习中碰到的英语单词记下来吧,,,
1.set the color value for a single pixel:为单个像素设置颜色值
2.Set the RGBA or mapped integer color value for a single pixel. If the Surface does not have per pixel alphas, the alpha value is ignored. Setting pixels outside the Surface area or outside the Surface clipping will have no effect.为每个像素设置RGBA或映射整数值,如果不需要透明度,则透明度这个参数被忽略,如果设置的像素位置不在surface上,则是无效的
Getting and setting pixels one at a time is generally too slow to be used in a game or realtime situation.在游戏中或者现实场景中单个单个地设置像素太慢而一般不会使用
This function will temporarily lock and unlock the Surface as needed.这个函数将根据需要临时锁定和解锁surface。
surface.set_at(position,rgba)->examples:
surface.set((200,300),0,0,0,2)或surface.set_at((200,300),0,0,0)
import pygame
pygame.init()

screen = pygame.display.set_mode((640, 480))

all_colors = pygame.Surface((4096,4096), depth=24)

for r in xrange(256):
    print r+1, "out of 256"
    x = (r&15)*256
    y = (r>>4)*256
    for g in xrange(256):
        for b in xrange(256):
            all_colors.set_at((x+g, y+b), (r, g, b))

pygame.image.save(all_colors, "allcolors.bmp")
我认为这个代码不能生成所有颜色,下一次的颜色设置有些必然会覆盖之前设置的颜色。
用一个Python脚本生成三原色:
#!/usr/bin/env python
import pygame
from pygame.locals import *
from sys import exit
pygame.init()
screen = pygame.display.set_mode((640, 480), 0, 32)
#1
def create_scales(height):
red_scale_surface = pygame.surface.Surface((640, height))
green_scale_surface = pygame.surface.Surface((640, height))
blue_scale_surface = pygame.surface.Surface((640, height))
for x in range(640):
c = int((x/640.)*255.)
red = (c, 0, 0)
green = (0, c, 0)
blue = (0, 0, c)
line_rect = Rect(x, 0, 1, height)
pygame.draw.rect(red_scale_surface, red, line_rect)#将渐变颜色填充在矩形rect里
pygame.draw.rect(green_scale_surface, green, line_rect)
pygame.draw.rect(blue_scale_surface, blue, line_rect)
return red_scale_surface, green_scale_surface, blue_scale_surface
red_scale, green_scale, blue_scale = create_scales(80)
color = [127, 127, 127]
#2
while True:
#2.1
for event in pygame.event.get():
if event.type == QUIT:
exit()
screen.fill((0, 0, 0))
screen.blit(red_scale, (0, 00))
screen.blit(green_scale, (0, 80))
screen.blit(blue_scale, (0, 160))
#2.2
x, y = pygame.mouse.get_pos()
if pygame.mouse.get_pressed()[0]:
for component in range(3):
if y > component*80 and y < (component+1)*80:
color[component] = int((x/639.)*255.)
pygame.display.set_caption("PyGame Color Test - "+str(tuple(color)))
#2.3
for component in range(3):
pos = ( int((color[component]/255.)*639), component*80+40 )
pygame.draw.circle(screen, (255, 255, 255), pos, 20)
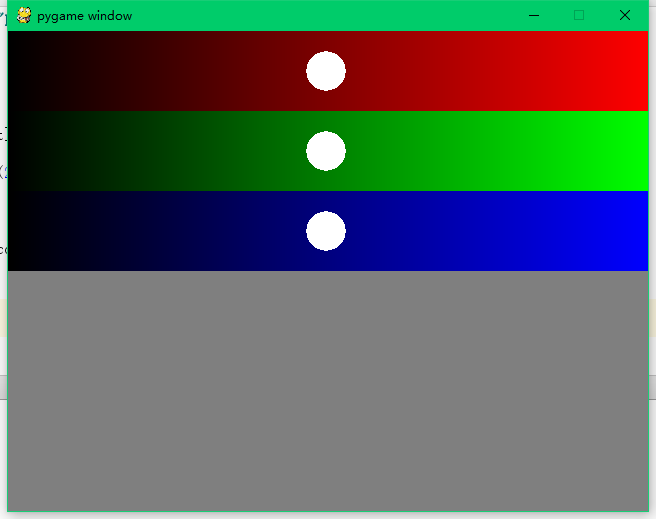
pygame.draw.rect(screen, tuple(color), (0, 240, 640, 240))
pygame.display.update()效果图如下:
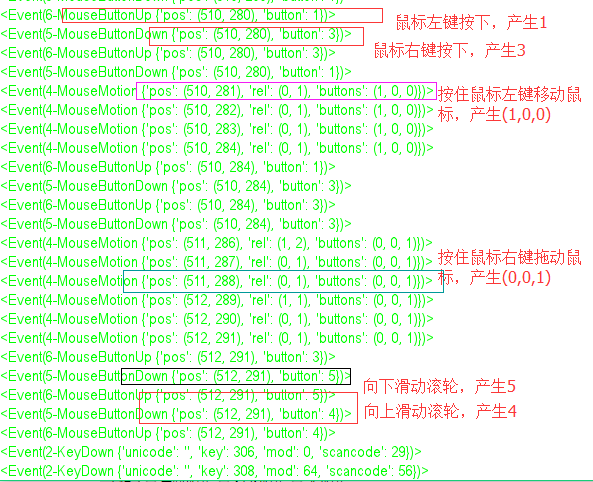
这里先讲一下鼠标事件和相关函数,然后再解读这个程序:

第一个参数表示事件,第二个参数表示该事件产生的条件,第三个参数表示描述该事件的参数
附上一张图来描述一下:
程序思路:
1.先创建三个子surface,然后将渐变颜色填入这三个子surface里面,这也就是create_scalse函数的作用
2.然后就是while循环了,将三个子surface画进大的screen里面,并接受处理鼠标事件。#2.2是将鼠标位置值转换为rgb值,#2.3部分是在鼠标的位置画圆和更新下方矩形框内的颜色(注意:#2.2和#2.3的执行有小小的区别,#2.2部分的执行是有条件的,即发生鼠标点击这个事件,而#2.3是每一次while都需要执行的)
然后讲解一下pygame.mouse.get_pressed()函数就OK了
该函数返回值有三个参数(x,y,z),当鼠标左键点击后,x的值就返回为1,当鼠标右键点击后,z的值就返回为1,当没有点击事件发生时,该函数返回(0,0,0)
另外补充一下get_pressed和MOUSEDOWN事件,当你把鼠标一直按下时,get_pressed就会一直感知到,而MOUSEDOWN只处理一次鼠标按下事件。
附带一下碰到的资源:http://bbs.fishc.com/thread-62164-1-1.html和http://bbs.fishc.com/thread-62190-1-1.html和http://www.pygame.org/docs/ref/display.html#pygame.display.set_mode
补充一下(复习笔记):
隔了一个星期没有碰pygame(因为忙于实习和其他事情),重新看第二个程序都有点生疏了,记下现在生疏的地方,看以后还会不会
1.创建一个surface对象,传入长和宽
pygame.surface.Surface
Rect(x, 0, 1, height)
pygame.draw.rect(red_scale_surface, red, line_rect)
screen.blit(red_scale, (0, 00))
pygame.draw.circle(screen, (255, 255, 255), pos, 20)


 530
530


 被折叠的 条评论
为什么被折叠?
被折叠的 条评论
为什么被折叠?
 到【灌水乐园】发言


