


latex is fucking good. 当使用latex写文档后,发现它真的是太强大了,包含的内容如此之多,如此之广,可谓All in one, one is enough! 当然在使用它的时候会有很多很多细节无法记住,那么现将遇到的细小问题汇总于此,说明如下:
- 主要用于汇总latex使用过程中遇到的各种小问题,方便以后查阅;
- 涉及标签,命令等相关用法;
所有小问题如下:
1. Tikz绘图时,使node labels的位置位于node之下,而非node之中。
参考:Tikz node labels more below than below
解决方法: 在node的选项中加入label即可:
\begin{tikzpicture}
    \fill (0,0) circle (0.05) node[below,draw]{$b_1$};
    \fill (1,0) circle (0.05) node[label=below:$b_1$,draw]{};
\end{tikzpicture}
2.-tikz中,node里面的内容或label换行设置问题。
参考: How to add newline within node using TikZ?
解决方法:在node选项中加入align=center, 然后在使用换行符 \即可。
\documentclass[]{minimal}

\usepackage{amsmath,amsfonts,amssymb}
\usepackage{tikz}
\usetikzlibrary{automata,positioning}

\begin{document}

\begin{tikzpicture}[shorten >=1pt,node distance=5cm,on grid,auto]

% 具体设置在这里
\node[state,initial] (q_0) {$q_0$};
\path[->] (q_0) edge[loop above] node[text width=1cm,align=center] {0,1,2\\3,4,5} (q_0);

\end{tikzpicture}
\end{document}
3.在tikz中,多个node如何设置一样的大小?
参考:how to draw nodes with same size
解决方法:在scope中设置minimum size和inner seq即可。
\documentclass[11pt,tikz,border=2pt]{standalone}
    \usetikzlibrary{positioning}
    \begin{document}
     \begin{tikzpicture}[scale=1.5]
      \begin{scope}[auto, every node/.style={draw,circle,minimum size=2em,inner sep=1},node distance=2cm]
        % the vertices
        \node(v1) at (0,0){1};
        \node[above=of v1] (v2) {2};
        \node[above=of v2] (v3) {3};
        \node[right=of v1] (v4) {4};
        \node[above=of v4] (v5) {5};
        \node[above=of v5] (v6) {6};
        \node[right=of v4] (v7) {7};
        \node[above=of v7] (v8) {8};
        \node[above=of v8] (v9) {9};
        \node[right=of v7 ,] (v10) {10};
        \node[above=of v10] (v11) {11};
        \node[above=of v11,] (v12) {12};
      \end{scope}
     \end{tikzpicture}
    \end{document}
4.tikz中,node相互之间的位置和距离如何设置?
参考:How to increase the horizontal distance between nodes?
解决方法:在node中加入这个[below right=0.7cm and 4cm of A]选项或xshift即可。
\documentclass{article}
\usepackage{tikz}
\usetikzlibrary{positioning}
\begin{document}
\begin{tikzpicture}
  [align=center,node distance=2cm]  %< no need of this global node separation
  \node[label=above:A] (A)
       {(1)};
  \node[label=above:B1] (B1) [above right=0.7cm and 4cm of A]
       {($m+1$)};
  \node[label=above:B2] (B2) [below right=0.7cm and 4cm of A]
       {($m+1$)};
  \node[label=above:C] (C)  [below right=0.7cm and 4cm of B1]
       {($2m-1$)};
\end{tikzpicture}
\end{document}
或者使用下面的xshift参数:
\documentclass{article}
\usepackage{tikz}
\usetikzlibrary{positioning}

\begin{document}

\begin{tikzpicture}[state/.style={draw=red,ultra thick,rectangle,rounded corners}]

 \node[state] (q3)  {$test$};
 \node[state] (q4) [below left of=q3] {$homing$};
 \node[state] (q5) [below left of=q3,xshift=-2cm] {$homing1$};

\end{tikzpicture}

\end{document}
5.在tikz绘图中,使用for循环按照步长生成多个图的方法?
参考:Repeating Things: The Foreach Statement
解决方法:参考下面的例子。
% 下面1与2之间的间距即是步长,\y的用法一样。
\foreach \x in {1,2,...,6} {\x, } yields 1, 2, 3, 4, 5, 6,
\foreach \x in {1,2,3,...,6} {\x, } yields 1, 2, 3, 4, 5, 6,
\foreach \x in {1,3,...,11} {\x, } yields 1, 3, 5, 7, 9, 11,
\foreach \x in {1,3,...,10} {\x, } yields 1, 3, 5, 7, 9,
\foreach \x in {0,0.1,...,0.5} {\x, } yields 0, 0.1, 0.20001, 0.30002, 0.40002,
\foreach \x in {a,b,9,8,...,1,2,2.125,...,2.5} {\x, } yields a, b, 9, 8, 7, 6, 5, 4, 3, 2, 1, 2, 2.125, 2.25, 2.375, 2.5,
\foreach \x in {1,...,6} {\x, } yields 1, 2, 3, 4, 5, 6,
\foreach \x in {9,...,3.5} {\x, } yields 9, 8, 7, 6, 5, 4,
% 使用方法如下
\tikz
  \foreach \x in {0,1,...,3}
    \draw (\x,0) circle (0.2cm);
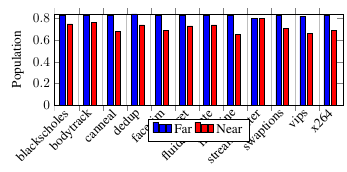
6.使用pgfplots包绘制一组柱状图tikzpicture。
代码如下参考这里:
\begin{figure}[t]
    \centering
    \begin{tikzpicture}
    \begin{axis}[
        ylabel=Population,
        width=0.5\textwidth,    height=4cm,
        xticklabels={blackscholes,bodytrack,canneal,dedup,facesim,ferret,fluidanimate,freqmine,streamcluster,swaptions,vips,x264},
        xtick={1,...,12},
        %xtick=data,
        x tick label style={rotate=45,anchor=east,xshift=3},
        major x tick style = {opacity=1},
        %minor x tick num = 1,
        minor tick length=1ex,
        bar width=4pt,
        enlargelimits=false,
        legend style={at={(0.5,-0.15)},
        anchor=north, legend columns=-1},
        ybar interval]

        \addplot[ybar,fill=blue,bar shift=0.2cm] table[x index=0,y index=1] {results/energy.dat};
        \addplot[ybar,fill=red,bar shift=0.4cm] table[x index=0,y index=2] {results/energy.dat};

        \legend{Far,Near};
    \end{axis}
    \end{tikzpicture}
\end{figure}
其中的数据格式为:
1   0.8 0.75
2   0.2 0.76
3   0.8 0.68
4   0.5 0.74
5   0.2 0.69
6   0.9 0.73
7   0.4 0.74
8   0.9 0.65
9   0.3 0.8
10  0.7 0.71
11  0.7 0.66
12  0.4 0.69
13  0   0
第13行为辅助数据,没有意义,不添加将会导致最后一列的数据看不到。
效果图类似下面的:
7.tikz中的图片设置全局字体大小,即设置后所有字体都是统一的大小?
在头部添加如下代码参考这里:set fontsize for TikZ figure:
% 可以自定义字体大小font issue={\fontsize{10}{12}}
\tikzset{every picture/.style={font issue=\footnotesize},
font issue/.style={execute at begin picture={#1\selectfont}}
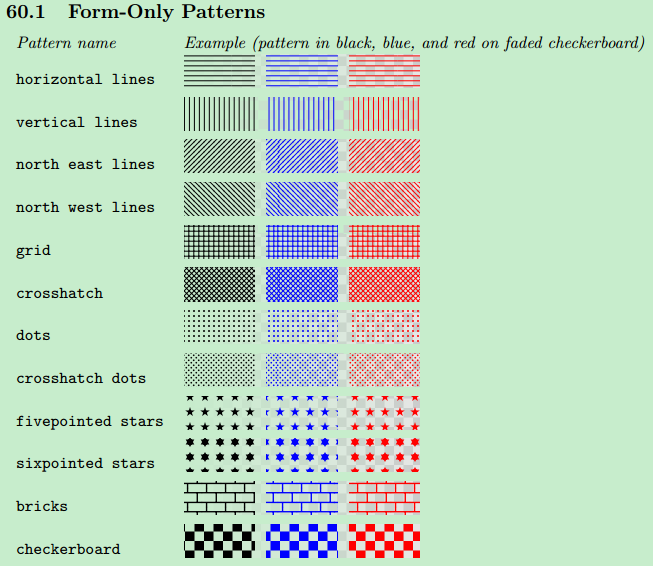
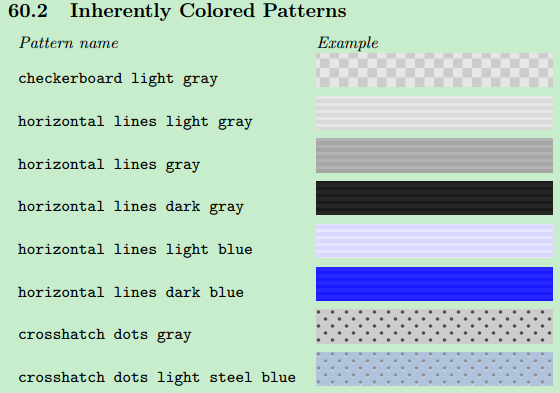
} % set the global font pic for tikz pic.8.tikz中柱状图的条纹显示方式。参考:Where is the pattern list gallery for pgfplots?和tikz&pgf manual手册60 Pattern Library第656页。
首先加入库文件:
\usepgflibrary{patterns} % LATEX and plain TEX and pure pgf
\usepgflibrary[patterns] % ConTEXt and pure pgf
\usetikzlibrary{patterns} % LATEX and plain TEX when using Tik Z
\usetikzlibrary[patterns] % ConTEXt when using Tik Z
使用方式如下:
\addplot[ybar,fill=black!40,bar shift=0.4cm,postaction={ pattern=fivepointed stars}] table[x index=0,y index=2] {results/energy.dat};各种显示效果如下:
9.带括号的参考文献上角标显示方法?
解答:只需要引用下面这个包即可,这样自动生成的文献引用即变为了带括号的上角标:
\usepackage[super,square]{natbib}


 2954
2954

 被折叠的 条评论
为什么被折叠?
被折叠的 条评论
为什么被折叠?
 到【灌水乐园】发言


