


最近学了不少驱动的东西,想做一个综合的东西。结合手中的资源,初步定了一个小方案。
树莓派3B + ST7735屏 + LVGL + USB鼠标。
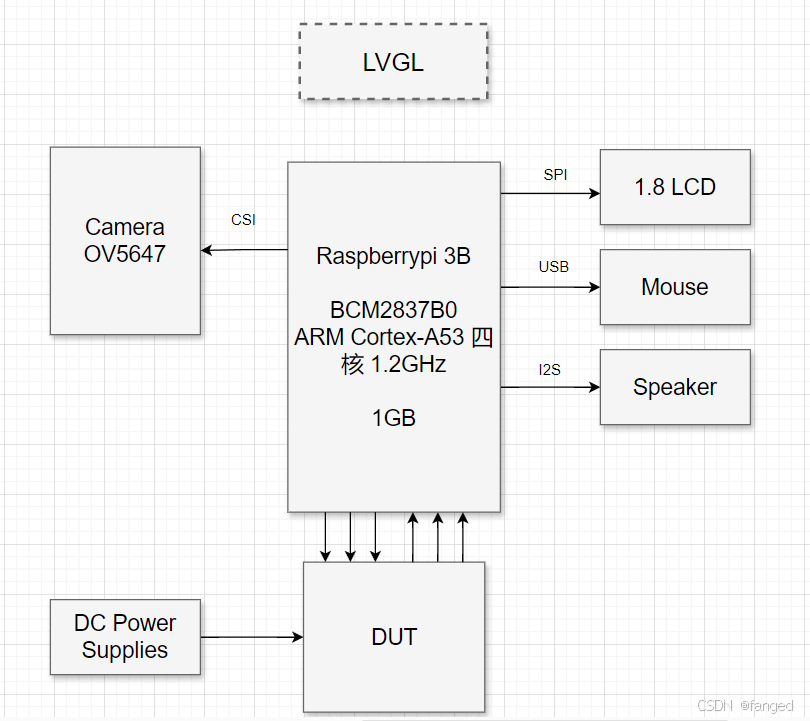
设想的系统框图
这次的学习还是订了三个小目标:
目标1:屏就不用python去驱动了,直接在内核里面驱动,然后用LVGL做一个界面,上面可以显示USB鼠标的滑动,用鼠标点一下会有声音。
目标2:驱动摄像头,并在LCD里面进行显示。
目标3:基于摄像头,做一些边缘AI的应用。
这个系统其实不难,很多操作都是最简单,其实还是重在学习的过程。
安装树莓派 Pico 的 C/C++ SDK
git clone https://github.com/hathach/tinyusb.git
CMakeList.txt
cmake_minimum_required(VERSION 3.13)
include(pico_sdk_import.cmake)
project(usb_host_mouse_example)
pico_sdk_init()
add_executable(usb_host_mouse_example
main.c
)
# 添加对 TinyUSB 的支持
add_subdirectory(tinyusb)
target_link_libraries(usb_host_mouse_example pico_stdlib tinyusb_host)
pico_add_extra_outputs(usb_host_mouse_example)
main.c
#include "pico/stdlib.h"
#include "bsp/board.h"
#include "tusb.h"
// USB HID 鼠标回调函数
void tuh_hid_mouse_mounted_cb(uint8_t dev_addr) {
printf("A USB mouse is mounted.\n");
}
void tuh_hid_mouse_unmounted_cb(uint8_t dev_addr) {
printf("A USB mouse is unmounted.\n");
}
void tuh_hid_mouse_isr(uint8_t dev_addr, uint8_t instance, const uint8_t* report, uint16_t len) {
// 解析鼠标报告
int8_t x = report[1];
int8_t y = report[2];
int8_t wheel = report[3];
printf("Mouse movement: x=%d, y=%d, wheel=%d\n", x, y, wheel);
}
int main() {
// 初始化板子和 USB 主机
board_init();
tusb_init();
while (true) {
// 处理 USB 事件
tuh_task();
}
return 0;
}
mkdir build
cd build
cmake ..
make
生成的 usb_host_mouse_example.uf2 文件拖放到树莓派 Pico 的 USB 驱动器中,完成固件上传。


 5710
5710

 被折叠的 条评论
为什么被折叠?
被折叠的 条评论
为什么被折叠?
 到【灌水乐园】发言


