


Flume安装部署及应用
一、Flume安装部署
将apache-flume-1.9.0-bin.tar.gz 上传到 linux 的/opt/tools目录下
解压apache-flume-1.9.0-bin.tar.gz 到/opt/目录下:
[root@node01 tools]# tar -zxvf apache-flume-1.9.0-bin.tar.gz -C /opt
修改 apache-flume-1.9.0-bin 的名称为 flume
[root@node01 tools]#mv /opt/apache-flume-1.9.0-bin /opt/flume
将flume-env.sh.template文件重命名为 flume-env.sh
[root@node01 tools]$ cd /opt/flume/conf/ #进入该目录
[root@node01 conf]$ mv flume-env.sh.template flume-env.sh #修改名字

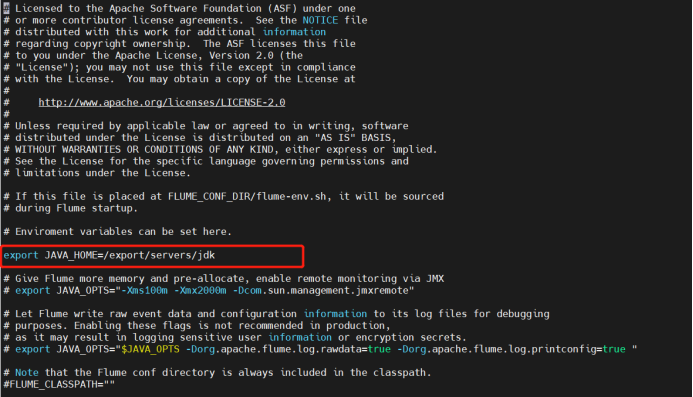
修改flume-env.sh文件
[root@node01 conf]$ vim flume-env.sh #输入该文件
添加如下配置export JAVA_HOME=/export/servers/jdk
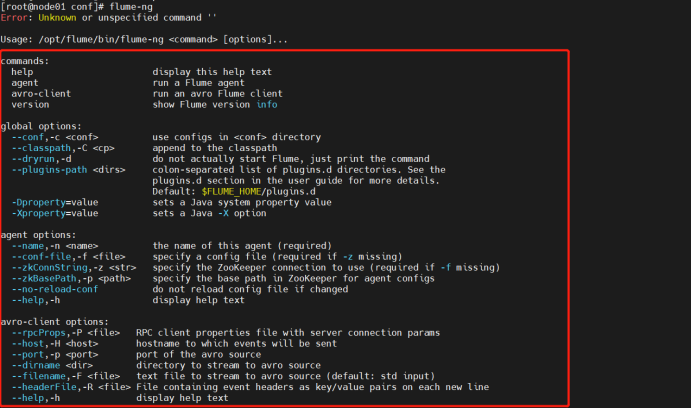
6. 测试配置是否成功,输入flume-ng
[root@node01 conf]$ flume-ng
二.实时监控文件数据。
案例需求: 使用Flume 监听一个文件,收集该文件中新增数据,并打印到控制台
1.创建文件/root/aa.txt
$ touch /root/aa.txt
2.创建 Flume Agent 配置文件 exec-logger.conf
$ touch /opt/flume/conf/exec-logger.conf
3.编辑exec-logger.conf
# Name the components on this agent
a1.sources = r1
a1.sinks = k1
a1.channels = c1
#exec 指的是命令
# Describe/configure the source
a1.sources.r1.type = exec
#F根据文件名追中, f根据文件的nodeid追中
a1.sources.r1.command = tail -F /root/aa.txt
a1.sources.r1.channels = c1
# Describe the sink
a1.sinks.k1.type = logger
# Use a channel which buffers events in memory
a1.channels.c1.type = memory
a1.channels.c1.capacity = 1000
a1.channels.c1.transactionCapacity = 100
# Bind the source and sink to the channel
a1.sources.r1.channels = c1
a1.sinks.k1.channel = c1
(4)开启 flume 监听文件
bin/flume-ng agent -c conf -f conf/exec-logger.conf -n a1 -Dflume.root.logger=INFO,console
(5)向文件中追加内容
echo "hello" >> /root/aa.txt
(6)控制台中查看打印的信息
hello
三.实时监控日志文件并存储到HDFS
案例需求: 使用Flume 监听一个文件,收集该文件中新增数据,并存储到HDFS
1.创建文件/root/dd.log
$ touch /root/dd.log
2.创建 Flume Agent 配置文件 tail-hdfs.conf
$ touch /opt/flume/conf/tail-hdfs.conf
3.编辑tail-hdfs.conf
# Name the components on this agent
a1.sources = r1
a1.sinks = k1
a1.channels = c1
#exec 指的是命令
# Describe/configure the source
a1.sources.r1.type = exec
#F根据文件名追中, f根据文件的nodeid追中
a1.sources.r1.command = tail -F /root/dd.log
a1.sources.r1.channels = c1
# Describe the sink
#下沉目标
a1.sinks.k1.type = hdfs
a1.sinks.k1.channel = c1
#指定目录, flum帮做目的替换
a1.sinks.k1.hdfs.path = /flume/events/%y-%m-%d/%H%M/
#文件的命名, 前缀
a1.sinks.k1.hdfs.filePrefix = events-
#10 分钟就改目录
a1.sinks.k1.hdfs.round = true
a1.sinks.k1.hdfs.roundValue = 10
a1.sinks.k1.hdfs.roundUnit = minute
#文件滚动之前的等待时间(秒)
a1.sinks.k1.hdfs.rollInterval = 3
#文件滚动的大小限制(bytes)
a1.sinks.k1.hdfs.rollSize = 500
#写入多少个event数据后滚动文件(事件个数)
a1.sinks.k1.hdfs.rollCount = 20
#5个事件就往里面写入
a1.sinks.k1.hdfs.batchSize = 5
#用本地时间格式化目录
a1.sinks.k1.hdfs.useLocalTimeStamp = true
#下沉后, 生成的文件类型,默认是Sequencefile,可用DataStream,则为普通文本
a1.sinks.k1.hdfs.fileType = DataStream
# Use a channel which buffers events in memory
a1.channels.c1.type = memory
a1.channels.c1.capacity = 1000
a1.channels.c1.transactionCapacity = 100
# Bind the source and sink to the channel
a1.sources.r1.channels = c1
a1.sinks.k1.channel = c1
4. 开启 flume 监听文件
$ bin/flume-ng agent -c conf -f conf/tail-hdfs.conf -n a1
5. 创建shell脚本,添加以下内容并执行
#/bin/bash
while true
do
echo '2222222' >> /root/dd.log
sleep 0.5
done
(6)查看HDFS文件信息


 213
213


 被折叠的 条评论
为什么被折叠?
被折叠的 条评论
为什么被折叠?
 到【灌水乐园】发言


