


目标检测算法通常会在输入图像中采样大量的区域,然后判断这些区域中是否包含我们感兴趣的目标,并调整区域边界从而更准确地预测目标的真实边界框(ground-truth bounding box)。不同的模型使用的区域采样方法可能不同。这里我们介绍其中的一种方法:以每个像素为中心,生成多个缩放比和宽高比(aspect ratio)不同的边界框。这些边界框被称为锚框(anchor box)。---- 《动手学深度学习v2》上文表明,锚框不过是图像中采样的区域,也介绍了最简单的一种生成这些区域的方法。此外,目标检测算法会判断这些区域是否有目标,是分类任务。调整这些区域到目标真实框是回归任务。
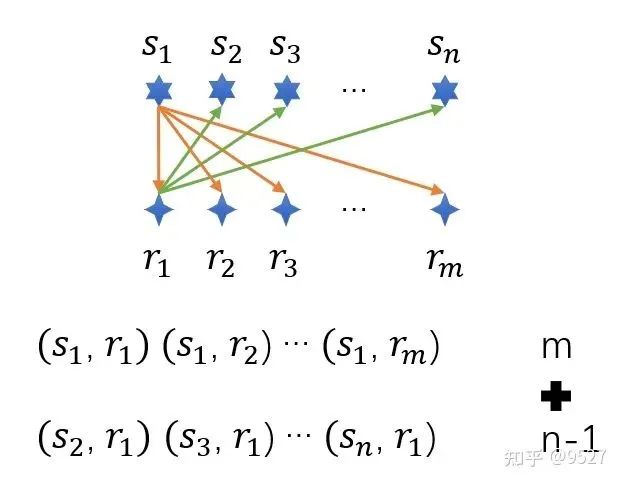
假设输入图像的高度为ℎ,宽度为 。以图像的每个像素为中心生成不同形状的锚框:比例为 ∈(0,1],宽高比为 >0。要生成多个不同形状的锚框,设置一系列刻度 和一系列宽高比 。为了减少计算复杂度,只考虑包含 或 的组合,如下图所示。
推导1:设 w, h 为 图像中锚框的实际宽高, W,H 为图像的宽高。
由 和 和 。
对 和 归一化 和 。
显然,当 H = W 时, , 。
推导2:设 和 为归一化的小数,可得到
公式1: 和 公式2:
和 。与推导1结论相同。
动手学深度学习V2中的代码,当H = W 时,和下面修改的结果是一致的。但当H != W 时, 二者结果并不相同。但是其实二者区别不大,不过是锚框的初始大小区别而已,而这不过是人自定义的。
import torch
from d2l import torch as d2l
# torch.set_printoptions(2)  # 精简输出精度

def multibox_prior(data, sizes, ratios):
    """生成以每个像素为中心具有不同形状的锚框"""
    in_height, in_width = data.shape[-2:]
    device, num_sizes, num_ratios = data.device, len(sizes), len(ratios) # 3, 3
    boxes_per_pixel = (num_sizes + num_ratios - 1) # 每个像素的锚框数
    size_tensor = torch.tensor(sizes, device=device) # list 转为 tensor
    ratio_tensor = torch.tensor(ratios, device=device)

    # 为了将锚点移动到像素的中心,需要设置偏移量。
    # 因为一个像素的的高为1且宽为1,我们选择偏移我们的中心0.5
    offset_h, offset_w = 0.5, 0.5
    steps_h = 1.0 / in_height  # 在y轴上缩放步长
    steps_w = 1.0 / in_width  # 在x轴上缩放步长

    # 生成锚框的所有中心点
    center_h = (torch.arange(in_height, device=device) + offset_h) * steps_h
    center_w = (torch.arange(in_width, device=device) + offset_w) * steps_w
    shift_y, shift_x = torch.meshgrid(center_h, center_w)

    # center_h:tensor([0.1250, 0.3750, 0.6250, 0.8750])
    # tensor([
    #       [0.1250, 0.1250, 0.1250, 0.1250],
    #       [0.3750, 0.3750, 0.3750, 0.3750],
    #       [0.6250, 0.6250, 0.6250, 0.6250],
    #       [0.8750, 0.8750, 0.8750, 0.8750]])

    # tensor([
    #       [0.1250, 0.3750, 0.6250, 0.8750],
    #       [0.1250, 0.3750, 0.6250, 0.8750],
    #       [0.1250, 0.3750, 0.6250, 0.8750],
    #       [0.1250, 0.3750, 0.6250, 0.8750]])
    shift_y, shift_x = shift_y.reshape(-1), shift_x.reshape(-1)
    # 全部每个像素中心点坐标
    # tensor([0.1250, 0.1250, 0.1250, 0.1250, 0.3750, 0.3750, 0.3750, 0.3750, 0.6250,
    #     0.6250, 0.6250, 0.6250, 0.8750, 0.8750, 0.8750, 0.8750])
    # tensor([0.1250, 0.3750, 0.6250, 0.8750, 0.1250, 0.3750, 0.6250, 0.8750, 0.1250,
    #     0.3750, 0.6250, 0.8750, 0.1250, 0.3750, 0.6250, 0.8750])

    # 生成“boxes_per_pixel”个高和宽,
    # 之后用于创建锚框的四角坐标(xmin,xmax,ymin,ymax)

    ## 动手学深度学习V2 原始代码
    # w = torch.cat((size_tensor * torch.sqrt(ratio_tensor[0]),
    #                sizes[0] * torch.sqrt(ratio_tensor[1:])))\
    #                * in_height / in_width  # 处理矩形输入
    # h = torch.cat((size_tensor / torch.sqrt(ratio_tensor[0]),
    #                sizes[0] / torch.sqrt(ratio_tensor[1:])))
    # # 除以2来获得半高和半宽
    # anchor_manipulations = torch.stack((-w, -h, w, h)).T.repeat(
    #                                     in_height * in_width, 1) / 2

    ## 更新后的代码
    w_0 = torch.cat((sizes[0] * torch.sqrt(in_height * ratio_tensor[:] / in_width),
                     size_tensor[1:] * torch.sqrt(in_height * ratio_tensor[0] / in_width)))
    h_0 = torch.cat((sizes[0] * torch.sqrt(in_width / ratio_tensor[:] / in_height),
                     size_tensor[1:] * torch.sqrt(in_width / ratio_tensor[0] / in_height)))
    # 除以2来获得半高和半宽
    anchor_manipulations = torch.stack((-w_0, -h_0, w_0, h_0)).T.repeat(
                                        in_height * in_width, 1) / 2

    # 每个中心点都将有“boxes_per_pixel”个锚框,
    # 所以生成含所有锚框中心的网格,重复了“boxes_per_pixel”次
    out_grid = torch.stack([shift_x, shift_y, shift_x, shift_y],
                dim=1).repeat_interleave(boxes_per_pixel, dim=0)
    output = out_grid + anchor_manipulations
    return output.unsqueeze(0)


img = d2l.plt.imread('d2l-zh/pytorch/img/catdog.jpg')
h, w = img.shape[:2]

print(h, w)
X = torch.rand(size=(1, 3, 4, 4))
Y = multibox_prior(X, sizes=[0.75, 0.5, 0.25], ratios=[1, 2, 0.5])
print(Y, Y.shape)
显示代码修改
d2l.set_figsize()
bbox_scale = torch.tensor((w, h, w, h))
fig = d2l.plt.imshow(img)
# 上述代码按图1 组合,故下面的顺序作了调整。
# show_bboxes(fig.axes, boxes[250, 250, :, :] * bbox_scale,
#             ['s=0.75, r=1', 's=0.5, r=1', 's=0.25, r=1', 's=0.75, r=2',
#              's=0.75, r=0.5'])
show_bboxes(fig.axes, boxes[250, 350, :, :] * bbox_scale,
            ['s=0.75, r=1', 's=0.75, r=2', 's=0.75, r=0.5', 's=0.5, r=1',
             's=0.25, r=1'])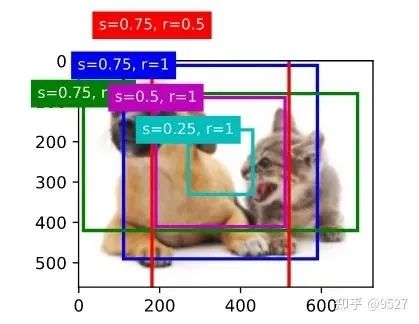

往期精彩回顾


适合初学者入门人工智能的路线及资料下载(图文+视频)机器学习入门系列下载机器学习及深度学习笔记等资料打印《统计学习方法》的代码复现专辑机器学习交流qq群955171419,加入微信群请扫码


 186
186


 被折叠的 条评论
为什么被折叠?
被折叠的 条评论
为什么被折叠?
 到【灌水乐园】发言


