


三层构架开发在企业中应用的比较广泛,三层构架运用的广泛肯定有其优点,主要是运用面向对象的思想开发项目,有利于项目组成员分工协作、代码复用、程序松 耦合、有利于后期的修改和扩展。三层构架可以理解为多层构架,大家都知道超过两个就可以称为多,三层主要是指数据层、业务逻辑层和视图层。超过三层也只是 对三层的扩展,如使用设计模式时,业务逻辑层一般会分为多个层。不管分为多少层,实质上还是3层。下面就以.NET为例来讲解三层构架开发。
这个实例的开发环境是VS2008(C#)+SQL2005 ,主要是实现用户登录的功能。
1、数据库
数据库设计的很简单,数据库名:Enterprise 数据表:Users。
create database Enterprise
if object_id('Users') is not null drop table Users
go
create table Users
(
User_Id int identity(1,1) primary key,
User_Name varchar(50),
User_Pwd varchar(50)
)
insert into Users values('aa','123456')
insert into Users values('ab','123456')
select * from Users
下面为Users表截图:

2、打开VS2008,新建一个空白解决方案,命名为:Enterprise 。在这个解决方案上右键选择添加:新建网站,命名为WEB。把这个网站作为我们的视图层。新建一个Login.aspx页面,代码为:
<%@ Page Language="C#" AutoEventWireup="true" CodeBehind=" Login .a spx.cs" Inherits="Enterprise._Default" %>
<!DOCTYPE html PUBLIC "-//W3C//DTD XHTML 1.0 Transitional//EN" "http://www.w3.org/TR/xhtml1/DTD/xhtml1-transitional.dtd">
<html xmlns="http://www.w3.org/1999/xhtml" >
<head runat="server">
<title>登录页面</title>
<script language ="javascript" type ="text/javascript">
function TABLE1_onclick()
{
}
function checkClint()
{
var gettxtName=document .getElementById ("txtName");
var gettxtPwd =document .getElementById ("txtPwd");
if(gettxtName.value=="")
{
alert('請輸入用户名!');
gettxtName .focus();
return false;
}
else if (gettxtPwd .value=="")
{
alert('请输入密码!');
gettxtPwd.focus();
return false ;
}
else
{
return true ;
}
}
</script>
</head>
<body style="font-size: 12px">
<form id="form1" runat="server">
<table align="center" style="width: 246px; height: 1px; border-right: #00cc99 thin groove; border-top: #00cc99 thin groove; border-left: #00cc99 thin groove; border-bottom: #00cc99 thin groove;" id="TABLE1" οnclick="return TABLE1_onclick()">
<tr>
<td align="center" colspan="3" style="height: 8px; background-color: #00cc99;">
-=登录窗口=-</td>
</tr>
<tr>
<td align="center" style="width: 93px; height: 15px">
用户名:</td>
<td colspan="2" style="width: 138px; height: 15px">
<asp:TextBox ID="txtName" runat="server" Width="140px"></asp:TextBox></td>
</tr>
<tr>
<td align="center" style="width: 93px; height: 33px;">
密码:</td>
<td colspan="2" style="width: 138px; height: 33px;">
<asp:TextBox ID="txtPwd" runat="server" TextMode="Password" Width="136px"></asp:TextBox></td>
</tr>
<tr>
<td align="right" colspan="3" style="background-color: #00cc99; height: 24px;">
<asp:Button ID="btnSubmit" runat="server" Font-Size="Smaller"
OnClick="btnSubmit_Click" OnClientClick="return checkClint() " Text="登 录" Height="25px" /> <asp:Button
ID="btnCandel" runat="server"
Font-Size="Smaller" OnClick="btnCandel_Click" Text="清 空"
style="height: 21px" Height="25px" /></td>
</tr>
</table>
</form>
</body>
</html>
在web.config里配置
<appSettings> //SQL 验证方式
<add key="strConn" value="server=(local);database=Enterprise;User Id=sa;pwd="/>
</appSettings>
<appSettings> //Window验证方式
<add key="strConn" value="server=./SQLEXPRESS;database=Enterprise;Integrated Security=SSPI"/>
</appSettings>
3、建立数据层
在解决方案上单击右键->添加->新建项目->选择C#类库,命名为:DAL(DataAccessLayer的缩写)。在类库中添加一个数据通用访问类:CommonDB.cs ,由于只实现登录验证,所以写的不全。代码如下:
using System;
using System.Collections.Generic;
using System.Linq;
using System.Text;
using System.Configuration;
using System.Data;
using System.Data.SqlClient;
namespace DAL
{
public class CommonDB
{
static string strConn = System.Configuration.ConfigurationSettings.AppSettings["strConn"].ToString();
public static DataSet getDataSet(string sql)
{
SqlConnection Conn = new SqlConnection(strConn);
Conn.Open();
SqlDataAdapter sda = new SqlDataAdapter(sql, Conn);
DataSet ds = new DataSet();
sda.Fill(ds);
return ds;
}
}
}
再添加一个登录验证模块类:UsesDB.cs验证用户是否存在。 代码如下:
using System;
using System.Collections.Generic;
using System.Linq;
using System.Text;
using System.Data;
namespace DAL
{
public class UsersDB
{
public DataSet isUserExist(string username,string userpwd)
{
DataSet ds = new DataSet();
string sql = "select * from Users where User_Name='" + username + "' and User_Pwd='" + userpwd + "'";
ds= CommonDB.getDataSet(sql);
return ds;
}
}
}
数据访问层实现完成。
4、业务逻辑层
在这我们将业务逻辑层中的实体与逻辑操作分开。当然也可以放在一个类库里。
(1)在解决方案上单击右键->添加->新建项目->选择C#类库,命名为:Common。在类库中添加一个用户实体类:Users.cs 代码如下:
using System;
using System.Collections.Generic;
using System.Linq;
using System.Text;
namespace Common
{
public class Users
{
private string _username;
private string _userpwd;
public Users(string username,string userpwd)
{
this._username = username;
this._userpwd = userpwd;
}
public string UserName
{
get { return _username; }
set { _username = value; }
}
public string UserPwd
{
get { return _userpwd; }
set { _userpwd = value; }
}
}
}
(2)在解决方案上单击右键->添加->新建项目->选择C#类库,命名 为:BLL(BusinessLogicalLayer的缩写)。由于业务逻辑层需要调用数据访问层和实体层中的类,需要在此类库中引用Common类库 和DAL类库(单击BLL类库->右键->添加引用->项目->选择Common和DAL),在类库中添加逻辑判断 类:UserBLL.cs 代码如下:
using System;
using System.Collections.Generic;
using System.Linq;
using System.Text;
using System.Data;
using DAL;
using Common;
namespace BLL
{
public class UserBLL
{
UsersDB udb = new UsersDB();
public bool isUserExist(string username,string userpwd)
{
Users us = new Users(username, userpwd);
if (udb.isUserExist(us.UserName, us.UserPwd).Tables[0].Rows.Count > 0)
{
return true;
}
return false;
}
}
}
5、在视图层调用业务逻辑层,实现登录验证,首先需要在网站项目中添加业务逻辑层BLL类库的引用(在网站项目上单击->右键->添加引用 ->项目->BLL)。在Default.aspx.cs页面中写btnSubmit_Click事件。代码如下:
using System;
using System.Configuration;
using System.Data;
using System.Linq;
using System.Web;
using System.Web.Security;
using System.Web.UI;
using System.Web.UI.HtmlControls;
using System.Web.UI.WebControls;
using System.Web.UI.WebControls.WebParts;
using System.Xml.Linq;
using BLL;
public partial class _Default : System.Web.UI.Page
{
protected void Page_Load(object sender, EventArgs e)
{
}
protected void btnSubmit_Click(object sender, EventArgs e)
{
string UserName = txtName.Text;
string UserPwd = txtPwd.Text;
UserBLL ub = new UserBLL();
if (ub.isUserExist(UserName, UserPwd))
{
Response.Write("<script>alert('登录成功!');location='javascript:history.go(-1)'</script>");
}
else
{
Response.Write("<script>alert('登录失败!');location='javascript:history.go(-1)'</script>");
}
}
protected void btnCandel_Click(object sender, EventArgs e)
{
txtName.Text = "";
txtPwd.Text = "";
}
}
6、将WEB网站设为启动项目即视图层(用户访问层)。运行 Login.aspx。
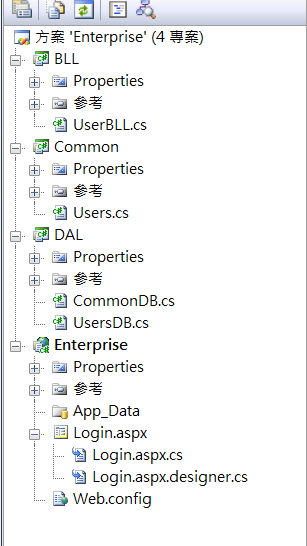
解决方案资源管理器截图:
OK,使用 .NET实现三层构架开发的简单的DEMO讲解完毕。希望对您有所帮助,如果有什么问题及改进意见大家可以讨论。


 1296
1296

 被折叠的 条评论
为什么被折叠?
被折叠的 条评论
为什么被折叠?
 到【灌水乐园】发言


