


Netty
Netty是什么
Netty是由JBOSS提供的一个java开源框架, 是业界最流行的NIO框架,整合了多种协议(包括FTP、SMTP、HTTP等各种二进制文本协议)的实现经验,精心设计的框架,在多个大型商业项目中得到充分验证。
Netty源码
Netty官方文档
Netty应用场景
1、搜索引擎框架 ElasticSerach
2、Netty在Dubbo里面使用的地址

为什么要用Netty
1.为什么不用nio 而是去使用netty
1)nio使用困难: 协议切换,粘包问题。netty有流量控制 黑白名单等
2)bug nio有一个epoll,会占用cpu 100%空转。 jdk不修改bug,这时netty针对这个bug进行了判断,如果出现此bug则进行相应措施
	nio中 jdk12出现一个bug: Option not Fount  这个bug netty也进行了修复
3)nio的api使用: buffer 是final没办法扩容,并且只有一个指针。netty中有读写两个索引,同时还可以扩容。
              netty中提供了 FastThreadLocal 在并发场景下性能更好
			  netty切换协议方便,切换io模式 nio,bio,aio切换也方便
2为什么不使用Mina呢
其实mina和netty的作者是同一个人,我们问作者用哪个好,作者说netty是对mina的重塑 (rebuid)。
其他的rpc框架关注量没有netty的多,并且更新也不频繁,也就是说用java写的rpc也就netty和 mina最好了
其实netty是作者私人财产,mina是作者和另一个一起开发,所以说并不能说名netty比mina更好
Netty版本
netty会维护三个版本
3.0
4.0  性能好,
4.1  后支持安卓
5.0  废弃了 维护复杂,性能没有较大提升
基础知识
Echo服务
什么是Echo服务:就是一个应答服务(回显服务器),客户端发送什么数据,服务端就响应对应的数据 是一个非常有的用于调试和检测的服务;
五种I/O模型
Linux网络编程中的五种I/O模型:
1)阻塞式I/O;
2)非阻塞式I/O;
3)I/O复用(select,poll,epoll…);
4)信号驱动式I/O(SIGIO);
5)异步I/O(POSIX的aio_系列函数) Future-Listener机制;
Netty 支持的模式
下图说名 在不同平台使用不同类效果会更好,更加吹嘘出了作者懂两个系统

Netty如何切换IO模型,切换成 将Nio切换成Oio

Reactor模式:
1)单线程模式
服务端采用一个线程,创建一个selector来处理所有客户端的请求


2)多线程模式
服务端采用一个线程来处理所有的连接请求,将剩下的读写请求交给另一个线程池来处理


3)主从线程模式
上一种线程模型中接收连接请求的线程挂了,会导致服务端不可用,所以将接收连接请求的线程换成了线程池。


Netty线程模型
boss group 是一个线程组,用来处理连接请求
work group 也是一个线程组,主要用来处理读写请求
客户端请求首先交给boss group 处理连接请求,然后交给work group处理读写请求,在处理读写请求时通过pipeline获得channel通过handler中的逻辑进行处理

Netty如何设置reactor模型

粘包 半包
如何解决
固定长度:空间浪费,同时空间是否充足
分隔符:根据指定分隔符划分包,要扫描其中数据
固定长度字段,先读取长度然后再通过长度读取数据
通过json的括号判断,要扫描其中数据,浪费资源

Netty拆装包支持的类

Netty解码器的使用
第一次解码 首先要进行防止粘包的解码
第二次解码 然后根据字节数据 转换成java对象
序列化不能很好的集成多种语言
Protobuf 性能相对好,可读性差,最灵活
json可读行好,但是性能相对差。xml比json性能还要差
MessagePack 性能相对好,可读性差

Protobuf 使用
根据书写配置文件,然后使用文件生成java类

序列化和反序列化代码如下

Netty中的keepalive
为什么要用 keepalive

在传输层 通过tcp 参数来控制keepalive(传输层关注连接)

第一个参数 再7200没有数据传过来则做一次检测
第二个参数 下一个探测包时间
第三个参数 探测包总共9个
(也就是过了7200秒则会发送九个探测包,每个探测包的发送间隔时间时75秒)
发现时间大约在2个小时,时间长所以tcp 在传输层的 keepalive 默认关闭,同时要改linux参数不方便
在应用层 通过 Idle监测
在传输层keepalive 探测是一分钟发一条消息进行确认,那么百万连接则发很多信息。
Idle核心是为了减少keepalive 发送消息。
有些机器连接,不发送消息,只是连接那么会消耗资源,通过Idle判断让其断开连接

在netty中如何通过keepalive 进行检测呢
在netty 的服务端通过childOption方法进行设置如下参数,Option方法无效

netty开启Idel IdleStateHandler 中三个参数,通过这三个值的正负来开启不同Idle

Netty
NioEventLoopGroup
NioEventLoopGroup 方法中会创建指定个数个EventExecutor 接口的实现类 NioEventLoop。
在每个NioEventLoop 中都会创建一个 Seletor,同时每个NioEventLoop 中都会维护一个taskQueue和 一个 tailTaskQueue。
主要代码如下
protected MultithreadEventExecutorGroup(int nThreads, Executor executor,
                                        EventExecutorChooserFactory chooserFactory, Object... args) {
    if (nThreads <= 0) {
        throw new IllegalArgumentException(String.format("nThreads: %d (expected: > 0)", nThreads));
    }

    if (executor == null) {
       //创建线程工厂,通过线程工厂创建线程,用于设置线程的名字、线程优先级、是否是守护线程
       //将线程工厂给线程池ThreadPerTaskExecutor
       //线程池通过线程工程创建的线程执行command
       //threadFactory.newThread(command).start();
        executor = new ThreadPerTaskExecutor(newDefaultThreadFactory());
    }
    //根据 NioEventLoopGroup 构造方法看是否传入nThreads,有则使用
    //如果没有传入则从配置中取,
    //配置中没有配置的话,通过java虚拟机Runtime 获得系统核数
    //根据nThreads 创建指定的个数的 EventExecutor
    children = new EventExecutor[nThreads];

    for (int i = 0; i < nThreads; i ++) {
        boolean success = false;
        try {
            //为每个executor 中赋值,在每个对象中都创建一个 taskQueue
            children[i] = newChild(executor, args);
            success = true;
        } catch (Exception e) {
            // TODO: Think about if this is a good exception type
            throw new IllegalStateException("failed to create a child event loop", e);
        } finally {
            if (!success) {
                for (int j = 0; j < i; j ++) {
                    children[j].shutdownGracefully();
                }

                for (int j = 0; j < i; j ++) {
                    EventExecutor e = children[j];
                    try {
                        while (!e.isTerminated()) {
                            e.awaitTermination(Integer.MAX_VALUE, TimeUnit.SECONDS);
                        }
                    } catch (InterruptedException interrupted) {
                        // Let the caller handle the interruption.
                        Thread.currentThread().interrupt();
                        break;
                    }
                }
            }
        }
    }

    chooser = chooserFactory.newChooser(children);

    final FutureListener<Object> terminationListener = new FutureListener<Object>() {
        @Override
        public void operationComplete(Future<Object> future) throws Exception {
            if (terminatedChildren.incrementAndGet() == children.length) {
                terminationFuture.setSuccess(null);
            }
        }
    };

    for (EventExecutor e: children) {
        e.terminationFuture().addListener(terminationListener);
    }

    Set<EventExecutor> childrenSet = new LinkedHashSet<EventExecutor>(children.length);
    Collections.addAll(childrenSet, children);
    readonlyChildren = Collections.unmodifiableSet(childrenSet);
}
ServerBootstrap 的初始化
group方法
serverBootstrap.group(bossGroup,workGroup) 方法
将 bossGroup 参数赋值给父类 AbstractBootstrap的成员变量
将 workGroup 参数赋值给 ServerBootstrap 的成员变量
channel 方法
serverBootstrap.channel(NioServerSocketChannel.class) 方法
代码如下
public B channel(Class<? extends C> channelClass) {
    if (channelClass == null) {
        throw new NullPointerException("channelClass");
    }
    //channelFactory 对ReflectiveChannelFactory进行了静态代理
    return channelFactory(new ReflectiveChannelFactory<C>(channelClass));
}
public class ReflectiveChannelFactory<T extends Channel> implements ChannelFactory<T> {

    private final Class<? extends T> clazz;
    //将字节码赋值给成员变量
    public ReflectiveChannelFactory(Class<? extends T> clazz) {
        if (clazz == null) {
            throw new NullPointerException("clazz");
        }
        this.clazz = clazz;
    }

    @Override
    public T newChannel() {
        try {
            //创建根据字节码通过构造方法创建对象
            return clazz.getConstructor().newInstance();
        } catch (Throwable t) {
            throw new ChannelException("Unable to create Channel from class " + clazz, t);
        }
    }
}
NioServerSocketChannel初始化
public NioServerSocketChannel(ServerSocketChannel channel) {
    //传入感兴趣的事件  将serverSocketChannel设置成非阻塞的
    //同时创建一个ChannelPipeline
    super(null, channel, SelectionKey.OP_ACCEPT);
    //javaChannel().socket() 创建 ServerSocket
    //NioServerSocketChannelConfig 会创建 new AdaptiveRecvByteBufAllocator() 对象
    config = new NioServerSocketChannelConfig(this, javaChannel().socket());
}
下面来看下 AdaptiveRecvByteBufAllocator 对象,这个类是给 ServerSocket 设置指定缓冲区buffer的大小的
代码如下
public class AdaptiveRecvByteBufAllocator extends DefaultMaxMessagesRecvByteBufAllocator {
	static {
        List<Integer> sizeTable = new ArrayList<Integer>();
        for (int i = 16; i < 512; i += 16) {
            sizeTable.add(i);
        }

        for (int i = 512; i > 0; i <<= 1) {
            sizeTable.add(i);
        }

        SIZE_TABLE = new int[sizeTable.size()];
        for (int i = 0; i < SIZE_TABLE.length; i ++) {
            SIZE_TABLE[i] = sizeTable.get(i);
        }
    }

    @Override
    public Handle newHandle() {
        return new HandleImpl(minIndex, maxIndex, initial);
    }
}
接下来来看 Handle 的父类 MaxMessageHandle,在方法中有创建缓冲区的方法
public abstract class DefaultMaxMessagesRecvByteBufAllocator implements MaxMessagesRecvByteBufAllocator {
    public abstract class MaxMessageHandle implements ExtendedHandle {
        @Override
        public ByteBuf allocate(ByteBufAllocator alloc) {
            return alloc.ioBuffer(guess());
        }
}
option(key,value)
给boosGroup设置参数
childOption(key,value)
给workGroup设置参数
handler()
赋值给 ServerBootstrap 的父类 AbstractBootstrap 的成员变量
childHandler()
赋值给ServerBootstrap的成员变量
ServerBootstrap 的启动
bind方法
bind方法会返回 ChannelFuture 类型对象,此对象实现Future接口,
jdk中有FutureTask 类型接口也是继承了Future接口,
Netty中不使用FutureTask 而是创建一个新的接口ChannelFuture,ChannelFuture 到底提供了什么新功能呢?
首先FutureTask 中有isDone() 方法能确定任务是否执行完,但是不能判断执行的方法中有没有抛异常
而ChannelFuture 接口能判断是否有抛异常,同时还可以添加监听
ChannelFuture 接口的代码和 父接口 的代码合并后如下
public interface ChannelFuture extends Future<Void> {
    //是否执行成功
    boolean isSuccess();
    boolean isCancellable();
    Throwable cause();
    Channel channel();
    //添加一个监听,某些时刻所有的监听的固定实现方法会被调用
    @Override
    ChannelFuture addListeners(GenericFutureListener<? extends Future<? super Void>>... listeners);

    @Override
    ChannelFuture removeListener(GenericFutureListener<? extends Future<? super Void>> listener);

    @Override
    ChannelFuture sync() throws InterruptedException;
}
ChannelFuture 的执行状态
ChannelFuture 中线程执行完有两种状态,一种是Uncompleted正在运行,一种是Completed运行结束
如下图
正在运行时 ChannelFuture 获得状态的返回值,
运行结束时 (成功、失败、取消) ChannelFuture 获得的返回值
non-null 代表非空

bind 方法代码如下
    //我们一般这样调用bind方法
    ChannelFuture channelFuture = b.bind(ip,port).sync();
    //bind方法实现
    public ChannelFuture bind(String inetHost, int inetPort) {
        //首先根据ip 和端口创建 InetSocketAddress
        //然后调用bind方法
        return bind(SocketUtils.socketAddress(inetHost, inetPort));
    }
接下来我们来看bind方法会执行哪些主要代码
private ChannelFuture doBind(final SocketAddress localAddress) {
        final ChannelFuture regFuture = initAndRegister();
        final Channel channel = regFuture.channel();
        if (regFuture.cause() != null) {
            return regFuture;
        }

        if (regFuture.isDone()) {
            // At this point we know that the registration was complete and successful.
            ChannelPromise promise = channel.newPromise();
            doBind0(regFuture, channel, localAddress, promise);
            return promise;
        } else {
            // Registration future is almost always fulfilled already, but just in case it's not.
            final PendingRegistrationPromise promise = new PendingRegistrationPromise(channel);
            regFuture.addListener(new ChannelFutureListener() {
                @Override
                public void operationComplete(ChannelFuture future) throws Exception {
                    Throwable cause = future.cause();
                    if (cause != null) {
                        // Registration on the EventLoop failed so fail the ChannelPromise directly to not cause an
                        // IllegalStateException once we try to access the EventLoop of the Channel.
                        promise.setFailure(cause);
                    } else {
                        // Registration was successful, so set the correct executor to use.
                        // See https://github.com/netty/netty/issues/2586
                        promise.registered();

                        doBind0(regFuture, channel, localAddress, promise);
                    }
                }
            });
            return promise;
        }
    }
首先分析 initAndRegister 方法
final ChannelFuture initAndRegister() {
    Channel channel = null;
    try {
        //根据channelFactory创建NioServerSocketChannel 对象
        //在NioServerSocketChannel 中会创建一个非阻塞的ServerSocketChannel
        //同时在NioServerSocketChannel 还维护一个 ChannelPipeline
        channel = channelFactory.newChannel();
        init(channel);
    } catch (Throwable t) {
        if (channel != null) {
            // channel can be null if newChannel crashed (eg SocketException("too many open files"))
            channel.unsafe().closeForcibly();
            // as the Channel is not registered yet we need to force the usage of the GlobalEventExecutor
            return new DefaultChannelPromise(channel, GlobalEventExecutor.INSTANCE).setFailure(t);
        }
        // as the Channel is not registered yet we need to force the usage of the GlobalEventExecutor
        return new DefaultChannelPromise(new FailedChannel(), GlobalEventExecutor.INSTANCE).setFailure(t);
    }

    ChannelFuture regFuture = config().group().register(channel);
    if (regFuture.cause() != null) {
        if (channel.isRegistered()) {
            channel.close();
        } else {
            channel.unsafe().closeForcibly();
        }
    }
    return regFuture;
}
接下来分析 init 方法,代码如下
 void init(Channel channel) throws Exception {
        //获得成员变量中 option 设置的参数属性
        final Map<ChannelOption<?>, Object> options = options0();
        synchronized (options) {
            //将option参数设置到channel中
            setChannelOptions(channel, options, logger);
        }

        final Map<AttributeKey<?>, Object> attrs = attrs0();
        synchronized (attrs) {
            for (Entry<AttributeKey<?>, Object> e: attrs.entrySet()) {
                //将attr参数设置到channel中
                @SuppressWarnings("unchecked")
                AttributeKey<Object> key = (AttributeKey<Object>) e.getKey();
                channel.attr(key).set(e.getValue());
            }
        }

        ChannelPipeline p = channel.pipeline();

        final EventLoopGroup currentChildGroup = childGroup;
        final ChannelHandler currentChildHandler = childHandler;
        final Entry<ChannelOption<?>, Object>[] currentChildOptions;
        final Entry<AttributeKey<?>, Object>[] currentChildAttrs;
        synchronized (childOptions) {
            currentChildOptions = childOptions.entrySet().toArray(newOptionArray(0));
        }
        synchronized (childAttrs) {
            currentChildAttrs = childAttrs.entrySet().toArray(newAttrArray(0));
        }
        //往 channelpipline 中添加 channelHandler
        p.addLast(new ChannelInitializer<Channel>() {
            @Override
            public void initChannel(final Channel ch) throws Exception {
                final ChannelPipeline pipeline = ch.pipeline();
                //将 serverBootstrap 的handler 方法添加的handler 注册到pipeline上
                ChannelHandler handler = config.handler();
                if (handler != null) {
                    pipeline.addLast(handler);
                }

                ch.eventLoop().execute(new Runnable() {
                    @Override
                    public void run() {
                        pipeline.addLast(new ServerBootstrapAcceptor(
                                ch, currentChildGroup, currentChildHandler, currentChildOptions, currentChildAttrs));
                    }
                });
            }
        });
    }
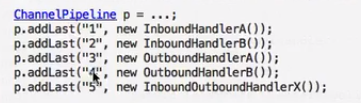
先看下 ChannelPipline 接口吧,ChannelPipline 中存储了多个ChannelHandler
接口上的注释如下
 *                                                      |
 *  +---------------------------------------------------+---------------+
 *  |                           ChannelPipeline         |               |
 *  |                                                  \|/              |
 *  |    +---------------------+            +-----------+----------+    |
 *  |    | Inbound Handler  N  |            | Outbound Handler  1  |    |
 *  |    +----------+----------+            +-----------+----------+    |
 *  |              /|\                                  |               |
 *  |               |                                  \|/              |
 *  |    +----------+----------+            +-----------+----------+    |
 *  |    | Inbound Handler N-1 |            | Outbound Handler  2  |    |
 *  |    +----------+----------+            +-----------+----------+    |
 *  |              /|\                                  .               |
 *  |               .                                   .               |
 *  | ChannelHandlerContext.fireIN_EVT() ChannelHandlerContext.OUT_EVT()|
 *  |        [ method call]                       [method call]         |
 *  |               .                                   .               |
 *  |               .                                  \|/              |
 *  |    +----------+----------+            +-----------+----------+    |
 *  |    | Inbound Handler  2  |            | Outbound Handler M-1 |    |
 *  |    +----------+----------+            +-----------+----------+    |
 *  |              /|\                                  |               |
 *  |               |                                  \|/              |
 *  |    +----------+----------+            +-----------+----------+    |
 *  |    | Inbound Handler  1  |            | Outbound Handler  M  |    |
 *  |    +----------+----------+            +-----------+----------+    |
 *  |              /|\                                  |               |
 *  +---------------+-----------------------------------+---------------+
 *                  |                                  \|/
 *  +---------------+-----------------------------------+---------------+
 *  |               |                                   |               |
 *  |       [ Socket.read() ]                    [ Socket.write() ]     |
 *  |                                                                   |
 *  |  Netty Internal I/O Threads (Transport Implementation)            |
 *  +-------------------------------------------------------------------+
如下图,
入栈顺序为从上到下为 125
出栈顺序为从下向上 543
Netty源码分析
Netty的启动
一、创建EventLoopGroup
EventLoopGroup 中有多个 EventLoop,在EventLoop 中会创建一个Selector,和一个TaskQueue
二、创建ServerBootstrap
将Channel 、Option、Handler 绑定到ServerBootstrap 上
三、调用ServerBootstrap 的bind方法
3.1) 根据ip和port创建一个SocketAddress
3.2)初始化并且注册
-----初始化
通过反射创建Channel (NioServerSocketChannel)
将ServerBootstrap 中的Option参数、AttributeKey参数 添加到channel中
将配置给ServerBootstrap 的Handler 和 ServerBootstrapAcceptor 添加给 channel 的 ChannelPipeline, ServerBootstrapAcceptor 用于接收请求。
----注册
将 Channel 包装成 DefaultChannelPromise,然后根据算法获得一个eventLoop,如果当前线程是eventLoop中的线程则直接将channel注册到eventLoop的selector上,否则本线程通过eventLoop的excute方法将channel注册到selector上的任务添加到eventLoop的taskQueue中,然后通过startThread 方法调用dostartThread 方法通过eventLoop中的线程开启eventLoop的run方法。
注册成功后返回ChannelFuture 对象
3.3)绑定
首先将channel绑定SocketAddress 的行为添加到eventLoop的taskQueue中。
通过执行taskQueue中的事件调用DefaultChannelPipeline 的bind方法,bind方法中会调用很多handler中的bind方法,主要有HeadContext类的bind方法,然后调用AbstractChannel的bind方法 会将 SocketAddress绑定到channel,然后通过eventLoop的taskQueue执行 pipline 的fireChannelActive方法,然后获得感兴趣的事件将事件注册给SelectKey对象。
Netty构建连接(boss如何将任务分配给worker的)
在服务端启动完成,客户端建立连接请求时
代码执行流程如下
NioEventLoop 的 run 方法 接收请求
	processSelectedKeys(); 处理请求
		processSelectedKeysOptimized(); 不使用jdk中的方法,提高性能
			processSelectedKey(k, (AbstractNioChannel) a); k参数是selectedKeys、a参数是ServerSocketChannel
			    unsafe.read(); 如果请求selectedKeys中的参数是SelectionKey.OP_ACCEPT (连接请求则调用) 则调用此方法
AbstractNioMessageChannel 的 read()
	doReadMessages(readBuf) 根据ServerSocketChannel创建 SocketChannel然后添加到readBuf中
	pipeline.fireChannelRead(readBuf.get(i)) 调用所有handler的ChannelRead方法
	pipeline.fireChannelReadComplete();      所有的Handler都执行完了ChannelRead方法后执行
	pipeline.fireExceptionCaught(exception); 报错的时候执行
接下来重点分析下 pipeline.fireChannelRead(readBuf.get(i))
DefaultChannelPipeline fireChannelRead();
	AbstractChannelHandlerContext  invokeChannelRead()
		executor.invokeChannelRead(m);
		((ChannelInboundHandler) handler()).channelRead(this, msg);  this的channelRead方法
			ServerBootStrap 的 channelRead()
			childGroup.register(child)  child参数是SocketChannel、childGoup 是worker线程池
			EmbeddedEventLoop register(Channel)
				promise.channel().unsafe().register(this, promise);
					AbstractChannel register(eventLoop,ChannelPromise)
					register0(promise);
						doRegister();
							selectionKey = javaChannel().register(eventLoop().unwrappedSelector(), 0, this); 将SocketChannel注册到workerGroup上
						pipeline.fireChannelActive();
							((ChannelInboundHandler) handler()).channelActive(this);
								HeadContext  channelActive()
								   readIfIsAutoRead()
										pipeline.read();
											HeadContext  read()
												AbstractNioChannel	doBeginRead()
													selectionKey.interestOps(interestOps | readInterestOp); 对SocketChannel的selectionKey注册感兴趣的事件, 这里注册selectionKey.OP_READ事件
Netty接收信息
还是要从 EventLoop 的 run方法开始分析
ch =selectedKeys.attachment(); //接收到了请求,可以通过请求获得SocketChannel
eventLoop = ch.eventLoop(); //在SocketChannel 中为什么会有eventLoop,这是在什么时候初始化的

//下面代码说明 读请求和 连接请求 使用同一个方法
if ((readyOps & (SelectionKey.OP_READ | SelectionKey.OP_ACCEPT)) != 0 || readyOps == 0) {
	//每一个channel中绑定一个unsafe对象
	//ServerSocketChannel 和 SocketChannel中的 unsafe对象不同
	//ServerSocketChannel 中unsafe对象是  NioMessageUnsafe
	//SocketChannel 中unsafe对象是 AbstractNioByteChannel
    unsafe.read();
}
由于是接收请求,使用的SocketChannel,所以接下来分析AbstractNioByteChannel 中的read方法
byteBuf = allocHandle.allocate(allocator);
	alloc.ioBuffer(guess())    //创建byteBuf 猜测buffer大小
pipeline.fireChannelRead(byteBuf);  //传入byteBuf 信息,调用所有handler的channelRead方法
pipeline.fireChannelReadComplete(); //
接收信息处理
主要代码就这 pipeline.fireChannelRead(byteBuf);
分析如下
DefaultChannelPipeline类中 fireChannelRead方法
   AbstractChannelHandlerContext.invokeChannelRead(head, msg); //其中head参数 是HeadContext对象,msg参数 是接收的byteBuf
AbstractChannelHandlerContext类中  fireChannelRead方法
   invokeChannelRead(final AbstractChannelHandlerContext next, Object msg) //next是HeadContext
		 next.invokeChannelRead(m);
HeadContext 类中  channelRead 方法
		ctx.fireChannelRead(msg); //这个handler中channelRead 方法最后一句话是这个,为了执行下一个handler,如果不想继续执行下一个handler则不用写这句话
AbstractChannelHandlerContext类中  fireChannelRead方法
		invokeChannelRead(findContextInbound(MASK_CHANNEL_READ), msg);
			findContextInbound(MASK_CHANNEL_READ) //找到下一个handler
				next.invokeChannelRead(m); //然后循环执行每个handler
Netty写数据
netty中有三种方式写数据方式
ChannelHandlerContext.write();  //将数据写到buffer中
ChannelHandlerContext.flush();  //将buffer中的数据发送
ChannelHandlerContext.writeAndFlush(); //将数据写到buffer中立刻发送数据
ChannelHandlerContext.channel().writeAndFlush(); //这种方法不建议使用
//因为这样会走所有的handler,容易造成死循环
//在服务端可以使用,但是不建议在handler中使用
//在服务端可以channelFuture.channel().writeAndFlush()
netty中创建bytebuf
ChannelHandlerContext.alloc().buffer(size);// 建议使用这种方法创建,否则对象可能不会被回收
Netty中的handler
在使用netty时候要用到很多handler,每个handler处理不同事情,要有哪些handler呢?
1.防止粘包半包的handler
2.将字节码转换成java对象,或将对象转换成字节码
3.非对称加密 翻译
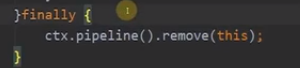
4.黑白名单拦截、授权(授权成功后移除此handler)、心跳检测
5.日志打印handler
6.客户端响应式处理(客户端发送数据后,接收服务端返回数据找到原来的阻塞线程)
7.业务逻辑处理
在使用handler的时候,有些handler要做成共享的,有些handler要做成非共享的
日志打印就要做成共享的
1.防止粘包半包的handler
2.将字节码转换成java对象,或将对象转换成字节码
3.非对称加密 翻译
4.黑白名单拦截、授权(授权成功后移除此handler)、心跳检测
5.日志打印handler
Netty中提供了日志打印handler为LoggingHandler
初始化时候选用日志打印类型,如果没有提供相对应的jar包也不会报错,因有如下pom文件
<dependency>
  <groupId>log4j</groupId>
  <artifactId>log4j</artifactId>
  <optional>true</optional>
</dependency>
LoggingHandler 初始化时选用对应打印日志的类
private static InternalLoggerFactory newDefaultFactory(String name) {
    InternalLoggerFactory f;
    try {
        f = new Slf4JLoggerFactory(true);
        f.newInstance(name).debug("Using SLF4J as the default logging framework");
    } catch (Throwable ignore1) {
        try {
            f = Log4J2LoggerFactory.INSTANCE;
            f.newInstance(name).debug("Using Log4J2 as the default logging framework");
        } catch (Throwable ignore2) {
            try {
                f = Log4JLoggerFactory.INSTANCE;
                f.newInstance(name).debug("Using Log4J as the default logging framework");
            } catch (Throwable ignore3) {
               //最后选用jdk的
                f = JdkLoggerFactory.INSTANCE;
                f.newInstance(name).debug("Using java.util.logging as the default logging framework");
            }
        }
    }
    return f;
}
日志handler的使用
首先共享handler上必须要有这个注解

创建一个对象直接添加到pipeline上即可
LoggingHandler loggingHandler=new LoggingHandler(LogLevel.INFO);
 pipeline.addLast(loggingHandler);
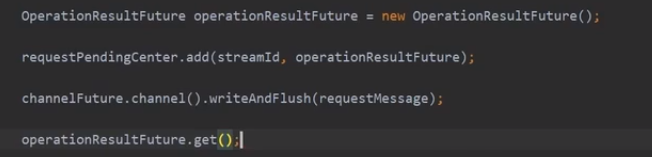
6.客户端响应处理
首先创建一个future

通过id来区分future

客户端再发送信息的时候通过handler将id和发送对象添加到map中,同时通过get()方法阻塞返回对应对象
7.业务逻辑处理handler
常用的有SimpleChannelInboundHandler 和 ChannelOutboundHandler
SimpleChannelInboundHandler 如果接收参数和泛型类型相同则执行此handler的方法否则跳过
本handler会自动释放byteBuf
同时会自动跳到下一个handler
@Override
public void channelRead(ChannelHandlerContext ctx, Object msg) throws Exception {
    boolean release = true;
    try {
        //判断此handler接收的信息是否符合泛型
        if (acceptInboundMessage(msg)) {
            I imsg = (I) msg;
            //执行本handler的channelRead0 方法
            channelRead0(ctx, imsg);
        } else {
            release = false;
            //不符合则执行下一个handler
            ctx.fireChannelRead(msg);
        }
    } finally {
        if (autoRelease && release) {
            //自动帮我们是否bytebuf
            ReferenceCountUtil.release(msg);
        }
    }
}
Netty的Option参数配置
首先看下linux中有哪些参数要进行配置
1.最大打开文件数
每建立一个连接就要被动开放一个端口,这是服务端要设置最大开启端口数量,也就是最大文件数
ulimit -n [xxx] 设置数量,只对本用户有效,重启失效


 87
87


 被折叠的 条评论
为什么被折叠?
被折叠的 条评论
为什么被折叠?
 到【灌水乐园】发言


