


一、Bootchart简介
Bootchart官网http://www.bootchart.org,已经很久没有更新了。
Bootchart的目的是将启动阶段的性能可视化(Boot Process Performance Visualization)。具体做法是在启动阶段通过采样/proc文件系统来搜集启动阶段的信息(如CPU负载,进程信息,磁盘访问等),然后通过另外的工具将搜集到的数据以可视化的方式进行输出。
因此,bootchart分为两个部分:
- 采样程序
bootchartd,系统启动后的第一个进程,采样并搜集启动过程中的/proc数据,启动完成后将采样数据压缩存放到/var/log/bootchart/bootlog.tgz文件中 - 外部工具
pybootchartgui,处理bootlog.tgz文件,输出为图片
- 对于
PC,系统会在启动完成后自动生成bootlog.png文件 - 对于嵌入式系统,需要将
bootlog.tgz导出到PC上进行处理
- 对于
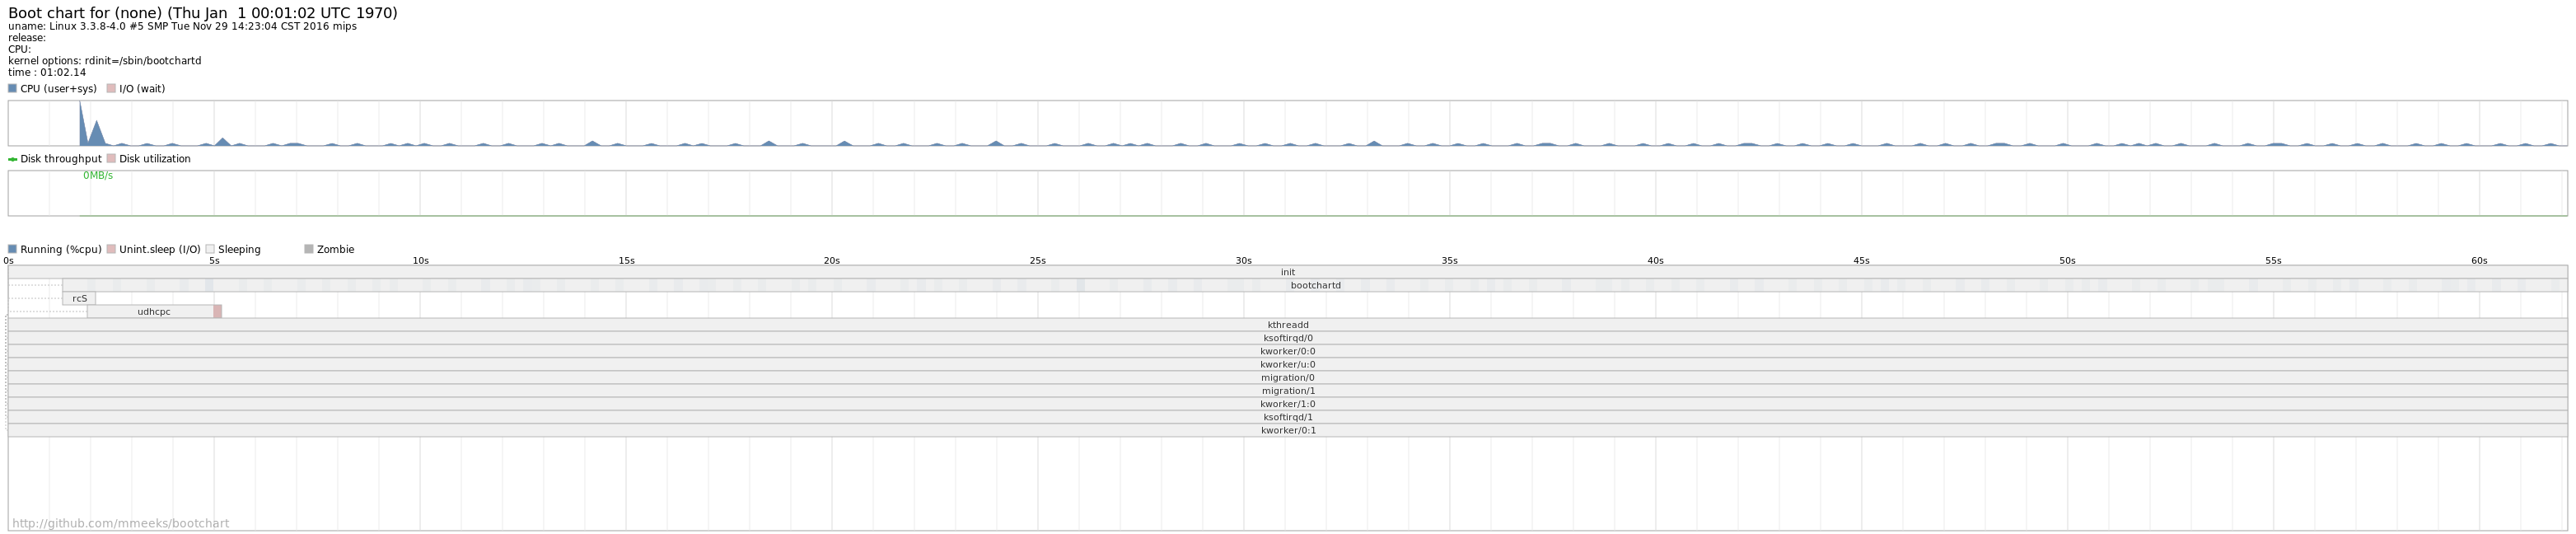
下图是一个嵌入式系统上的bootchart输出的示例图片:
 bootchart示例输出” title=”“>
我在虚拟机上安装bootchart并抓取了启动过程数据,点这里查看Ubuntu 12.04启动后生成的图片。
在bootchart生成的图像中,可以清楚的看到启动过程中CPU负载、磁盘吞吐和各进程实时的情况。
二、Bootchart配置
Busybox从v1.17版本开始引入bootchartd。
相比PC,嵌入式系统没有完备的Bootchart工具,启动过程中采样的数据需要导出在PC上进行处理。
Busybox上通过执行make menuconfig配置bootchartd,具体位置如下:
ygu@ubuntu:/opt/work/busybox$ make menuconfig

    Busybox Settings   --->
--- Applets
    ...
    Init Utilities   --->
        [*] bootchartd
        [*]   Compatible, bloated header
        [*]   Support bootchartd.conf
    ...
- 1
- 2
- 3
- 4
- 5
- 6
- 7
- 8
- 9
- 10

默认设置打开所有bootchartd设置:
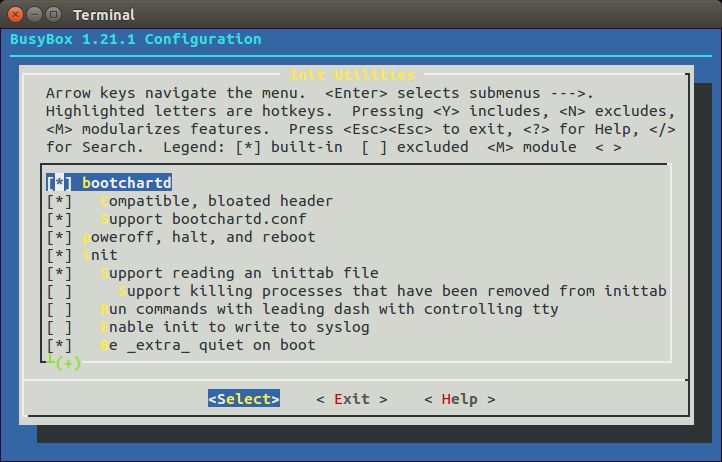 Busybox中
bootchartd的配置” title=”“>
设置总共有3项:
- 选项
[*] bootchartd,设置[BOOTCHARTD =y],是bootchart功能开关 - 选项
[*] Compatible, bloated header,设置[FEATURE_BOOTCHARTD_BLOATED_HEADER =y],设置后bootchartd会生成一个包含类似如下信息的header文件:
version = 0.8
title = Boot chart for (none) (Thu Jan  1 00:01:05 UTC 1970)
system.uname = Linux 3.3.8-4.0 #6 SMP Tue Nov 29 14:23:14 CST 2016 mips
system.kernel.options = ubiroot init=/sbin/bootchartd ubi.mtd=rootfs rootfstype=ubifs root=ubi0:rootfs
- 1
- 2
- 3
- 4
- 选项
[*] Support bootchartd.conf,设置[FEATURE_BOOTCHARTD_CONFIG_FILE =y],设置后bootchartd启动时会尝试读取并解析配置文件/etc/bootchartd.conf,配置文件的格式类似如下:
#
# supported options:
#

# Sampling period (in seconds)
SAMPLE_PERIOD=0.2

#
# not yet supported:
#

# tmpfs size
# (32 MB should suffice for ~20 minutes worth of log data, but YMMV)
TMPFS_SIZE=32m

# Whether to enable and store BSD process accounting information.  The
# kernel needs to be configured to enable v3 accounting
# (CONFIG_BSD_PROCESS_ACCT_V3). accton from the GNU accounting utilities
# is also required.
PROCESS_ACCOUNTING="no"

# Tarball for the various boot log files
BOOTLOG_DEST=/var/log/bootchart.tgz

# Whether to automatically stop logging as the boot process completes.
# The logger will look for known processes that indicate bootup completion
# at a specific runlevel (e.g. gdm-binary, mingetty, etc.).
AUTO_STOP_LOGGER="yes"

# Whether to automatically generate the boot chart once the boot logger
# completes.  The boot chart will be generated in $AUTO_RENDER_DIR.
# Note that the bootchart package must be installed.
AUTO_RENDER="no"
- 1
- 2
- 3
- 4
- 5
- 6
- 7
- 8
- 9
- 10
- 11
- 12
- 13
- 14
- 15
- 16
- 17
- 18
- 19
- 20
- 21
- 22
- 23
- 24
- 25
- 26
- 27
- 28
- 29
- 30
- 31
- 32
- 33
从busybox中bootchartd实现的代码来看,仅支持SAMPLE_PERIOD和SAMPLE_PERIOD两个选项。当然,也可以不用设置/etc/bootchartd.conf而使用代码中默认的设置。
三、Bootchart运行
bootchart的帮助信息:
Usage: bootchartd start [PROG ARGS]|stop|init

Options:
start: start background logging; with PROG, run PROG, then kill logging with USR1
stop: send USR1 to all bootchartd processes
init: start background logging; stop when getty/xdm is seen (for init scripts)
Under PID 1: start background logging, then execute $bootchart_init, /init, /sbin/init
This makes it possible to start bootchartd even before init by booting kernel with:
init=/sbin/bootchartd bootchart_init=/path/to/regular/init
- 1
- 2
- 3
- 4
- 5
- 6
- 7
- 8
- 9
从帮助信息可见bootchartd有两个用途:
linux启动时运行用于采样linux启动过程中的各项数据- 启动完成后运行,用于监测系统或指定应用程序
1. linux启动时运行
这是使用最多的方式,在linux启动的命令行中指定/sbin/bootchartd为init进程。
带
initramfs的系统,需要在命令行指定rdinit
rdinit=/sbin/bootchartd非
initramfs的系统,需要在命令行指定init
init=/sbin/bootchartd
linux启动中,会用/sbin/bootchartd创建第一个进程,然后在bootchartd中再fork一个真正的init进程。如果在启动的同时通过命令行指定了bootchart_init参数,则用这个参数指定的程序用于fork生成的init进程,否则依次使用默认的/init或/sbin/init作为init进程。如:
init=/sbin/bootchartd bootchart_init=/path/to/regular/init
以下是我在博通7583参考平台上使用带文件系统的kernel启动的log:
CFE>
CFE> boot -z -elf 192.168.1.95:7584a0/vmlinuz-initrd-7584a0 'rdinit=/sbin/bootchartd quiet'
Loader:elf Filesys:tftp Dev:eth0 File:192.168.1.95:7584a0/vmlinuz-initrd-7584a0 Options:rdinit=/sbin/bootchartd quiet
Loading: 0x80001000/11957248 0x80b68400/110224 Entry address is 0x8045f360
Closing network.
Starting program at 0x8045f360

Linux version 3.3.8-4.0 (ygu@fs-ygu) (gcc version 4.5.4 (Broadcom stbgcc-4.5.4-2.9) ) #5 SMP Tue Nov 29 14:23:04 CST 2016
Fetching vars from bootloader... found 14 vars.
Options: moca=0 sata=1 pcie=0 usb=1
Using 512 MB + 0 MB RAM (from CFE)
bootconsole [early0] enabled
CPU revision is: 0002a065 (Broadcom BMIPS4380)
FPU revision is: 00130001
Determined physical RAM map:
 memory: 10000000 @ 00000000 (usable)
 memory: 10000000 @ 20000000 (usable)
No PHY detected, not registering interface:1
starting pid 429, tty '': '/etc/init.d/rcS'
Mounting virtual filesystems
Starting mdev
* WARNING: THIS STB CONTAINS GPLv3 SOFTWARE
* GPLv3 programs must be removed in order to enable security.
* See: http://www.gnu.org/licenses/gpl-faq.html#Tivoization
Configuring eth0 interface
Configuring lo interface
Starting network services
starting pid 459, tty '': '/bin/cttyhack /bin/sh -l'
#
# shell-init: error retrieving current directory: getcwd: cannot access parent directories: Success
#
# ls -lh /var/log/
-rw-r--r--    1 root     root       28.9K Jan  1 00:01 bootlog.tgz
#
- 1
- 2
- 3
- 4
- 5
- 6
- 7
- 8
- 9
- 10
- 11
- 12
- 13
- 14
- 15
- 16
- 17
- 18
- 19
- 20
- 21
- 22
- 23
- 24
- 25
- 26
- 27
- 28
- 29
- 30
- 31
- 32
- 33
- 34
可以看到,系统启动完成后会在/var/log目录下生成bootlog.tgz文件(PC上采样的数据文件位于/var/log/bootchartd/目录下)。将文件/var/log/bootlog.tgz复制到PC上备用。
在主机上安装bootchart工具,安装的同时还会安装pybootchartgui用于将采集的数据转换为图片。
ygu@ubuntu:~$ sudo apt-get install bootchart
[sudo] password for ygu:
Reading package lists... Done
Building dependency tree
Reading state information... Done
The following NEW packages will be installed:
  bootchart
0 upgraded, 1 newly installed, 0 to remove and 0 not upgraded.
Need to get 0 B/11.0 kB of archives.
After this operation, 127 kB of additional disk space will be used.
Selecting previously unselected package bootchart.
(Reading database ... 170788 files and directories currently installed.)
Unpacking bootchart (from .../bootchart_0.90.2-8ubuntu1_i386.deb) ...
Processing triggers for ureadahead ...
Setting up bootchart (0.90.2-8ubuntu1) ...
update-initramfs: Generating /boot/initrd.img-3.13.0-32-generic
ygu@ubuntu:~$ scp ygu@192.168.1.95:/opt/bootchartd/bootlog.tgz work/bootchart
bootlog.tgz                                   100%   29KB  29.3KB/s   00:00
ygu@ubuntu:~$ cd work/bootchart
- 1
- 2
- 3
- 4
- 5
- 6
- 7
- 8
- 9
- 10
- 11
- 12
- 13
- 14
- 15
- 16
- 17
- 18
- 19
使用pybootchartgui处理bootlog.tgz:
ygu@ubuntu:~/work/bootchart$ ls -lh
total 32K
-rw-r--r-- 1 ygu ygu 30K Dec  1 10:28 bootlog.tgz
ygu@ubuntu:~/work/bootchart$
ygu@ubuntu:~/work/bootchart$ pybootchartgui bootlog.tgz
parsing 'bootlog.tgz'
parsing 'header'
parsing 'proc_diskstats.log'
parsing 'proc_ps.log'
warning: no parent for pid '2' with ppid '0'
parsing 'proc_stat.log'
merged 0 logger processes
pruned 29 process, 0 exploders, 0 threads, and 0 runs
False
Traceback (most recent call last):
  File "/usr/bin/pybootchartgui", line 23, in <module>
    sys.exit(main())
  File "/usr/lib/pymodules/python2.7/pybootchartgui/main.py", line 137, in main
    render()
  File "/usr/lib/pymodules/python2.7/pybootchartgui/main.py", line 128, in render
    batch.render(writer, res, options, filename)
  File "/usr/lib/pymodules/python2.7/pybootchartgui/batch.py", line 41, in render
    draw.render(ctx, options, *res)
  File "/usr/lib/pymodules/python2.7/pybootchartgui/draw.py", line 256, in render
    curr_y = draw_header(ctx, headers, off_x, duration)
  File "/usr/lib/pymodules/python2.7/pybootchartgui/draw.py", line 340, in draw_header
    txt = headertitle + ': ' + mangle(headers.get(headerkey))
TypeError: cannot concatenate 'str' and 'NoneType' objects
ygu@ubuntu:~/work/bootchart$
- 1
- 2
- 3
- 4
- 5
- 6
- 7
- 8
- 9
- 10
- 11
- 12
- 13
- 14
- 15
- 16
- 17
- 18
- 19
- 20
- 21
- 22
- 23
- 24
- 25
- 26
- 27
- 28
- 29
如上,由于Ubuntu版本的pybootchartgui不能解析busybox上的bootchart数据,所以这里出现了错误,需要用另外一个版本bootchart2的工具来处理。
用git下载bootchart2后需要执行make后才能使用pybootchartgui:
ygu@ubuntu:~/work/bootchart$ git clone https://github.com/xrmx/bootchart.git
Cloning into 'bootchart'...
remote: Counting objects: 2560, done.
remote: Total 2560 (delta 0), reused 0 (delta 0), pack-reused 2560
Receiving objects: 100% (2560/2560), 1.79 MiB | 228 KiB/s, done.
Resolving deltas: 100% (1600/1600), done.
ygu@ubuntu:~/work/bootchart$ cd bootchart/
ygu@ubuntu:~/work/bootchart/bootchart$ make
cc -g -Wall -O0  -pthread \
        -DEARLY_PREFIX='""' \
        -DLIBDIR='"/lib"' \
        -DPKGLIBDIR='"/lib/bootchart"' \
        -DPROGRAM_PREFIX='""' \
        -DPROGRAM_SUFFIX='""' \
        -DVERSION='"0.14.8"' \
         \
        -c collector/collector.c -o collector/collector.o
...
cc -g -Wall -O0  -pthread -Icollector -o bootchart-collector collector/collector.o collector/output.o collector/tasks.o collector/tasks-netlink.o collector/dump.o
sed -s -e "s:@LIBDIR@:/lib:g" -e "s:@PKGLIBDIR@:/lib/bootchart:" -e "s:@PROGRAM_PREFIX@::" -e "s:@PROGRAM_SUFFIX@::" -e "s:@EARLY_PREFIX@::" -e "s:@VER@:0.14.8:" bootchartd.in > bootchartd
...
sed -s -e "s:@LIBDIR@:/lib:g" -e "s:@PKGLIBDIR@:/lib/bootchart:" -e "s:@PROGRAM_PREFIX@::" -e "s:@PROGRAM_SUFFIX@::" -e "s:@EARLY_PREFIX@::" -e "s:@VER@:0.14.8:" pybootchartgui/main.py.in > pybootchartgui/main.py
ygu@ubuntu:~/work/bootchart/bootchart$
- 1
- 2
- 3
- 4
- 5
- 6
- 7
- 8
- 9
- 10
- 11
- 12
- 13
- 14
- 15
- 16
- 17
- 18
- 19
- 20
- 21
- 22
- 23
如果不编译,直接调用pybootchartgui会出现找不到main函数的错误:
ygu@ubuntu:~/work/bootchart$ ./bootchart/pybootchartgui.py bootlog.tgz
Traceback (most recent call last):
  File "./bootchart/pybootchartgui.py", line 20, in <module>
    from pybootchartgui.main import main
ImportError: No module named main
ygu@ubuntu:~/work/bootchart$
- 1
- 2
- 3
- 4
- 5
- 6
编译完成后,再次调用pybootchartgui.py处理bootlog.tgz:
ygu@ubuntu:~/work/bootchart$ ./bootchart/pybootchartgui.py bootlog.tgz
parsing 'bootlog.tgz'
parsing 'header'
parsing 'proc_diskstats.log'
parsing 'proc_ps.log'
parsing 'proc_stat.log'
merged 0 logger processes
pruned 29 process, 0 exploders, 0 threads, and 0 runs
bootchart written to 'bootchart.png'
ygu@ubuntu:~/work/bootchart$ ls -lh
total 96K
drwxr-xr-x 6 ygu ygu 4.0K Dec  1 10:45 bootchart
-rw-rw-r-- 1 ygu ygu  59K Dec  1 10:46 bootchart.png
-rw-r--r-- 1 ygu ygu  30K Dec  1 10:28 bootlog.tgz
ygu@ubuntu:~/work/bootchart$
- 1
- 2
- 3
- 4
- 5
- 6
- 7
- 8
- 9
- 10
- 11
- 12
- 13
- 14
- 15
将采集的数据转换为图片bootchart.png了,如下:
 bootlog.tgz的可视化图片” title=”“>
由于这里整个linux系统启动的任务比较简单,所以从bootchart.png上可见的任务也较少,这里寄希望于bootchart的结果来进行启动时间优化还是有些难度。
2. 监测系统或应用程序的运行情况
用于监测运行情况时需要给bootchartd指定参数,start参数开始监测,stop参数停止监测。
不过,系统启动后可以监测的手段较多,bootchartd工具并不是最优选择,非本文的介绍重点,暂略。
四、结论
Bootchart的原理和使用都比较简单,输出也比较直观,通过采样数据并处理生成的图片对整个启动系统形成总览,包括CPU在启动各时间段的负载和磁盘的吞吐情况,也呈现了启动过程中各进程的先后顺序和持续时间。但是在嵌入式系统中,CPU能力普遍不强,Bootchartd本身采样的开销也比较客观,甚至连日志输出的打包也会占用不少时间。另外,由于bootchartd启动上替代了init进程,因此在init进程启动之前的部分,bootchartd也无法反应。


 238
238

 被折叠的 条评论
为什么被折叠?
被折叠的 条评论
为什么被折叠?
 到【灌水乐园】发言


