


Seata分布式事务整合
- 关于seata的官方文档
- seata-server的服务部署(Linux上docker部署与Windows)
- 进入Nacos控制台,创建seata命名空间,记住命名空间ID自定义为seata_namespace_id

- Seata数据库创建
创建数据库名为seata,执行Seata的Github官方源码中提供的的MySQL数据库脚本
MySQL脚本地址:
https://github.com/seata/seata/blob/1.4.2/script/server/db/mysql.sql
1. Linux(docker部署)
-
查看seata版本-seata-server版本查询

-
这里选用1.4.2版本来部署(在seata1.4.2后才可以使用dataId = "seataServer.properties"的方式读取配置信息),获取版本镜像
docker pull seataio/seata-server:1.4.2
- 启动临时容器
docker run -d --name seata -p 8091:8091 seataio/seata-server
- 获取配置文件 registry.conf ,存放在指定路径下便于修改
    mkdir /opt/seata
    docker cp seata:/seata-server/resources/registry.conf  /opt/seata
- 修改指定路径下registry.conf
registry {
  type = "nacos"
  loadBalance = "RandomLoadBalance"
  loadBalanceVirtualNodes = 10

  nacos {
    application = "seata-server"
    serverAddr = "127.0.0.1:8848"
    namespace = "seata_namespace_id"
    group = "SEATA_GROUP"
    cluster = "default"
  }
}
config {
  type = "nacos"

  nacos {
    serverAddr = "127.0.0.1:8848"
    namespace = "seata_namespace_id"
    group = "SEATA_GROUP"
  }
}
- 修改好 registry.conf 之后,删除临时容器
docker rm -f seata
- 接下来着手开始推送Seata依赖配置至Nacos
从Seata的GitHub官方源码获取配置文件(config.txt)和推送脚本文件(nacos/nacos-config.sh)
地址:https://github.com/seata/seata/blob/develop/script/config-center
- 文件存放指定目录如下
/opt/seata
├── config.txt
└── nacos
    └── nacos-config.sh
修改配置文件 config.txt
service.vgroupMapping.mall_tx_group=default

store.mode=db
store.db.driverClassName=com.mysql.cj.jdbc.Driver
store.db.url=jdbc:mysql://xxx.xxx.xxx:3306/seata?useUnicode=true&rewriteBatchedStatements=true
store.db.user=root
store.db.password=root
- 推送配置文件到nacos(1.命令直接推送,配置文件为一条一条,大概九页 / 2.直接在nacos配置中心新建一个dataId = “seataServer.properties”,复制进去)
- 推送命令
cd /opt/seata/nacos

bash nacos-config.sh -h 127.0.0.1 -p 8848 -g SEATA_GROUP -t seata_namespace_id -u nacos -w nacos
-t seata_namespace_id 指定Nacos配置命名空间ID
-g SEATA_GROUP 指定Nacos配置组名称
- 复制粘贴修改后的config.txt 内容到 seataServer.properties
- 启动Seata容器 (ip统一用127.0.0.1代替,需要替换成服务器ip)
docker run -d --name seata --restart=always -p 8091:8091  \
-e SEATA_IP=127.0.0.1 \
-e SEATA_CONFIG_NAME=file:/seata-server/resources/registry.conf \
-v /opt/seata/registry.conf:/seata-server/resources/registry.conf \
-v /opt/seata/logs:/root/logs \
seataio/seata-server:1.4.2
- 服务

2. Windows部署
-
下载seata-server-下载seata-server

-
将seata配置文件加载到nacos,解压源码压缩包,进入script\config-center文件夹,打开并修改config.txt文件

-
推送配置文件到nacos(1.命令直接推送,配置文件为一条一条,大概九页 / 2.直接在nacos配置中心新建一个dataId = “seataServer.properties”,复制进去)
-
命令行推送(电脑需要安装git),进入script\config-center\nacos

命令:
# 导入,t:命名空间,g:分组
sh nacos-config.sh -h 127.0.0.1 -p 8848 -t seata_namespace_id -g SEATA_GROUP
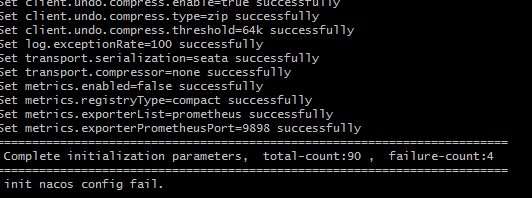
运行完成之后可以看到失败了4个,但是不影响使用,不用在意,可以看到seata中哟预料配置,大概九页

- 复制粘贴(要知道seata1.4.2是支持使用dataId = "seataServer.properties"的方式读取配置信息)

- 配置数据库,进入script\server\db,选择相应的数据库(这里是mysql)新建(数据库名和上述配置需要对应上,默认seata

- 修改seata-server 配置并启动服务,进入conf文件夹

- 修改registry.conf文件
registry {
  # file 、nacos 、eureka、redis、zk、consul、etcd3、sofa
  type = "nacos"

  nacos {
    application = "seata-server"
    serverAddr = "127.0.0.1:8848"
    group = "SEATA_GROUP
    namespace = "seata-namespace-id"
    cluster = "default"
    username = ""
    password = ""
  }
  eureka {
    serviceUrl = "http://localhost:8761/eureka"
    application = "default"
    weight = "1"
  }
  redis {
    serverAddr = "localhost:6379"
    db = 0
    password = ""
    cluster = "default"
    timeout = 0
  }
  zk {
    cluster = "default"
    serverAddr = "127.0.0.1:2181"
    sessionTimeout = 6000
    connectTimeout = 2000
    username = ""
    password = ""
  }
  consul {
    cluster = "default"
    serverAddr = "127.0.0.1:8500"
    aclToken = ""
  }
  etcd3 {
    cluster = "default"
    serverAddr = "http://localhost:2379"
  }
  sofa {
    serverAddr = "127.0.0.1:9603"
    application = "default"
    region = "DEFAULT_ZONE"
    datacenter = "DefaultDataCenter"
    cluster = "default"
    group = "SEATA_GROUP"
    addressWaitTime = "3000"
  }
  file {
    name = "file.conf"
  }
}

config {
  # file、nacos 、apollo、zk、consul、etcd3
  type = "nacos"

  nacos {
    serverAddr = "127.0.0.1:8848"
    namespace = "seata_namespace_id"
    group = "SEATA_GROUP"
    username = ""
    password = ""
    dataId = "seataServer.properties"
  }
  consul {
    serverAddr = "127.0.0.1:8500"
    aclToken = ""
  }
  apollo {
    appId = "seata-server"
    ## apolloConfigService will cover apolloMeta
    apolloMeta = "http://192.168.1.204:8801"
    apolloConfigService = "http://192.168.1.204:8080"
    namespace = "application"
    apolloAccesskeySecret = ""
    cluster = "seata"
  }
  zk {
    serverAddr = "127.0.0.1:2181"
    sessionTimeout = 6000
    connectTimeout = 2000
    username = ""
    password = ""
    nodePath = "/seata/seata.properties"
  }
  etcd3 {
    serverAddr = "http://localhost:2379"
  }
  file {
    name = "file.conf"
  }
}
- 进入conf文件夹,修改file.conf文件

- 启动服务,双击bin文件夹下的seata-server.bat

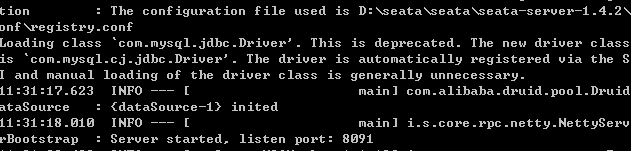
启动成功

**注意问题:
- service.vgroupMapping.mall_tx_group=default
中的mall_tx_group需要与bootstrap.yml中配置的seata.tx-service-group的值一致。 - service.vgroupMapping.my_test_tx_group=default
配置的default必须要等于registry.conf中配置的cluster=“default”。 - mysql5.+使用 driverClassName = “com.mysql.jdbc.Driver”
mysql8使用 driverClassName = “com.mysql.cj.jdbc.Driver”**
在seata-server启动过程中可能会遇到驱动之类的问题:
java.sql.SQLException: Could not retrieve transation read-only status server
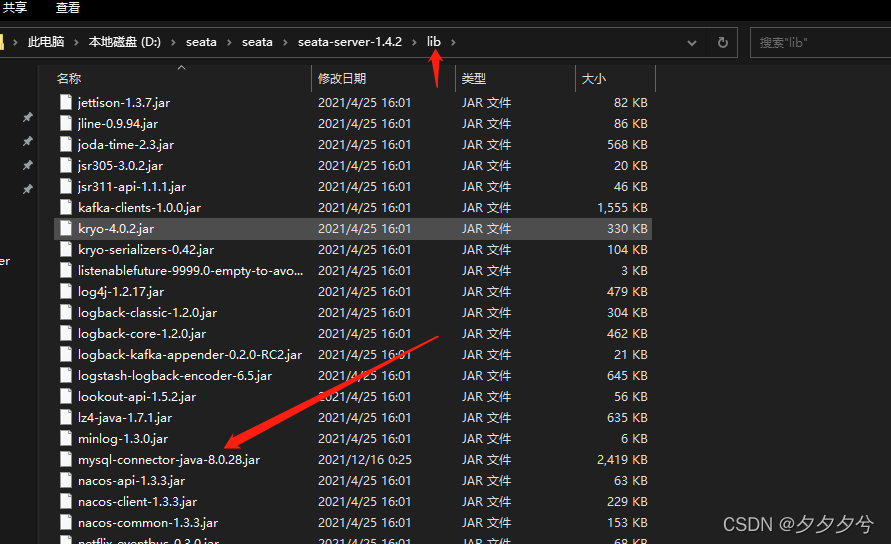
这是因为mysql是8.0的,驱动类需要com.mysql.cj.jdbc.Driver,而不是com.mysql.jdbc.Driver,然后去官网下载mysql驱动

然后放入lib文件夹下
部署启动好之后
3. 项目中整合
- 依赖-版本与seata-server版本一致
        <dependency>
            <groupId>io.seata</groupId>
            <artifactId>seata-spring-boot-starter</artifactId>
            <version>1.4.2</version>
        </dependency>
配置文件:
# 分布式事务配置
seata.enabled=true
# 要与配置文件中的vgroupMapping一致
seata.tx-service-group=mall_tx_group
# 是否开启数据源自动代理,默认为true
seata.enable-auto-data-source-proxy=true
seata.registry.type=nacos
seata.registry.nacos.application=seata-server
seata.registry.nacos.server-addr=${seata.nacos.server-addr}
seata.registry.nacos.namespace=seata_namespace_id
seata.registry.nacos.group=SEATA_GROUP

seata.config.type=nacos
seata.config.nacos.server-addr=${seata.nacos.server-addr}
seata.config.nacos.namespace=seata_namespace_id
seata.config.nacos.group=SEATA_GROUP
-
enable-auto-data-source-proxy: true 自动为Seata开启了代理数据源,实现集成对undo_log表操作
-
启动类调整
因为要使用Seata提供的代理数据源,所以在启动类移除SpringBoot自动默认装配的数据源
@SpringBootApplication(exclude = DataSourceAutoConfiguration.class)
-
开启全局事务 @GlobalTransactional(rollbackFor = Exception.class) 标识TM(事务管理器)开启全局事务
-
启动项目,注册成功

-
Seata客户端 添加undo_log表
Seata的AT模式下之所以在第一阶段直接提交事务,依赖的是需要在每个RM创建一张undo_log表,记录业务执行前后的数据快照。
Seata官方Github源码库undo_log表脚本地址:
https://github.com/seata/seata/blob/1.4.2/script/client/at/db/mysql.sql
undo_log:回滚日志表
在每个需要开启seata事务操作的数据库下都需要建立此表。
CREATE TABLE IF NOT EXISTS `undo_log`
(
    `branch_id`     BIGINT(20)   NOT NULL COMMENT 'branch transaction id',
    `xid`           VARCHAR(100) NOT NULL COMMENT 'global transaction id',
    `context`       VARCHAR(128) NOT NULL COMMENT 'undo_log context,such as serialization',
    `rollback_info` LONGBLOB     NOT NULL COMMENT 'rollback info',
    `log_status`    INT(11)      NOT NULL COMMENT '0:normal status,1:defense status',
    `log_created`   DATETIME(6)  NOT NULL COMMENT 'create datetime',
    `log_modified`  DATETIME(6)  NOT NULL COMMENT 'modify datetime',
    UNIQUE KEY `ux_undo_log` (`xid`, `branch_id`)
) ENGINE = InnoDB
  AUTO_INCREMENT = 1
  DEFAULT CHARSET = utf8 COMMENT ='AT transaction mode undo table';
如果二阶段需要回滚,直接根据undo_log表回滚,如果执行成功,则在第二阶段删除对应的快照数据。
4. 分布式事务测试
- 接口上加入全局事务,并执行int i=1/0; 如果没有事务的话,会先执行修改然后抛出异常,数据库数据会更新;加入事务之后,会抛出异常,数据库数据回滚不更新。


 1415
1415


 被折叠的 条评论
为什么被折叠?
被折叠的 条评论
为什么被折叠?
 到【灌水乐园】发言


