


一,Elasticsearch7.13安装
官网 https://www.elastic.co/cn/downloads/elasticsearch
选windows版

很简单,下载,解压,运行bin目录下elasticsearch.bat
启动之后用浏览器访问 http://localhost:9200/ ,返回如下内容说明安装成功了。
{
  "name" : "my_node",
  "cluster_name" : "elasticsearch",
  "cluster_uuid" : "u-MRpxz6SbOuwc8LZlGGOA",
  "version" : {
    "number" : "7.13.2",
    "build_flavor" : "default",
    "build_type" : "zip",
    "build_hash" : "4d960a0733be83dd2543ca018aa4ddc42e956800",
    "build_date" : "2021-06-10T21:01:55.251515791Z",
    "build_snapshot" : false,
    "lucene_version" : "8.8.2",
    "minimum_wire_compatibility_version" : "6.8.0",
    "minimum_index_compatibility_version" : "6.0.0-beta1"
  },
  "tagline" : "You Know, for Search"
}
为了学习方便,咱们只介绍windows安装方案,想了解linux如何安装的请走这:
https://blog.csdn.net/Ye_GuoLin/article/details/107138205
二,安装kibana
简单介绍下,Kibana是一个开源的分析与可视化平台,设计出来用于和Elasticsearch一起使用的。你可以用kibana搜索、查看存放在Elasticsearch中的数据。咱们主要是用于和ES交互,读写数据用。
选windows版:
https://www.elastic.co/guide/en/kibana/7.13/windows.html#windows

下载,解压,运行bin目录下kibana.bat。
访问页面:http://localhost:5601 ,能正常打开就说明成功了。
三,准备测试数据
https://download.elastic.co/demos/kibana/gettingstarted/accounts.zip
下载到本地,然后解压,先不导入,备用!
四,常用命令
常⽤的HTTP动词有下面五个
GET(SELECT):从服务器取出资源(⼀项或多项)。
POST(CREATE):在服务器新建⼀个资源。
PUT(UPDATE):在服务器更新资源(客户端提供改变后的完整资源)。
PATCH(UPDATE):在服务器更新资源(客户端提供改变的属性)。
DELETE(DELETE):从服务器删除资源。
1.查看集群情况
curl -X GET "localhost:9200/_cat/health?v"注:curl命令是可以在cmd命令行执行的,也可以把curl直接粘贴到kibana中的Dev Tools窗口中执行,贴进来之后会自动转变成如下命令:
GET /_cat/health?v执行结果, green代表执行正常:
epoch      timestamp cluster       status node.total node.data shards pri relo init unassign pending_tasks max_task_wait_time active_shards_percent
1624357838 10:30:38  elasticsearch green           1         1      6   6    0    0        0             0                  -                100.0%
2.查看索引列表(相当于数据库的show tables,索引就表)
curl -X GET "localhost:9200/_cat/indices?v"执行结果,去们查到的都是系统index,因为我们还没有建index,index就是表:
health status index                           uuid                   pri rep docs.count docs.deleted store.size pri.store.size
green  open   .kibana_7.13.2_001              sJ6TrishRvuAbfzj7w49cA   1   0         29           10      2.6mb          2.6mb
green  open   .apm-custom-link                SiqS72ZHS9KZWrBqndiRxg   1   0          0            0       208b           208b
green  open   .kibana-event-log-7.13.2-000001 M0xX0i_KS4GXH_0ioZ5qtg   1   0          1            0      5.6kb          5.6kb
green  open   .apm-agent-configuration        bja4WrJxRQOSH9VCA9iMnw   1   0          0            0       208b           208b
green  open   .kibana_task_manager_7.13.2_001 FI6mV9rSSJO0YV2b5IxLXQ   1   0         10        18035      1.7mb          1.7mb
3.创建索引
curl -X PUT "localhost:9200/accounts?pretty"pretty的意思是返回结果漂亮打印JSON格式,如果可以的话。
以上语句创建了名为“accounts”的索引(索引相当于表,以后不再强调!)
返回结果,acknowledged:true表示创建成功:
{
  "acknowledged" : true,
  "shards_acknowledged" : true,
  "index" : "accounts"
}
4.创建文档(插入数据)
注:ES里文档就是数据,一个文档相当于mysql里的一条记录
curl -X PUT "localhost:9200/accounts/_doc/1?pretty" -H 'Content-Type: application/json' -d'
{
  "name": "zhang san",
  "age": 25
}
'
# 或者不指定id创建
curl -X POST "localhost:9200/accounts/_doc?pretty" -H 'Content-Type: application/json' -d'
{
  "name": "zhang san"
}
返回结果,created代表新建的,"successful" : 1,表示成功:
{
  "_index" : "accounts",
  "_type" : "_doc",
  "_id" : "1",
  "_version" : 1,
  "result" : "created",
  "_shards" : {
    "total" : 2,
    "successful" : 1,
    "failed" : 0
  },
  "_seq_no" : 1,
  "_primary_term" : 1
}
5.查询文档(查询数据)
curl -X GET "localhost:9200/accounts/_doc/1?pretty"返回结果:
{
  "_index" : "accounts",
  "_type" : "_doc",
  "_id" : "1",
  "_version" : 1,
  "_seq_no" : 1,
  "_primary_term" : 1,
  "found" : true,
  "_source" : {
    "name" : "zhang san",
    "age" : 25
  }
}
6.覆盖更新文档(覆盖更新数据)
覆盖更新和插入是一样的语句,相当于插入覆盖更新,如果没有这个id就创建,有就覆盖更新所有的列。
curl -X PUT "localhost:9200/accounts/_doc/1?pretty" -H 'Content-Type: application/json' -d'
{
  "name": "Li si"
}
'
返回结果,updated表示更新:
{
  "_index" : "accounts",
  "_type" : "_doc",
  "_id" : "1",
  "_version" : 2,
  "result" : "updated",
  "_shards" : {
    "total" : 2,
    "successful" : 1,
    "failed" : 0
  },
  "_seq_no" : 2,
  "_primary_term" : 1
}
7.更新文档(更新数据)
更新与覆盖更新的区别就是,只更新传过来的列,没有传过来的列不变。
curl -X POST "localhost:9200/accounts/_update/1?pretty" -H 'Content-Type: application/json' -d'
{
  "doc": { "age": 22}
}
返回结果,updated表示更新:
{
  "_index" : "accounts",
  "_type" : "_doc",
  "_id" : "1",
  "_version" : 4,
  "result" : "updated",
  "_shards" : {
    "total" : 2,
    "successful" : 1,
    "failed" : 0
  },
  "_seq_no" : 4,
  "_primary_term" : 1
}
8.删除文档(删除数据)
curl -X DELETE "localhost:9200/accounts/_doc/1?pretty"返回结果,deleted表示删除:
{
  "_index" : "accounts",
  "_type" : "_doc",
  "_id" : "1",
  "_version" : 5,
  "result" : "deleted",
  "_shards" : {
    "total" : 2,
    "successful" : 1,
    "failed" : 0
  },
  "_seq_no" : 5,
  "_primary_term" : 1
}
9.删除索引(删除表)
curl -X DELETE "localhost:9200/accounts?pretty"返回结果:
{
  "acknowledged" : true
}
10.批操作
# 批量新增,如果没有表会自己建表
curl -X POST "localhost:9200/accounts/_bulk?pretty" -H 'Content-Type: application/json' -d'
{"index":{"_id":"1"}}
{"name": "zhang san" }
{"index":{"_id":"2"}}
{"name": "Li si" }
'
# 批量更新、删除
curl -X POST "localhost:9200/accounts/_bulk?pretty" -H 'Content-Type: application/json' -d'
{"update":{"_id":"1"}}
{"doc": { "name": "wang wu" } }
{"delete":{"_id":"2"}}
'
批操作有个坑,就是如果多字段要放在一行,不然后会报错,如:
{ "index": {} }
{"dt":"2018-12-30", "db_name":"ads", "ip":"1", "tbl_name":"n_ship", "ugi":"rc"}
{ "index": {} }
{"dt":"2018-12-27", "db_name":"ads", "ip":"1", "tbl_name":"ship_c", "ugi":"rc"}
五,复杂查询命令
1.导入官网样例数据
其中account为索引名称,_doc为type的名称,D:\accounts.json为下载的样例路径。
curl -H "Content-Type: application/json" -XPOST localhost:9200/accounts/_doc/_bulk?pretty --data-binary "@D:\accounts.json"2.搜索数据并指定字段排序
# accounts是表,_search是搜索,q=*是匹配全部,age排序字段,asc是升序
GET /accounts/_search?q=*&sort=age:asc&pretty
返回结果,只显示部分:
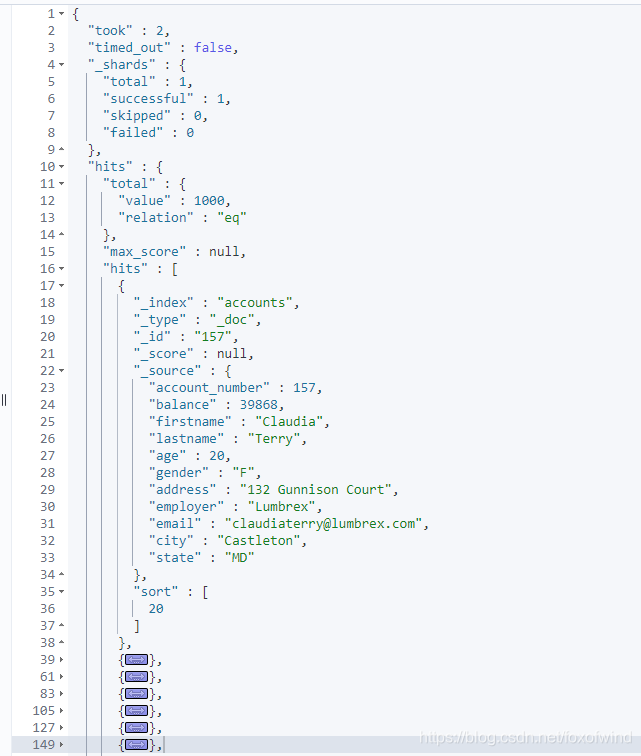
返回字段说明:

3.上面请求换成-d方式json串
curl -X GET "localhost:9200/accounts/_search" -H 'Content-Type: application/json' -d'
{
  "query": { "match_all": {} },
  "sort": [
    { "age": "asc" }
  ]
}
'
query指的查询,"match_all": {}匹配全部
sort是排序方式,[]中是排序的字段和排序方向。
{
  "query": { "match_all": {} },
  "_source": ["account_number", "balance"],
  "from": 10,
  "size": 10
}
另外里边还可以指定分页数据,from是从第几条开始,size是本次读取条数。
_source代表只返回指定字段,结果只返回"account_number", "balance"字段
4.搜索条件查询match、match_phrase
# match分词匹配
curl -X GET "localhost:9200/accounts/_search" -H 'Content-Type: application/json' -d'
{
  "query": { "match": { "address": "mill lane" } }
}
'
# match_phrase全词匹配
curl -X GET "localhost:9200/accounts/_search" -H 'Content-Type: application/json' -d'
{
  "query": { "match_phrase": { "address": "mill lane" } }
}
'
match 中如果加空格,那么会被认为两个单词,包含任意一个单词将被查询到。
match_parase 将忽略空格,将该字符认为一个整体,会在索引中匹配包含这个整体的文档。
5.bool must子句、bool should子句
# bool must 返回地址中包含“mill”和“lane”的所有帐户,bool must子句指定了所有必须为true的查询,# # 则将文档视为匹配。
curl -X GET "localhost:9200/accounts/_search" -H 'Content-Type: application/json' -d'
{
  "query": {
    "bool": {
      "must": [
        { "match": { "address": "mill" } },
        { "match": { "address": "lane" } }
      ]
    }
  }
}
'

# bool should 返回地址中包含“mill”或“lane”的所有帐户,bool should子句指定了一个查询列表,其中任何一个查询必须为真,才能将文档视为匹配。
curl -X GET "localhost:9200/accounts/_search" -H 'Content-Type: application/json' -d'
{
  "query": {
    "bool": {
      "should": [
        { "match": { "address": "mill" } },
        { "match": { "address": "lane" } }
      ]
    }
  }
}
'

# bool must_not 返回地址中既不包含“mill”也不包含“lane”的所有帐户,must_not子句指定了一个查询列表,其中没有一个查询必须为真,才能将文档视为匹配。
curl -X GET "localhost:9200/accounts/_search" -H 'Content-Type: application/json' -d'
{
  "query": {
    "bool": {
      "must_not": [
        { "match": { "address": "mill" } },
        { "match": { "address": "lane" } }
      ]
    }
  }
}
'

# bool must和must_not混合 返回所有40岁但不居住在ID(aho)的人的账户,一个包含一个不包含。
curl -X GET "localhost:9200/accounts/_search" -H 'Content-Type: application/json' -d'
{
  "query": {
    "bool": {
      "must": [
        { "match": { "age": "40" } }
      ],
      "must_not": [
        { "match": { "state": "ID" } }
      ]
    }
  }
}
'
6.执行过滤器bool filter子句
curl -X GET "localhost:9200/accounts/_search" -H 'Content-Type: application/json' -d'
{
  "query": {
    "bool": {
      "must": { "match_all": {} },
      "filter": {
        "range": {
          "balance": {
            "gte": 20000,
            "lte": 30000
          }
        }
      }
    }
  }
}
'
filter子句,它允许我们根据一系列值筛选文档。这通常用于数字或日期筛选。本例使用bool查询返回余额在20000到30000之间的数据。
7.执行聚合(类比mysql 聚合函数)
curl -X GET "localhost:9200/accounts/_search" -H 'Content-Type: application/json' -d'
{
  "size": 0,
  "aggs": {
    "group_by_state": {
      "terms": {
        "field": "state.keyword"
      }
    }
  }
}
'
这个示例按状态对所有帐户进行分组,然后返回按count降序排列的前10个(默认)状态(也是默认):
相当于sql:
SELECT state, COUNT(*) FROM accounts GROUP BY state ORDER BY COUNT(*) DESC LIMIT 10;8.查询和聚合语法还有很多,这里不细讲了,有需要可以去官网:
https://www.elastic.co/guide/en/elasticsearch/reference/current/index.html
中文参考文档:
https://blog.csdn.net/shenkeding9350/column/info/30857
9.sql查询
ES7还可以支持sql查询:
curl -X GET "localhost:9200/_sql?format=txt" -H 'Content-Type: application/json' -d'
{
  "query":"select account_number,firstname,age,balance from accounts limit 5"
}
'
返回结果:
account_number |   firstname   |      age      |    balance
---------------+---------------+---------------+---------------
6              |Hattie         |36             |5686
13             |Nanette        |28             |32838
18             |Dale           |33             |4180
20             |Elinor         |36             |16418
25             |Virginia       |39             |40540
这个非常强大,参考文档:
https://www.elastic.co/guide/en/elasticsearch/reference/current/xpack-sql.html
https://blog.csdn.net/huanqingdong/article/details/102510704


 2393
2393


 被折叠的 条评论
为什么被折叠?
被折叠的 条评论
为什么被折叠?
 到【灌水乐园】发言


