


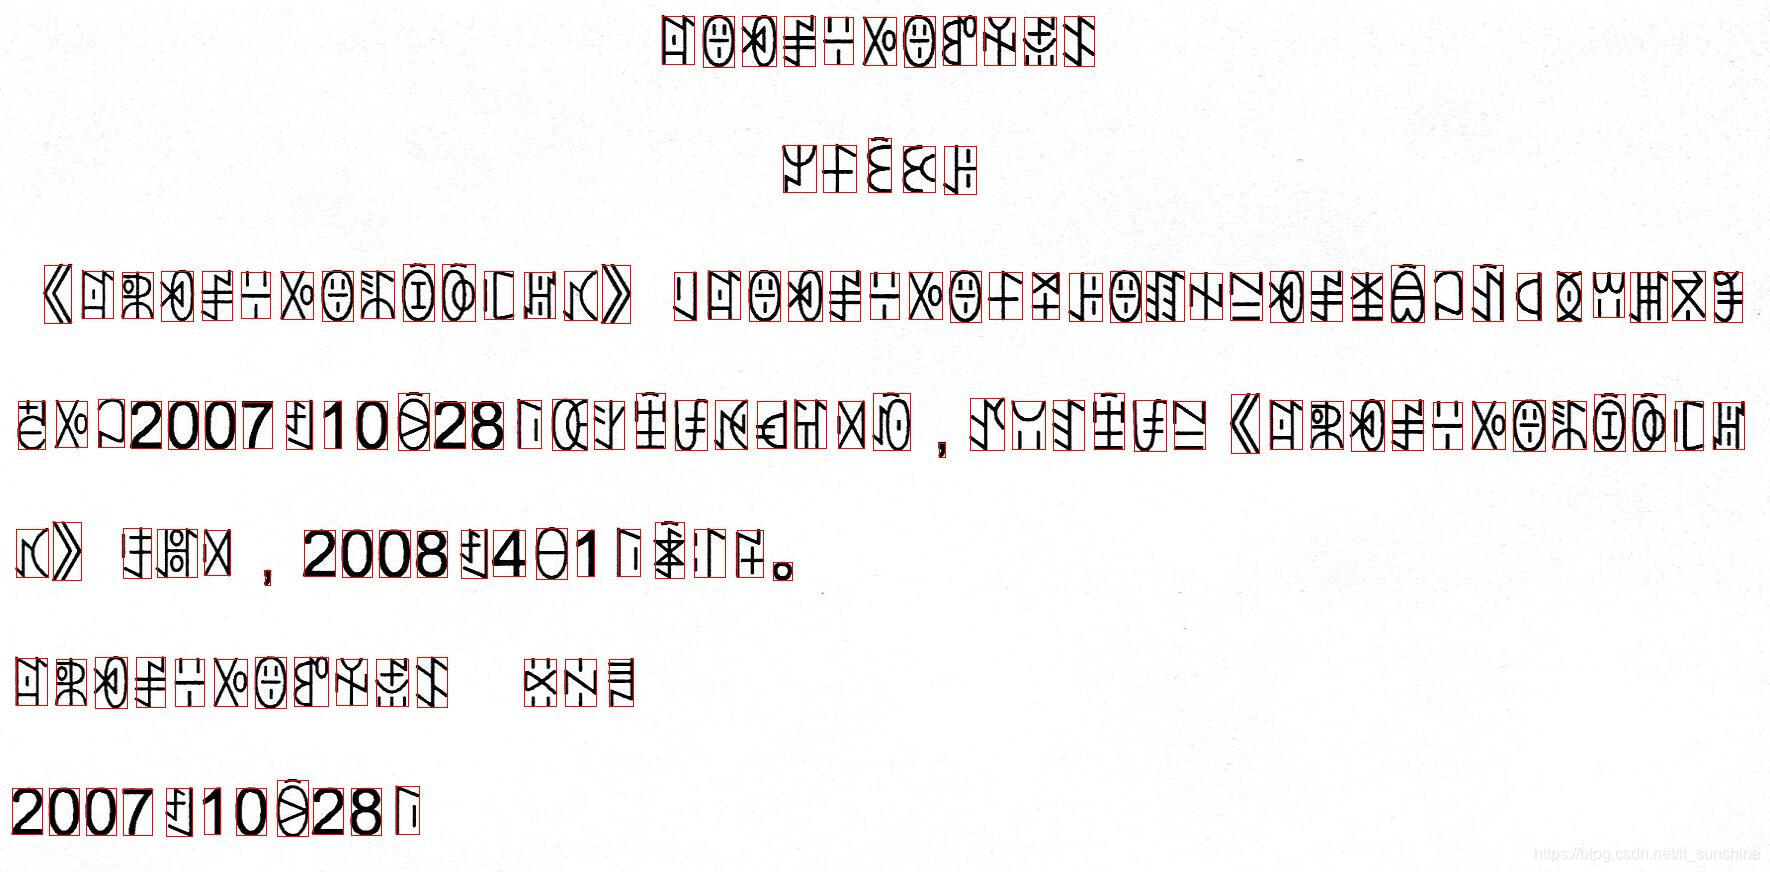
之前一段时间做了一个少数民族语言的文字检测与识别的项目,一共有6种语言,其中的彝语的识别相对简单,部分彝语文档图片如下。由于印刷体版式工整,加之彝语的结构较为简单,遂采取了单字符分割+识别(此算法同样可适用于汉字、韩语、日语等类似结构文字的单字符分割部分)的流程来进行彝语的识别工作。(其实主要还是因为训练样本不够啊,外加甲方希望能得到单字符的坐标,不然直接用CRNN来做序列识别可能会更简单一点,卒。。。)

上图所示为彝语打印文档的一张扫描件示例图。由图可见彝语的结构跟汉字在某些程度上有些相似之处,比如都属于方块字,存在上下结构和左右结构等。由图可发现彝语的识别可以采用单字符分割+识别的方式来进行处理。下面是我对这部分(单字符分割)的处理代码。(此代码经修改后同样可适用于汉字、韩语、日语等类似结构文字的单字符分割部分)
import cv2    # 版本为3.3.10,安装4.0及以上版本可能会不兼容
import os
import numpy as np


def display(img):
    cv2.imshow("1", img)
    cv2.waitKey(0)


def get_split_line(img, projection_row):
    split_line_list = []
    flag = False
    start = 0
    end = 0
    for i in range(0, len(projection_row)):
        if flag == False and projection_row[i] > 0:
            flag = True
            start = i
        elif flag and (projection_row[i] == 0 or i == len(projection_row) - 1):
            flag = False
            end = i
            if end - start < 15:  # need specify or rewrite
                flag = True
                continue
            else:
                split_line_list.append((start, end))
    return split_line_list


def get_contours(img):
    contour_list = []
    contours = cv2.findContours(img, cv2.RETR_EXTERNAL, cv2.CHAIN_APPROX_SIMPLE)
    for i in range(0, len(contours[1])):
        x, y, w, h = cv2.boundingRect(contours[1][i])
        contour_list.append((x, y, w, h))
        # cv2.rectangle(img_input, (x,y), (x+w, y+h), (0,0,255))
    return contour_list


def sort_merge(contour_row):
    contour_row = sorted(contour_row, key=lambda x: x[0])  # sort by x
    # print(contour_row)
    i = 0
    for _ in contour_row:    # 这部分的合并规则用的是刘成林老师paper中的方法
        if i == len(contour_row) - 1 or contour_row[i][0] == -1:
            break
        # print(contour_row[i])
        rectR = contour_row[i + 1]
        rectL = contour_row[i]
        ovlp = rectL[0] + rectL[2] - rectR[0]
        dist = abs((rectR[0] + rectR[2] / 2) - (rectL[0] - rectL[2] / 2))
        w_L = rectL[0] + rectL[2]
        w_R = rectR[0] + rectR[2]
        span = (w_R if w_R > w_L else w_L) - rectL[0]
        nmovlp = (ovlp / rectL[2] + ovlp / rectR[2]) / 2 - dist / span / 8
        if nmovlp > 0:
            x = rectL[0]
            y = (rectL[1] if rectL[1] < rectR[1] else rectR[1])
            w_L = rectL[0] + rectL[2]
            w_R = rectR[0] + rectR[2]
            w = (w_R if w_R > w_L else w_L) - x
            h_L = rectL[1] + rectL[3]
            h_R = rectR[1] + rectR[3]
            h = (h_R if h_R > h_L else h_L) - y
            contour_row[i] = (x, y, w, h)
            contour_row.pop(i + 1)  # after pop , index at i
            contour_row.append((-1, -1, -1, -1))  # add to fix bug(the better way is use iterator)
            i -= 1
        i += 1
    # print(contour_row)
    return contour_row


def combine_verticalLine(contour_row):
    i = 0
    pop_num = 0
    for _ in contour_row:
        rect = contour_row[i]
        if rect[0] == -1:
            break

        if rect[2] == 0:
            i += 1
            continue


        if rect[3] * 1.0 / rect[2] > 4:
            if i != 0 and i != len(contour_row) - 1:
                rect_left = contour_row[i - 1]
                rect_right = contour_row[i + 1]
                left_dis = rect[0] - rect_left[0] - rect_left[2]
                right_dis = rect_right[0] - rect[0] - rect[2]
                # if left_dis <= right_dis:
                if left_dis <= right_dis and rect_left[2] < rect_right[2]:
                    x = rect_left[0]
                    y = (rect_left[1] if rect_left[1] < rect[1] else rect[1])
                    w = rect[0] + rect[2] - rect_left[0]
                    h_1 = rect_left[1] + rect_left[3]
                    h_2 = rect[1] + rect[3]
                    h_ = (h_1 if h_1 > h_2 else h_2)
                    h = h_ - y
                    contour_row[i - 1] = (x, y, w, h)
                    contour_row.pop(i)
                    contour_row.append((-1, -1, -1, -1))
                    pop_num += 1
                    # don't need recursive merge, causing it's left and right merge
                else:
                    x = rect[0]
                    y = (rect[1] if rect[1] < rect_right[1] else rect_right[1])
                    w = rect_right[0] + rect_right[2] - rect[0]
                    h_1 = rect_right[1] + rect_right[3]
                    h_2 = rect[1] + rect[3]
                    h_ = (h_1 if h_1 > h_2 else h_2)
                    h = h_ - y
                    contour_row[i] = (x, y, w, h)
                    contour_row.pop(i + 1)
                    contour_row.append((-1, -1, -1, -1))
                    pop_num += 1
        i += 1
    for i in range(0, pop_num):
        contour_row.pop()
    return contour_row


def split_oversizeWidth(contour_row):
    i = 0
    for _ in contour_row:
        rect = contour_row[i]
        if rect[2] * 1.0 / rect[3] > 1.2:  # height/width>1.2 -> split
            x_new = int(rect[0] + rect[2] / 2 + 1)
            y_new = rect[1]
            w_new = rect[0] + rect[2] - x_new
            h_new = rect[3]
            contour_row[i] = (rect[0], rect[1], int(rect[2] / 2), rect[3])
            contour_row.insert(i + 1, (x_new, y_new, w_new, h_new))
        i += 1
    return contour_row


def image_preprocess(img_input):
    gray_img = cv2.cvtColor(img_input, cv2.COLOR_BGR2GRAY)
    gray_img = cv2.GaussianBlur(gray_img, (3, 3), 3)
    _, img = cv2.threshold(gray_img, 0, 255, cv2.THRESH_OTSU)  # 将一幅灰度图二值化 input-one channel

    _, img = cv2.threshold(img, 0, 255, cv2.THRESH_BINARY_INV)
    kernel = cv2.getStructuringElement(cv2.MORPH_CROSS, (3, 3))
    img = cv2.erode(img, kernel)
    # height,width=img.shape[:2]
    # img=cv2.resize(img,(int(width/2),int(height/2)),interpolation=cv2.INTER_CUBIC)
    # display(img)
    return img


def get_segmentation_result(img):  # has been eroded
    projection_row = cv2.reduce(img, 1, cv2.REDUCE_SUM, dtype=cv2.CV_32S)  # projection
    split_line_list = get_split_line(img, projection_row)  # split image as row
    segmentation_result = []
    for i in split_line_list:
        img_row = img[i[0]:i[1], :]
        contour_row = get_contours(img_row)
        contour_row = sort_merge(contour_row)
        contour_row = split_oversizeWidth(contour_row)
        contour_row = combine_verticalLine(contour_row)
        segmentation_result.append(contour_row)
        for (x, y, w, h) in contour_row:  # draw
            y += i[0]
            cv2.rectangle(img_input, (x, y), (x + w, y + h), (0, 0, 255))
    # cv2.imwrite("./test1/n003.jpg",img_input)
    return segmentation_result


pic_path = './img003.jpg'

img_input = cv2.imread(pic_path, 1)  # (2975, 1787, 3)   但是图片查看器显示的是  1787 * 2975
img = image_preprocess(img_input)  # erode
segmentation_result = get_segmentation_result(img)  # store segmentation result : [(x,y,w,h),(),...]

# cv2.imwrite("./save.jpg", img_input)
display(img_input)
代码运行结果如下:
此代码经过一定的修改可适用于很多的场景,大家有需要可以尝试一下。
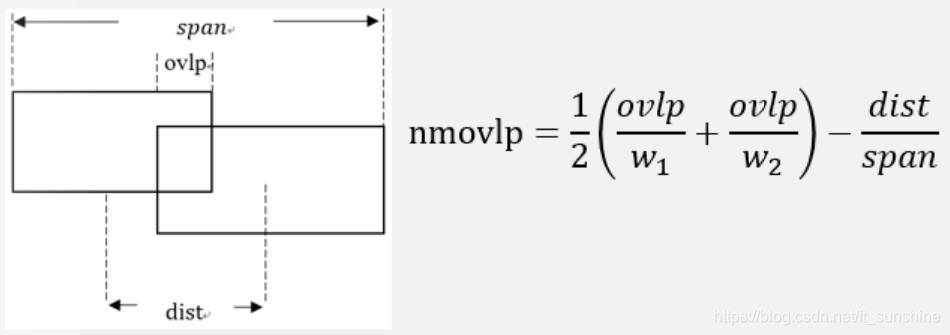
下面大致说一下代码的流程(关注get_segmentation_result部分),字符分割的代码部分主要是采用“投影+连通域”的方式来实现。首先对图像进行二值化与腐蚀(断开印刷过程中可能存在的粘连)的操作,之后对预处理后的图片进行水平投影,得到图片中所有的文本行。然后分别对图片中的每一个文本行进行一系列操作,得到其连通域,然后再对连通域进行合并(合并规则是刘成林老师的一篇paper中的方法,代码中已经注释,具体操作步骤见下图),针对合并错的部分进行切分操作(针对过宽的部分),最后再对没有合并的部分高宽比很大的竖形字符进行单独的合并。进行完上述操作之后,就可以得到不错的分割效果。(具体流程和操作步骤仅供参考)
有问题欢迎多交流,共同进步~


 3852
3852


 被折叠的 条评论
为什么被折叠?
被折叠的 条评论
为什么被折叠?
 到【灌水乐园】发言


