CreateDialog

使用对话框模版资源创建一个非模态对话框

CreateDialog调用 CreateDialogParam 函数。

调用语序:

HWND CreateDialog(HINSTANCE hInstance,LPCTSTR lpTemplate,HWND hWndParent,DLGPROC lpDialogFunc);

参数

hInstance类型:HINSTANCE

对话框模版所在模块的句柄。如果为NULL,则使用当前可执行文件。


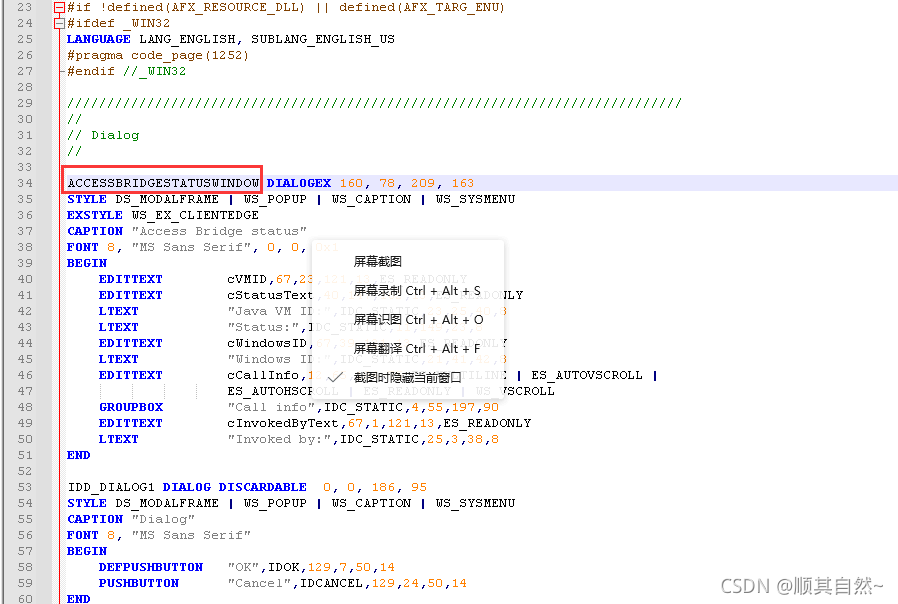
lpTemplate类型:LPCTSTR

对话框模版。这个参数是一个以空字符结尾的字符串指针用来指定对话框模版的名字,或者是是一个整数用来指定对话框模版资源的标识符。如果参数是资源标识符,高16位必须是0,低16位包含标识符,并且必须使用宏 MAKEINTRESOURCE 创建这个值。(这个名字在与RC文件中对话框模板名称相对应),如图所示:

hWndParent类型:HWND

拥有对话框窗口的句柄


lpDialogFunc类型:DLGPROC

对话框消息处理函数,又称为对话框过程。详细可了解 DialogProc 。

返回值

类型:HWND

如果成功,返回对话框窗口句柄。

如果失败返回NULL。

备注

CreateDialog本质是调用函数 CreateWindowEx 来创建对话框。创建以后,CreateDialog 会发送 WM_INITDIALOG 消息。

如果模版标识 WS_VISIBLE 风格, CreateDialog 函数显示对话框。

当 CreateDialog 返回后,应用程序通过 ShowWindow 函数显示对话框(如果对话框还没有显示的话)。应用程序通过 DestroyWindow 函数销毁非模态对话框。为了支持键盘浏览或其它对话框功能,消息循环必须调用 IsDialogMessage 函数。

支持

最低桌面系统支持Windows 2000 Professional
头文件Winuser.h (已包含在Windows.h中)
User32.lib
DLLUser32.dll
UNICODE版本名CreateDialogW
ANSI版本名CreateDialogA

参考:CreateDialog-WIN32 API手册-惧留孙课堂

  • 2
    点赞
  • 0
    收藏
    觉得还不错? 一键收藏
  • 打赏
    打赏
  • 0
    评论
package com.shou.loginfjame; import java.awt.BorderLayout; import java.awt.Color; import java.awt.Component; import java.awt.Container; import java.awt.Cursor; import java.awt.Dimension; import java.awt.FlowLayout; import java.awt.Font; import java.awt.Image; import java.awt.event.ActionEvent; import java.awt.event.ActionListener; import java.sql.SQLException; import java.util.List; import javax.swing.BorderFactory; import javax.swing.Box; import javax.swing.ImageIcon; import javax.swing.JButton; import javax.swing.JDialog; import javax.swing.JFrame; import javax.swing.JLabel; import javax.swing.JOptionPane; import javax.swing.JPanel; import javax.swing.JPasswordField; import javax.swing.JTextArea; import javax.swing.JTextField; import javax.xml.bind.util.ValidationEventCollector; import com.shou.LoginUtil.LoginUser; import com.shou.dao.LoginDao; import com.shuo.util.ValidCode; public class LoginFjame extends JFrame implements ActionListener { private JFrame frame = new JFrame("登录"); private JPanel panel = new JPanel(); private JLabel tiel = new JLabel("龍丶逸小说登录系统"); // 创建标题 private JLabel userLabel = new JLabel("用户名:"); // 创建UserJLabel private JTextArea userText=new JTextArea("请输入内容",7, 30); // 获取登录名 private JLabel passLabel = new JLabel("密 码:"); // 创建PassJLabel private JPasswordField passText = new JPasswordField(20); // 密码框隐藏 private JLabel verCodeLa = new JLabel("验证码:"); // 验证码 private JTextField inputCode = new JTextField(); // 验证码框 private ValidCode vcode = new ValidCode(); // 验证码内容 JTextField jt_code; private JButton loginButton = new JButton("登录"); // 创建登录按钮 private JButton registerButton = new JButton("注 册"); // 创建注册按钮 private JButton newPasswordButton = new JButton("忘记密码"); // 创建注册按钮 private JButton exitButton = new JButton("退出"); JTextField field = null; public LoginFjame() { System.out.println("====================================="); System.out.println("== 龍丶逸小说系统 =="); System.out.println("== V1.1.1.0 =="); System.out.println("====================================="); WinLogin(); } public void WinLogin() { panel.setLayout(null); // 设置布局为 null // 创建标题名称 this.tiel.setFont(new Font("宋体", 1, 20)); this.tiel.setBounds(150, 30, 300, 25); this.panel.add(this.tiel); // 创建 UserJLabel this.userLabel.setFont(new Font("宋体", 1, 13)); this.userLabel.setBounds(70, 80, 80, 25); this.panel.add(userLabel); // 创建文本域用于用户输入 this.userText.setBounds(145, 80, 165, 25); this.panel.add(this.userText); // 注册 this.registerButton.setFont(new Font("宋体", 1, 15)); this.registerButton.setContentAreaFilled(false); this.registerButton.setBorderPainted(false); /* registerButton.setBackground(Color.red); */ this.registerButton.setBounds(320, 80, 100, 25); this.panel.add(this.registerButton); // 变成小手 this.registerButton.setCursor(Cursor.getPredefinedCursor(Cursor.HAND_CURSOR)); // 创建PassJLabel this.passLabel.setFont(new Font("宋体", 1, 13)); this.passLabel.setBounds(70, 110, 80, 25); this.panel.add(this.passLabel); // 密码输入框 隐藏 this.passText.setBounds(145, 110, 165, 25); this.panel.add(this.passText); // 忘记密码 this.newPasswordButton.setFont(new Font("宋体", 1, 15)); this.newPasswordButton.setContentAreaFilled(false); this.newPasswordButton.setBorderPainted(false); /* registerButton.setBackground(Color.red); */ this.newPasswordButton.setBounds(320, 110, 100, 25); this.panel.add(this.newPasswordButton); // 变成小手 this.newPasswordButton.setCursor(Cursor.getPredefinedCursor(Cursor.HAND_CURSOR)); // 验证码code this.verCodeLa.setFont(new Font("宋体", 1, 13)); this.verCodeLa.setBounds(70, 140, 80, 25); this.panel.add(this.verCodeLa); // 验证码框 this.inputCode.setBounds(145, 140, 165, 25); this.panel.add(this.inputCode); // 验证码图片 this.vcode.setBounds(320, 140, 165, 25); this.panel.add(this.vcode); System.out.println(this.vcode); // 创建登录按钮 this.loginButton.setFont(new Font("宋体", 1, 15)); this.loginButton.setBounds(95, 190, 80, 25); this.panel.add(this.loginButton); // 变成小手 this.loginButton.setCursor(Cursor.getPredefinedCursor(Cursor.HAND_CURSOR)); // 退出按钮 this.exitButton.setFont(new Font("宋体", 1, 15)); this.exitButton.setBounds(230, 190, 80, 25); this.panel.add(this.exitButton); // 变成小手 this.exitButton.setCursor(Cursor.getPredefinedCursor(Cursor.HAND_CURSOR)); // 设置窗体的位置及大小 this.frame.setSize(460, 355); frame.setLocationRelativeTo(null); // 在屏幕中居中显示 frame.add(this.panel); // 添加面板 frame.setDefaultCloseOperation(JFrame.EXIT_ON_CLOSE); // 设置X号后关闭 //设置按钮 this.registerButton.addActionListener(this); //注册按钮 this.newPasswordButton.addActionListener(this); //忘记密码 this.loginButton.addActionListener(this); //登录 this.exitButton.addActionListener(this); //退出 // 往窗体里放其他控件 frame.setVisible(true); // 设置窗体可见 } @Override public void actionPerformed(ActionEvent e) { JButton bt = (JButton) e.getSource(); // 获取按钮信息 String str = bt.getText(); // 获取用户名 String name = this.userText.getText().trim(); // 获取密码 String password = this.passText.getText().trim(); // 获取验证码 String code = this.inputCode.getText().trim(); // 获取jsp验证码 String vcode = this.vcode.getCode(); // 登录 if (str.equals("登录")) { System.out.println("登录"); // 验证码转为大写 String Dcode = code.toUpperCase(); String Dvcode = vcode.toUpperCase(); // 验证码判断 if (Dcode.equals(Dvcode)) { //获取页面的用户名 String username=this.userText.getText().trim(); // 根据用户名查看是否有该用户 try { List loginUser=new LoginDao().queryAll(username); String a=loginUser.toString(); System.out.println(a.toString()); if(!a.toString().equals("[]")){ //密码判断 String mysqlPasword=loginUser.get(0).l_password(); if(mysqlPasword.equals(password)){ //登录成功 JOptionPane pane = new JOptionPane("登录成功"); JDialog dialog = pane.createDialog(this, "警告"); dialog.show(); }else{ JOptionPane pane = new JOptionPane("密码错误错误,请重新输入"); JDialog dialog = pane.createDialog(this, "警告"); dialog.show(); } }else{ JOptionPane pane = new JOptionPane("用户名错误,请重新输入"); JDialog dialog = pane.createDialog(this, "警告"); dialog.show(); } /*System.out.println(loginUser.toString()); String sqlUername=loginUser.get(0).getL_username();*/ /*int sqlpassword=loginUser.get(0).getL_power();*/ /*System.out.println("loginF:"+sqlUername);*/ } catch (SQLException e1) { // TODO Auto-generated catch block e1.printStackTrace(); } } else { JOptionPane pane = new JOptionPane("验证码错误,请重新输入"); JDialog dialog = pane.createDialog(this, "警告"); System.out.println(dialog.getFont()); dialog.show(); } } else // 退出 if (str.equals("退出")) { System.out.println("退出"); System.exit(0); } else // 注册 if (str.equals("注 册")) { System.out.println("注 册"); } // 注册 else if (str.equals("忘记密码")) { System.out.println("忘记密码"); } else { System.out.println("异常错误"); } } public boolean isValidCodeRight() { System.out.println(this.jt_code.getText()); if (this.jt_code == null) { return false; } if (this.vcode == null) { return true; } if (this.vcode.getCode().equals(this.jt_code.getText())) { return true; } return false; } public static void main(String[] args) { new LoginFjame(); } }
如果你想在`<component>`标签上设置插槽,并将其映射到内部的`vxe-grid`组件上,你可以使用`v-slot`指令以及动态组件的特性来实现。 首先,在父组件中,你可以使用`<template>`标签来定义插槽的内容,并通过`v-slot`指令进行命名。然后,将插槽内容作为`<component>`标签的子元素。例如,你可以在父组件中这样设置插槽内容: ```html <template> <div> <component :is="listComponent" v-bind:gridConfig="gridConfig" @formCreateMethod="createDialog" ref="abc" > <!-- 自定义表头插槽 --> <template v-slot:header> <div class="custom-header">自定义表头</div> </template> <!-- 自定义单元格插槽 --> <template v-slot:cell="{ row, column, rowIndex, columnIndex }"> <span class="custom-cell">{{ row[column.property] }}</span> </template> </component> </div> </template> ``` 然后,在响应式组件内部,你可以使用`$slots`对象来访问父组件设置的插槽内容,并将其传递给内部的`vxe-grid`组件。例如,你可以在响应式组件的模板中这样使用插槽: ```html <template> <div> <vxe-grid :data="gridData"> <!-- 使用插槽 --> <template v-for="slotName in Object.keys($slots)"> <slot :name="slotName" v-bind="getSlotProps(slotName)"></slot> </template> </vxe-grid> </div> </template> <script> export default { methods: { getSlotProps(slotName) { // 将父组件传递的插槽内容传递给内部的vxe-grid组件 return this.$slots[slotName][0].children; } } } </script> ``` 通过以上代码,你就可以在父组件中设置插槽内容,并将其映射给内部的`vxe-grid`组件了。请注意,这里假设每个插槽只有一个子元素,如果插槽内容有多个子元素,你需要根据实际情况进行相应的调整。

“相关推荐”对你有帮助么?

  • 非常没帮助
  • 没帮助
  • 一般
  • 有帮助
  • 非常有帮助
提交
评论
添加红包

请填写红包祝福语或标题

红包个数最小为10个

红包金额最低5元

当前余额3.43前往充值 >
需支付:10.00
成就一亿技术人!
领取后你会自动成为博主和红包主的粉丝 规则
hope_wisdom
发出的红包

打赏作者

顺其自然~

你的鼓励将是我创作的最大动力

¥1 ¥2 ¥4 ¥6 ¥10 ¥20
扫码支付:¥1
获取中
扫码支付

您的余额不足,请更换扫码支付或充值

打赏作者

实付
使用余额支付
点击重新获取
扫码支付
钱包余额 0

抵扣说明:

1.余额是钱包充值的虚拟货币,按照1:1的比例进行支付金额的抵扣。
2.余额无法直接购买下载,可以购买VIP、付费专栏及课程。

余额充值