


系统要求
JDK17
spring-security-oauth2-authorization-server 1.3.0 以上
spring-boot-starter-oauth2-client 3.3.0 以上
Spring Boot 3.3.0 以上
修改 C:\Windows\System32\drivers\etc\hosts文件。(如果授权服务器和客户端在不同的域名下,就不用修改了)
构建授权服务
POM内容
<?xml version="1.0" encoding="UTF-8"?>
<project xmlns="http://maven.apache.org/POM/4.0.0" xmlns:xsi="http://www.w3.org/2001/XMLSchema-instance"
	xsi:schemaLocation="http://maven.apache.org/POM/4.0.0 https://maven.apache.org/xsd/maven-4.0.0.xsd">
	<modelVersion>4.0.0</modelVersion>
	<parent>
		<groupId>org.springframework.boot</groupId>
		<artifactId>spring-boot-starter-parent</artifactId>
		<version>3.3.0</version>
		<relativePath/> <!-- lookup parent from repository -->
	</parent>
	<groupId>com.oauth.server.demo</groupId>
	<artifactId>oauth_server</artifactId>
	<version>0.0.1-SNAPSHOT</version>
	<name>oauth_server</name>
	<description>OAuth2 Server Demo project for Spring Boot</description>
	<properties>
		<java.version>17</java.version>
	</properties>
	<dependencies>
		<dependency>
			<groupId>org.springframework.boot</groupId>
			<artifactId>spring-boot-starter-oauth2-authorization-server</artifactId>
		</dependency>
		<dependency>
			<groupId>org.springframework.boot</groupId>
			<artifactId>spring-boot-starter-web</artifactId>
		</dependency>
		<!--
		<dependency>
		    <groupId>org.springframework.boot</groupId>
		    <artifactId>spring-boot-starter-freemarker</artifactId>
		</dependency>
		-->
	   <dependency>
	      <groupId>org.springframework.boot</groupId>
	      <artifactId>spring-boot-devtools</artifactId>
	      <scope>runtime</scope>
	      <optional>true</optional>
	    </dependency>
		<dependency>
			<groupId>org.springframework.boot</groupId>
			<artifactId>spring-boot-starter-test</artifactId>
			<scope>test</scope>
		</dependency>
	</dependencies>

	<build>
		<plugins>
			<plugin>
				<groupId>org.springframework.boot</groupId>
				<artifactId>spring-boot-maven-plugin</artifactId>
			</plugin>
		</plugins>
	</build>

</project>
以上是一个完整的服务端pom内容,可以直接拿来用
YML配置
server:
  port: 8080

spring:
  freemarker:
    template-loader-path: classpath:/templates/
    suffix: .html
    charset: UTF-8
    cache: false
    content-type: text/html
logging:
  level:
    root: info
核心代码
package com.oauth.server.demo.config;

import org.springframework.context.annotation.Bean;
import org.springframework.context.annotation.Configuration;
import org.springframework.core.Ordered;
import org.springframework.core.annotation.Order;
import org.springframework.http.HttpMethod;
import org.springframework.http.MediaType;
import org.springframework.security.config.Customizer;
import org.springframework.security.config.annotation.web.builders.HttpSecurity;
import org.springframework.security.config.annotation.web.configuration.EnableWebSecurity;
import org.springframework.security.oauth2.server.authorization.config.annotation.web.configuration.OAuth2AuthorizationServerConfiguration;
import org.springframework.security.oauth2.server.authorization.config.annotation.web.configurers.OAuth2AuthorizationServerConfigurer;
import org.springframework.security.web.SecurityFilterChain;
import org.springframework.security.web.authentication.LoginUrlAuthenticationEntryPoint;
import org.springframework.security.web.util.matcher.MediaTypeRequestMatcher;

@Configuration
@EnableWebSecurity
public class SecurityConfig {

	@Bean
	@Order(Ordered.HIGHEST_PRECEDENCE)
	public SecurityFilterChain authorizationServerSecurityFilterChain(HttpSecurity http)
			throws Exception {

		OAuth2AuthorizationServerConfiguration.applyDefaultSecurity(http);
		http.getConfigurer(OAuth2AuthorizationServerConfigurer.class)
			.oidc(Customizer.withDefaults());	// Enable OpenID Connect 1.0
		http
			// Redirect to the login page when not authenticated from the
			// authorization endpoint
			.exceptionHandling((exceptions) -> exceptions
				.defaultAuthenticationEntryPointFor(
					new LoginUrlAuthenticationEntryPoint("/login"),
					new MediaTypeRequestMatcher(MediaType.TEXT_HTML)
				)
			)
			// Accept access tokens for User Info and/or Client Registration
			.oauth2ResourceServer(resourceServer -> resourceServer
					                                  .jwt(Customizer.withDefaults()
					               ));

		return http.build();
	}

	@Bean
	@Order(2)
	public SecurityFilterChain defaultSecurityFilterChain(HttpSecurity http)
			throws Exception {
		http
			.authorizeHttpRequests((authorize) -> authorize.requestMatchers(HttpMethod.GET,"/login")
                                                           .permitAll()
			)
			// Form login handles the redirect to the login page from the
			// authorization server filter chain
			.formLogin(Customizer.withDefaults());

		return http.build();
	}

}
重点讲解
核心代码中配置了两个SecurityFilterChain对象,一个是处理OAuth授权的,一个是处理SpringSecurity登录的。
授权服务的相关配置和前面几章的一样,只不过不再用@Import(OAuth2AuthorizationServerConfiguration.class) 这种方式了,
因为它默认不会开启OIDC,想看代码的可以去代码仓库。
构建客户端服务
POM内容
<project xmlns="http://maven.apache.org/POM/4.0.0" xmlns:xsi="http://www.w3.org/2001/XMLSchema-instance" xsi:schemaLocation="http://maven.apache.org/POM/4.0.0 https://maven.apache.org/xsd/maven-4.0.0.xsd">
  <modelVersion>4.0.0</modelVersion>
  <parent>
		<groupId>org.springframework.boot</groupId>
		<artifactId>spring-boot-starter-parent</artifactId>
		<version>3.3.0</version>
		<relativePath/> <!-- lookup parent from repository -->
	</parent>
  <groupId>com.oauth.client.demo</groupId>
  <artifactId>oauth_client_demo</artifactId>
  <version>0.0.1-SNAPSHOT</version>
  <name>oauth_client</name>
	<description>OAuth Client Demo project for Spring Boot</description>
	<properties>
		<java.version>17</java.version>
	</properties>
	<dependencies>
		<dependency>
			<groupId>org.springframework.boot</groupId>
			<artifactId>spring-boot-starter-oauth2-client</artifactId>
		</dependency>
		<dependency>
			<groupId>org.springframework.boot</groupId>
			<artifactId>spring-boot-starter-web</artifactId>
		</dependency>
         <dependency>
			<groupId>org.springframework</groupId>
			<artifactId>spring-webflux</artifactId>
		</dependency>
		<dependency>
			<groupId>io.projectreactor.netty</groupId>
			<artifactId>reactor-netty</artifactId>
		</dependency>
		<dependency>
			<groupId>org.springframework.boot</groupId>
			<artifactId>spring-boot-devtools</artifactId>
			<scope>runtime</scope>
			<optional>true</optional>
		</dependency>
		<dependency>
			<groupId>org.springframework.boot</groupId>
			<artifactId>spring-boot-starter-test</artifactId>
			<scope>test</scope>
		</dependency>
	</dependencies>

	<build>
		<plugins>
			<plugin>
				<groupId>org.springframework.boot</groupId>
				<artifactId>spring-boot-maven-plugin</artifactId>
			</plugin>
		</plugins>
	</build>
</project>
YML配置
server:
  port: 8010
logging:
  level:
    root: info
spring:
  application:
    name: oauth_client
  security:
    oauth2:
      client:
        provider:
            oauth:
              issuer-uri: http://www.oauth2server.com:8080
              #authorization-uri: http://www.oauth2server.com:8080/oauth2/authorize
              #token-uri: http://www.oauth2server.com:8080/oauth2/token
        registration:
          clientSecretBasic:
            provider: oauth
            client-id: clientid
            client-secret: client_secret
            client-authentication-method: client_secret_basic
            authorization-grant-type: client_credentials
            scope: openid,profile
          clientSecretPost:
            provider: oauth
            client-id: clientid
            client-secret: client_secret
            client-authentication-method: client_secret_post
            authorization-grant-type: client_credentials
            scope: openid,profile
          authcode:
            provider: oauth
            client-id: clientid
            client-authentication-method: none
            authorization-grant-type: authorization_code
            scope: openid
            redirect-uri: '{baseUrl}/login/oauth2/code/authcode'
核心代码
package com.oauth.client.demo.config;

import org.springframework.context.annotation.Bean;
import org.springframework.context.annotation.Configuration;
import org.springframework.security.config.Customizer;
import org.springframework.security.config.annotation.web.builders.HttpSecurity;
import org.springframework.security.config.annotation.web.configuration.EnableWebSecurity;
import org.springframework.security.oauth2.client.registration.ClientRegistrationRepository;
import org.springframework.security.web.SecurityFilterChain;

@Configuration
@EnableWebSecurity
public class SecurityConfig {

	@Bean
	public SecurityFilterChain securityFilterChain(ClientRegistrationRepository clientRegistrationRepository,HttpSecurity http) throws Exception {
		http.authorizeHttpRequests(auth->{
			      auth.anyRequest().authenticated();
			}).oauth2Client(Customizer.withDefaults())
		      .oauth2Login(Customizer.withDefaults());
		return http.build();
	}


}
重点讲解
yml中的认证地址都加了域名,这是因为,客户端和服务端都在同一台电脑上,如果都用localhost的话会出authorization_request_not_found的问题。
核心代码中配置了一个SecurityFilterChain,主要目的是初始OAuth2的客户端和配置OAuth2的登录。
演示效果

常见问题
如果你在同一台电脑上启动的客户端和服务端,都用的localhost访问的话。会遇到下面这个问题:
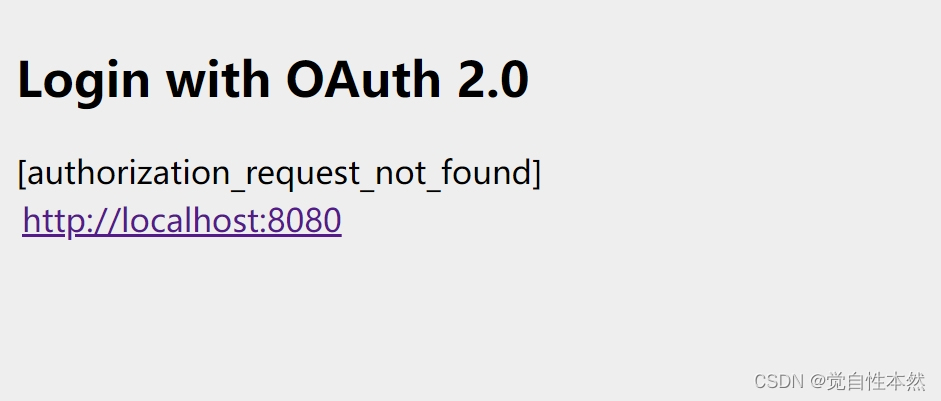
这时候只要配置一下hosts文件:127.0.0.1 www.oauth2server.com
再把客户端的yml配置改成域名就行了。
代码地址
完整代码参考地址:demo_03
以上只是一篇以讲解怎样以最简单的方式搭建OAuth2授权码服务。其中还有很多细节,比如
- 为什么授权码模式要开启OIDC ?
- 为什么回调地址是{baseUrl}/login/oauth2/code/authcode ?
- 怎么配置自己的登录页面和协议页面?
- 授权码模式中的code_challenge是做什么的?
等等,这些都会在后面的章节一一解答。敬请期待!


 856
856


 被折叠的 条评论
为什么被折叠?
被折叠的 条评论
为什么被折叠?
 到【灌水乐园】发言


