


This is my first time to install CUDA, so I mark down the whole process for future use.
In the most part of this installation, I just refer to Ubuntu 14.04 上安装 CUDA 7.5/8.0 超详细教程
Here are the steps and experience:
Background:
PC:ASUS
GPU: GeForce GTX 750
NVIDIA UNIX x86_64 Kernel Module 384.81
系统环境:Ubuntu16.04 64位
CUDA 版本: 9.0
其他:Ubuntu中不存在已经安装的CUDA
Notice:
如果你的电脑是双显,而且用来显示的那块GPU不是NVIDIA,则OpenGL Libraries就不应该安装,否则不是NVIDIA的那块GPU使用的OpenGL Libraries会被覆盖,然后GUI就无法工作了。
I met some problem with libglvnd, which is related to openGL library, so I choice no for this installation when installing CUDA.
0、Disable Secure Boot
If you don't go through this step to disable it, you will probably not be able to log in with the graphic mode. SoWe need to disable secure boot before installing CUDA.
Here I refer to 华硕主板禁用UEFI安全启动.
BIOS's Secure Boot menu should show Secure Boot state as "enabled" and Platform Key (PK) state as "loaded(or Unloaded)"
How to disable the BIOS UEFI secure boot:
- Make sure the "OS Type" is "Windows UEFI"
- Enter "Key Management"
- Select "Clear Secure Boot keys" (You will have the option "Install default Secure Boot keys" to restore the default keys after you cleared the Secure Boot Keys)
If you already meet the problem to log in after CUDA installation , you need to uninstall CUDA or directly run$sudo apt-get remove nvidia* to uninstall NVIDIA. Some says there is no need to install NVIDIA before installing CUDA, for CUDA installation includes NVIDIA driver.
1、NVIDIA
My computer has no NVIDIA at the beginning, so I check the version of my Geforce and boot it according to NVIDIA official website.(But this step seems to be not necessary)
2、检查自己的电脑环境是否具备安装CUDA的条件
a) 检查自己的GPU是否是CUDA-capable
在终端中输入: $ lspci | grep -i nvidia ,会显示自己的NVIDIA GPU版本信息
去CUDA的官网查看自己的GPU版本是否在CUDA的支持列表中
b) 检查自己的Linux版本是否支持 CUDA(Ubuntu 14.04没问题)
c) 检查自己的系统中是否装了gcc
在终端中输入: $gcc –version 可以查看自己的gcc版本信息
d) 检查是否安装了kernel header和 package development
在终端中输入: $uname –r 可以查看自己的kernel版本信息
在终端中输入:$ sudo apt-get install linux-headers-$(uname -r)
可以安装对应kernel版本的kernel header和package development
以上检查我的电脑系统都满足要求,如果没有满足要求的话,可以参考cuda的官方文档,里面有详细的针对每个问题的解决方案。
3、 选择安装方式
CUDA提供两种安装方式:package manager安装和runfile安装
我本来选的是 package manager 安装,这种方法相对简单,但尝试了几次都失败。后来是转换到runfile安装才成功的。因此此处只介绍runfile安装方式。
下载cuda安装包:cuda官网下载,根据系统信息选择对应的版本,runfile安装的话最后一项要选择 runfile文件
4、runfile安装cuda
a) 禁用 nouveau (I have no output at this step)
终端中运行:$ lsmod | grep nouveau,如果有输出则代表nouveau正在加载。
Ubuntu的nouveau禁用方法:
在/etc/modprobe.d中创建文件blacklist-nouveau.conf,在文件中输入一下内容
blacklist nouveau
options nouveau modeset=0
打开终端,运行
$ sudo update-initramfs –u设置完毕可以再次运行 $ lsmod | grep nouveau 检查是否禁用成功,如果运行后没有任何输出,则代表禁用成功。
另外可参考:

b) 重启电脑,到达登录界面时,alt+ctrl+f1,进入text mode,登录账户
c) 输入 $ sudo service lightdm stop 关闭图形化界面
d) 切换到cuda安装文件的路径,运行$ sudo sh cuda_9.0.176_384.81_linux.run
按照提示一步步操作
遇到提示是否安装openGL ,选择no(如果你的电脑跟我一样是双显,且主显是非NVIDIA的GPU需要选择no,否则可以yes)
其他都选择yes或者默认
安装成功后,会显示installed,否则会显示failed。
e) 输入 $ sudo service lightdm start重新启动图形化界面。
Alt + ctrl +F7,返回到图形化登录界面,输入密码登录。
如果能够成功登录,则表示不会遇到循环登录的问题,基本说明CUDA的安装成功了。
f) 重启电脑。检查Device Node Verification。
检查路径/dev下 有无存在名为nvidia*(以nvidia开头)的多个文件(device files)
如果没有的话,可以参考官方文档里的指导步骤,进行添加。
g) 设置环境变量。
终端中输入 $ sudo gedit /etc/profile
在打开的文件末尾,添加以下两行。
 export PATH=/usr/local/cuda-7.5/bin:$PATH
 export LD_LIBRARY_PATH=/usr/local/cuda7.5/lib64
保存文件。
这里有点与官方安装文档稍有不同,需要说明:
官方文档里说只需在终端中运行上述两条export语句即可,但如果不将它们不写入/etc/profile文件的话,这样的环境变量在你退出终端后就消失了,不起作用了,所以写入才是永久的做法。
h) 重启电脑,检查上述的环境变量是否设置成功。
终端中输入 : $ env
在输出的环境变量中检查有无上述 g) 中设置的变量,如果有则代表设置成功。
到此为止,CUDA的安装算是告一段落了。为了保险起见,建议进行下述的检查工作,确保真正的安装成功。(The truth is , I do meet an error in the following step.)
5、 安装完毕后的检查工作。
a) 检查 NVIDIA Driver是否安装成功
终端输入 :$ cat /proc/driver/nvidia/version 会输出NVIDIA Driver的版本号
b) 检查 CUDA Toolkit是否安装成功
终端输入 : $ nvcc –V 会输出CUDA的版本信息
c) 尝试编译cuda提供的例子
切换到例子存放的路径,默认路径是 ~/NVIDIA_CUDA-9.0_Samples
(即 /home/xxx/ NVIDIA_CUDA-9.0_Samples, xxx是你自己的用户名)
然后终端输入:$ make
如果出现错误的话,则会立即报错停止,否则会开始进入编译阶段。
The problem I meet is like
eglstrm_common.c:85:81: error: ‘EGL_SUPPORT_REUSE_NV’ undeclared (first use in this function) This problem comes from the version of GEL library. Just need to replace three files {
egl.h, eglext.h, eglplatform.h } in path /usr/include/GEL by the 1.5-version-files in
Khronos EGL Registry
整个编译的时间持续比较长,耐心等待,大概十几分钟是需要的。
d) 运行编译生成的二进制文件。
编译后的二进制文件 默认存放在~/NVIDIA_CUDA-9.0_Samples/bin中。
切换路径 : cd ~/NVIDIA_CUDA-9.0_Samples/bin/x86_64/linux/release
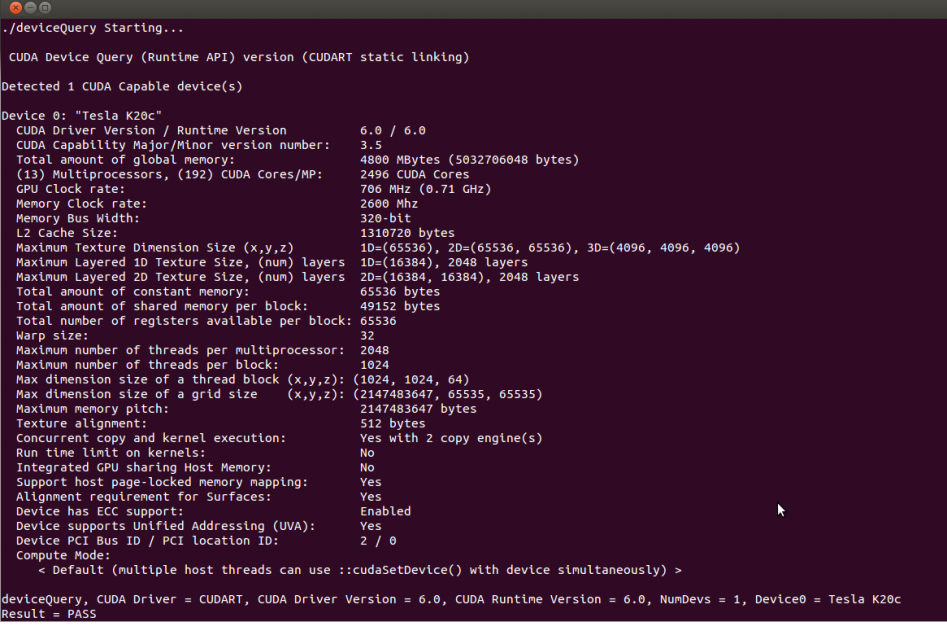
终端输入 :$ ./deviceQuery
看到类似如下图片中的显示,则代表CUDA安装且配置成功(congratulation!!)
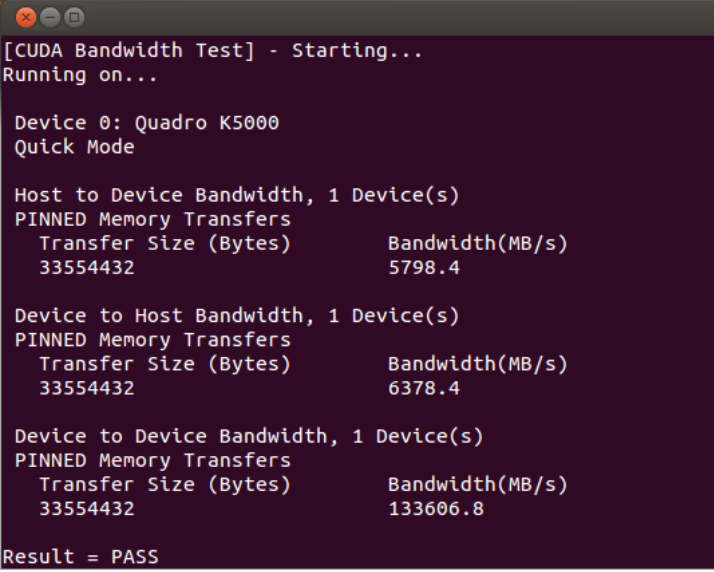
再检查一下系统和CUDA-Capable device的连接情况
终端输入 : $ ./bandwidthTest
看到类似如下图片中的显示,则代表成功
最后祝大家都能顺利安装CUDA~~
Finally make it !
God bless you!!!


 1834
1834

 被折叠的 条评论
为什么被折叠?
被折叠的 条评论
为什么被折叠?
 到【灌水乐园】发言


