TestStand系列----3创建序列

本节我们来亲自创建一个序列并探索TestStand的一些功能。

首先打开序列编辑器,通过菜单命令“File >> New >> Sequence File”新建序列文件,或单击工具栏上的图标,如下图红色方框显示。
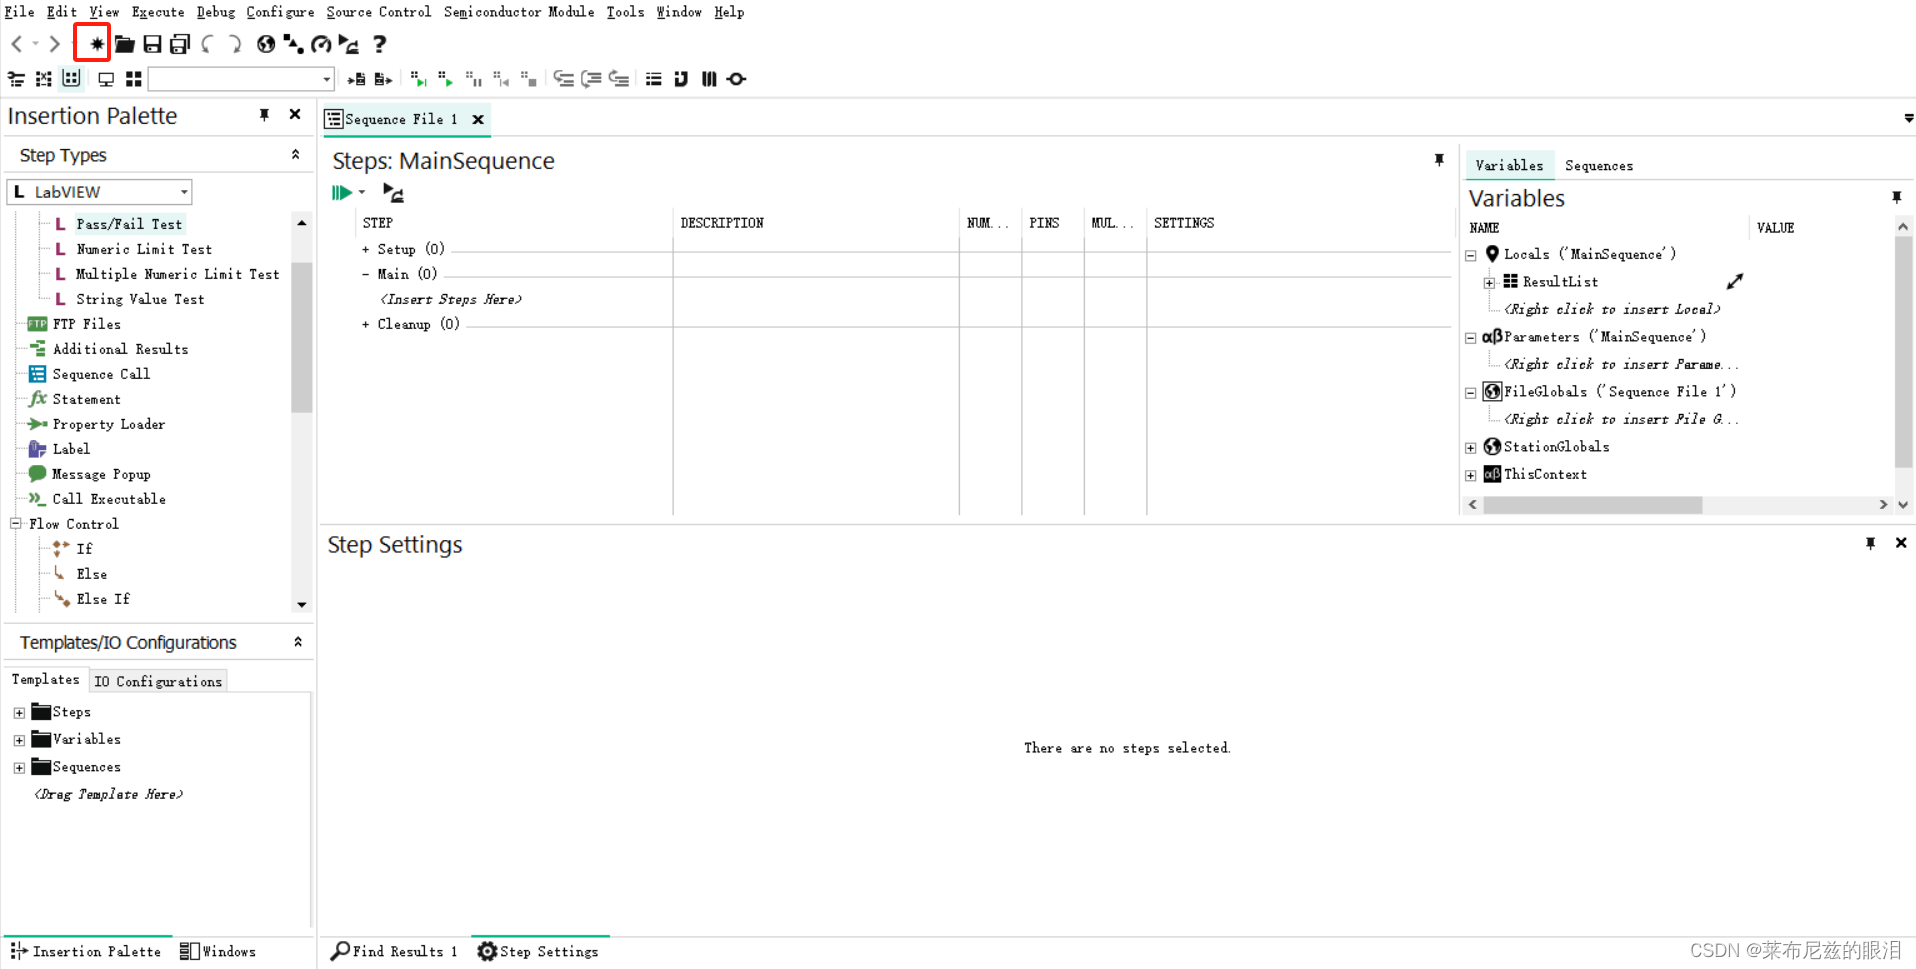
接下来就可以给序列中添加Step了。对于Step而言,主要分为三类:

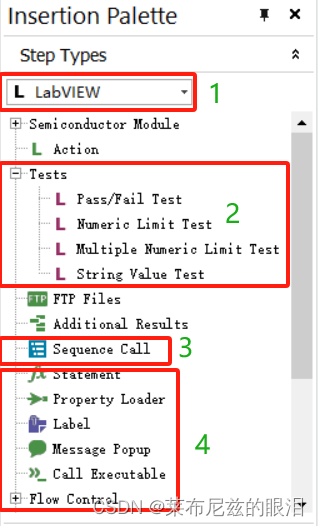
1、使用任意模块适配器,如“Action”步骤类型,可以调用LabVIEW、C/C++ DLL等代码模块(如下图标号1所示,下拉框可选LabVIEW、LabWindows/CVI、C/C++ DLL、.Net等),TestStand可以传递参数给代码模块,有些还执行额外的操作,如将代码模块的返回值和限度值进行比较(下图标号2所示step可做相应操作);

2、使用特定模块适配器,如“Sequence Call”步骤类型就是指定使用Sequence模块适配器(如下图标号3所示);

3、指定特定的操作,但并不需要调用代码模块,如Label、Statement、Message Popup、Flow control等(如下图标号4所示)。
 接下来我们简单创建一个特定操作适配器,暂时无需添加任何diamante模块。

第一步:从Insertion Palette框中选中Message Popup,并用鼠标左键按住不放拖入Steps: MainSequence中的Main下,如下图所示:
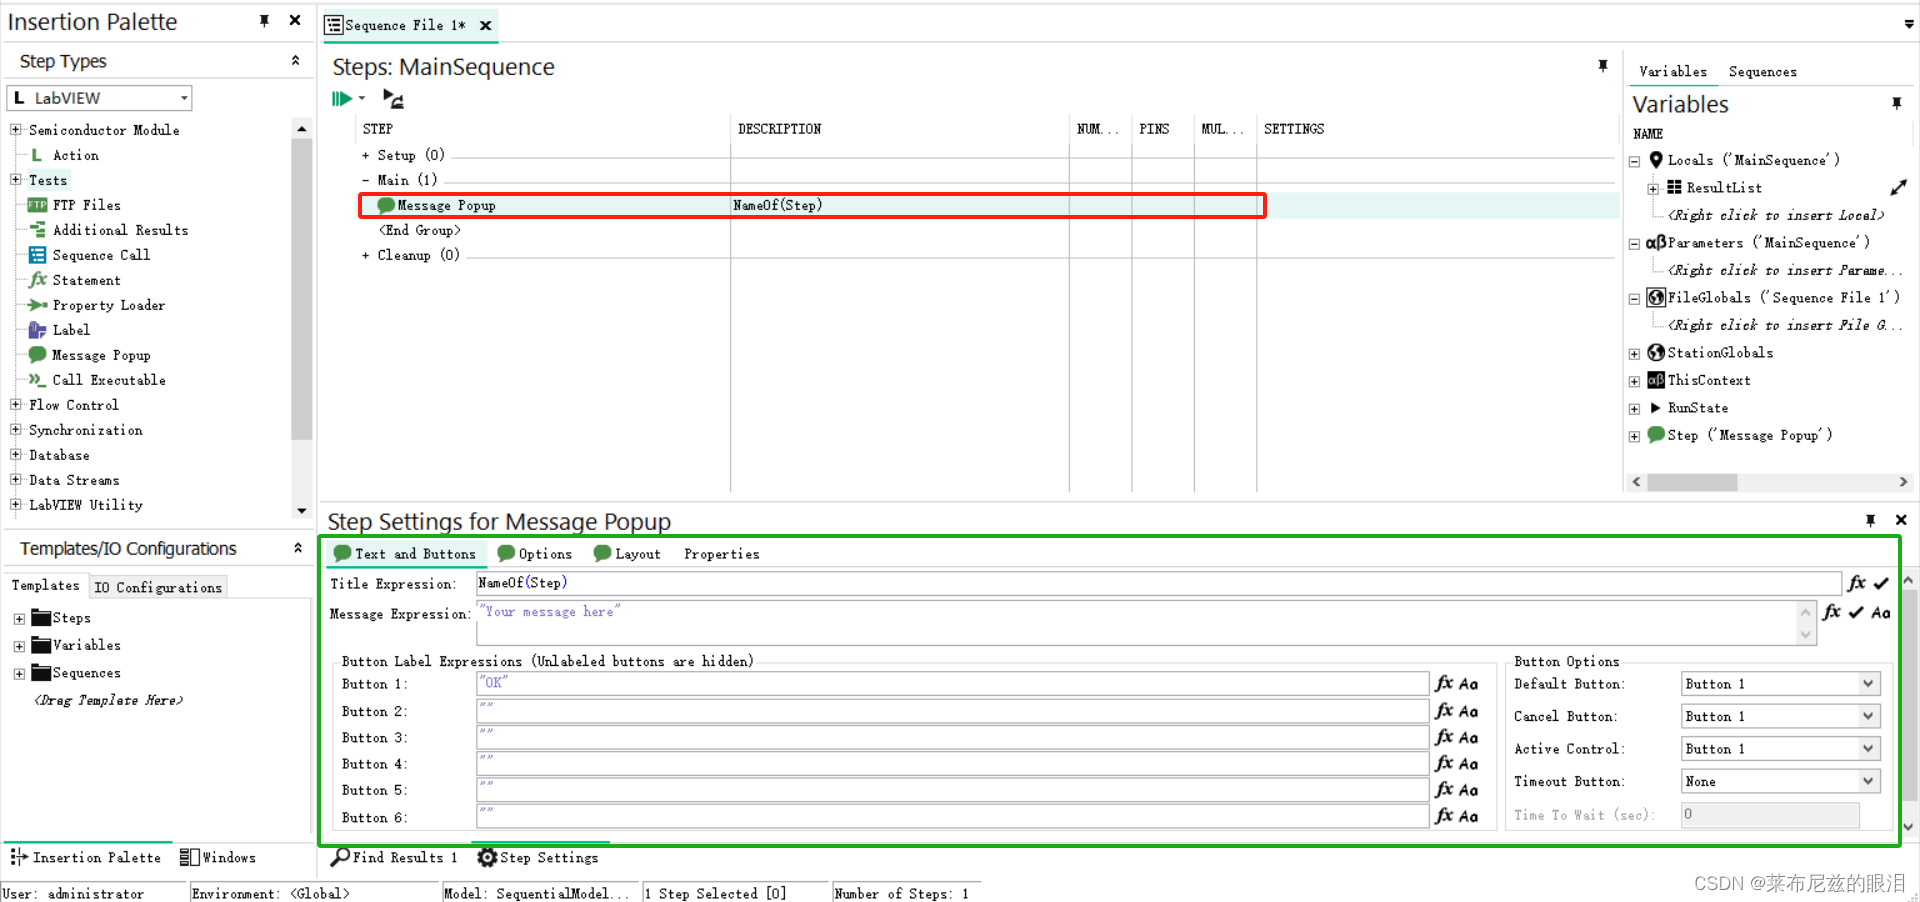
 红框为我们刚放置的step,绿框是这个step需要设置的一些参数。

Title Expression:显示弹窗的标题,默认是NameOf(Step),即当前步骤的名称;

Message Expression:这里输入的内容将作为消息对话框窗口文本的主体;

Button Label Expression:按钮显示标签,这里可最多支持6个按钮,未填写文本的按钮将不显示;

Button Options“Default Button”使用“Enter”作为快捷键,“Cancel Button”使用“Esc”作为快捷键,“Active Control”指在消息框弹出时默认聚焦在哪个按钮上,“Timeout”指超过特定时间仍没有按钮按下,系统默认激活当前设定的按钮。

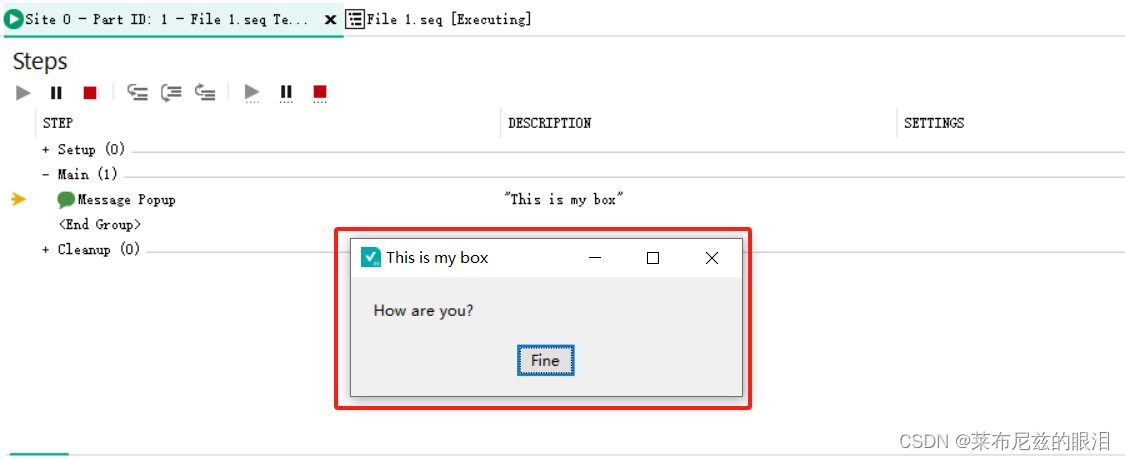
接下来我们运行以下程序看看结果,点击Execute下single Test或点击红框运行箭头,可以执行程序。

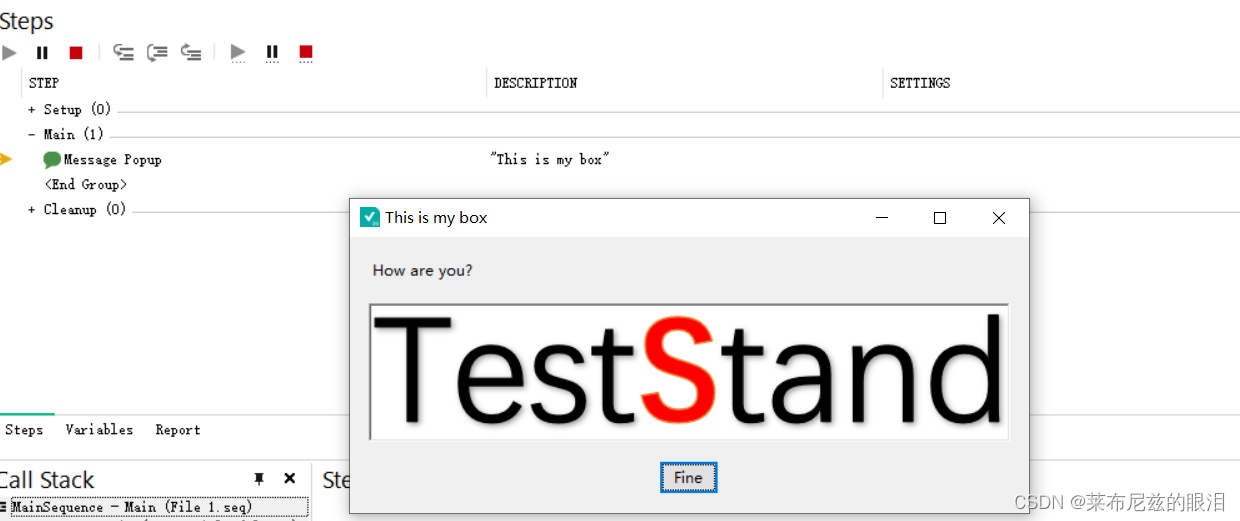
下图为程序运行结果:
在某些场景下可能需要输入一段文本应答记录一些信息,可以在选项配置页面进行配置,如下图所示。 选择Enable Response Text Box可使能输入文本信息,选择Display Image or Web Page可使能输入图片或网页展示在弹框中。

下图展示了在Enable   “Display Image or Web Page”时程序运行结果:
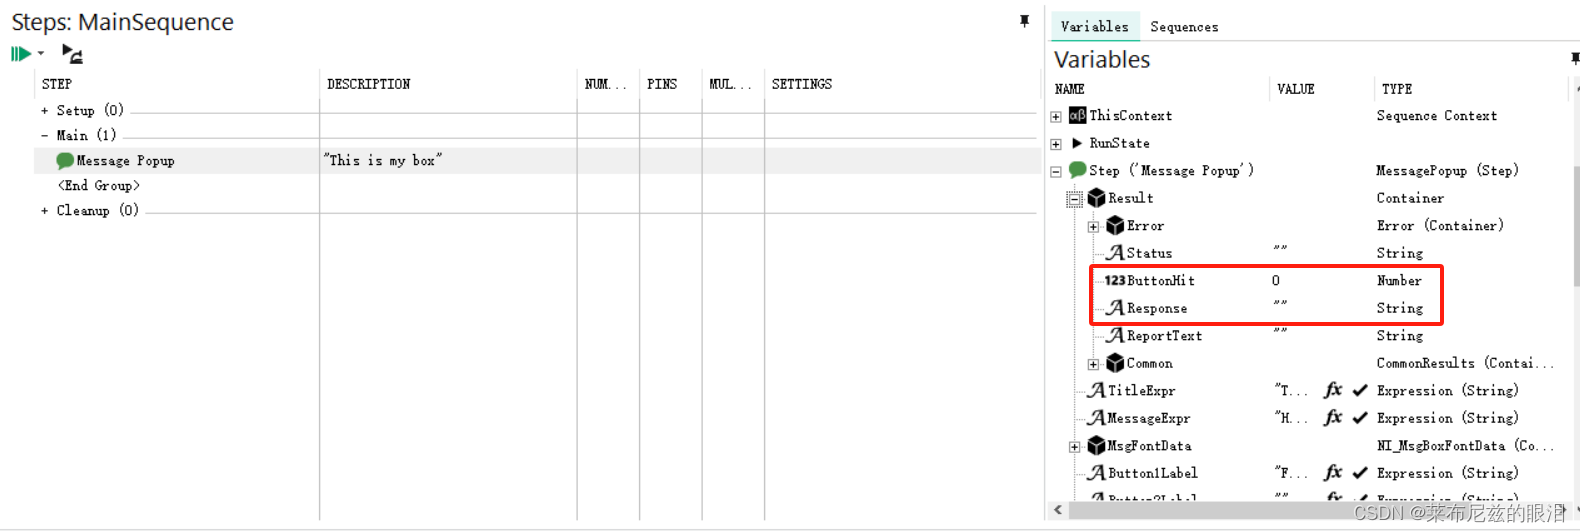
对于每个Step都会有自身的一些属性可以配置修改,通过选中Step在Variables中可以看到其所有的属性。对于Message Popup比较重要的属性有Step.Result.ButtonHit、Step.Result.Response、Step.TitleExpr、Step.MessageExpr。Step.Result.ButtonHit可以记录用户单击了哪个按钮,Step.Result.Response保存应答文本。
以上就是一个创建一个简单序列的执行过程,对于需要调用代码模块的程序我们后续在使用的时候可以介绍具体用法。本Message Popup程序我放至资源处,有需要可下载自行修改尝试。 

  • 0
    点赞
  • 2
    收藏
    觉得还不错? 一键收藏
  • 打赏
    打赏
  • 1
    评论
最全的Teststand 教程(英文版) Introduction Introduction.................................................................................................................xi Technical Support Options.........................................................................................xii Course Objectives.......................................................................................................xiii Course Description .....................................................................................................xiii Course Map.................................................................................................................xiv Items You Need for this Course Module:...................................................................xv Note on Hands-On Exercises......................................................................................xvi Lesson 1 Introduction to TestStand Introduction.................................................................................................................1-1 The Role of a Test Executive......................................................................................1-2 The TestStand Goal ....................................................................................................1-3 What is TestStand?.....................................................................................................1-4 The TestStand Architecture........................................................................................1-5 The Sequence Editor...................................................................................................1-6 The Operator Interface................................................................................................1-7 The TestStand Engine.................................................................................................1-8 Module Adapters ........................................................................................................1-9 The TestStand Architecture........................................................................................1-10 Summary.....................................................................................................................1-13 Exercises Exercise 1-1 Running a Sequence File..................................................................1-15 Exercise 1-2A Running a Sequence File from the LabVIEW Operator Interface ............................................................................1-20 Exercise 1-2B Running a Sequence File from the LabWindows/CVI Operator Interface..............................................1-25 Contents TestStand Development Course Manual iv www.ni.com Lesson 2 The TestStand Environment Introduction.................................................................................................................2-1 What is a Sequence?...................................................................................................2-2 Step Groups.................................................................................................................2-3 TestStand Sequence Files ...........................................................................................2-4 Debugging Tools.........................................................................................................2-5 The TestStand Process Model.....................................................................................2-8 The Default Process Model: Test UUTs Mode ..........................................................2-9 TestStandModel.seq....................................................................................................2-10 The Role of the Process Model within the TestStand Architecture............................2-11 Exercises Exercise 2-1 Understanding the Sequence File.....................................................2-15 Exercise 2-2 Running a Sequence File with Breakpoints and Single Stepping.................................................................................2-21 Exercise 2-3 Understanding the Process Model....................................................2-28 Lesson 3 Creating Sequences Introduction.................................................................................................................3-1 How to Create Test Sequences ...................................................................................3-2 Action 1 : Specify the Adapter ...................................................................................3-3 Action 2: Select the Step Type ...................................................................................3-4 Step Types...................................................................................................................3-5 Action 3: Specify the Test Module.............................................................................3-6 Specifying the Module................................................................................................3-7 Specifying the Module: Search Directories................................................................3-8 Action 4: Configure Step Properties...........................................................................3-9 Step Properties: General Tab......................................................................................3-10 Step Properties: Preconditions....................................................................................3-11 Step Properties: Run Options......................................................................................3-12 Step Properties: Post Actions......................................................................................3-14 Step Properties: Loop..................................................................................................3-15 Step Properties: Expressions.......................................................................................3-17 Exercises Exercise 3-1 Creating Steps in the Sequence Editor .............................................3-23 Exercise 3-2 Configuring Loop Options ...............................................................3-34 Exercise 3-3 Creating a Sequence.........................................................................3-38 Exercise 3-4 Running Sequences in Parallel (Optional) .......................................3-58 Contents © National Instruments Corporation v TestStand Development Course Manual Lesson 4 TestStand Parameters, Variables, and Expressions Introduction.................................................................................................................4-1 Parameters...................................................................................................................4-2 Parameters: Passing data from top-level sequences to subsequences.........................4-3 TestStand Variables....................................................................................................4-4 Local Variables...........................................................................................................4-5 Creating Locals Variables...........................................................................................4-6 Sequence File Global Variables..................................................................................4-8 Creating Sequence File Global Variables...................................................................4-9 Station Globals............................................................................................................4-10 The Expression Browser.............................................................................................4-11 Exercises Exercise 4-1 Using Local Variables......................................................................4-19 Exercise 4-2 Examine the Uses and Differences between Locals, File Globals, and Station Globals.....................................................4-22 Exercise 4-3 Using Expressions to Change Step Properties..................................4-30 Exercise 4-4 Passing Parameters...........................................................................4-39 Exercise 4-5 Dynamically Selecting Which Sequence to Run..............................4-49 Exercise 4-6 Using the UUT Serial Number to Determine Which Sequence to Run...............................................................................4-50 Lesson 5 Creating Test Modules in External Environments Introduction.................................................................................................................5-1 Creating Tests in External Application Development Environments (ADEs)...........5-2 Methods of Data Transfer for TestStand ....................................................................5-3 Method 1—Passing Parameters Directly Using Structures........................................5-3 Using Clusters to Pass Data from LabVIEW..............................................................5-4 Using Structures to Pass Data from LabWindows/CVI..............................................5-6 Method 2—Passing Arbitrary Number of Parameters Directly..................................5-8 Method 3—Using the ActiveX Automation API to Access Properties and Methods .............................................................................................................5-12 What is ActiveX Automation?....................................................................................5-13 Summary of ActiveX Automation..............................................................................5-14 TestStand and ActiveX Automation...........................................................................5-15 Using TestStand ActiveX Automation Functions in LabVIEW.................................5-16 An Example of Using ActiveX Automation in LabVIEW.........................................5-17 Using ActiveX Automation in LabWindows/CVI......................................................5-18 An Example Of Using The TestStand API Instrument Driver In LabWindows/CVI.....................................................................................................5-19 Using TestStand to Generate Code Templates...........................................................5-24 Code Templates ..........................................................................................................5-25 Contents TestStand Development Course Manual vi www.ni.com Exercises Exercise 5-1A Creating Pass/Fail Tests in LabVIEW..............................................5-27 Exercise 5-1B Creating Pass/Fail Tests with LabWindows/CVI.............................5-33 Exercise 5-1C Creating Pass/Fail Tests for the DLL Flexible Prototype Adapter.............................................................................5-44 Exercise 5-2A Creating Numeric Limit Tests with LabVIEW................................5-54 Exercise 5-2B Creating Numeric Limit Tests with LabWindows/CVI.............................................................................5-59 Exercise 5-2C Creating Numeric Limit Tests for the DLL Flexible Prototype Adapter...............................................................5-67 Exercise 5-3A Debugging Tests Using LabVIEW...................................................5-80 Exercise 5-3B Debugging Tests Using LabWindows/CVI......................................5-84 Exercise 5-3C Debugging Tests that use the DLL Flexible Prototype Adapter.............................................................................5-88 Exercise 5-4A Using the ActiveX API in Code Modules with LabVIEW .................................................................................5-91 Exercise 5-4B Using the ActiveX API in Code Modules with LabWindows/CVI ....................................................................5-100 Exercise 5-4C Using the ActiveX API in Flexible DLL Code Modules............................................................................................5-110 Exercise 5-5A Creating a Simple Test Using the LabVIEW Standard Prototype Adapter .............................................................5-122 Exercise 5-5B Creating A Simple Test Using The C/CVI Standard Prototype Adapter .............................................................5-124 Exercise 5-6A Passing Parameters from TestStand to LabVIEW using The TestStand API..................................................................5-125 Exercise 5-6B Passing Parameters from TestStand to LabWindows/CVI using The TestStand API...................................5-127 Exercise 5-7 Passing Data Between TestStand and a Test Module Using the DLL Flexible Prototype Adapter........................5-129 Lesson 6 User Management Introduction.................................................................................................................6-1 The TestStand User Manager .....................................................................................6-2 Default User Profiles in TestStand .............................................................................6-3 Linking Windows System Users.................................................................................6-5 Exercise Exercise 6-1 Setting User Login Access and Privileges........................................6-7 ...............
teststand教材是一种用于学习和理解teststand测试平台的教育资源。teststand是一款由National Instruments(NI)公司开发的自动化测试软件平台,用于编写、执行和管理测试序列。它提供了一个直观的图形用户界面,使用户能够轻松创建和编辑测试序列,以及监控和分析测试结果。 teststand教材的目的是帮助学习者逐步掌握teststand的各项功能和应用。教材通常会介绍teststand的基本概念、工作原理和使用方法,包括如何创建和配置测试序列,如何添加测试步骤和操作,以及如何运行和调试测试程序。教材还会介绍teststand的高级功能,例如如何添加自定义代码和脚本,如何处理测试数据和生成测试报告,以及如何与其他测试设备和工具进行集成。 通过学习teststand教材,学生可以获得以下几方面的收益。首先,他们将了解到自动化测试的概念和好处,学会如何利用teststand提高测试效率和精度。其次,他们将掌握teststand的使用技巧和最佳实践,能够独立编写和管理测试序列,以及解决测试过程中的常见问题。最后,通过实际的实验和项目练习,学生能够应用所学的知识和技能解决实际的测试问题,提升他们的工程能力和竞争力。 总的来说,teststand教材是一种有助于学习者理解和掌握teststand测试平台的重要学习资源。通过系统地学习和实践,学生将能够熟练应用teststand进行各种测试任务,为他们的工作和职业发展打下坚实的基础。

“相关推荐”对你有帮助么?

  • 非常没帮助
  • 没帮助
  • 一般
  • 有帮助
  • 非常有帮助
提交
评论 1
添加红包

请填写红包祝福语或标题

红包个数最小为10个

红包金额最低5元

当前余额3.43前往充值 >
需支付:10.00
成就一亿技术人!
领取后你会自动成为博主和红包主的粉丝 规则
hope_wisdom
发出的红包

打赏作者

莱布尼兹的眼泪

你的鼓励将是我创作的最大动力

¥1 ¥2 ¥4 ¥6 ¥10 ¥20
扫码支付:¥1
获取中
扫码支付

您的余额不足,请更换扫码支付或充值

打赏作者

实付
使用余额支付
点击重新获取
扫码支付
钱包余额 0

抵扣说明:

1.余额是钱包充值的虚拟货币,按照1:1的比例进行支付金额的抵扣。
2.余额无法直接购买下载,可以购买VIP、付费专栏及课程。

余额充值