


文章目录
前置知识
需要一定的Linux基础知识
virtualbox或者vmware安装CentOS7,以及会创建/复制/还原镜像
CentOS7配置yum源,yum安装各种软件
黑马程序员Nginx视频地址:https://www.bilibili.com/video/BV1ov41187bq
一. 源码安装 Nginx
- 准备工作–下载源码(这步放在完成下面第3步后面再操作也可以,Centos默认没有wget,需要yum install)
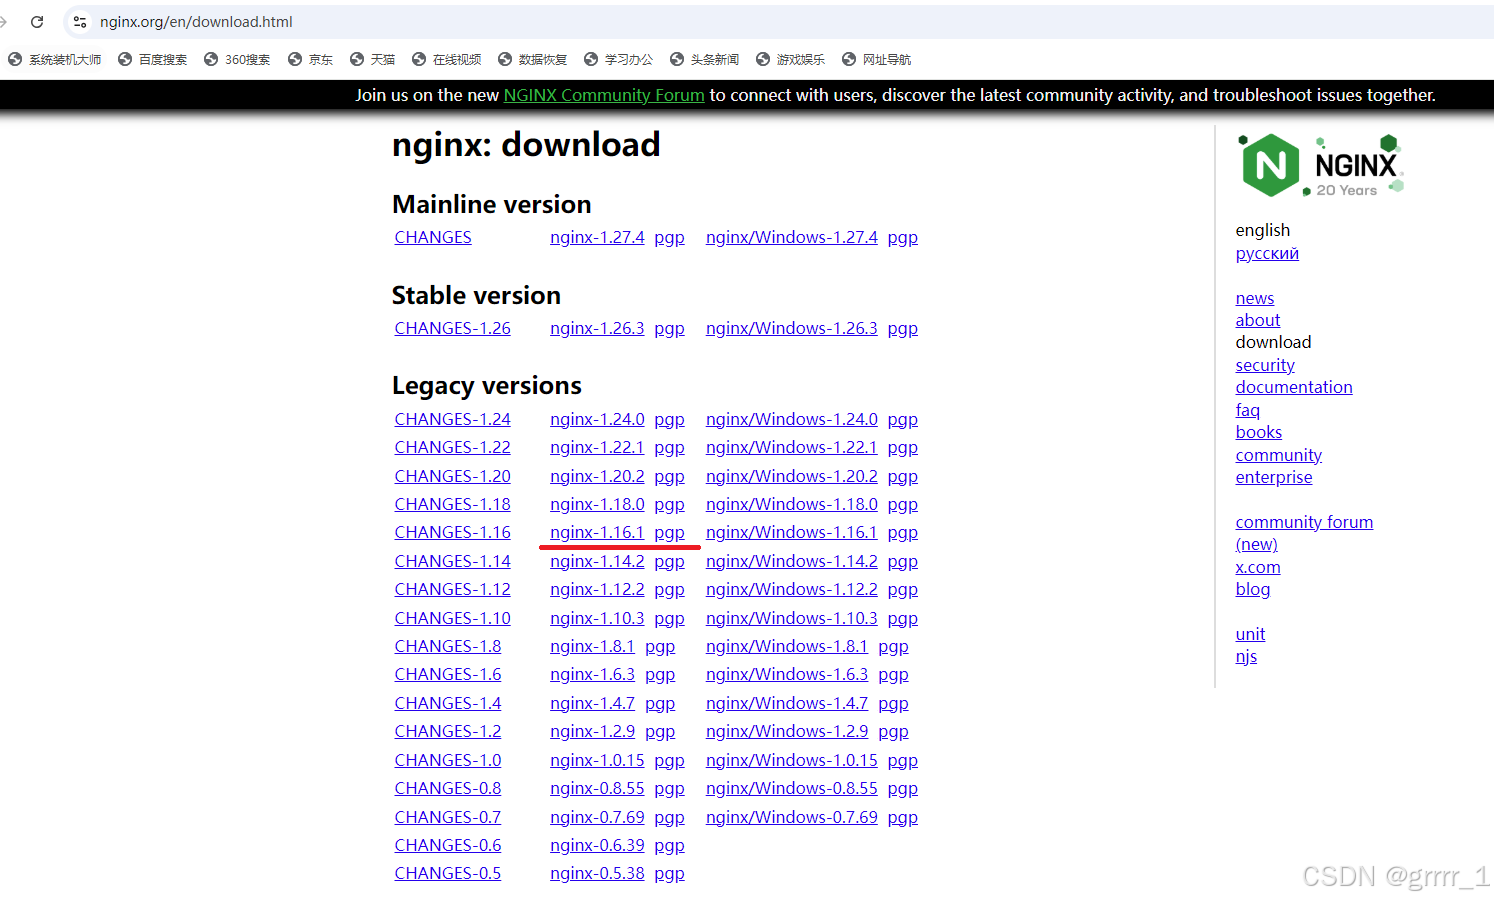
nginx官网https://nginx.org/en/download.html,以nginx 1.16.1为例
mkdir -p nginx/core  # 新建文件夹
wget https://nginx.org/download/nginx-1.16.1.tar.gz  # 下载源码tar.gz包
mv nginx-1.16.1.tar.gz nginx/core # 移动到文件夹中
cd nginx/core # 进入文件夹中
tar -xzf nginx-1.16.1.tar.gz  # 解包
- 关闭 firewalld / selinux
# 关闭防火墙
systemctl stop firewalld
# 检查防火墙状态
systemctl status firewalld

# 第3行 dead 表示已经关闭防火墙 ,注意是测试环境,实际工作中必须使用其他方法
● firewalld.service - firewalld - dynamic firewall daemon
   Loaded: loaded (/usr/lib/systemd/system/firewalld.service; enabled; vendor preset: enabled)
   Active: inactive (dead) since Wed 2025-03-19 15:00:06 EDT; 1h 39min ago
     Docs: man:firewalld(1)
  Process: 4135 ExecStart=/usr/sbin/firewalld --nofork --nopid $FIREWALLD_ARGS (code=exited, status=0/SUCCESS)
 Main PID: 4135 (code=exited, status=0/SUCCESS)

Mar 19 14:59:36 localhost.localdomain systemd[1]: Stopped firewalld - dynamic firewall daemon.
Mar 19 14:59:36 localhost.localdomain systemd[1]: Starting firewalld - dynamic firewall daemon...
Mar 19 14:59:36 localhost.localdomain systemd[1]: Started firewalld - dynamic firewall daemon.
Mar 19 14:59:36 localhost.localdomain firewalld[4135]: WARNING: AllowZoneDrifting is enabled. This is considered an insecure configuration option. It will be removed in a future release. Please...bling it now.
Mar 19 15:00:05 localhost.localdomain systemd[1]: Stopping firewalld - dynamic firewall daemon...
Mar 19 15:00:06 localhost.localdomain systemd[1]: Stopped firewalld - dynamic firewall daemon.
Hint: Some lines were ellipsized, use -l to show in full.

# 关闭selinux
selinux # 查看状态显示如下

SELinux status:                 enabled
SELinuxfs mount:                /sys/fs/selinux
SELinux root directory:         /etc/selinux
Loaded policy name:             targeted
Current mode:                   permissive
Mode from config file:          error (Success)
Policy MLS status:              enabled
Policy deny_unknown status:     allowed
Max kernel policy version:      31

# 修改 config 中配置并重启文件再能关闭
vim /etc/selinux/config

# This file controls the state of SELinux on the system.
# SELINUX= can take one of these three values:
#     enforcing - SELinux security policy is enforced.
#     permissive - SELinux prints warnings instead of enforcing.
#     disabled - No SELinux policy is loaded.
# SELINUX=enforcing # 这个是未修改时的配置
SELINUX=disabled  #【<-将其设置为disable】
# SELINUXTYPE= can take one of three values:
#     targeted - Targeted processes are protected,
#     minimum - Modification of targeted policy. Only selected processes are protected.
#     mls - Multi Level Security protection.
SELINUXTYPE=targeted

reboot # 重启后生效

sestatus  # 再查看状态,显示如下:
SELinux status:                 disabled
3. 编译前准备工作--安装编译所需要的必要环境,一些软件如c语言等依赖包,不然无法编译
yum install gcc pcre pcre-devel zlib zlib-devel openssl openssl-devel -y

# 安装完成后,用下面命令可以检查依赖包是否安装成功
rpm -qa gcc pcre pcre-devel zlib zlib-devel openssl openssl-devel
pcre-8.32-17.el7.x86_64
zlib-1.2.7-21.el7_9.x86_64
pcre-devel-8.32-17.el7.x86_64
openssl-devel-1.0.2k-26.el7_9.x86_64
openssl-1.0.2k-26.el7_9.x86_64
zlib-devel-1.2.7-21.el7_9.x86_64
gcc-4.8.5-44.el7.x86_64
其中 gcc 是 c 语言,pcre 两个是正则解析和正则开发库,zlib 2个是压缩和其开发库,openssl是大名鼎鼎的安全通讯套件。
- 编译以及启动
nginx
cd nginx/core/nginx-1.16.1
./configure
make && make install
# 开始等待安装完毕
cd /usr/local/sbin
./nginx
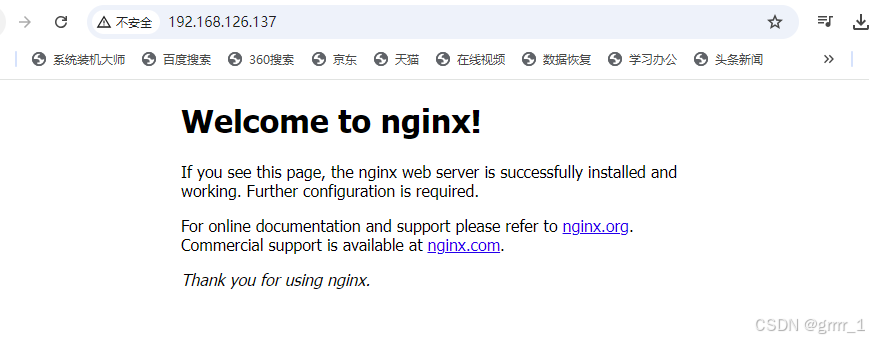
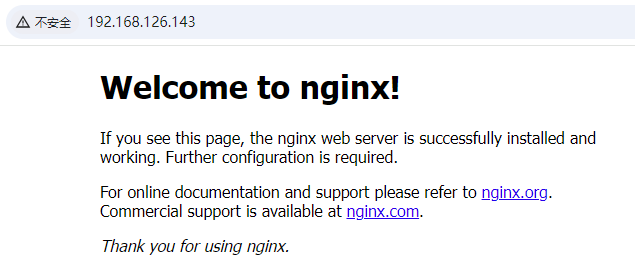
# 在 linux 内,用命令行访问下如下地址:
# localhost / 127.0.0.1 / 虚拟机的 ipv4
# 都可以看到已经出现了 welcome to nginx
curl localhost
<!DOCTYPE html>
<html>
<head>
<title>Welcome to nginx!</title>
<style>
body {
width: 35em;
margin: 0 auto;
font-family: Tahoma, Verdana, Arial, sans-serif;
}
</style>
</head>
<body>
<h1>Welcome to nginx!</h1>
<p>If you see this page, the nginx web server is successfully installed and
working. Further configuration is required.</p>
<p>For online documentation and support please refer to
<a href="http://nginx.org/">nginx.org</a>.<br/>
Commercial support is available at
<a href="http://nginx.com/">nginx.com</a>.</p>
<p><em>Thank you for using nginx.</em></p>
</body>
</html>
# 如果是物理机,只能通过访问虚拟机的ip地址来访问nginx
# 如果访问无反应,然后拒绝访问,请检查虚拟机的防火墙 firewalld 是否开启状态
# 防火墙开启的时候无法访问
如果访问无反应,然后拒绝访问,请检查虚拟机的防火墙firewalld是否没关闭
二. yum安装 Nginx
为区别上面的的源码安装的nginx,此时建议克隆个未安装yum的centos7虚拟机
- 根据 nginx 官网 文档的介绍 RHEL and derivatives
[nginx-stable]  # 稳定版
name=nginx stable repo
baseurl=http://nginx.org/packages/centos/$releasever/$basearch/
gpgcheck=1
enabled=1
gpgkey=https://nginx.org/keys/nginx_signing.key
module_hotfixes=true

[nginx-mainline] # 主线版
name=nginx mainline repo
baseurl=http://nginx.org/packages/mainline/centos/$releasever/$basearch/
gpgcheck=1
enabled=0
gpgkey=https://nginx.org/keys/nginx_signing.key
module_hotfixes=true
By default, the repository for stable nginx packages is used. If you would like to use mainline nginx packages, run the following command:
# 非必须
sudo yum-config-manager --enable nginx-mainline  # 如果要切换主线版,执行该命令。一般无需。
yum 安装 nginx
yum install nginx
安装完毕后,可执行 whereis nginx 查找装在哪里
yum.repos.d]# whereis nginx
nginx: /usr/sbin/nginx /usr/lib64/nginx /etc/nginx /usr/share/nginx /usr/share/man/man8/nginx.8.gz
启动nginx
cd /usr/sbin
./nginx
浏览器访问 nginx ,输入 ipv4地址即可,如果无法访问请留意是否未关闭防火墙
三. 比较源码安装 和 yum 安装的 Nginx 的不同
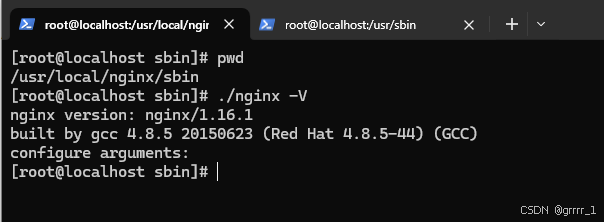
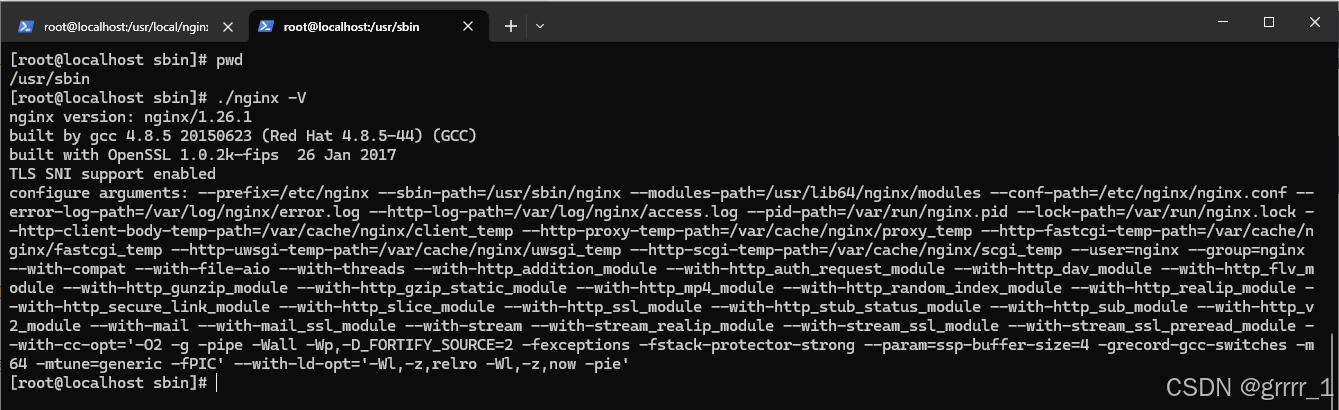
用./nginx -V查看可以获悉:
- 源码安装:
- yum安装:
关于nginx源码文件/文件夹用途
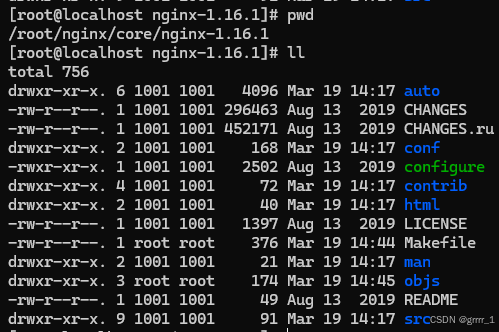
[root@localhost nginx-1.16.1]# pwd
/root/nginx/core/nginx-1.16.1
[root@localhost nginx-1.16.1]# ll
total 756
drwxr-xr-x. 6 1001 1001   4096 Mar 19 14:17 auto    # 编译相关脚本文件
-rw-r--r--. 1 1001 1001 296463 Aug 13  2019 CHANGES   # nginx 不同版本变更记录
-rw-r--r--. 1 1001 1001 452171 Aug 13  2019 CHANGES.ru  # 上个文件俄文版
drwxr-xr-x. 2 1001 1001    168 Mar 19 14:17 conf   # 配置文件,里面有个重要的nginx.conf
-rwxr-xr-x. 1 1001 1001   2502 Aug 13  2019 configure  # 自动脚本程序,c语言编写必然存在。会检测环境以及生成编译用的 makefile 文件
drwxr-xr-x. 4 1001 1001     72 Mar 19 14:17 contrib  # 一些特殊脚本文件,可以查看README
drwxr-xr-x. 2 1001 1001     40 Mar 19 14:17 html  # nginx的默认文件 index.html 和出错文件的跳转页面 50.html
-rw-r--r--. 1 1001 1001   1397 Aug 13  2019 LICENSE  # 许可证描述文件
-rw-r--r--. 1 root root    376 Mar 19 14:44 Makefile  # 通过 configure 编译后生成的内容
drwxr-xr-x. 2 1001 1001     21 Mar 19 14:17 man # nginx 帮助文档
drwxr-xr-x. 3 root root    174 Mar 19 14:45 objs  # 通过 configure 编译后生成的内容
-rw-r--r--. 1 1001 1001     49 Aug 13  2019 README # nginx描述信息
drwxr-xr-x. 9 1001 1001     91 Mar 19 14:17 src  # 源代码
[root@localhost nginx-1.16.1]# ./configure --help

  --help                             print this message

  --prefix=PATH                      set installation prefix
  --sbin-path=PATH                   set nginx binary pathname
  --modules-path=PATH                set modules path
  --conf-path=PATH                   set nginx.conf pathname
  --error-log-path=PATH              set error log pathname
  --pid-path=PATH                    set nginx.pid pathname
  --lock-path=PATH                   set nginx.lock pathname

  --user=USER                        set non-privileged user for
                                     worker processes
  --group=GROUP                      set non-privileged group for
                                     worker processes

  --build=NAME                       set build name
  --builddir=DIR                     set build directory

  --with-select_module               enable select module
  --without-select_module            disable select module
  --with-poll_module                 enable poll module
  --without-poll_module              disable poll module

  --with-threads                     enable thread pool support

  --with-file-aio                    enable file AIO support

  --with-http_ssl_module             enable ngx_http_ssl_module
  --with-http_v2_module              enable ngx_http_v2_module
  --with-http_realip_module          enable ngx_http_realip_module
  --with-http_addition_module        enable ngx_http_addition_module
  --with-http_xslt_module            enable ngx_http_xslt_module
  --with-http_xslt_module=dynamic    enable dynamic ngx_http_xslt_module
  --with-http_image_filter_module    enable ngx_http_image_filter_module
  --with-http_image_filter_module=dynamic
                                     enable dynamic ngx_http_image_filter_module
  --with-http_geoip_module           enable ngx_http_geoip_module
  --with-http_geoip_module=dynamic   enable dynamic ngx_http_geoip_module
  --with-http_sub_module             enable ngx_http_sub_module
  --with-http_dav_module             enable ngx_http_dav_module
  --with-http_flv_module             enable ngx_http_flv_module
  --with-http_mp4_module             enable ngx_http_mp4_module
  --with-http_gunzip_module          enable ngx_http_gunzip_module
  --with-http_gzip_static_module     enable ngx_http_gzip_static_module
  --with-http_auth_request_module    enable ngx_http_auth_request_module
  --with-http_random_index_module    enable ngx_http_random_index_module
  --with-http_secure_link_module     enable ngx_http_secure_link_module
  --with-http_degradation_module     enable ngx_http_degradation_module
  --with-http_slice_module           enable ngx_http_slice_module
  --with-http_stub_status_module     enable ngx_http_stub_status_module

  --without-http_charset_module      disable ngx_http_charset_module
  --without-http_gzip_module         disable ngx_http_gzip_module
  --without-http_ssi_module          disable ngx_http_ssi_module
  --without-http_userid_module       disable ngx_http_userid_module
  --without-http_access_module       disable ngx_http_access_module
  --without-http_auth_basic_module   disable ngx_http_auth_basic_module
  --without-http_mirror_module       disable ngx_http_mirror_module
  --without-http_autoindex_module    disable ngx_http_autoindex_module
  --without-http_geo_module          disable ngx_http_geo_module
  --without-http_map_module          disable ngx_http_map_module
  --without-http_split_clients_module disable ngx_http_split_clients_module
  --without-http_referer_module      disable ngx_http_referer_module
  --without-http_rewrite_module      disable ngx_http_rewrite_module
  --without-http_proxy_module        disable ngx_http_proxy_module
  --without-http_fastcgi_module      disable ngx_http_fastcgi_module
  --without-http_uwsgi_module        disable ngx_http_uwsgi_module
  --without-http_scgi_module         disable ngx_http_scgi_module
  --without-http_grpc_module         disable ngx_http_grpc_module
  --without-http_memcached_module    disable ngx_http_memcached_module
  --without-http_limit_conn_module   disable ngx_http_limit_conn_module
  --without-http_limit_req_module    disable ngx_http_limit_req_module
  --without-http_empty_gif_module    disable ngx_http_empty_gif_module
  --without-http_browser_module      disable ngx_http_browser_module
  --without-http_upstream_hash_module
                                     disable ngx_http_upstream_hash_module
  --without-http_upstream_ip_hash_module
                                     disable ngx_http_upstream_ip_hash_module
  --without-http_upstream_least_conn_module
                                     disable ngx_http_upstream_least_conn_module
  --without-http_upstream_random_module
                                     disable ngx_http_upstream_random_module
  --without-http_upstream_keepalive_module
                                     disable ngx_http_upstream_keepalive_module
  --without-http_upstream_zone_module
                                     disable ngx_http_upstream_zone_module

  --with-http_perl_module            enable ngx_http_perl_module
  --with-http_perl_module=dynamic    enable dynamic ngx_http_perl_module
  --with-perl_modules_path=PATH      set Perl modules path
  --with-perl=PATH                   set perl binary pathname

  --http-log-path=PATH               set http access log pathname
  --http-client-body-temp-path=PATH  set path to store
                                     http client request body temporary files
  --http-proxy-temp-path=PATH        set path to store
                                     http proxy temporary files
  --http-fastcgi-temp-path=PATH      set path to store
                                     http fastcgi temporary files
  --http-uwsgi-temp-path=PATH        set path to store
                                     http uwsgi temporary files
  --http-scgi-temp-path=PATH         set path to store
                                     http scgi temporary files

  --without-http                     disable HTTP server
  --without-http-cache               disable HTTP cache

  --with-mail                        enable POP3/IMAP4/SMTP proxy module
  --with-mail=dynamic                enable dynamic POP3/IMAP4/SMTP proxy module
  --with-mail_ssl_module             enable ngx_mail_ssl_module
  --without-mail_pop3_module         disable ngx_mail_pop3_module
  --without-mail_imap_module         disable ngx_mail_imap_module
  --without-mail_smtp_module         disable ngx_mail_smtp_module

  --with-stream                      enable TCP/UDP proxy module
  --with-stream=dynamic              enable dynamic TCP/UDP proxy module
  --with-stream_ssl_module           enable ngx_stream_ssl_module
  --with-stream_realip_module        enable ngx_stream_realip_module
  --with-stream_geoip_module         enable ngx_stream_geoip_module
  --with-stream_geoip_module=dynamic enable dynamic ngx_stream_geoip_module
  --with-stream_ssl_preread_module   enable ngx_stream_ssl_preread_module
  --without-stream_limit_conn_module disable ngx_stream_limit_conn_module
  --without-stream_access_module     disable ngx_stream_access_module
  --without-stream_geo_module        disable ngx_stream_geo_module
  --without-stream_map_module        disable ngx_stream_map_module
  --without-stream_split_clients_module
                                     disable ngx_stream_split_clients_module
  --without-stream_return_module     disable ngx_stream_return_module
  --without-stream_upstream_hash_module
                                     disable ngx_stream_upstream_hash_module
  --without-stream_upstream_least_conn_module
                                     disable ngx_stream_upstream_least_conn_module
  --without-stream_upstream_random_module
                                     disable ngx_stream_upstream_random_module
  --without-stream_upstream_zone_module
                                     disable ngx_stream_upstream_zone_module

  --with-google_perftools_module     enable ngx_google_perftools_module
  --with-cpp_test_module             enable ngx_cpp_test_module

  --add-module=PATH                  enable external module
  --add-dynamic-module=PATH          enable dynamic external module

  --with-compat                      dynamic modules compatibility

  --with-cc=PATH                     set C compiler pathname
  --with-cpp=PATH                    set C preprocessor pathname
  --with-cc-opt=OPTIONS              set additional C compiler options
  --with-ld-opt=OPTIONS              set additional linker options
  --with-cpu-opt=CPU                 build for the specified CPU, valid values:
                                     pentium, pentiumpro, pentium3, pentium4,
                                     athlon, opteron, sparc32, sparc64, ppc64

  --without-pcre                     disable PCRE library usage
  --with-pcre                        force PCRE library usage
  --with-pcre=DIR                    set path to PCRE library sources
  --with-pcre-opt=OPTIONS            set additional build options for PCRE
  --with-pcre-jit                    build PCRE with JIT compilation support

  --with-zlib=DIR                    set path to zlib library sources
  --with-zlib-opt=OPTIONS            set additional build options for zlib
  --with-zlib-asm=CPU                use zlib assembler sources optimized
                                     for the specified CPU, valid values:
                                     pentium, pentiumpro

  --with-libatomic                   force libatomic_ops library usage
  --with-libatomic=DIR               set path to libatomic_ops library sources

  --with-openssl=DIR                 set path to OpenSSL library sources
  --with-openssl-opt=OPTIONS         set additional build options for OpenSSL

  --with-debug                       enable debug logging
  # yum 安装 nginx 后用 nginx -V 查看到的
四. Nginx通过源码以及 configure + 参数形式进行复杂安装
这种安装方式和简单的安装配置不同的地方在第一步,通过 ./configure 来对编译参数进行设置,需要我们手动指定。对于参数的设置,下面进行略微详细的说明。
PATH:是和路径相关的配置信息with:启动模块,默认是关闭的without:是关闭模块,默认是开启的
这里补充nginx完整的配置参数表格文件,先说明一些比较好理解的配置参数。
–prefix=PATH
指向 Nginx 的安装目录
–sbin-path=PATH
指向(执行)程序文件(nginx)的路径,默认值为<prefix>/sbin/nginx
# 源码默认安装时的nginx
[root@localhost sbin]# realpath nginx
/usr/local/nginx/sbin/nginx
–modules-path=PATH
指向 Nginx 动态模块的安装目录,默认值为<prefix>/modules
–conf-path=PATH
指向配置文件(nginx.conf)的路径,默认值为<prefix>/conf/nginx.conf
# 源码默认安装时的 nginx.conf
[root@localhost conf]# realpath nginx.conf
/usr/local/nginx/conf/nginx.conf
–error-log-path=PATH
指向错误日志文件的路径,默认值为<prefix>/logs/error.log
# 源码默认安装时的 access.log 和 error.log
[root@localhost logs]# realpath access.log error.log
/usr/local/nginx/logs/access.log
/usr/local/nginx/logs/error.log
–http-log-path=PATH
指向访问日志文件的路径,默认值为<prefix>/logs/access.log
–pid-path=PATH
指向Nginx启动后的ID的文件路径,默认值为<prefix>/logs/nginx.pid
# 源码默认安装时的 nginx.pid
[root@localhost logs]# realpath nginx.pid
/usr/local/nginx/logs/nginx.pid
–lock-path=PATH
指向Nginx锁文件的存放文件路径,默认值为<prefix>/logs/nginx.lock
在源码默认安装后的 nginx 上没有看到 nginx.lock 文件存在
yum 默认安装后的 nginx 上 -V 可以看到 --lock-path 的参数
但是文件夹中并没有看到 nginx.lock 这个文件
可能会在特殊情况下再会出现
接下来用源码带参数再安装一遍,参数具体如下
./configure --prefix=/usr/local/nginx \
--sbin-path=/usr/local/nginx/sbin/nginx \
--modules-path=/usr/local/nginx/sbin/nginx \
--conf-path=/usr/local/nginx/conf/nginx.conf \
--error-log-path=/usr/local/nginx/logs/error.log \
--http-log-path=/usr/local/nginx/logs/access.log \
--pid-path=/usr/local/nginx/logs/nginx.pid \
--lock-path=/usr/local/nginx/logs/nginx.lock
安装前请先把 用 nginx 源码默认已安装的 nginx 进行卸载,协助步骤如下:
步骤一:需要将 nginx 进程关闭
./nginx -s stop
步骤二:将安装的 nginx 进行删除
rm -rf /usr/local/nginx
步骤三:将安装包之前编译额环境清理掉
make clean
# 执行过程如下:
[root@localhost sbin]# ps -ef | grep nginx
root       3905      1  0 Mar19 ?        00:00:00 nginx: master process ./nginx
nobody     3906   3905  0 Mar19 ?        00:00:00 nginx: worker process
root      10701   9362  0 03:22 pts/0    00:00:00 grep --color=auto nginx
[root@localhost sbin]# ./nginx -s stop
[root@localhost sbin]# ps -ef | grep nginx
root      10712   9362  0 03:22 pts/0    00:00:00 grep --color=auto nginx
[root@localhost sbin]# rm -rf /usr/local/nginx

[root@localhost sbin]# cd ~/nginx/core
[root@localhost core]# ls
nginx-1.16.1  nginx-1.16.1.tar.gz
[root@localhost core]# cd nginx-1.16.1
[root@localhost nginx-1.16.1]# make clean
rm -rf Makefile objs
[root@localhost nginx-1.16.1]# ls
auto  CHANGES  CHANGES.ru  conf  configure  contrib  html  LICENSE  man  README  src
带参数编译nginx
复制上面的命令后进行 ./configure 再 make && make install
后续重新启动 nginx

[root@localhost nginx-1.16.1]# cd /usr/local/nginx
[root@localhost nginx]# ls
conf  html  logs  sbin
[root@localhost nginx]# cd sbin
[root@localhost sbin]# ll
total 3736
-rwxr-xr-x 1 root root 3824928 Mar 20 03:26 nginx

[root@localhost sbin]# ps -ef | grep nginx
root      13554   9362  0 03:27 pts/0    00:00:00 grep --color=auto nginx
[root@localhost sbin]# ./nginx
[root@localhost sbin]# ps -ef | grep nginx
root      13568      1  0 03:27 ?        00:00:00 nginx: master process ./nginx
nobody    13569  13568  0 03:27 ?        00:00:00 nginx: worker process
root      13572   9362  0 03:27 pts/0    00:00:00 grep --color=auto nginx
浏览器访问 ip 查看,并 -V 查看

[root@localhost sbin]# ./nginx -V
nginx version: nginx/1.16.1
built by gcc 4.8.5 20150623 (Red Hat 4.8.5-44) (GCC)
configure arguments: --prefix=/usr/local/nginx --sbin-path=/usr/local/nginx/sbin/nginx --modules-path=/usr/local/nginx/sbin/nginx --conf-path=/usr/local/nginx/conf/nginx.conf --error-log-path=/usr/local/nginx/logs/error.log --http-log-path=/usr/local/nginx/logs/access.log --pid-path=/usr/local/nginx/logs/nginx.pid --lock-path=/usr/local/nginx/logs/nginx.lock
五. Nginx目录结构的分析
注意CentOS7默认没有tree命令,可自行yum install
[root@localhost ~]# tree /usr/local/nginx
/usr/local/nginx
├── client_body_temp
├── conf # 配置文件目录,按类型放到了一起调整过顺序,并用空行作为分隔
│   ├── fastcgi.conf  # 这组是和接口相关
│   ├── fastcgi.conf.default
│   ├── fastcgi_params
│   ├── fastcgi_params.default
│   ├── scgi_params
│   ├── scgi_params.default
│   ├── uwsgi_params
│   ├── uwsgi_params.default

│   ├── koi-utf  # 这组和编码有关
│   ├── koi-win
│   ├── win-utf

│   ├── mime.types  # mime,文件类型相关
│   ├── mime.types.default
│   ├── nginx.conf # nginx重要的配置文件
│   └── nginx.conf.default

├── fastcgi_temp
├── html  # 默认页面和初始页面
│   ├── 50x.html
│   └── index.html
├── logs  # 日志文件和pid文件
│   ├── access.log
│   ├── error.log
│   └── nginx.pid
├── proxy_temp
├── sbin
│   └── nginx  # 二进制可执行文件,启动nginx以及做其他许多操作
├── scgi_temp
└── uwsgi_temp

9 directories, 21 files
conf:nginx 所有配置文件目录
CGI(Common Gateway Interface)通用网关接口,主要解决的我呢提是从客户端发送一个请求和数据,服务端获取到的请求和数据后可以调用CGI【程序】处理及响应结果给客户端的一种标准规范。
fastcgi.conf:fastcgi相关配置文件fastcgi.conf.default 上面的备份文件fastcgi_params:fastcgi的参数文件
-fastcgi_params.default上面的备份文件scgi_paramsscgi的参数文件scgi_params.default上面的备份文件uwsgi_paramsuwsgi的参数uwsgi_params.default上面的备份文件
关于access.log和error.log验证
输入tail -f 跟踪access.log日志后按两个回车空行,然后浏览器访问本机ip可以发现空行后新增了一个访问日志
[root@localhost logs]# tail -f access.log
192.168.126.1 - - [20/Mar/2025:03:29:25 -0400] "GET / HTTP/1.1" 200 612 "-" "Mozilla/5.0 (Windows NT 10.0; Win64; x64) AppleWebKit/537.36 (KHTML, like Gecko) Chrome/134.0.0.0 Safari/537.36"


192.168.126.1 - - [20/Mar/2025:04:32:21 -0400] "GET / HTTP/1.1" 200 612 "-" "Mozilla/5.0 (Windows NT 10.0; Win64; x64) AppleWebKit/537.36 (KHTML, like Gecko) Chrome/134.0.0.0 Safari/537.36"
输入tail -f 跟踪error.log日志,因为nginx之前没有错误日志,所以跟踪后会没有内容,此时浏览器访问本机ip加一个不存在的文件,比如test.html,可以·error.log·中新增一个错误日志
[root@localhost logs]# tail -f error.log
2025/03/20 04:37:27 [error] 13569#0: *5 open() "/usr/local/nginx/html/test.html" failed (2: No such file or directory), client: 192.168.126.1, server: localhost, request: "GET /test.html HTTP/1.1", host: "192.168.126.137"
六. Nginx服务器启停命令
nginx服务器的启动和停止主要有两种方式::
Nginx服务的信号控制Nginx的命令行控制
方式一:Nginx服务的信号控制
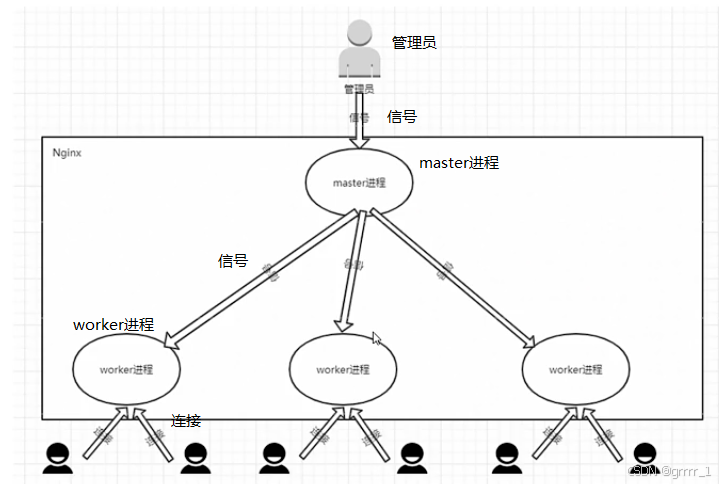
1. Nginx中的master和worker进程是什么?
2. Nginx的工作方式?
3. 如何获取进程id?
4. 信号有哪些?
5. 如何通过信号控制Nginx的启停等相关操作
1. Nginx中的master和worker进程是什么?
在Nginx还未启动的情况下,可以看到没有Nginx的进程,当启动Nginx后可以看到进程中有一个master和一个(或者多个)worker进程,master进程主要是用来管理worker进程,包含接受外接的信息,并将接收到的信号发送给各个worker进程,监控worker进程的状态,当worker进程出现异常推出后,会自动重新启动新的worker进程。
(1)获得nginx的pid的方法
方法1:直接使用ps命令查看nginx的PID
[root@localhost ~]# ps -ef | grep nginx    # 未启动nginx时ps内是没有nginx进程的
root       1290   1270  0 15:12 pts/0    00:00:00 grep --color=auto nginx
[root@localhost ~]# nginx  # 启动nginx
[root@localhost ~]# ps -ef | grep nginx   # 启动nginx后可以看到多了master和worker两个nginx的进程
root       1292      1  0 15:12 ?        00:00:00 nginx: master process nginx
nobody     1293   1292  0 15:12 ?        00:00:00 nginx: worker process
root       1295   1270  0 15:12 pts/0    00:00:00 grep --color=auto nginx
方法2:查看nginx的log目录中的nginx.pid文件
上图中的1292就是nginx的PID,也可以使用下面的方法查看PID
[root@localhost ~]# nginx -V
nginx version: nginx/1.16.1
built by gcc 4.8.5 20150623 (Red Hat 4.8.5-44) (GCC)
configure arguments: --prefix=/usr/local/nginx --sbin-path=/usr/local/nginx/sbin/nginx --modules-path=/usr/local/nginx/sbin/nginx --conf-path=/usr/local/nginx/conf/nginx.conf --error-log-path=/usr/local/nginx/logs/error.log --http-log-path=/usr/local/nginx/logs/access.log --pid-path=/usr/local/nginx/logs/nginx.pid --lock-path=/usr/local/nginx/logs/nginx.lock
[root@localhost ~]# cat /usr/local/nginx/logs/nginx.pid
1292
(2)信号
| 信号 | 作用 |
|---|---|
| TERM/INT | 立即关闭整个服务 |
| QUIT | 优雅地关闭整个服务 |
| HUP | 重读配置文件并使服务对新配置生效 |
| USR1 | 重新打开日志文件,可以用来进行日志切割 |
| USR2 | 平滑升级到最新版的nginx |
| WINCH | 所有子进程不再处理新连接,相当于给worker进程发送quit指令 |
调用命令为 kill -signal PID
signal即为信号,PID即为获取到的Nginx的master的线程ID
1、发送TERM/INT信号给master进程,会将Nginx服务立即关闭
kill -TERM PID / kill -TERM `cat /usr/local/nginx/log/nginx.pid`
kill -INT PID / kill -TERM `cat /usr/local/nginx/log/nginx.pid`
演示TERM/INT如下:
[root@localhost ~]# ps -ef | grep nginx
root       1292      1  0 15:12 ?        00:00:00 nginx: master process nginx
nobody     1293   1292  0 15:12 ?        00:00:00 nginx: worker process
root       1327   1270  0 15:29 pts/0    00:00:00 grep --color=auto nginx
[root@localhost ~]# kill -TERM 1292
[root@localhost ~]# ps -ef | grep nginx
root       1329   1270  0 15:29 pts/0    00:00:00 grep --color=auto nginx
通过worker进程的PID调整来间接判断出HUP信号关闭并重新开启过新的worker进程
[root@localhost ~]# ps -ef | grep nginx
root       1331      1  0 15:31 ?        00:00:00 nginx: master process nginx
nobody     1332   1331  0 15:31 ?        00:00:00 nginx: worker process
root       1335   1270  0 15:31 pts/0    00:00:00 grep --color=auto nginx
[root@localhost ~]# kill -HUP 1331
[root@localhost ~]# ps -ef | grep nginx   # 留意这里nginx的worker进程的PID调整过
root       1331      1  0 15:31 ?        00:00:00 nginx: master process nginx
nobody     1336   1331  0 15:32 ?        00:00:00 nginx: worker process
root       1338   1270  0 15:32 pts/0    00:00:00 grep --color=auto nginx
rm Nginx的2个log文件后再使用kill -USR1 PID可以恢复日志,后期日志分割时再详解
kill -USR2 PID用户升级Nginx,该signal较为复杂后期详解
使用WINCH信号通知master不再接受新连接,相当于对worker进程发送QUIT信号
[root@localhost ~]# ps -ef | grep nginx
root       1331      1  0 15:31 ?        00:00:00 nginx: master process nginx
nobody     1336   1331  0 15:32 ?        00:00:00 nginx: worker process
root       1367   1270  0 15:46 pts/0    00:00:00 grep --color=auto nginx
# 注意这里使用飘号的语法来动态获得PID
[root@localhost ~]# kill -WINCH `cat /usr/local/nginx/logs/nginx.pid`
[root@localhost ~]# ps -ef | grep nginx
root       1331      1  0 15:31 ?        00:00:00 nginx: master process nginx  # 注意这里的master不会被关掉
root       1371   1270  0 15:47 pts/0    00:00:00 grep --color=auto nginx
发送-USR2信号给master进程,告诉master进程要平滑升级,此时会重新开启对应的master/worker进程,整个系统中会有两个master进程,新的master进程PID会记录在/logs/nginx.pid中,旧的master进程会记录在/logx/nginx.pid.oldbin文件中,接着再次发送QUIT信号给旧的master让其处理完请求后再进行关闭。
kill -USR2 `cat /usr/local/nginx/logs/nginx.pid`  #
kill -QUIT `cat /usr/local/nginx/logs/nginx.pid.oldbin
USR2演示如下:
[root@localhost sbin]# ps -ef | grep nginx
root       1299   1251  0 16:09 pts/0    00:00:00 grep --color=auto nginx
[root@localhost sbin]# ./nginx
[root@localhost sbin]# ps -ef | grep nginx
root       1301      1  0 16:09 ?        00:00:00 nginx: master process ./nginx
nobody     1302   1301  0 16:09 ?        00:00:00 nginx: worker process
root       1304   1251  0 16:09 pts/0    00:00:00 grep --color=auto nginx
[root@localhost sbin]# kill -USR2 1301
[root@localhost sbin]# ps -ef | grep nginx
root       1301      1  0 16:09 ?        00:00:00 nginx: master process ./nginx
nobody     1302   1301  0 16:09 ?        00:00:00 nginx: worker process
root       1305   1301  0 16:09 ?        00:00:00 nginx: master process ./nginx
nobody     1306   1305  0 16:09 ?        00:00:00 nginx: worker process
root       1308   1251  0 16:09 pts/0    00:00:00 grep --color=auto nginx
[root@localhost sbin]# ll /usr/local/nginx/logs/
total 16
-rw-r--r-- 1 root root 579 Mar 20 04:37 access.log
-rw-r--r-- 1 root root 650 Mar 25 16:09 error.log
-rw-r--r-- 1 root root   5 Mar 25 16:09 nginx.pid
-rw-r--r-- 1 root root   5 Mar 25 16:09 nginx.pid.oldbin
[root@localhost sbin]# kill -QUIT 1301
[root@localhost sbin]# ps -ef | grep nginx
root       1305      1  0 16:09 ?        00:00:00 nginx: master process ./nginx
nobody     1306   1305  0 16:09 ?        00:00:00 nginx: worker process
root       1311   1251  0 16:10 pts/0    00:00:00 grep --color=auto nginx
方式一:Nginx服务的信号控制
通过Nginx安装目录下的sbin文件夹中的可执行文件nginx来进行Nginx的状态控制,可以使用nginx -h来查看都有哪些参数可以用。
···java
[root@localhost sbin]# nginx -h
nginx version: nginx/1.16.1
Usage: nginx [-?hvVtTq] [-s signal] [-c filename] [-p prefix] [-g directives]
Options:
-?,-h : this help
-v : show version and exit
-V : show version and configure options then exit
-t : test configuration and exit
-T : test configuration, dump it and exit
-q : suppress non-error messages during configuration testing
-s signal : send signal to a master process: stop, quit, reopen, reload
-p prefix : set prefix path (default: /usr/local/nginx/)
-c filename : set configuration file (default: /usr/local/nginx/conf/nginx.conf)
-g directives : set global directives out of configuration file
| 参数 | 使用说明 |
|---|---|
| -?/-h | 显示帮助信息 |
| -v | 打印版本信息 |
| -V | 打印版本信息和配置信息 |
| -t | 测试nginx配置文件语法是否正确并退出 |
| -T | 测试nginx配置文件语法是否正确并列出用到的配置文件信息然后退出 |
| -q | 在配置测试期间禁止显示非错误消息 |
| -s:signal信号 | 后面可以跟: |
| stop[快速关闭] | 类似于TERM/INIT信号的作用 |
| stop[快速关闭] | 类似于TERM/INIT信号的作用 |
| quit[优雅得关闭] | 类似QUIT信号的作用 |
| reopen[重新打开日志文件] | 类似于USR1信号的作用 |
| reload[重新加载配置文件] | 类似于HUB信号的作用] |
| -p prefix | 设置安装目录【实际不太会用到】 |
| -c filename | 启动时指定nginx.conf位置,默认为conf/nginx.conf |
| -g用来补充nginx配置文件 | 向nginx服务指定启动时应用全局的配置 |
-v/-V 查看版本信息和查看版本信息+编译时候的参数
[root@localhost sbin]# ./nginx -v
nginx version: nginx/1.16.1
[root@localhost sbin]# ./nginx -V
nginx version: nginx/1.16.1
built by gcc 4.8.5 20150623 (Red Hat 4.8.5-44) (GCC)
configure arguments: --prefix=/usr/local/nginx --sbin-path=/usr/local/nginx/sbin/nginx --modules-path=/usr/local/nginx/sbin/nginx --conf-path=/usr/local/nginx/conf/nginx.conf --error-log-path=/usr/local/nginx/logs/error.log --http-log-path=/usr/local/nginx/logs/access.log --pid-path=/usr/local/nginx/logs/nginx.pid --lock-path=/usr/local/nginx/logs/nginx.lock
-t/-T 测试配置是否出错
[root@localhost sbin]# ./nginx -t
nginx: the configuration file /usr/local/nginx/conf/nginx.conf syntax is ok
nginx: configuration file /usr/local/nginx/conf/nginx.conf test is successful

# 注意,用vi在 nginx.conf 行首输入了abc三个字符,故意导致nginx.conf文件配置出错
[root@localhost sbin]# vi /usr/local/nginx/conf/nginx.conf
[root@localhost sbin]# head -n 3 /usr/local/nginx/conf/nginx.conf
abc <-行首错误配置
#user  nobody;
worker_processes  1;
[root@localhost sbin]# ./nginx -t
nginx: [emerg] unknown directive "abc" in /usr/local/nginx/conf/nginx.conf:3
nginx: configuration file /usr/local/nginx/conf/nginx.conf test failed
[root@localhost sbin]# ./nginx -T
nginx: [emerg] unknown directive "abc" in /usr/local/nginx/conf/nginx.conf:3
nginx: configuration file /usr/local/nginx/conf/nginx.conf test failed
[root@localhost sbin]#
-q 测试期间只输出错误信息
# 将 nginx.conf 配置的错误修改正确
[root@localhost ~]# head -n 3 /usr/local/nginx/conf/nginx.conf

#user  nobody;
worker_processes  1;
[root@localhost ~]# nginx -tq  # 此时用-q参数不会显示任何信息,表面已经没有错误;测试成功的话,什么输出也没有
[root@localhost ~]# nginx -t
nginx: the configuration file /usr/local/nginx/conf/nginx.conf syntax is ok
nginx: configuration file /usr/local/nginx/conf/nginx.conf test is successful
-s signal
这里可以自己调试下
-g 配置全局变量
[root@localhost ~]# nginx -s stop  # 先停止nginx
[root@localhost ~]# ps -ef | grep nginx   # 停止后进程中已经没有nginx
root       1577   1458  0 17:39 pts/1    00:00:00 grep --color=auto nginx

# 我们查看下 nginx.conf 中 PID 的配置情况
[root@localhost ~]# head -n 10 /usr/local/nginx/conf/nginx.conf

#user  nobody;
worker_processes  1;

#error_log  logs/error.log;
#error_log  logs/error.log  notice;
#error_log  logs/error.log  info;

#pid        logs/nginx.pid;

# 设置 pid 的文件为另外一个文件,因为要加分号,所以第一条 -g 命令出错,第二条正确了
[root@localhost ~]# nginx -g "pid logs/abc.pid"
nginx: [emerg] unexpected end of parameter, expecting ";" in command line
[root@localhost ~]# nginx -g "pid logs/abc.pid;"

# 启动后我们检查下进程中的 PID 和 目录中的 PID 完全一致
[root@localhost ~]# ps -ef | grep nginx
root       1582      1  0 17:40 ?        00:00:00 nginx: master process nginx -g pid logs/abc.pid;
nobody     1583   1582  0 17:40 ?        00:00:00 nginx: worker process
root       1585   1458  0 17:40 pts/1    00:00:00 grep --color=auto nginx
[root@localhost ~]# cat /usr/local/nginx/logs/abc.pid
1582

# 值得注意的是,用`-V`看到的 `PID` 文件还在老位置,因为-V显示的是编译时的参数
[root@localhost ~]# nginx -V
nginx version: nginx/1.16.1
built by gcc 4.8.5 20150623 (Red Hat 4.8.5-44) (GCC)
configure arguments: --prefix=/usr/local/nginx --sbin-path=/usr/local/nginx/sbin/nginx --modules-path=/usr/local/nginx/sbin/nginx --conf-path=/usr/local/nginx/conf/nginx.conf --error-log-path=/usr/local/nginx/logs/error.log --http-log-path=/usr/local/nginx/logs/access.log --pid-path=/usr/local/nginx/logs/nginx.pid --lock-path=/usr/local/nginx/logs/nginx.lock

# 所以如果用 `-s stop` 的话,nginx 会因找不到原来的 PID 文件导致出错,就只能用信号关闭
[root@localhost ~]# nginx -s stop
nginx: [error] open() "/usr/local/nginx/logs/nginx.pid" failed (2: No such file or directory)
七.nginx`服务器的平滑升级(从1.14->1.16)
建议新开个虚拟机,复现下前置工作:
- 下载 1.14 和 1.1.6 源码 nginx/download
- 关闭防火墙和selinux
- 配置yum源,安装编译需要的依赖
- 正常安装1.14的 nginx 确保可以正常访问默认页
- 1.16源码只做到
make为止,先不要make install
wget https://nginx.org/download/nginx-1.16.1.tar.gz
wget https://nginx.org/download/nginx-1.14.2.tar.gz

curl -o /etc/yum.repos.d/CentOS-Base.repo https://mirrors.aliyun.com/repo/Centos-7.repo # yum 阿里云仓库地址
yum clean all
yum makecache
yum install gcc pcre pcre-devel zlib zlib-devel openssl openssl-devel-y
yum install tree tmux -y  # tree是个常用工具,tmux

# 如果没有网络,
请将  /etc/sysconfig/network-scripts/ifcfg-enp0s3 文件(或对于网卡文件)的 ONBOOT=no 改成 yes
systemctl restart network  # 重启网络
ping -c 3 www.baidu.com  # 如果可以ping到百度的ip,说明网络ok

# 关闭防火墙和selinux
systemctl stop firewalld
systemctl disable firewalld
vi /etc/selinux
sestatus
方法一:使用源码编译后进行升级
此时我们可以看到,在1.16中因为已经完成make所以多了Makefile文件和objs文件夹,并且objs文件夹中多了个nginx的二进制文件

物理机可以使用 curl -I 探测下Nginx的版本号
D:\>curl -I http://192.168.126.142/
HTTP/1.1 200 OK
Server: nginx/1.14.2
...
热升级服务的步骤
第一步:先将1.14版本的sbin目录下的nginx文件进行备份(防止万一出错还可以恢复)
cd /usr/loca/nginx/sbin
mv nginx nginxold
第二步:将Nginx1.16安装目录编译后的objs目录下的nginx二进制文件,复制到cd /usr/loca/nginx/sbin
cp ~/nginx-1.16.1/objs/nginx /usr/loca/nginx/sbin/nginx
第三步:发送信号USR2给Nginx1.14对应的master进程
kill -USR2 `cat /usr/local/nginx/logs/nginx.pid`
第四步:发送信号QUIT给Nginx的1.14版本对应的master进程
kill -QUIT `cat /usr/local/nginx/logs/nginx.pid.oldbin`
[root@localhost sbin]# ps -ef | grep nginx
root       6298      1  0 00:18 ?        00:00:00 nginx: master process ./nginx
nobody     6299   6298  0 00:18 ?        00:00:00 nginx: worker process
root       6372   1179  0 00:48 pts/0    00:00:00 grep --color=auto nginx
[root@localhost sbin]# kill -USR2 `cat /usr/local/nginx/logs/nginx.pid`
注意此时Nginx版本实际已经变成了1.16
D:\>curl -I http://192.168.126.142/
HTTP/1.1 200 OK
Server: nginx/1.16.1
...
优雅停止老的 nginx.pid 后,就只剩下最新的nginx了
[root@localhost sbin]# ps -ef | grep nginx
root       6298      1  0 00:18 ?        00:00:00 nginx: master process ./nginx
nobody     6299   6298  0 00:18 ?        00:00:00 nginx: worker process
root       6374   6298  0 00:49 ?        00:00:00 nginx: master process ./nginx
nobody     6375   6374  0 00:49 ?        00:00:00 nginx: worker process
root       6377   1179  0 00:49 pts/0    00:00:00 grep --color=auto nginx
[root@localhost sbin]# ls ../logs
access.log  error.log  nginx.pid  nginx.pid.oldbin
[root@localhost sbin]# kill -QUIT `cat /usr/local/nginx/logs/nginx.pid.oldbin`
[root@localhost sbin]# cat ../logs/nginx.pid ../logs/nginx.pid.oldbin
6374
6298
[root@localhost sbin]# kill -QUIT `cat /usr/local/nginx/logs/nginx.pid.oldbin`
[root@localhost sbin]# ps -ef | grep nginx
root       6374      1  0 00:49 ?        00:00:00 nginx: master process ./nginx
nobody     6375   6374  0 00:49 ?        00:00:00 nginx: worker process
root       6404   1179  0 00:51 pts/0    00:00:00 grep --color=auto nginx
到此完成了升级
方法二:使用 make upgrade 进行升级
还需重新配置一个新的centos,完成上面的前置工作 ,做到 nginx1.6 完成make为止,但不要make install
同时完成上面方法的步骤一和步骤二:
第一步:先将1.14版本的sbin目录下的nginx文件进行备份(防止万一出错还可以恢复)
cd /usr/loca/nginx/sbin
mv nginx nginxold
第二步:将Nginx1.16安装目录编译后的objs目录下的nginx二进制文件,复制到cd /usr/loca/nginx/sbin
cp ~/nginx-1.16.1/objs/nginx /usr/local/nginx/sbin/nginx
此时curl -I ip看到的还是1.14
C:\Users\Administrator>curl -I  192.168.56.101
HTTP/1.1 200 OK
Server: nginx/1.14.2
第三步:确保在 nginx1.6的objs文件夹所在目录,也就是nginx1.16的二进制文件的上级目录,也就是 configure所在目录
make upgrade
执行完毕后先查看下 nginx 版本
C:\Users\Administrator>curl -I  192.168.56.101
HTTP/1.1 200 OK
Server: nginx/1.16.1
再看下 make upgrade 执行了哪些步骤
[root@local nginx-1.16.1]# make upgrade
/usr/local/nginx/sbin/nginx -t # 先测试conf文件是否正确配置
nginx: the configuration file /usr/local/nginx/conf/nginx.conf syntax is ok
nginx: configuration file /usr/local/nginx/conf/nginx.conf test is successful
kill -USR2 `cat /usr/local/nginx/logs/nginx.pid`  # 使用 USR2 信号
sleep 1  # 暂停1秒
test -f /usr/local/nginx/logs/nginx.pid.oldbin  # 探测nginx.pid.oldbin 是否存在
kill -QUIT `cat /usr/local/nginx/logs/nginx.pid.oldbin`  # 停止老的nginx
总结,上面方案一或者方案二的平滑升级,都是通过信号进行控制
八. Nginx 核心配置文件
1.默认配置文件及其分块
先查看下nginx.conf的核心配置文件,我们可以使用grep -v "#" nginx.conf",grep -v是反向过滤。
# 全局块,设置 nginx 服务器整体运行的配置指令
worker_processes  1;

# events 块,用来配置 Nginx 服务器与用户网络连接相关内容
# 会对 Nginx 服务器的性能影响较大,主要是运维设置相关
events {
    worker_connections  1024;
}

# http 块,和日志/代理/缓存/第三方模块等密切相关,是最重要的一块
http {
    include       mime.types;
    default_type  application/octet-stream;
    sendfile        on;
    keepalive_timeout  65;

    # http 块中的 server 块,可以有多个 server 块
    # server 块是和配置 nginx 虚拟主机相关内容
    server {
        listen       80;    # listen 和 server_name
        server_name  localhost;  # 如果访问 localhost 的 80 端口 会被nginx拦截下来
        location / {             # 然后调用 location / ,因此会返回 index.html 默认页
            root   html;
            index  index.html index.htm;
        }
        error_page   500 502 503 504  /50x.html;
        location = /50x.html {
            root   html;
        }
    }
}
例:修改 http 块中的 server 块,根据不同的响应返回不同的页面

如果访问 ip/helloworld.html,会返回404 Not Found,我们现在要修改配置让Nginx将404也跳转到50x.html,则需要对nginx.conf文件的server块进行如下修改:
    server {
        listen       80;    # listen 和 server_name
        server_name  localhost;  # 如果访问 localhost 的 80 端口 会被nginx拦截下来
        location / {             # 然后调用 location / ,因此会返回 index.html 默认页
            root   html;
            index  index.html index.htm;
        }
        error_page   500 502 503 504 404 /50x.html; # 在这里加上 404
        location = /50x.html {
            root   html;
        }
修改完毕后需要重新加载配置文件,使用nginx -s reload后,刷新浏览器,则会变成如下:
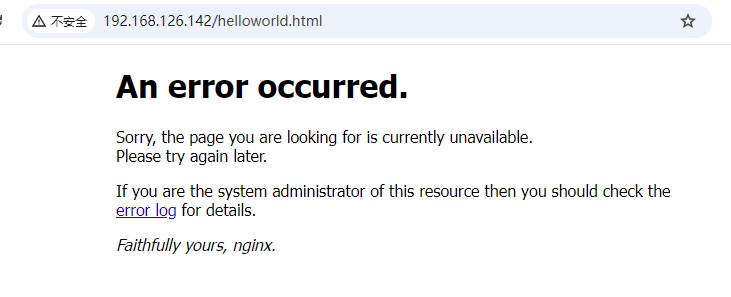
简单创建一个正常的helloworld.html文件,让其不要发生404错误。
[root@localhost conf]# cd ../html
[root@localhost html]# echo "<h1>helloworld</h1>">helloworld.html
刷新后,页面恢复了正常

nginx.conf 文件小结:
nginx.conf配置文件中默认有三大块:全局块、events块和http块
http块中可以配置多个server块,每个server块可以配置多个location块
2. 全局块之use指令
(1)修改配置中 user 的配置
首先查看下nginx.conf的前3行,可以看到第2行被注释掉的user nobody
[root@localhost conf]# head -n 3 nginx.conf

#user  nobody;
worker_processes  1;
启动 nginx 以及查看其进程,留意 worker 进程的用户是nobody
[root@localhost conf]# nginx
[root@localhost conf]# ps -ef | grep nginx
root       1210      1  0 13:11 ?        00:00:00 nginx: master process nginx
nobody     1211   1210  0 13:11 ?        00:00:00 nginx: worker process  # 留意用户
root       1213   1178  0 13:11 pts/0    00:00:00 grep --color=auto nginx
查看下/etc/passwd中的用户信息可以得知,nobody 用户是 linux 系统中一个自带的权限比较小的用户
[root@localhost conf]# cat /etc/passwd | grep nobody
nobody:x:99:99:Nobody:/:/sbin/nologin
使用vi 等文本编辑工具对 nginx.conf的user nobody;改成usr www;,同时使用nginx -t对conf文件进行验证。
# 查看前2行,user 值以及被改为www
[root@localhost conf]# head -n 2 nginx.conf

user  www;

# 养成习惯,在reload前或者启动前对 nginx 配置文件进行验证
[root@localhost conf]# nginx -t
nginx: [emerg] getpwnam("www") failed in /usr/local/nginx/conf/nginx.conf:2
nginx: configuration file /usr/local/nginx/conf/nginx.conf test failed
上面的错误表面是没有www用户。
(2)Linux 系统创建一个新用户 www
使用useradd www命令在Linux系统中,添加一个叫www的用户
[root@localhost conf]# useradd www
添加完毕后再使用nginx -t对配置文件进行检查,发现已经successful
[root@localhost conf]# nginx -t
nginx: the configuration file /usr/local/nginx/conf/nginx.conf syntax is ok
nginx: configuration file /usr/local/nginx/conf/nginx.conf test is successful
(3)Nginx 重新装载user www的配置文件
让nginx重新装载配置文件并查看进程,留意worker的进程用户已经变成 www
[root@localhost kali]# nginx -s reload
[root@localhost kali]# ps -ef | grep nginx
root       1210      1  0 13:11 ?        00:00:00 nginx: master process nginx
www        1448   1210  0 13:54 ?        00:00:00 nginx: worker process
root       1450   1301  0 13:54 pts/1    00:00:00 grep --color=auto nginx
(4)创建/root/html/index.html文件
和Nginx默认的index.html略有差异,最后加上一个I am www的<p>标签
[root@localhost html]# tail -n 4 /root/html/index.html
<p><em>Thank you for using nginx.</em></p>
<p><em>I am www</em></p>
</body>
</html>
(5)修改nginx.conf文件配置,测试启动访问
location / {
    root    /root/html;
    index   index.html index.htm;
}
修改完成后,先进行测试。
[root@localhost html]# nginx -t
nginx: the configuration file /usr/local/nginx/conf/nginx.conf syntax is ok
nginx: configuration file /usr/local/nginx/conf/nginx.conf test is successful
reload前先查看原始页面
reload后访问发现Forbidden,无权限访问

将/root/html/index.html移动到/home/www/下
[root@localhost html]# mv /root/html/index.html /home/www
[root@localhost html]# ls /home/www
index.html
将nginx.conf中的location中的index.html相关信息修改到www的家目录下
        location / {
            root   /home/www;
            index  index.html index.htm;
        }
nginx重新加载配置后,发现已经可以访问到了该文件
(6)分析原因
当前用户www没有访问/root/html目录的权限,nobody也没有访问目录权限。尝试使用su www切换成www用户后访问/root和/root/home文件夹,均提示Permission denied,也是导致刚才Forbidden的直接原因。
[www@localhost /]$ cd /root
bash: cd: /root: Permission denied
[www@localhost /]$ ls /root/html
ls: cannot access /root/html: Permission denied
(7)结论
综上所述,使用user指令可以指定启动运行进程的用户及用户组,这样对于系统的权限访问更加精细,也更加安全。
3. work process指令
master_process 用来指定是否开启工作进程
| 语法 | master_process on|off |
|---|---|
| 默认值 | master_process on |
| 位置 | 全局块 |
master_process用于配置Nginx生成工作进程的数量,这个是Nginx服务器实现并发处理服务的关键所在。理论上worker processes的值越大,可支持的并发处理量也越多,但实际上这个值的设定是需要受到来自服务器自身的限制,建议将该值和服务器CPU的内核数保持一致。
| 语法 | worker_processes num/auto |
|---|---|
| 默认值 | 1 |
| 位置 | 全局块 |
我们在nginx.conf中添加master_process off指令后,-t 进行检查
[root@localhost conf]# head -n 3 nginx.conf
user  www;
master_process off;

[root@localhost conf]# nginx -t
nginx: the configuration file /usr/local/nginx/conf/nginx.conf syntax is ok
nginx: configuration file /usr/local/nginx/conf/nginx.conf test is successful
reload前我们先看下Nginx的进程,留意有work process的数量。
[root@localhost conf]# ps -ef | grep nginx
root       1237      1  0 22:14 ?        00:00:00 nginx: master process nginx
www        1238   1237  0 22:14 ?        00:00:00 nginx: worker process
root       1250   1194  0 22:17 pts/0    00:00:00 grep --color=auto nginx
请注意master_process指令需要关闭Nginx指令再重启后再回生效
[root@localhost conf]# nginx -s reload
[root@localhost conf]# ps -ef | grep nginx
root       1449      1  0 23:06 ?        00:00:00 nginx: master process nginx
www        1457   1449  0 23:08 ?        00:00:00 nginx: worker process
root       1459   1419  0 23:08 pts/1    00:00:00 grep --color=auto nginx
[root@localhost conf]# nginx -s stop
[root@localhost conf]# nginx
[root@localhost conf]# ps -ef | grep nginx
root       1462      1  0 23:08 ?        00:00:00 nginx
root       1464   1419  0 23:09 pts/1    00:00:00 grep --color=auto nginx
下面开始设置worker_processes,要设置该指令,必须先将master_process恢复原状或者打开状态,否则会和下面的worker_processes设置发生冲突。worker_processes的设置,应该和虚拟机中本台Linux设置的处理器数量保持一致,否则性能会无效。将worker_processes设置成2且reload后,则会看到如下进程信息:
[root@localhost conf]# ps -ef | grep nginx
root       1237      1  0 22:14 ?        00:00:00 nginx: master process nginx
www        1238   1237  0 22:14 ?        00:00:00 nginx: worker process
www        1239   1237  0 22:14 ?        00:00:00 nginx: worker process
root       1242   1194  0 22:14 pts/0    00:00:00 grep --color=auto nginx
关于worker_processes和cpu核的关系:
如果工作进程数超过 CPU 核心数,操作系统会通过 时间片轮转调度 分配 CPU 资源,导致进程频繁切换,可能增加上下文切换的开销,反而降低性能。但并不是绝对,下文会说到例外情况。
如果不能确定自己Linux的CPU核心数,可以使用下条命令进行查看:
[root@localhost conf]# grep "processor" /proc/cpuinfo | wc -l
1
例外情况:以下场景可能允许 worker_processes 超过 CPU 核心数(但还需谨慎测试):
- I/O 密集型任务:
当请求处理涉及大量磁盘 I/O 或网络 I/O(如反向代理、文件下载)时,工作进程可能因等待 I/O 而阻塞。此时适当增加进程数可能提升吞吐量。
例如:单核 CPU 下设置worker_processes 2;。 - 混合使用多线程模块:
如果使用了 Nginx 的多线程模块(如 thread_pool),可以结合多线程与多进程,但需详细调优。
另外,我们还可以使用worker_processes auto;自适应的方式
4. daemon 指令
daemon:设定Nginx是否以守护进程的方式启动。
守护进程是Linux后台执行的一种服务进程,特点是独立于控制终端,不会随着终端关闭而停止。
| 语法 | daemon on|off; |
|---|---|
| 默认值 | daemon on; |
| 位置 | 全局块 |
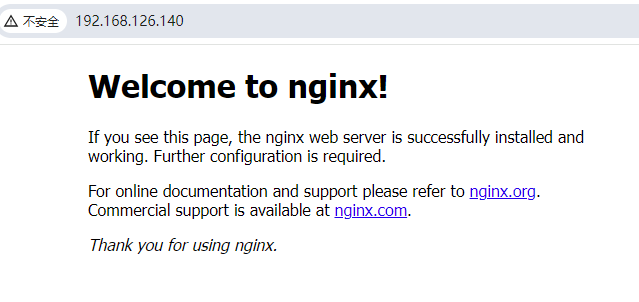
启动nginx后会发现,关闭守护进程的情况下执行nginx命令后,就会一直悬停无法输入其他命令,所以提前开了用tmux在另一个分屏下查询进程,可以看到nginx的进程已经正常启动。
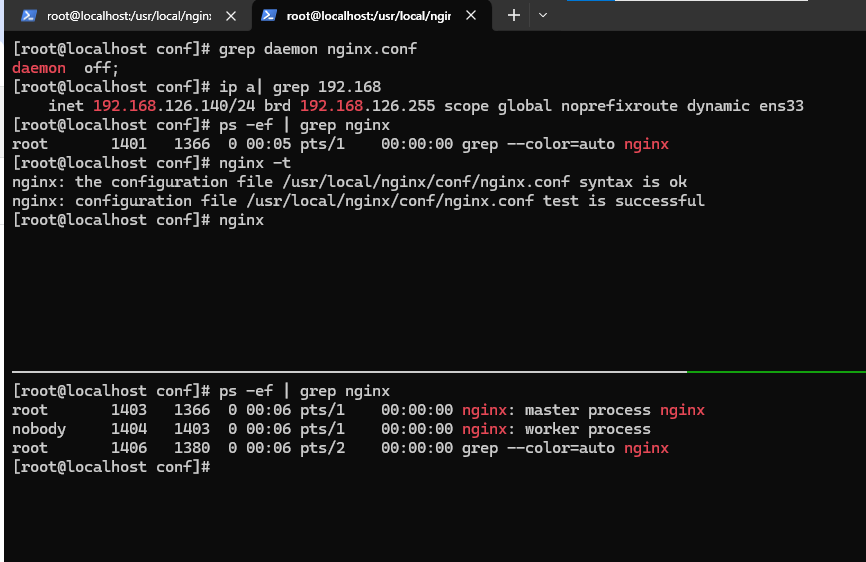
此时浏览器访问ip地址也可以看到Nginx的页面(如果无法访问请检查是否未关闭防火墙)
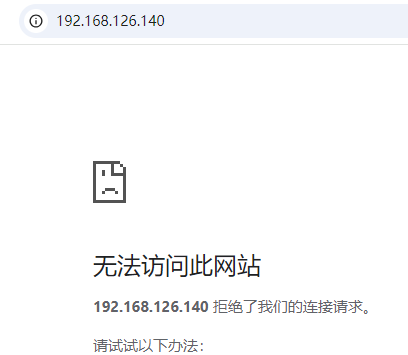
由于上面Nginx一致悬停,所以无法执行命令,当我们强行ctrl+c结束的时候会发现,Nginx进程已经结束:

而此时刷新浏览器发现也无法访问了。


 5320
5320

 被折叠的 条评论
为什么被折叠?
被折叠的 条评论
为什么被折叠?
 到【灌水乐园】发言


