


 文章介绍了如何在StableDiffusion的txt2imgAPI中切换模型,主要涉及修改源码以添加模型名称参数,通过CheckpointInfo类的filename指定模型路径,并使用reload_model_weights函数加载模型。此外,还提到了需要在StableDiffusionProcessingTxt2Img类和API接口中增加模型名称的接收和处理。
研究过Stable Diffusion接口文档的小伙伴们肯定知道,文档中并没有提供模型参数,那么如何实现api切换模型呢?
我们先来看原先的sd-webui的代码,找到模型接收请求参数的中心代码,然后自己修改源码,将这些请求参数传递到这段中心函数中去。
StableDiffusionProcessingTxt2Img
首要咱们来看最重要的txt2img的代码,中心的类便是modules.processing中的StableDiffusionProcessingTxt2Img类,它的init函数接纳以下的参数:
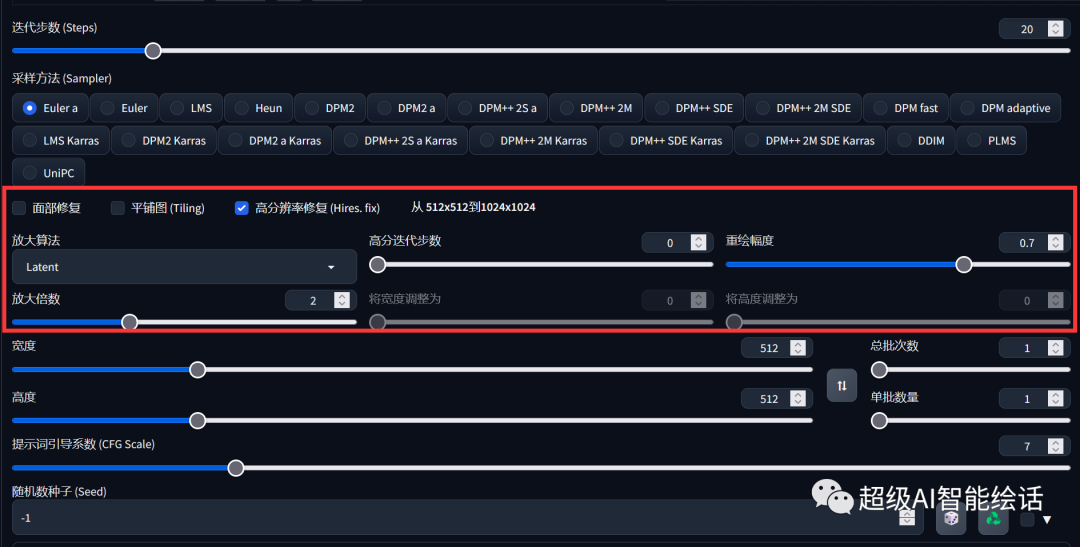
def __init__(self, enable_hr: bool = False, denoising_strength: float = 0.75, firstphase_width: int = 0, firstphase_height: int = 0, hr_scale: float = 2.0, hr_upscaler: str = None, hr_second_pass_steps: int = 0, hr_resize_x: int = 0, hr_resize_y: int = 0, **kwargs)代码中的缩写hr代表的便是webui中的Hires.fix,相关的参数对应的是webui中的这些选项:
接下来,能够看到还有很多其他的参数没有看到,其实这些参数都是在StableDiffusionProcessingTxt2Img的父类:StableDiffusionProcessing类的init中指定的:
def __init__(self, sd_model=None, outpath_samples=None, outpath_grids=None, prompt: str = "", styles: List[str] = None, seed: int = -1, subseed: int = -1, subseed_strength: float = 0, seed_resize_from_h: int = -1, seed_resize_from_w: int = -1, seed_enable_extras: bool = True, sampler_name: str = None, batch_size: int = 1, n_iter: int = 1, steps: int = 50, cfg_scale: float = 7.0, width: int = 512, height: int = 512, restore_faces: bool = False, tiling: bool = False, do_not_save_samples: bool = False, do_not_save_grid: bool = False, extra_generation_params: Dict[Any, Any] = None, overlay_images: Any = None, negative_prompt: str = None, eta: float = None, do_not_reload_embeddings: bool = False, denoising_strength: float = 0, ddim_discretize: str = None, s_churn: float = 0.0, s_tmax: float = None, s_tmin: float = 0.0, s_noise: float = 1.0, override_settings: Dict[str, Any] = None, override_settings_restore_afterwards: bool = True, sampler_index: int = None, script_args: list = None):
    self.outpath_samples: str = outpath_samples # 生成的图片的保存路径,和下面的do_not_save_samples配合运用
    self.outpath_grids: str = outpath_grids
    self.prompt: str = prompt # 正向提示词
    self.prompt_for_display: str = None
    self.negative_prompt: str = (negative_prompt or "") # 反向提示词
    self.styles: list = styles or []
    self.seed: int = seed # 种子,-1表明运用随机种子
    self.sampler_name: str = sampler_name # 采样方法,比方"DPM++ SDE Karras"
    self.batch_size: int = batch_size # 每批生成的数量?
    self.n_iter: int = n_iter
    self.steps: int = steps # UI中的sampling steps
    self.cfg_scale: float = cfg_scale # UI中的CFG Scale,提示词相关性
    self.width: int = width # 生成图像的宽度
    self.height: int = height # 生成图像的高度
    self.restore_faces: bool = restore_faces # 是否运用面部修正
    self.tiling: bool = tiling # 是否运用可平铺(tilling)
    self.do_not_save_samples: bool = do_not_save_samples
咱们对应UI界面来看这些参数的意义,父类中有一些参数不是在txt2img中用到的,我就忽略了
api接口中模型是如何加载的
我们来看modules/api/api.py中text2imgapi代码:
def text2imgapi(self, txt2imgreq: models.StableDiffusionTxt2ImgProcessingAPI):
        ......
        with self.queue_lock:
            p = StableDiffusionProcessingTxt2Img(sd_model=shared.sd_model, **args)
            ......
            return models.TextToImageResponse(images=b64images, parameters=vars(txt2imgreq), info=processed.js())
从代码中可以看出加载的模型是从shared.sd_model获取的,但是这样加载的模型不是用户维度而是全局的,当我们api传过来的模型与当前模型不一样的时候,我们就需要重新加载模型,那么就需要直接调用modules/sd_models.py中的reload_model_weights(sd_model=None, info=None)函数,咱们只需传入info参数就行,用info参数来指定咱们想要加载的模型,而在这个函数中,会自动判断咱们想要加载的模型和当前模型是否相同,相同的话就不加载。
从函数签名很难看出来info字段是一个什么样的参数,经过我对代码的研究,我发现info其实便是下面这个类:
class CheckpointInfo:
    def __init__(self, filename):
        self.filename = filename
        abspath = os.path.abspath(filename)
        if shared.cmd_opts.ckpt_dir is not None and abspath.startswith(shared.cmd_opts.ckpt_dir):
            name = abspath.replace(shared.cmd_opts.ckpt_dir, '')
        elif abspath.startswith(model_path):
            name = abspath.replace(model_path, '')
        else:
            name = os.path.basename(filename)
        if name.startswith("\\") or name.startswith("/"):
            name = name[1:]
        self.name = name
        self.name_for_extra = os.path.splitext(os.path.basename(filename))[0]
        self.model_name = os.path.splitext(name.replace("/", "_").replace("\\", "_"))[0]
        self.hash = model_hash(filename)
        self.sha256 = hashes.sha256_from_cache(self.filename, "checkpoint/" + name)
        self.shorthash = self.sha256[0:10] if self.sha256 else None
        self.title = name if self.shorthash is None else f'{name} [{self.shorthash}]'
self.ids = [self.hash, self.model_name, self.title, name, f'{name} [{self.hash}]'] + ([self.shorthash, self.sha256, f'{self.name} [{self.shorthash}]'] if self.shorthash else [])init里的一大串其实都不用管,咱们只需求指定filename就行了。所以用如下的示例代码就能够手动从头加载一个指定的模型:
from modules import sd_models
checkpoint_info = sd_models.CheckpointInfo("模型的全路径名称")
sd_models.reload_model_weights(info=checkpoint_info)
看完这里,我们就可以直接修改源码了:
1.修改 modules/api/models.py中的StableDiffusionTxt2ImgProcessingAPI增加模型名称
StableDiffusionTxt2ImgProcessingAPI = PydanticModelGenerator(
    "StableDiffusionProcessingTxt2Img",
    StableDiffusionProcessingTxt2Img,
    [
        {"key": "sampler_index", "type": str, "default": "Euler"},
        {"key": "script_name", "type": str, "default": None},
        {"key": "script_args", "type": list, "default": []},
        {"key": "send_images", "type": bool, "default": True},
        {"key": "save_images", "type": bool, "default": False},
        {"key": "alwayson_scripts", "type": dict, "default": {}},
        {"key": "model_name", "type": str, "default": None},
    ]
).generate_model()2.修改modules/processing.py中的StableDiffusionProcessingTxt2Img,增加模型名称接收:
def __init__(self, enable_hr: bool = False, denoising_strength: float = 0.75, firstphase_width: int = 0, firstphase_height: int = 0, hr_scale: float = 2.0, hr_upscaler: str = None, hr_second_pass_steps: int = 0, hr_resize_x: int = 0, hr_resize_y: int = 0, hr_sampler_name: str = None, hr_prompt: str = '', hr_negative_prompt: str = '',model_name: str=None, **kwargs):3.修改modules/api/api.py中text2imgapi代码:
def text2imgapi(self, txt2imgreq: models.StableDiffusionTxt2ImgProcessingAPI):
        ......
        model_name=txt2imgreq.model_name
        if model_name is None:
            raise HTTPException(status_code=404, detail="model_name not found")
        ......
        with self.queue_lock:
            checkpoint_info = sd_models.CheckpointInfo(os.path.join(models_path,'Stable-diffusion',model_name))
            sd_models.reload_model_weights(info=checkpoint_info)
            p = StableDiffusionProcessingTxt2Img(sd_model=shared.sd_model, **args)
...... 到此,我们就完成了文生图api接口切换模型了,同理,我们也可对图生图api增加模型切换。下篇我们将会介绍如何增加任务id及通过任务id查询任务进度。扫码体验绘画小程序:


 3781
3781

 被折叠的 条评论
为什么被折叠?
被折叠的 条评论
为什么被折叠?
 到【灌水乐园】发言


