


人脸识别2:InsightFace实现人脸识别Face Recognition(含源码下载)
目录
人脸识别2:InsightFace实现人脸识别Face Recognition(含源码下载)
1. 前言
这是项目《人脸识别Face Recognition》系列之《InsightFace实现人脸识别Face Recognition》Python版本;项目基于开源ArcFace(也称InsightFace)模型搭建一套完整的Python版本人脸识别系统(Face Recognition or Face Identification);
整套人脸识别系统核心算法包含人脸检测和人脸关键点检测,人脸校准,人脸特征提取以及人脸比对(1:1)和人脸搜索(1:N)。本项目人脸识别系统可以达到目前商业级别的人脸识别准确率,在误识率(FAR)0.1%的情况下,可提供99.57%的通过率(TAR);可以满足人脸比对,人脸签到、人脸门禁、人员信息查询、安防监控等人脸识别应用场景。
Python版本人脸检测和人脸识别效果:
【尊重原创,转载请注明出处】https://blog.csdn.net/guyuealian/article/details/130600472
更多项目《人脸识别Face Recognition》系列文章请参考:
- 人脸识别1:人脸识别数据集https://blog.csdn.net/guyuealian/article/details/130600545
- 人脸识别2:InsightFace实现人脸识别Face Recognition(含源码下载)https://blog.csdn.net/guyuealian/article/details/130600472
- 人脸识别3:C/C++ InsightFace实现人脸识别Face Recognition(含源码)https://blog.csdn.net/guyuealian/article/details/130600571
- 人脸识别4:Android InsightFace实现人脸识别Face Recognition(含源码)https://blog.csdn.net/guyuealian/article/details/130600600
2. 项目安装
项目结构说明
.
├── configs                # 配置文件(设置检测模型,特征提取模型)
├── core
│   ├── alignment          # 人脸校准算法
│   ├── detection          # 人脸检测模型
│   ├── feature            # 人脸特征提取模型
│   ├── face_detector.py   # 人脸检测(支持MTCNN和RFB)
│   ├── face_feature.py    # 人脸特征提取模型
│   ├── face_matcher.py    # 人脸匹配算法
│   ├── face_recognizer.py # 人脸识别
│   └── face_register.py   # 人脸注册
├── data                   # 人脸识别相关数据
├── face_compare.py        # 1:1人脸比对Demo
├── face_search.py         # 1:N人脸搜索Demo
├── register.py            # 1:N人脸搜索人脸数据库注册Demo
├── README.md              # 说明文档
└── requirements.txt # 项目依赖文件Python依赖环境,使用pip安装即可,项目代码都在Ubuntu系统和Windows系统验证正常运行,请放心使用;若出现异常,大概率是相关依赖包版本没有完全对应
numpy==1.16.3
matplotlib==3.1.0
Pillow==6.0.0
easydict==1.9
opencv-contrib-python==4.5.2.52
opencv-python==4.5.1.48
pandas==1.1.5
PyYAML==5.3.1
scikit-image==0.17.2
scikit-learn==0.24.0
scipy==1.5.4
seaborn==0.11.2
tensorboard==2.5.0
tensorboardX==2.1
torch==1.7.1+cu110
torchvision==0.8.2+cu110
tqdm==4.55.1
xmltodict==0.12.0
basetrainer
pybaseutils项目安装教程请参考(初学者入门,麻烦先看完下面教程,配置好开发环境):
3. 人脸识别系统
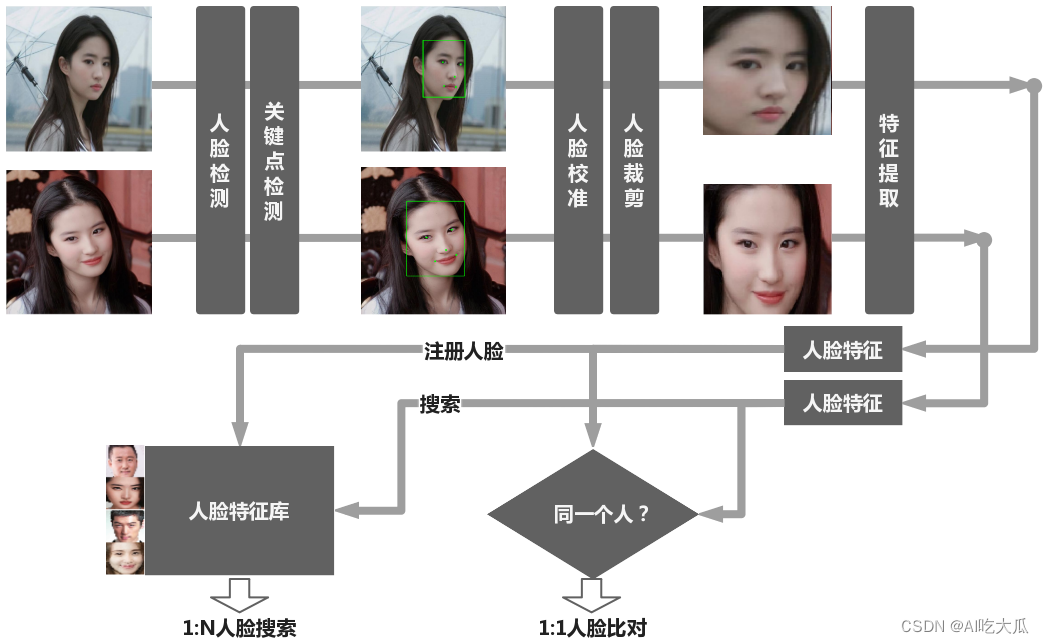
人脸识别主要包含人脸比对(1:1)和人脸搜索(1:N)两大功能,涉及的核心算法主要包含:人脸检测和人脸关键点检测,人脸校准,人脸特征提取以及人脸比对(1:1)和人脸搜索(1:N);当然,实际业务中,可能还会增加人脸质量检测以及活体识别等算法,碍于篇幅,后续再分享活体识别算法。
下图给出本项目人脸识别系统算法实现架构流程图:
(1)人脸检测和关键点检测
人脸检测的方法比较多,项目提供两种人脸检测方法:一种是基于MTCNN的通用人脸检测模型,另一种是轻量化的、快速的RFB人脸检测模型;这个两个模型都能实现人脸检测,并同时预测人脸的五个关键点(Landmark)。
| 模型 | Paper | 源码 | 说明 |
| MTCNN | Paper | Link |
|
| RFB | Paper | Link |
|
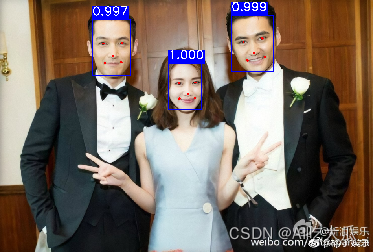
下图是MTCNN模型人脸检测和人脸关键点(Landmark)检测效果
- 人脸关键点(Landmark):共预测五个人脸关键点,分别为:左眼中心点,右眼中心点,鼻尖中心点以及左嘴角和右嘴角
- 利用Landmark信息,后续可以通过仿射变换,对人脸进行校准,获得相对比较正的人脸。人脸校准可以有效提升人脸识别的效果
(2)人脸校准
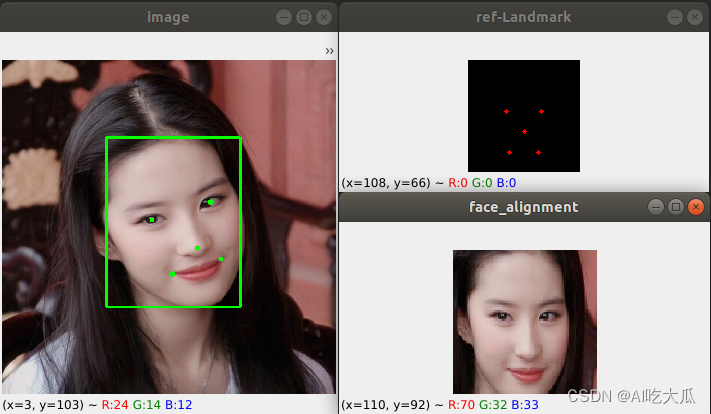
利用Landmark信息,可以通过仿射变换,对人脸进行校准,获得相对比较正的人脸,项目core/alignment模块提供人脸校准算法。
其中实现思路是:
利用OpenCV的estimateAffine2D()函数估计人脸关键点(5个landmark)和参考人脸关键点(reference landmark)的仿射变换矩阵M,再根据仿射变换矩阵M矫正人脸图像
下图给出人脸校准的效果图,其中【image】是原始图像,【ref-Landmark】图像是112×112图像的参考人脸关键点(reference landmark),而【face_alignment】是最终矫正的人脸效果图。
(3)人脸特征提取
项目基于开源的ArcFace(也称InsightFace)训练框架,开发并优化了三个版本的人脸识别模型:mobilenet_v2,IR-18(resnet18优化版)以及IR-50(resnet50优化版),用于人脸特征提取
ArcFace:GitHub - TreB1eN/InsightFace_Pytorch: Pytorch0.4.1 codes for InsightFace
| 模型 | LFW | CFP_FF | CFP_FP | AgeDB | CALFW | CPLFW |
|---|---|---|---|---|---|---|
| resnet50 | 99.78 | 99.69 | 98.14 | 97.53 | 95.87 | 92.45 |
| resnet18 | 99.55 | 99.61 | 97.74 | 96.52 | 94.66 | 90.01 |
| mobilenet_v2 | 99.23 | 99.27 | 90.74 | 93.22 | 93.57 | 88.69 |
resnet50和resnet18参数量比较大,计算量较大,适合在PC服务器部署 ;而mobilenet_v2
模型计算量较小,适合嵌入式,开发板,Android等终端部署。
(4)人脸比对(1:1)
1:1人脸比对(也称人脸验证,身份验证),即将两张人脸进行1:1比对,得到人脸相似度,来判断是否是同一个人,一般用作人证比对等场景,比如银行卡/QQ/微信/支付宝等账号登录时人脸身份验证。
项目实现了1:1人脸比对功能(face_compare.py)
# -*- coding: utf-8 -*-
import os
import cv2
import argparse
import traceback
from core import face_recognizer
from pybaseutils import image_utils, file_utils
class Example2(face_recognizer.FaceRecognizer):
def __init__(self, database):
"""
@param database: 人脸数据库的路径
"""
super(Example2, self).__init__(database=database)
def compare_face_task(self, image_file1, image_file2, score_thresh=0.75, vis=True):
"""
1:1人脸比对,比较两张肖像图是否是同一个人
@param image_file1 肖像图1
@param image_file2 肖像图2
@param score_thresh 相似人脸分数人脸阈值
"""
# 去读取图片
image1 = cv2.imread(image_file1)
image2 = cv2.imread(image_file2)
face_info1, face_info2, score = self.compare_face(image1, image2)
if len(face_info1['face']) > 0 and len(face_info2['face']) > 0:
v1 = face_info1["feature"]
v2 = face_info2["feature"]
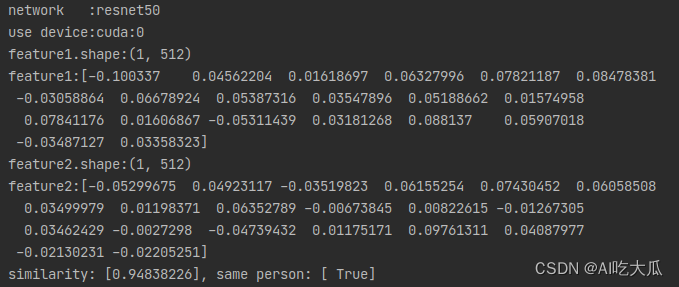
same_person = score > score_thresh
print("feature1.shape:{}\nfeature1:{}".format(v1.shape, v1[0, 0:20]))
print("feature2.shape:{}\nfeature2:{}".format(v2.shape, v2[0, 0:20]))
print("similarity: {}, same person: {}".format(score, same_person))
if vis: self.show_result(image1, face_info1, image2, face_info2)
else:
print("No face detected")
return score
def show_result(self, image1, face_info1, image2, face_info2):
face1 = face_info1["face"]
face2 = face_info2["face"]
if len(face1) > 0: image_utils.cv_show_image("face1", face1[0], delay=1)
if len(face2) > 0: image_utils.cv_show_image("face2", face2[0], delay=1)
self.draw_result("image1", image=image1, face_info=face_info1, vis=True, delay=1)
self.draw_result("image2", image=image2, face_info=face_info2, vis=True, delay=0)
def parse_opt():
image_file1 = "data/test_image/test1.jpg"
image_file2 = "data/test_image/test2.jpg"
parser = argparse.ArgumentParser()
parser.add_argument('--image_file1', type=str, default=image_file1, help='image_file1')
parser.add_argument('--image_file2', type=str, default=image_file2, help='image_file1')
opt = parser.parse_args()
print(opt)
return opt
if __name__ == "__main__":
"""1:1人脸比对,可用于人证比对等场景"""
opt = parse_opt()
fr = Example2(database="")
fr.compare_face_task(opt.image_file1, opt.image_file2, vis=True)
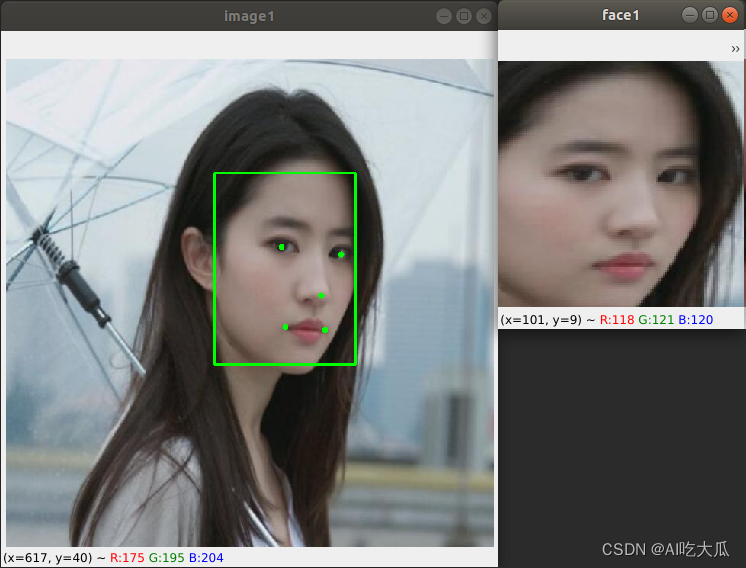
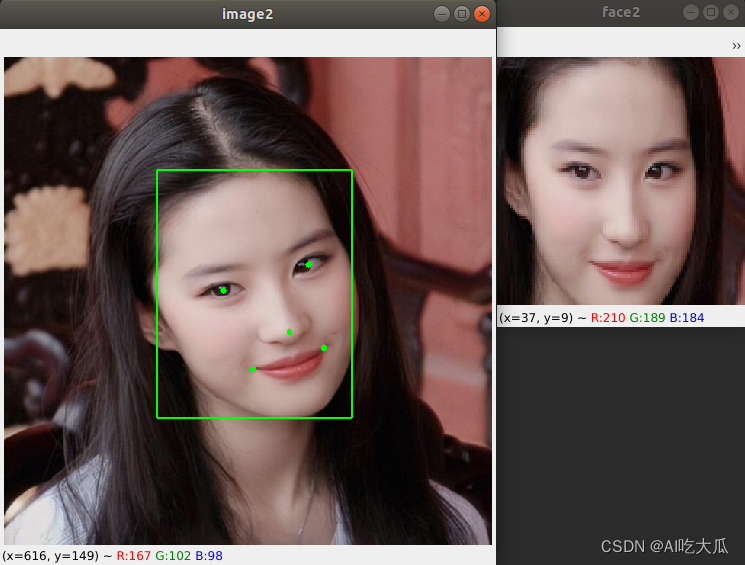
测试1:1人脸比对,可在终端运行:
python face_compare.py --image_file1 "data/test_image/test1.jpg" --image_file2 "data/test_image/test2.jpg"
运行结果如下:
(5)人脸搜索(1:N)
1:N人脸搜索,将一张人脸和N张人脸进行比对,找出最相似的一张或多张人脸,即1:N人脸搜索。可用作人脸签到、人脸门禁、人员信息查询、安防监控等应用场景。
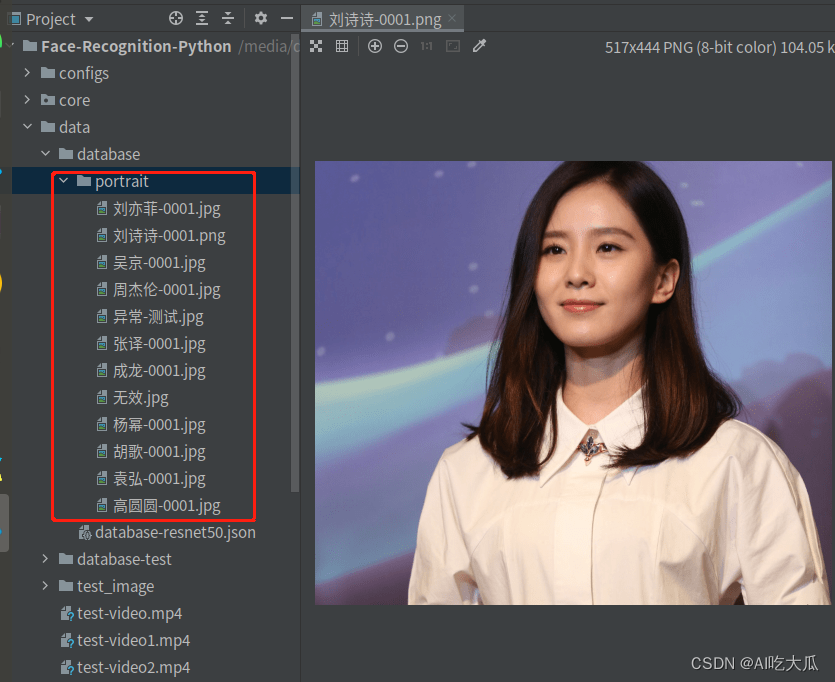
项目实现了1:N人脸搜索功能,需要提前生成人脸数据库(Face database),先录入注册人脸数据
项目register.py 实现人脸数据库(database)人脸注册,database人脸图像要求满足以下:
- 图片按照[ID-XXXX.jpg]命名,如:张三-image.jpg,作为人脸识别的底图
- 个人照片可以是个人证件照,生活照,肖像照片,要求五官清晰且正脸的照片,不能出现多个人脸的情况
- 尽量不要出现过度美颜,头发遮挡,低头侧脸等问题
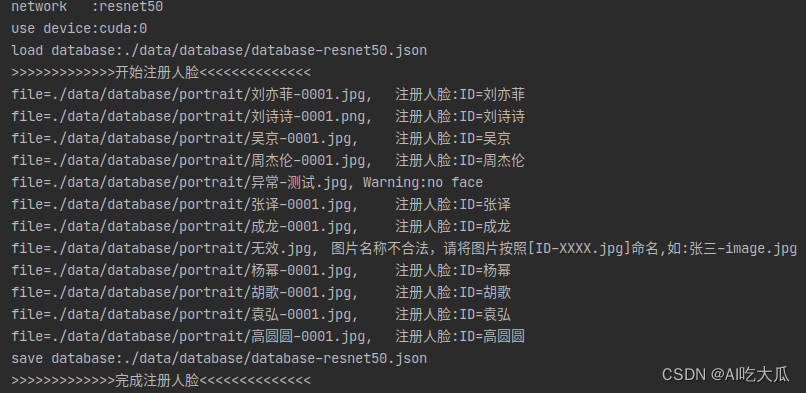
实现人脸注册, 可在终端运行(register.py):
# 默认人脸数据库,图像存放在portrait = "./data/database/portrait"
# 默认人脸数据库,特征文件保存在database='./data/database/database-resnet50.json'

python register.py
运行结果如下:
如果需要注册新人 ,请参考如下步骤:
- 采集一张新人的个人照片,以张三的照片为例子
- 照片保存在人脸数据库中(data/database/portrait)中,图片按照[ID-XXXX.jpg]命名,如:张三-image.jpg,作为人脸识别的底图
- 然后运行register.py,完成人脸数据库的人脸注册
完成人脸注册后,下一步可以进行1:N人脸搜索,实现人脸识别的功能(face_search.py):
- 测试图片文件,可在终端运行:
# 待识别人脸图片存放在项目目录data/test_image
python face_search.py --image_dir "data/test_image"- 测试视频文件,可在终端运行:
# 测试视频文件,--video_file填写视频文件的路径
python face_search.py --video_file "data/test-video.mp4"- 测试摄像头,可在终端运行:
# 测试摄像头,--video_file填写摄像头ID号,一般默认从0开始
python face_search.py --video_file 0
# -*- coding: utf-8 -*-
import os
import cv2
import argparse
import traceback
from configs import configs
from core import face_recognizer
from pybaseutils import image_utils, file_utils
class Example1(face_recognizer.FaceRecognizer):
def __init__(self, database):
"""
@param database: 人脸数据库的路径
"""
super(Example1, self).__init__(database=database)
def start_capture(self, video_file, save_video=None, detect_freq=1, vis=True):
"""
start capture video
:param video_file: *.avi,*.mp4,...
:param save_video: *.avi
:param detect_freq:
:return:
"""
video_cap = image_utils.get_video_capture(video_file)
width, height, numFrames, fps = image_utils.get_video_info(video_cap)
if save_video:
self.video_writer = image_utils.get_video_writer(save_video, width, height, fps)
count = 0
while True:
if count % detect_freq == 0:
# 设置抽帧的位置
if isinstance(video_file, str): video_cap.set(cv2.CAP_PROP_POS_FRAMES, count)
isSuccess, frame = video_cap.read()
if not isSuccess:
break
frame, face_info = self.search_face_task(frame, thickness=4, fontScale=2.0, delay=10, vis=True)
if save_video:
self.video_writer.write(frame)
count += 1
video_cap.release()
def detect_image_dir(self, image_dir, out_dir=None, vis=True):
"""
@param image_dir:
@param out_dir:
@param vis:
@return:
"""
image_list = file_utils.get_files_lists(image_dir, postfix=file_utils.IMG_POSTFIX)
for image_file in image_list:
try:
print("image_file:{}\t".format(image_file), end=',', flush=True)
image = image_utils.read_image_ch(image_file)
image = image_utils.resize_image(image, size=(None, 640))
image, face_info = self.search_face_task(image, vis=vis)
if out_dir:
out_file = file_utils.create_dir(out_dir, None, os.path.basename(image_file))
print("save result:{}".format(out_file))
cv2.imwrite(out_file, image)
except:
traceback.print_exc()
print(image_file, flush=True)
def search_face_task(self, bgr, thickness=2, fontScale=1.5, delay=0, vis=False):
"""
1:N人脸搜索任务
:param bgr: BGR image
:return:
"""
face_info = self.detect_search(bgr, max_face=-1, vis=False)
image = self.draw_result("Recognizer", image=bgr, face_info=face_info,
thickness=thickness, fontScale=fontScale, delay=delay, vis=vis)
return image, face_info
def parse_opt():
database = configs.database # 存储人脸数据库特征路径database
# image_dir = 'data/database-test' # 测试图片的目录
image_dir = 'data/test_image' # 测试图片的目录
out_dir = "output/" # 保存检测结果
video_file = None # video_file is None表示进行图片测试
# video_file = "data/test-video.mp4" # 视频文件测试
# video_file = "0" # 摄像头测试
parser = argparse.ArgumentParser()
parser.add_argument('--database', type=str, default=database, help='存储人脸数据库特征路径database')
parser.add_argument('--image_dir', type=str, default=image_dir, help='image_dir')
parser.add_argument('--video_file', type=str, default=video_file, help='camera id or video file')
parser.add_argument('--out_dir', type=str, default=out_dir, help='save result')
opt = parser.parse_args()
print(opt)
return opt
if __name__ == "__main__":
"""1:N人脸搜索,可用于人脸签到、人脸门禁、人员信息查询、安防监控等应用场景"""
opt = parse_opt()
fr = Example1(database=opt.database)
if isinstance(opt.video_file, str) or isinstance(opt.video_file, int):
opt.video_file = str(opt.video_file)
if len(opt.video_file) == 1: opt.video_file = int(opt.video_file)
save_video = os.path.join(opt.out_dir, "result.avi") if opt.out_dir else None
fr.start_capture(opt.video_file, save_video, detect_freq=1, vis=True)
else:
fr.detect_image_dir(opt.image_dir, opt.out_dir, vis=True)
(6)配置文件config
项目配置文件configs/configs.py,用于设置人脸检测模型,特征提取模型,可以根据自己的需要选择
- 人脸检测模型,目前支持RFB和MTCNN人脸检测
- 人脸识别(特征提取)模型,目前支持resnet50,resnet18和mobilenet_v2模型
人脸识别特征提取模型,提供resnet50,resnet18和mobilenet_v2 ,其测试准确率,参考如下:
| 模型 | LFW | CFP_FF | CFP_FP | AgeDB | CALFW | CPLFW |
|---|---|---|---|---|---|---|
| resnet50 | 99.78 | 99.69 | 98.14 | 97.53 | 95.87 | 92.45 |
| resnet18 | 99.55 | 99.61 | 97.74 | 96.52 | 94.66 | 90.01 |
| mobilenet_v2 | 99.23 | 99.27 | 90.74 | 93.22 | 93.57 | 88.69 |
resnet50和resnet18参数量比较大,计算量较大,适合在PC服务器部署 ;而mobilenet_v2
模型计算量较小,适合嵌入式,开发板,Android等终端部署。
# -*-coding: utf-8 -*-
import torch
import os

root = os.path.dirname(os.path.dirname(__file__))

det_thresh = 0.5  # 人脸检测阈值,小于该阈值的检测框会被剔除
rec_thresh = 0.5  # 人脸识别阈值,小于该阈值的人脸识别结果为unknown,表示未知
# 人脸检测模型,目前支持RFB和MTCNN人脸检测
DETECTOR = {
    # "net_name": "RFB",
    "net_name": "MTCNN",
}

# 人脸识别(特征提取)模型配置文件,目前支持resnet50,resnet18和mobilenet_v2模型
FEATURE = {
    "net_name": "resnet50",
    # "net_name": "resnet18",
    # "net_name": "mobilenet_v2",
    "input_size": (112, 112),
    "embedding_size": 512
}

# 人脸数据库图像路径,用于注册人脸
portrait = "./data/database/portrait"
# 人脸数据库特征路径database(注册人脸后生成的特征文件)
database = os.path.join(os.path.dirname(portrait), "database-{}.json".format(FEATURE['net_name']))

# 运行设备
# device = "cpu"
device = "cuda:0" if torch.cuda.is_available() else "cpu"
(7)人脸识别优化建议
- 人脸识别依赖人脸检测,一个高精度的人脸检测模型算法,可以有效提高人脸识别的准确率
- 人脸校准算法可以矫正人脸倾斜等问题,可以极大提高人脸识别效果;需要依赖人脸关键点检测(Landmark),本项目使用的RFB和MTCNN模型都可预测人脸关键点
- 人脸识别中,待识别人脸图片,如果存在低头侧脸,或者人脸存在遮挡等情况,人脸识别准确率较低(可能被识别为unknown),实际使用过程中,需要用户配合,正对着摄像头,以提高人脸识别准确率的效果。
- 1:N人脸搜索中,要求注册底库的人脸数据库是高质量的个人照片;建议每人需要提供一张高清的、不模糊的、少美颜的,五官清晰可见的,正脸的,不低头不侧脸的个人自拍照(生活照、证件照),以便可以生成高质量的人脸特征
- 1:N人脸搜索中,当N属于百万级别以上海量人脸数据时,人脸识别会比较慢,毕竟需要遍历人脸进行特征匹配,性能较差;解决方法是可以采用人脸特征聚类,分而治之的思路;目前已有很多开源框架,感兴趣的可以参考Faiss 、milvus等库。
- 目前,项目暂不支持人脸真伪鉴别(活体识别),后续计划开发基于RGB的活体识别功能,敬请期待哈
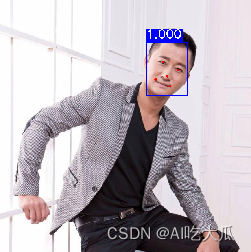
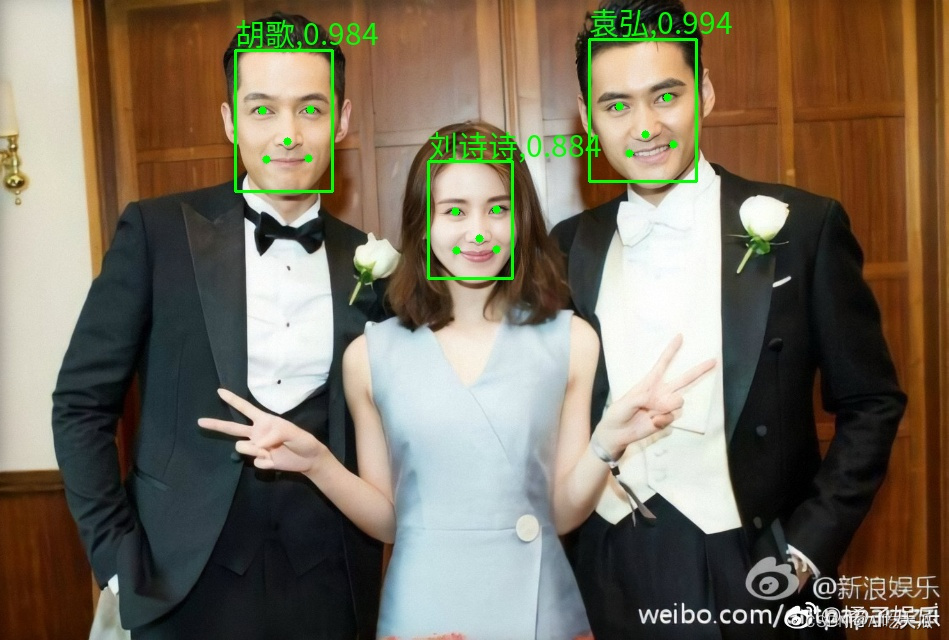
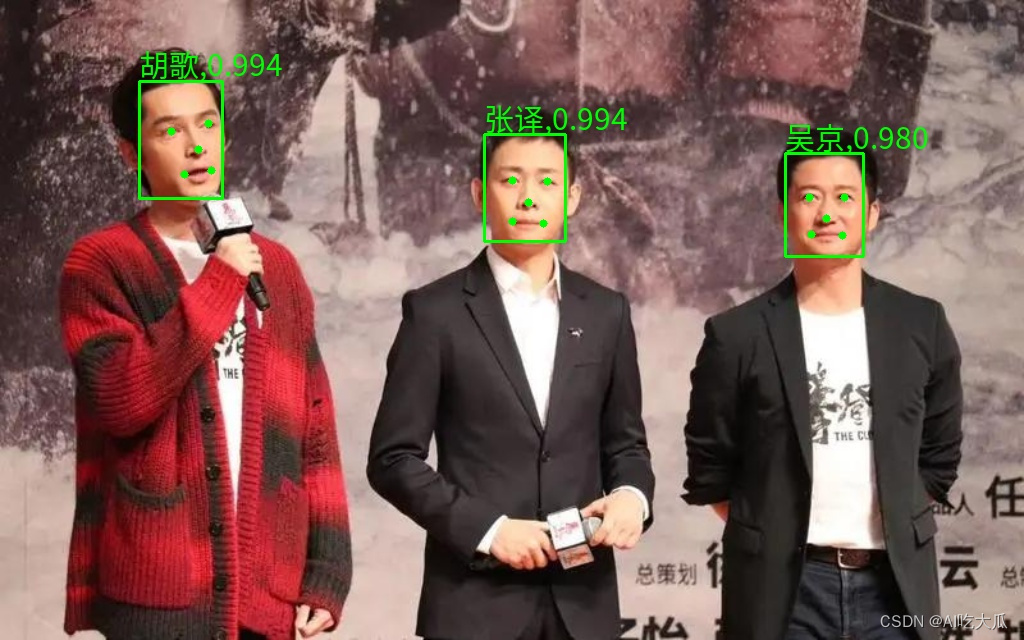
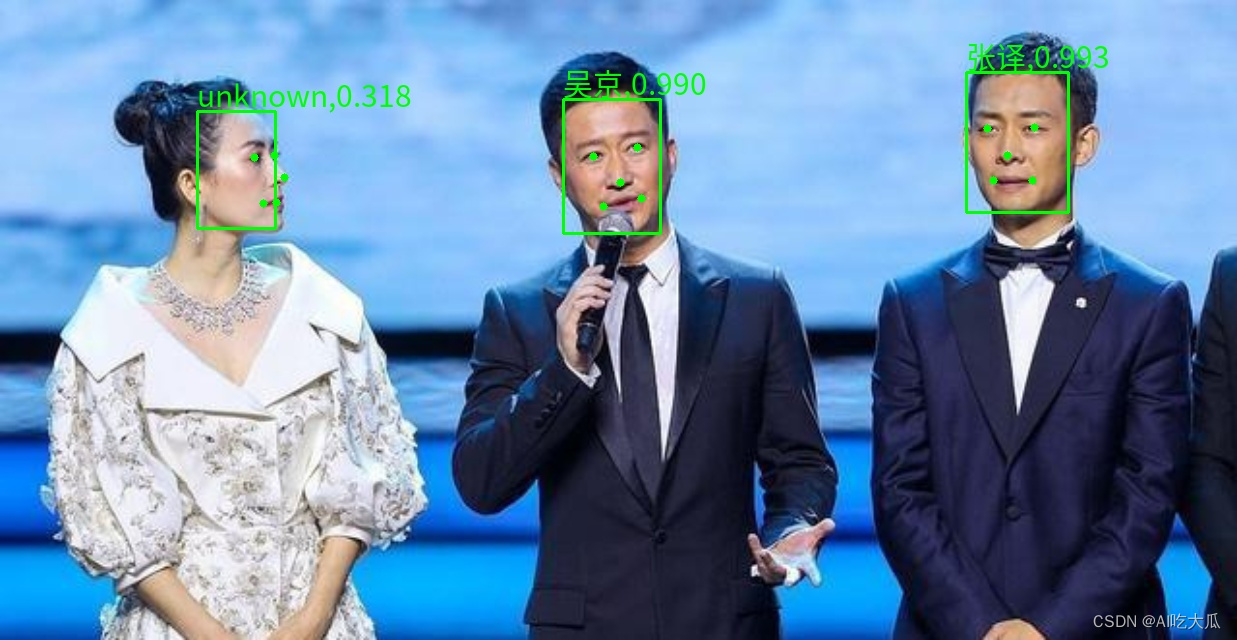
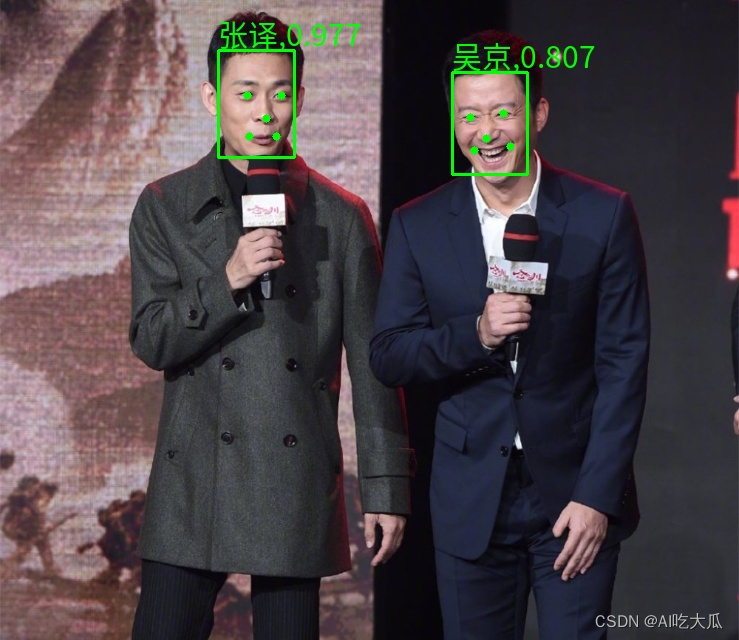
4. 人脸识别Demo效果
下图是Python版本的人脸识别Demo效果,图中绘制了绿色框,框上面文本是人脸识别结果和匹配相似度(置信度);当置信度小于rec_thresh=0.5时,人脸识别结果为unknown,表示未知。
5. 人脸识别C/C++版本源码下载
参考文章 《人脸检测和人脸识别3:C/C++实现人脸检测和人脸识别》https://blog.csdn.net/guyuealian/article/details/130600571
| C/C++版本人脸识别效果 | Python版本人脸识别效果 |
 |  |
6. 人脸识别Android版本源码下载
参考文章 《人脸检测和人脸识别4:Android实现人脸检测和人脸识别》https://blog.csdn.net/guyuealian/article/details/130600600
7. 人脸识别Python版本源码下载
如需下载项目源码,请WX关注【AI吃大瓜】,回复【人脸识别】即可下载
项目源码包含内容:
- 提供两种人脸检测方法:一种是基于MTCNN的通用人脸检测模型,另一种是轻量化的、快速的RFB人脸检测模型;这个两个模型都能实现人脸检测,并同时预测人脸的五个关键点(Landmark)。
- 提供三个人脸识别特征提取模型:mobilenet_v2,IR-18(resnet18优化版)以及IR-50(resnet50优化版),用于人脸特征提取
- 提供1:1人脸比对:face_compare.py,可用于人证比对等场景
- 提供人脸注册功能:register.py,项目自带人脸识别测试数据,可用于验证人脸识别效果
- 提供1:N人脸搜索:face_search.py,可用于人脸签到、人脸门禁、人员信息查询、安防监控等应用场景
- 项目1:N人脸搜索:face_search.py,支持图片,视频和摄像头测试


 1027
1027

 被折叠的 条评论
为什么被折叠?
被折叠的 条评论
为什么被折叠?
 到【灌水乐园】发言


