


目录
1.3 applications (可以在终端输入app直接打开)
2. Directory structure of an OpenFOAM application/utility
2.1 Directory structure of a general solver
2.2 Directory structure of a general utility
3. Application/utilities in OpenFOAM
4. Directory structure of an OpenFOAM case
5.5.3 constant/transportProperties
Appendix A: Installation of Pyfoam
Appendix B: Installation of OpenFOAM-v9 for WDW course
Error 1: 运行run_sampling.sh时,gnuplot出错
1. OpenFOAM目录组成
1.1 环境变量
OpenFOAM使用自己的环境变量,其设置在OpenFOAM-10/etc目录中。
位置为:
$HOME/OpenFOAM/OpenFOAM-9/etc
如果运行bash或者ksh(可通过echo $SHELL查看类型),向$HOME/.bashrc文件中加入下面一行,可以source文件$WM_PROJECT_DIR/etc/bashrc:
source $HOME/OpenFOAM/OpenFOAM-9/etc/bashrc
以符号$开始的词为环境变量,通过echo来找出它的值,例如找到环境变量$WM_PROJECT_DIR的值:
echo $WM_PROJECT_DIR
得到:

(图里应该是9,不是10)
即$WM_PROJECT_DIR的值为:/home/dyfluid/OpenFOAM/OpenFOAM-9
下面的命令可以列出所有的环境变量:(没有得到,可以在.bashrc文件里查看和编辑)
env
列出与OpenFOAM有关的变量:
env | grep -i "OpenFOAM"
aliases 化名,别名;在OpenFOAM中有很多。通过预定义的别名/简称可以直接进入对应的目录(directory)。(可以参考$WM_PROJECT_DIR/etc/config.sh/aliases或者$WM_PROJECT_DIR/etc/config.csh/aliases),例如:
alias foam='cd $WM_PROJECT_DIR'
alias app='cd $FOAM_APP'
alias src='cd $FOAM_SRC'
alias tut='cd $FOAM_TUTORIALS'
列出所有与OpenFOAM有关的aliases:
alias | grep -i "FOAM"
1.2 Allwmake
1.3 applications (可以在终端输入app直接打开)
- Allwmake:脚本,编译slovers和utilities的内容。
- solvers: 包含分布式求解器(distributed solver)的源代码。
- test:包含测试算例的源代码,展示一些OpenFOAM类(class)的用法。输入wmake编译算例。
- utilities:包含分布式工具的源代码。
1.4 bin
- 包含很多shell脚本,例如foamNew, foamLog,foamJob,foamNewApp等。
- 以及parafoam,可以启动paraView
1.5 COPYING
1.6 doc
包含OpenFOAM文档,即用户指南、程序员指南、html格式的氧生成文件(Doxygen)。
- Allwmake
- codingStyleGuide.org 从源代码中提取的注释(commentation)
- Doxygen
- Guides
- tools
1.7 etc (重要)
包含环境文件、OpenFOAM全局指令和默认的热化学数据库thermoData/thermoData.
- caseDicts(重要): 包含与输入文件相关的模板,用于设置一个OpenFOAM算例。建议花时间去研究这些文件。
- controlDict: 可以在这里设置一些debug flags和default units.
1.8 platforms
包含二进制(binary),它在编译applications目录时产生。以及库(libraries),它在编译src目录中的源代码时产生。
编译后,二进制文件的位置:
$WM_PROJECT_DIR/platforms/linux64GccDPInt32OptSYSTEMOPENMPI/bin
$WM_PROJECT_DIR/platforms/linux64GccDPOpt/lib
编译后,库的位置:
$WM_PROJECT_DIR/platforms/linux64GccDPInt32OptSYSTEMOPENMPI/lib
-
linux64GccDPInt32Opt
- applications
- bin
- lib
- src
-
linux64GccDPInt32OptSYSTEMOPENMPI
src
1.9 README.org
1.10 src (src)
包含所有基础库的源代码,是OpenFOAM的核心。
分为多个子目录,每个子目录包含很多库。
-
OpenFOAM: 为核心库,包含用于操作(operation)的容器的定义、域定义(field definitions)、网格声明(declaration)、网格特征。
-
finiteVolume: 包含有限元离散需要的所有类,例如网格处理、有限元离散关键字(发散、拉普拉斯算子、梯度、体积分数fvc、质量分数fvm等)、边界条件。在目录finiteVolume/lnIclude中可以找到非常重要的文件fvCFD.H,包含在大多数应用中。
-
MomentumTransportModels: 包含很多湍流模型。
-
sixDoFRigidBodyMotion: 该核心库包含刚体运动的求解器。
-
transportModels: 该核心库包含很多运输模型。
-
… …
1.11 test
1.12 tutorials (tut)
包含每一个求解器的算例,根据所包含的物理过程分类,可以通过这些教程发展自己的算例。
并不适合被作为练习,教程仅用来展示如何使用。
1.13 wmake
OpenFOAM使用特殊的构建(make)指令:wmake。wmake理解OpenFOAM中的文件结构,能使用当前目录下的默认编译指令。
如果在OpenFOAM的bashrc文件中添加了新的编译名,应该同时告诉wmake如何解释这个编译名。
在wmake/rules中,可以发现现有编译器的默认设置。
还有一些脚本将对组织或整理编译非常有用。
1.14 $WM_PROJECT_USER_DIR
用户目录,在该目录下建立自己的算例,通常指向$HOME/OpenFOAM/USER_NAME-9
2. Directory structure of an OpenFOAM application/utility
2.1 Directory structure of a general solver
-
$WM_PROJECT_DIR/applications/solvers/solverName/: 包含求解器的源代码
-
createFields.H:声明所有的变量、初始化解
-
appName.C:求解器的实际源代码
-
Make
-
files:命名所有的源文件(.C),指出(specify)solverName名称和输出文件的位置。
-
options:指出要搜索的目录,包括要链接求解器的文件和库。
-
-
2.2 Directory structure of a general utility
-
$WM_PROJECT_DIR/applications/utilities/utilityName/: 包含工具的源代码
-
header_files.H:编译应用需要的头文件
-
utilityName.C:工具的实际源代码
-
utility_dictionary: 程序的主目录
-
Make
-
files:命名所有的源文件(.C),指出(specify)utilityName名称和输出文件的位置。
-
options:指出要搜索的目录,包括要链接求解器的文件和库。
-
-
2.3 user directory
-
建议把目录**$WM_PROJECT_DIR/applications/solvers/和$WM_PROJECT_DIR/applications/utilities/的源代码复制一份到$WM_PROJECT_USER_DIR**目录下,不改变结构。同时修改文件Make/files和Make/options指出[链接求解器的编译的二进制文件和库]的新名字和位置。
-
在主文件*.C 中,可以获得当前求解器或者工具的简短描述。
3. Application/utilities in OpenFOAM
OpenFOAM不是单一的可执行文件。
如果向了解所有的求解器、工具和库,可以阅读user guide的applications和libraries(第三章)。在目录$WM_PROJECT_DIR/doc中可以找到pdf格式的文件。
或者查看线上user guide第三章(http://cfd.direct/openfoam/userguide/#contents)。
如果在运行应用时想要获得帮助,在终端输入:
application_name -help
-help仅仅展示所有的选项,并不会运行应用。也可以在源文件中获得帮助。
- 部分求解器举例
- icoFoam: 层流不可压非定常求解器。有很多限制(有限的后处理特征,没有建模能力),不要将该求解器用于生产运行(production runs),最好用pisoFoam或pimpleFoam。
- pisoFoam
- simpleFoam: 不可压定常求解器,用于层流/湍流。
- pimpleFoam: 不可压非定常求解器,用于层流/湍流。
- rhoSimpleFoam: 可压缩定常求解器,用于层流/湍流。
- rhoPimpleFoam: 可压缩非定常求解器,用于层流/湍流。
- interFoam: 用VOF方法求解分离流(层流和湍流)的非定常多相求解器。
- laplacianFoam: 拉普拉斯方程求解器。
- potentialFoam: 势流求解器。
- scalarTransportFoam: 定常/非定常一般运输方程求解器。
4. Directory structure of an OpenFOAM case
Directory structure of a general case
- case_name: 算例目录的名字,不要使用空格和特殊字符。最上层目录。
- 0: 包括边界条件(BC)和初始条件(IC)。
- p
- U
- constant: 包括网格信息、物性参数、湍流模型特性、高等物理等,
- polymesh: 包括多面体网格信息。
- boundary
- faces
- neighbour
- owner
- points
- transportPorperties
- polymesh: 包括多面体网格信息。
- system: 包括运行时间设置和求解器数值。
- controlDict
- fvSchemes
- fvSolution
- time_directories: 包括解和导数域(derived fields)。求解器根据预设置的保存步长, 自动生成目录。
- 0: 包括边界条件(BC)和初始条件(IC)。
5. 运行2D算例(只讲解怎么运行,不包含具体的建模)
在开始前,可以在下面文件夹找到一个和我的算例接近的算例作参考:
$WM_PROJECT_DIR/tutorials
$WDW
5.1 问题描述与分析
盖子驱动的方形腔上的流动,雷诺数100,不可压流动。
(Case: Flow on a lid-driven square cavity-Re=100, incompressible flow)
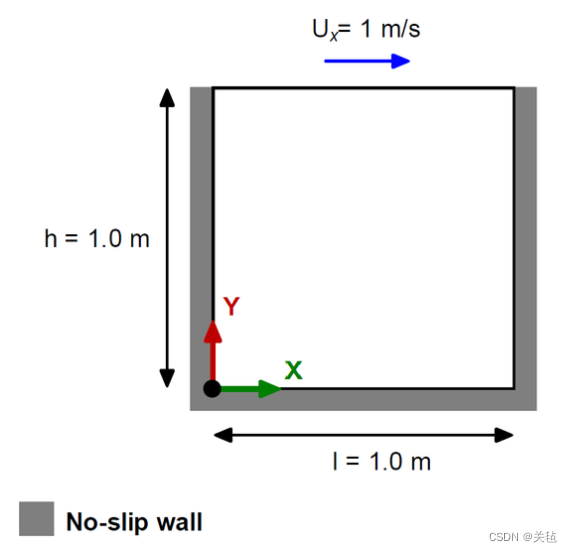
分析:
-
该问题的控制方程是不可压层流N-S方程;
-
该问题可以从二维拓展到三维;
-
为了得到数值解,我们需要进行空间离散(生成网格)、设置边界条件和初始条件、定义流动特性、设置数值格式和求解器、设置运行时间参数(时间步长、仿真时间、保存频率等);
-
为方便起见,处理不可压流动时我们将使用相对压强。
-
工作流程如下图:
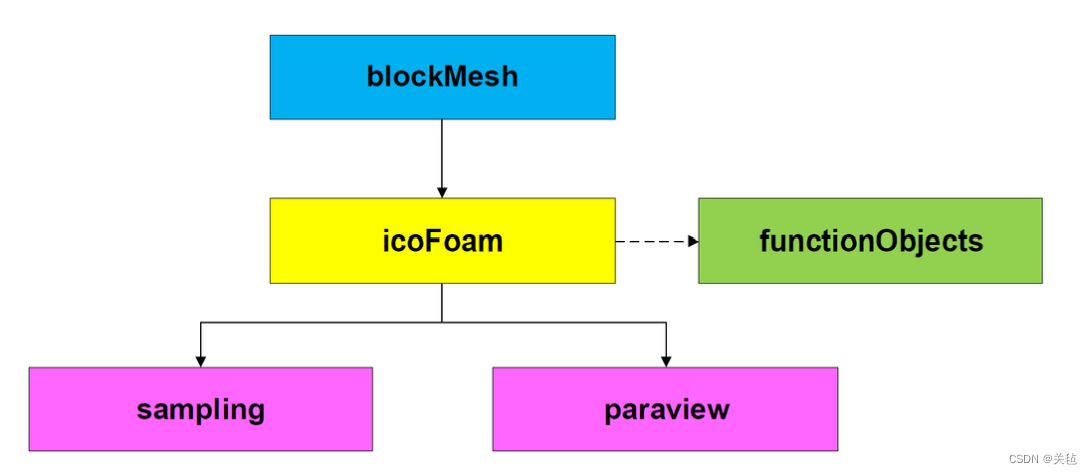
*functionObjects: 计算时的在线采样.
5.2 加载OpenFOAM环境
如果在使用实验室工作站,需要source一下OpenFOAM(加载OpenFOAM环境)。
source OpenFOAM需在终端输入:
of9
使用PyFoam(绘图工具)也需要source,此处不用。
anaconda3
在加载PyFoam后可能需要再次加载OpenFOAM。
5.3 运行一个现有算例
5.3.1 初步运行
cd $WDW/101OF/cavity
ls –l
blockMesh #生成网格
checkMesh #检查网格质量
icoFoam #开始计算

postProcess -func sampleDict -latestTime
# 我们使用实用程序postProcess只对最后保存的数据(latestTime)进行采样。
# 这个实用程序将读取目录system中名为sampleDict的文件。

gnuplot gnuplot/gnuplot_script
paraFoam
5.3.2 保存标准输出(log文件,ascii)的运行
-
保存log文件有很多方法,这里使用Linux的命令tee,它可以将屏幕上显示的内容同步导出到log文件里:
foamCleanTutorials
blockMesh | tee log.blockMesh
checkMesh | tee log.checkMesh
icoFoam | tee log.icoFoam

# 竖线“|”为连接命令的符号
终端显示最后一行是end,则表示结束。
提取log文件:
foamLog log.icoFoam
# 提取log文件中的信息,以可编辑/可绘图的格式保存在目录logs中。
打开log文件 :
more log.solver终端显示:
/*---------------------------------------------------------------------------*\\
  =========                 |
  \\\\      /  F ield         | OpenFOAM: The Open Source CFD Toolbox
   \\\\    /   O peration     | Website:  <https://openfoam.org>
    \\\\  /    A nd           | Version:  9
     \\\\/     M anipulation  |
\\*---------------------------------------------------------------------------*/
Build  : 9-710dba47639b
Exec   : icoFoam
Date   : Apr 04 2024
Time   : 18:53:07
Host   : "dyfluid-virtual-machine"
PID    : 3774
I/O    : uncollated
Case   : /home/dyfluid/OpenFOAM/OP9/101OF/cavity2D
nProcs : 1
sigFpe : Enabling floating point exception trapping (FOAM_SIGFPE).
fileModificationChecking : Monitoring run-time modified files using timeStampMas
ter (fileModificationSkew 10)
allowSystemOperations : Allowing user-supplied system call operations

// * * * * * * * * * * * * * * * * * * * * * * * * * * * * * * * * * * * * * //
Create time

Create mesh for time = 0

Reading transportProperties

Reading field p

Reading field U

Reading/calculating face flux field phi
#开始时间循环,或者迭代(稳态时)
Starting time loop

#我们定义的最小和最大值
volFieldValue cellMin write:
    min() of p = 0 at location (0.025 0.025 0.5) in cell 0

volFieldValue cellMax write:
    max() of p = 0 at location (0.025 0.025 0.5) in cell 0

volFieldValue cellMinMag write:
    minMag() of U = 0 at location (0.025 0.025 0.5) in cell 0

volFieldValue cellMaxMag write:
    maxMag() of U = 0 at location (0.025 0.025 0.5) in cell 0

#超前(advanced)时间步长,是contolDict中设置的deltaT
Time = 0.05

Courant Number mean: 0 max: 0
#速度的残差
DILUPBiCGStab:  Solving for Ux, Initial residual = 1, Final residual = 6.3538055
e-09, No Iterations 3
DILUPBiCGStab:  Solving for Uy, Initial residual = 0, Final residual = 0, No Ite
rations 0
#压强的残差,文件controlDict里有保存residual的方法。
#还有另一种保存残差的方法,pyfoam有一系列工具,可以用来进行后处理,需额外安装。
DICPCG:  Solving for p, Initial residual = 1, Final residual = 2.7197723e-07, No
 Iterations 36
DICPCG:  Solving for p, Initial residual = 1.2414932e-07, Final residual = 1.241
4932e-07, No Iterations 0
#continuity error:应该是一个较小的值,正负号不重要,
time step continuity errors : sum local = 4.0653019e-10, global = 7.544946e-20,
cumulative = 7.544946e-20
ExecutionTime = 0.11 s  ClockTime = 0 s

#计算场变量的最小和最大值,取决于使用的求解器,和求解的物理过程
volFieldValue cellMin write:
    min() of p = 4.569655e-10 at location (0.025 0.025 0.5) in cell 0

volFieldValue cellMax write:
    max() of p = 1.0332807 at location (0.975 0.975 0.5) in cell 399

volFieldValue cellMinMag write:
    minMag() of U = 0.00045740535 at location (0.975 0.025 0.5) in cell 19

volFieldValue cellMaxMag write:
    maxMag() of U = 0.22712324 at location (0.475 0.975 0.5) in cell 389

Time = 0.1

#库朗数:非常重要,是稳定性和精度的直接表达,理想值应该大约是1
#由于正在使用的求解器是隐式的,所以这里没有限制,不过理想值任然是保持在1附近
Courant Number mean: 0.028426523 max: 0.22729545
DILUPBiCGStab:  Solving for Ux, Initial residual = 0.32458045, Final residual =
8.1629155e-11, No Iterations 3
DILUPBiCGStab:  Solving for Uy, Initial residual = 0.40739399, Final residual =
4.8334402e-09, No Iterations 2
DICPCG:  Solving for p, Initial residual = 0.34199623, Final residual = 6.736912
5e-07, No Iterations 34
DICPCG:  Solving for p, Initial residual = 6.3231087e-07, Final residual = 6.323
1087e-07, No Iterations 0
time step continuity errors : sum local = 2.0184217e-09, global = -1.0714966e-20
, cumulative = 6.4734494e-20
#执行时间,计算时间
ExecutionTime = 0.11 s  ClockTime = 0 s
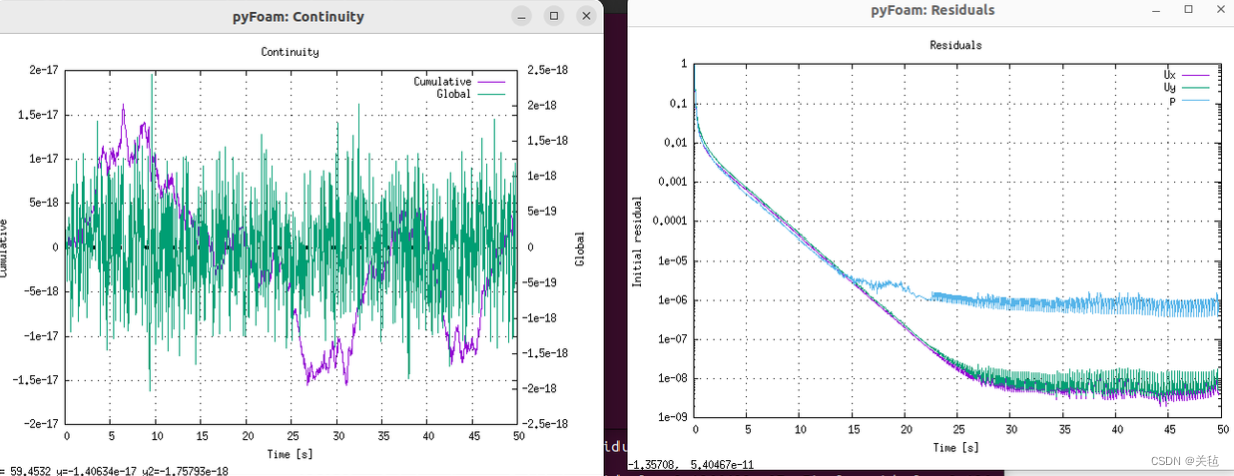
5.3.3 画出残差-方法一:使用pyFoam(推荐)
-
平时只用下面一个命令,前提是需要有log文件:
pyFoamPlotWatcher.py log.solver然后会画出残差(左边的值应该很小,右边的值逐渐减少直到稳定,代表物理过程稳定):
通过帮助指令获得更多用法:
pyFoamPlotWatcher.py --help
5.3.4 画出残差-方法二:使用OpenFOAM内部指令
-
执行下面的命令,将会提取数据到新创建的目录logs中,文件中的数据是时间列和变量列。
foamLog log.solver可以用gnuplot进行绘制:
gnuplot/
#画Ux的残差
>plot 'Ux_0' u 1:2 w l #using 1:2(column) with lines
#画Ux和p的残差
>plot 'Ux_0' using 1:2 with lines, 'p_1' u 1:2 wit lines
#需要等一会,没等出来
#退出
>exit
5.3.5 同时计算和绘制残差
-
pyFoamPlotRunner.py icoFoam这将会增加计算时间,因此仍然推荐下面的命令:
最好在一个终端sh run_solver.sh,在另一个终端绘制残差。
pyFoamPlotWatcher.py log.icoFoam
5.3.6 文件controlDict里保存残差(没试过)
5.4 停止与清除
5.4.1 停止计算
方法一:ctrl+c (杀死进行,粗暴不推荐,将不会保存最后的时刻)
方法二:文件controlDict中的“stopAt”,在运行时设置endTime为0或者“writeNow”(立马停止,100则为在计算100步),并保存。
终端输入“more log.icoFoam”,可以查看停止的位置(PID)
5.4.2 清除计算数据
foamCleanTutorials
5.4.3 只清除结果(文件夹1,2,3),不清除网格
foamListTimes -rm
5.4.4 只清除网格
foamCleanPolyMesh
5.5 算例文件内容详解
目录:$WDW/101OF/cavity2D/
5.5.0 foamInfo命令
foamInfo
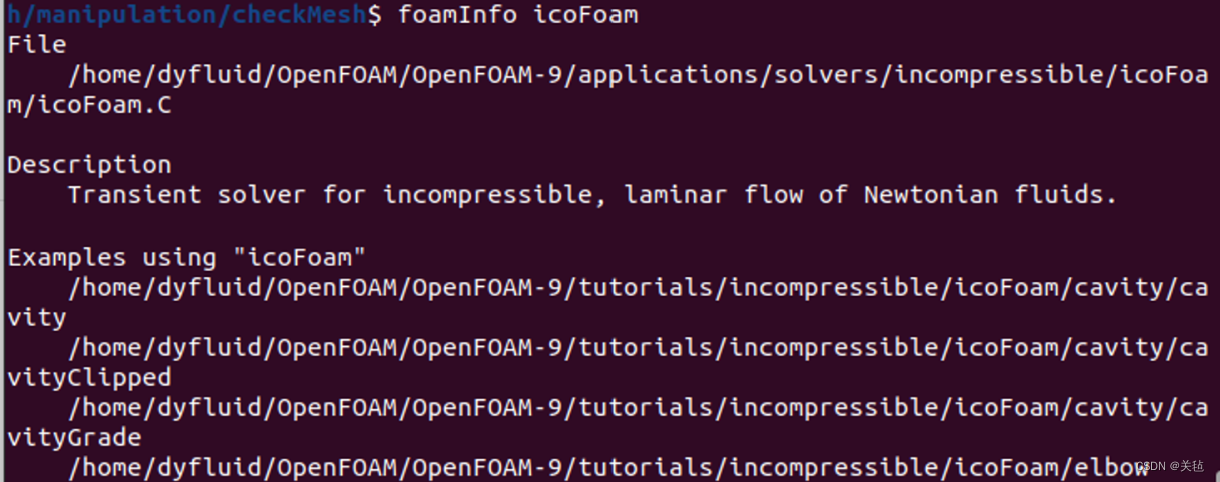
例1:查看某个求解器(如icoFoam)的基本信息:
foamInfo icoFoam
显示位置、描述和算例:
例2:查看网格求解器:
foamInfo blockMesh
找到相关文件:
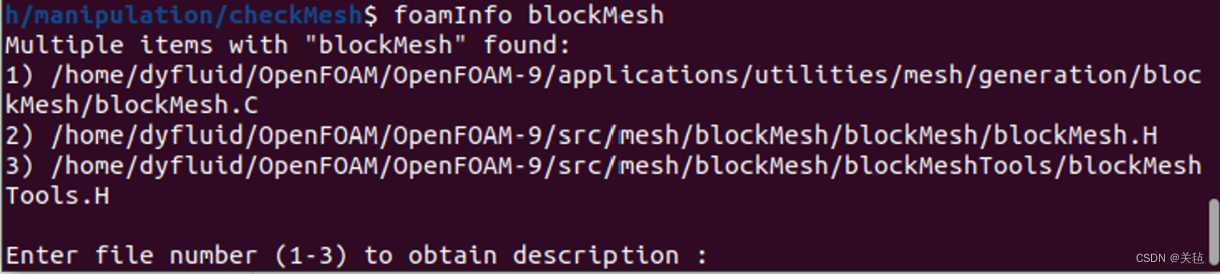
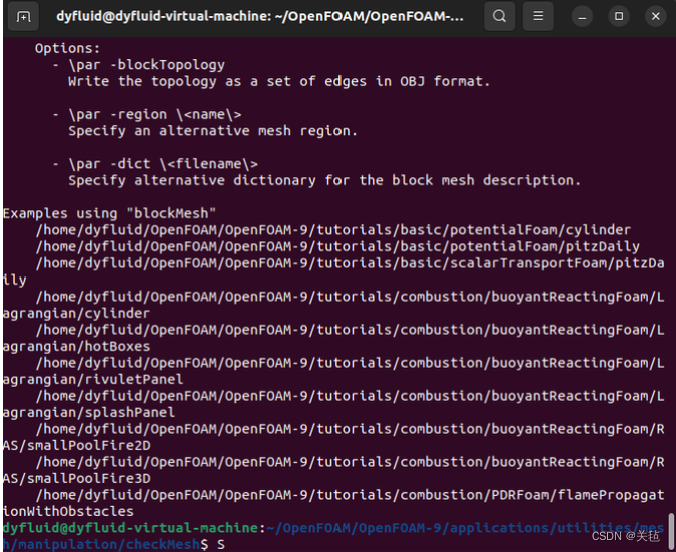
输入对应数字查看详细信息,例如1:
1
blockMesh的详细信息:
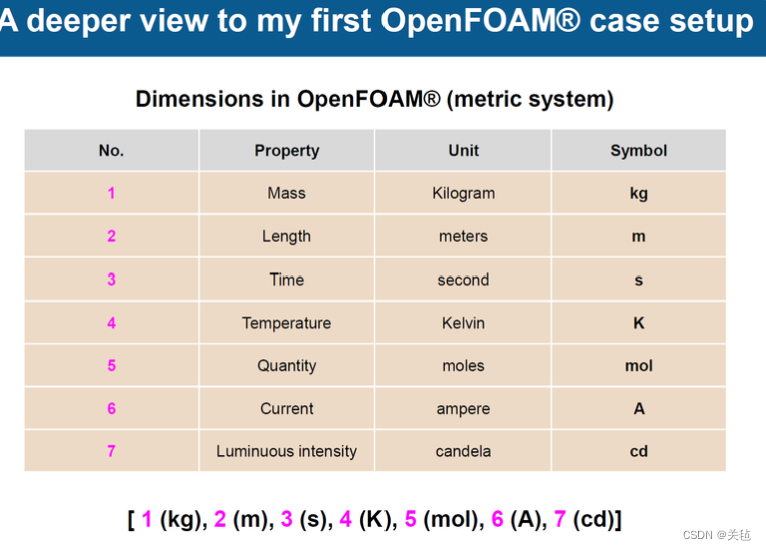
5.5.0 定义正确的量纲(dimensions)
比如运动粘性:
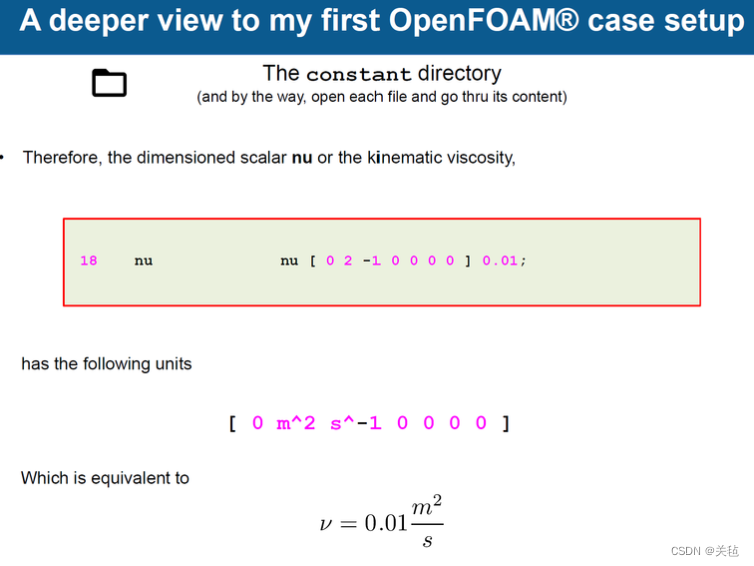
方括号中不同的项对应的内容:
5.5.1 sh文件
在算例目录下,可以发现一些拓展名为.sh的脚本,即run_all.sh,run_mesh.sh,run_sampling.sh,run_solver.sh等。通过这些脚本,可以在终端自动运行算例,例如:
sh run_solver.sh
建议阅读这些sh文件中的命令,在终端输入这些命令。通过这个方法可以熟悉和学会使用命令行。
run_solver 脚本(将第三步运行时打在终端的命令写入脚本):
#!/bin/bash

foamCleanTutorials
blockMesh | tee log.blockMesh
checkMesh | tee log.checkMesh

icoFoam | tee log.icoFoam
#pisoFoam | tee log.solver
run_sampling.ch脚本解析:
#!/bin/bash

postProcess -func sampleDict -latestTime
#使用工具“postProcess”, 可使用“foamInfo postProcess”查看工具信息。
#命令postProcess将会打开输入文件sampleDict(在路径cavity/system下,optional input file, not compulsory).
#-lastestTime仅处理最后时刻的解
gnuplot gnuplot/gnuplot_script
sampleDict文件解析:
...
// Fields to sample.
//要采集(绘图)的变量为U
fields
(
    U
);

sets
(
//第一个图?
    l1
    {
        //type            lineCellFace;
        //type            lineCell;
        type            lineFace;

        //type            lineUniform;
		//nPoints 	  	100;
//取样的数据点位置,线段(-1  0.5  0)-(2  0.5  0)为绘图的x轴
        axis            x;
        start           ( -1  0.5 0);
        end             ( 2  0.5 0);
    }
//第二个图?
    l2
    {
        //type            lineCellFace;
        //type            lineCell;
        type            lineFace;
//取样的数据点位置,线段(0.5  -1  0)-(0.5  2  0)为绘图的x轴
        //type            lineUniform;
		//nPoints 	  	100;

        axis            y;
        start           (0.5 -1 0);
        end             (0.5 2 0);
    }

);
5.5.2 cavity2D/0 初始条件和边界条件
在0时刻文件夹下,有初始边界条件,是第一步需要求解的变量:速度U和压强p。
最常用的边界条件是fixedValue和zero gradient,有时候用用symmetry、nt或者periodic基本够用。
纽曼边界条件:零梯度,导数为0。
-
U:
//...... FoamFile { format ascii;//格式 class volVectorField; //U是矢量,p是向量volScalarField object U; //处理对象为U } //以上为文件头,不要修改 // * * * * * * * * * * * * * * * * * * * * * * * * * * * * * * * * * * * * * // //定义维度 dimensions [0 1 -1 0 0 0 0]; //初始条件 internalField uniform (0 0 0); boundaryField { movingWall { type fixedValue; //设置为固定值,可以infoFoam fixedValue查看 value uniform (1 0 0); } fixedWalls { type fixedValue; value uniform (0 0 0); } frontAndBack { //这是一个二维的算例,但由于OpenFOAM是三维的,因此设置顶面和底面为空,不处理 //这一类型被称为constraint patch type(约束补丁类型),值不变 type empty; } } -
p:
//... ...
FoamFile
{
    format      ascii;
    class       volScalarField;
    object      p;
}
// * * * * * * * * * * * * * * * * * * * * * * * * * * * * * * * * * * * * * //

//注意这里的单位不是根据帕斯卡设置的,
//因为对于不可压求解器,处理的压强为 压强/密度,见代码后面的图
//不可压:icoFoam,simpleFoam,pisoFoam,pimpleFoam
//在可压缩求解器里面是帕斯卡
dimensions      [0 2 -2 0 0 0 0];

internalField   uniform 0;

boundaryField
{
    movingWall
    {
    //纽曼边界条件(newman)
        type            zeroGradient;
    }

    fixedWalls
    {
        type            zeroGradient;
    }

    frontAndBack
    {
        type            empty;
    }
}
5.5.3 constant/transportProperties
-
//... ...
FoamFile
{
    format      ascii;
    class       dictionary;
    object      transportProperties;
}
// * * * * * * * * * * * * * * * * * * * * * * * * * * * * * * * * * * * * * //

transportModel  Newtonian; //使用牛顿模型

nu              nu [ 0 2 -1 0 0 0 0 ] 0.01;	//Re 100 //运动粘度
//nu              nu [ 0 2 -1 0 0 0 0 ] 0.001;	//Re 1000

// ************************************************************************* //
5.5.4 system/controlDict
-
//... ...
FoamFile
{
    format      ascii;
    class       dictionary;
    object      controlDict;
}
// * * * * * * * * * * * * * * * * * * * * * * * * * * * * * * * * * * * * * //
application     icoFoam; //不是必须的,仅为了放正确的应用

startFrom       startTime;
//从startTime开始

startTime       0;
//startTime为0,也可以设置为其他时间,例如100,但是必须有100时间为100的变量

stopAt          endTime;
//在endTime停止

endTime         50;
//endTime为50

deltaT          0.05;	//0.01-0.02
//计算步长

writeControl    runTime;
//读写控制

writeInterval   1;
//读写步长为1s

purgeWrite      0;
//你想要保留的解,0表示保留所有的解的文件夹。
//如果改成2,仅保留最后两个解的文件夹。

writeFormat     ascii;
//推荐读写数据为二元格式,更快并且文件更小,适合大算例。
//这里为ascii格式,非二元格式,小算例可以用这个。

writePrecision  8;

writeCompression off;

timeFormat      general;

timePrecision   6;

//注意这里都设置为true,意思是在算例运行时所有的输入文件和目录可以被修改
runTimeModifiable true;

// ************************************************************************* //

functions
{

///
//OF8

/*
minmaxdomain
{
	type fieldMinMax;
	//type banana;

	functionObjectLibs ("libfieldFunctionObjects.so");

	enabled true;

	mode component;

	writeControl timeStep;
	writeInterval 1;

	log true;

	fields (p U);
}
*/
///

///
//OF9 - Extended functionObjects
//This is the way I like to do it

/*
minmaxdomain_scalar
{
    type            volFieldValue;
    libs            ("libfieldFunctionObjects.so");

    enabled 	    true; 	//true or false
    log             true;	//write to screen

    //writeControl    writeTime;
    writeControl    timeStep;
    writeInterval   1;

    writeFields     false;	//write solution to field value - Not needed when only reporting value to screen

    writeLocation   true;	//write location in the output file

    //mode component;

    regionType      all;

    operation       none;

    fields
    (
        p
    );
}

minmaxdomain_vector
{
    type            volFieldValue;
    libs            ("libfieldFunctionObjects.so");

    enabled 	    true; 	//true or false
    log             true;	//write to screen

    //writeControl    writeTime;
    writeControl    timeStep;
    writeInterval   1;

    writeFields     false;	//write solution to field value - Not needed when only reporting value to screen

    writeLocation   true;	//write location in the output file

    //mode component;

    regionType      all;

    operation       none;

    fields
    (
        U
    );
}

mindomain_scalar
{
    $minmaxdomain_scalar
    operation       min;
}

mindomain_vector
{
    $minmaxdomain_vector
    operation       minMag;
}

maxdomain_scalar
{
    $minmaxdomain_scalar
    operation       max;
}

maxdomain_vector
{
    $minmaxdomain_vector
    operation       maxMag;
}
*/
///

///
//OF9 - Packed functionObjects
//The cfd files are located in the directory  etc/caseDicts/postProcessing/

//For scalars
//该function计算最大值和最小值,上面的注释里是旧版本的写法,更长更详细,但结果一样
cellMin
{
    #includeEtc "caseDicts/postProcessing/minMax/cellMin.cfg"
    enabled 	    true; 	//true or false
    log             true;	//write to screen
    fields  (p);
}

cellMax
{
    #includeEtc "caseDicts/postProcessing/minMax/cellMax.cfg"
    enabled 	    true; 	//true or false
    log             true;	//write to screen
    fields  (p);
}

//For vectors
//Mag用于向量的计算
cellMinMag
{
    #includeEtc "caseDicts/postProcessing/minMax/cellMinMag.cfg"
    enabled 	    true; 	//true or false
    log             true;	//write to screen
    fields  (U);
}

cellMaxMag
{
//call这个模板
    #includeEtc "caseDicts/postProcessing/minMax/cellMaxMag.cfg"
    enabled 	    true; 	//true or false
    log             true;	//write to screen
 //变量U取样
    fields  (U);
}

///

///
/*
residuals
{
	functionObjectLibs ("libutilityFunctionObjects.so");

	type residuals;

	enabled true;

	writeControl timeStep;
	writeInterval 1;

	fields (p U);
}
*/
///

};
5.5.5 system/fvSchemes
-
离散方程,例如动量方程。因此需要定义所有出现在方程中的项。
//... ...
FoamFile
{
    format      ascii;
    class       dictionary;
    object      fvSchemes;
}
// * * * * * * * * * * * * * * * * * * * * * * * * * * * * * * * * * * * * * //

//求解方程中的时间导数
ddtSchemes
{
    default         backward;
    //default意为对每个有时间的变量使用该方法,也可以使用不同的方法,下同。
}

//求解方程中的梯度
gradSchemes
{
    default         Gauss linear;
    grad(p)         Gauss linear;
}

//求解方程中的散度,推荐使用至少二阶精度,Gauss linear是二阶精度。
divSchemes
{
    default         none;
    //none表示必须详细的设置每一项的离散方法
    div(phi,U)      Gauss linear;
    //速度相关的散度

    div((nuEff*dev2(T(grad(U))))) Gauss linear;
    //与雷诺应力有关的
}

//求解方程中的拉普拉斯算子
laplacianSchemes
{
    //default         Gauss linear orthogonal;
    default         Gauss linear limited 1;
    //可以使用其他方法,但建议使用当前方法
}

//如何插值?how you interpolate from cell center to face center
interpolationSchemes
{
    default         linear;
    //可以选择别的方法
}

//phases相之间的梯度?通常与laplacianSchemes一致
snGradSchemes
{
    //default         orthogonal;
    default         limited 1;
}
5.5.6 system/fvSolutions
-
大量地处理数据,fvSchemes装配了一个线性系统,在这里要求解这个线性系统。
-
//... ...
FoamFile
{
    format      ascii;
    class       dictionary;
    object      fvSolution;
}
// * * * * * * * * * * * * * * * * * * * * * * * * * * * * * * * * * * * * * //

//压强、速度等的求解器
solvers
{
    p
    {
        //求解方法有很多种,取决于问题
        solver          PCG;
        preconditioner  DIC;
        tolerance       1e-06;
        //迭代到公差为1e-06
        relTol          0;
        //相对公差

/*
        solver          PBiCGStab;
        preconditioner  FDIC;
        tolerance       1e-06;
        relTol          0;
*/

/*
        solver           GAMG;
        tolerance        1e-6;
        relTol           0.0;
        smoother         GaussSeidel;
        nPreSweeps       0;
        nPostSweeps      2;
        cacheAgglomeration on;
        agglomerator     faceAreaPair;
        nCellsInCoarsestLevel 100;
        mergeLevels      1;
*/

    }

    pFinal
    {
        $p;
        relTol          0;
    }

    U
    {
/*
        solver          smoothSolver;
        smoother        symGaussSeidel;
        tolerance       1e-08;
        relTol          0;
*/

        solver          PBiCGStab;
        preconditioner  DILU;
        tolerance       1e-08;
        relTol          0;
    }
}

//与速度压力耦合相关,icoFoam使用PISO耦合
PISO
{
    //consistent 	  yes;
    //momentumPredictor   yes;

    //修正correction,改善计算的迭代方法。迭代次数越多,得到的解越好,但花费的时间越多
    nCorrectors     1;
    nNonOrthogonalCorrectors 1;

    pRefCell        0;
    pRefValue       0;
}

//松弛因子
relaxationFactors
{
    fields
    {
        ".*" 0.9;
    }
    equations
    {
        ".*" 0.9;
    }
}
5.5.7 system/blockMeshDict
-

//... ...
FoamFile
{
    format      ascii;
    class       dictionary;
    object      blockMeshDict;
}
// * * * * * * * * * * * * * * * * * * * * * * * * * * * * * * * * * * * * * //

//是scaling factor
convertToMeters 1;	//This is an scaling operation. Done at the end.

xmin 0;
xmax 1;
ymin 0;
ymax 1;
zmin 0;
zmax 1;

//定义网格数量
xcells 20;
ycells 20;
zcells 1; //二维

//deltax 0.00775;	//As in Ghia et al 129 x 129 cells
//deltax 0.05;
//lx #calc "$xmax-$xmin";
//xcells #calc "round($lx/$deltax)";

//ycells $xcells;

//顶点坐标,使用前面声明的变量
vertices
(
    ($xmin  $ymin  $zmin) //0
    ($xmax  $ymin  $zmin) //1
    ($xmax  $ymax  $zmin) //2
    ($xmin  $ymax  $zmin) //3
    ($xmin  $ymin  $zmax) //4
    ($xmax  $ymin  $zmax) //5
    ($xmax  $ymax  $zmax) //6
    ($xmin  $ymax  $zmax) //7

/*
    (0 0 0)
    (1 0 0)
    (1 1 0)
    (0 1 0)
    (0 0 0.1)
    (1 0 0.1)
    (1 1 0.1)
    (0 1 0.1)
*/
);

//定义如何连接顶点,这里按顺序连接
blocks
(
    hex (0 1 2 3 4 5 6 7) ($xcells $ycells $zcells) simpleGrading (1 1 1)
);

edges
(
    //arc 0 1 (0.5 -0.1 0)
    //arc 4 5 (0.5 -0.1 1)
);

//给不同的平面命名
boundary
(
    movingWall  //名字
    {
        type wall;  //类型
        faces
        (
            (3 7 6 2)  //用顶点连接 构成平面
        );
    }
    fixedWalls
    {
        type wall;
        faces
        (
            (0 4 7 3)
            (2 6 5 1)
            (1 5 4 0)
        );
    }
    frontAndBack
    {
        type empty;
        faces
        (
            (0 3 2 1)
            (4 5 6 7)
        );
    }
);

mergePatchPairs
(
    //(interface1 interface2)
);
5.5.8 网格
-
生成网格
查看blockMesh.C文件路径,可以看到一些基本结构:$WM_PROJECT_DIR/applications/utilities/mesh/generation/blockMesh
当生成或者输入网格后(例如blockMesh),会自动在目录constant下生成一个新的目录polyMesh,唯一可以修改(不确定)的文件是boundary:
\\*---------------------------------------------------------------------------*/ FoamFile { format ascii; class polyBoundaryMesh; location "constant/polyMesh"; object boundary; } // * * * * * * * * * * * * * * * * * * * * * * * * * * * * * * * * * * * * * // //有3个可以分配边界条件的面 3 ( //可以在这里修改面的名称,注意在这里修改了名字时,目录0中的U和p也需要修改名字 movingWall { //类型可以修改,例如修改成patch。 //区别是用wall时可以使用湍流模型,可以使用wall function。patch不能用wall function type wall; //下面三行不能修改,是OpenFOAM用来连接的内部信息 //inGroups这一项有时候并不是必须的 //nFaces和startFace是必须的 inGroups List<word> 1(wall); nFaces 20; startFace 760; } fixedWalls { type wall; inGroups List<word> 1(wall); nFaces 60; startFace 780; } frontAndBack { type empty; inGroups List<word> 1(empty); nFaces 800; startFace 840; } ) // ************************************************************************* // -
检查网格
检查网格质量,checkMesh.C文件:
$WM_PROJECT_DIR/applications/utilities/mesh/manipulation/checkMesh
blockMesh
checkMesh
终端显示:
/*---------------------------------------------------------------------------*\\
  =========                 |
  \\\\      /  F ield         | OpenFOAM: The Open Source CFD Toolbox
   \\\\    /   O peration     | Website:  <https://openfoam.org>
    \\\\  /    A nd           | Version:  9
     \\\\/     M anipulation  |
\\*---------------------------------------------------------------------------*/
Build  : 9-710dba47639b
Exec   : checkMesh
Date   : Apr 04 2024
Time   : 18:41:02
Host   : "dyfluid-virtual-machine"
PID    : 3766
I/O    : uncollated
Case   : /home/dyfluid/OpenFOAM/OP9/101OF/cavity2D
nProcs : 1
sigFpe : Enabling floating point exception trapping (FOAM_SIGFPE).
fileModificationChecking : Monitoring run-time modified files using timeStampMaster (fileModificationSkew 10)
allowSystemOperations : Allowing user-supplied system call operations

// * * * * * * * * * * * * * * * * * * * * * * * * * * * * * * * * * * * * * //
Create time

Create polyMesh for time = 0

Time = 0

Mesh stats
    points:           882
    internal points:  0
    faces:            1640
    internal faces:   760
    cells:            400
    faces per cell:   6
    boundary patches: 3
    point zones:      0
    face zones:       0
    cell zones:       0

Overall number of cells of each type:
    hexahedra:     400
    prisms:        0
    wedges:        0
    pyramids:      0
    tet wedges:    0
    tetrahedra:    0
    polyhedra:     0

#非常重要,如果拓扑有error,必须修正它
Checking topology...
    Boundary definition OK.
    Cell to face addressing OK.
    Point usage OK.
    Upper triangular ordering OK.
    Face vertices OK.
    Number of regions: 1 (OK).

#可以分配边界条件的表面有以下三个
Checking patch topology for multiply connected surfaces...
    Patch               Faces    Points   Surface topology
    movingWall          20       42       ok (non-closed singly connected)
    fixedWalls          60       122      ok (non-closed singly connected)
    frontAndBack        800      882      ok (non-closed singly connected)

#网格质量
Checking geometry...
    Overall domain bounding box (0 0 0) (1 1 1)
    Mesh has 2 geometric (non-empty/wedge) directions (1 1 0)
    Mesh has 2 solution (non-empty) directions (1 1 0)
    All edges aligned with or perpendicular to non-empty directions.
    Boundary openness (6.476301e-17 -6.476301e-17 -6.0072028e-16) OK.
    Max cell openness = 8.6736174e-17 OK.
    Max aspect ratio = 1 OK.
    Minimum face area = 0.0025. Maximum face area = 0.05.  Face area magnitudes OK.
    Min volume = 0.0025. Max volume = 0.0025.  Total volume = 1.  Cell volumes OK.
    Mesh non-orthogonality Max: 0 average: 0
    #重要:Non-orthogonality
    Non-orthogonality check OK.
    Face pyramids OK.
    #重要:Max skewness
    Max skewness = 8.8839526e-15 OK.
    Coupled point location match (average 0) OK.

Mesh OK.

End
Appendix A: Installation of Pyfoam
PyFoam安装 - 知乎 (zhihu.com) https://zhuanlan.zhihu.com/p/360456556
一、相关依赖
首先是安装相关依赖(Pre-Requisites),包括Python,Pip,Numpy,Gnuplot。
- 安装Python3
sudo apt-get install python3
- 安装Pip
sudo apt-get install python3-pip
- 安装Numpy
pip install Numpy
- 安装Gnuplot
sudo apt-get install gnuplot gnuplot-x11
- 测试Gnuplot绘图
gnuplot
plot sin(x)
二、PyFoam安装
方一:命令行安装
pip install PyFoam
方法二:安装包安装
Contrib/PyFoam - OpenFOAMWiki中下载最新版本的PyFoam安装包,这里下载的是0.6.6版本。
将下载好的安装包在需要安装的位置解压
tar -xvf PyFoam-0.6.6.tar.gz
进入解压的文件夹
cd PyFoam-0.6.6
安装PyFoam
sudo python setup.py install
三、检查安装
先进入python的环境中;
python3
然后使用PyFoam输出OpenFOAM的tutorials路径
import PyFoam
import PyFoam.FoamInformation
print (PyFoam.FoamInformation.foamTutorials**())**
如果输出与下面的输出类似,表示安装成功。
/home/nonroot/OpenFOAM/OpenFOAM-1.2-devel/tutorials
接着就可以使用PyFoam提供的一些功能了。
Appendix B: Installation of OpenFOAM-v9 for WDW course
由于该教程使用的是OpenFOAM-v9版本,我下载的是东岳流体中装有v10、v11和v2306的虚拟机,教程中的算例无法直接在v10计算,因此需要再安装一个v9版本。
注意:由于paraFoam只能在V10环境下加载,因此使用paraFoam使需要将环境改到of10,方可正常使用后处理。
-
一、安装OpenFOAM-v9
07 Ubuntu双版本OpenFOAM安装 - 哔哩哔哩 (bilibili.com)
https://www.bilibili.com/read/cv28810533/OpenFOAM安装 — OpenFOAM|CFD (dyfluid.com)
http://www.dyfluid.com/install.html虚拟机已安装了OpenFOAM其他版本,所以这里直接进行第5步,即一次性复制下面所有内容到终端:
cd $HOME &&
if [ ! -d "OpenFOAM" ];then mkdir OpenFOAM; fi &&
sudo apt update &&
sudo apt-get install -y build-essential flex bison git-core cmake zlib1g-dev libboost-system-dev libboost-thread-dev libopenmpi-dev openmpi-bin gnuplot libreadline-dev libncurses-dev libxt-dev &&
cd OpenFOAM &&
git clone <https://e.coding.net/dyfluid/OpenFOAM/OpenFOAM-9.git> &&
git clone <https://e.coding.net/dyfluid/OpenFOAM/ThirdParty-9.git> &&
source OpenFOAM-9/etc/bashrc &&
cd OpenFOAM-9 &&
./Allwmake -j &&
sed -i '$a source $HOME/OpenFOAM/OpenFOAM-9/etc/bashrc' $HOME/.bashrc
这时候会输出大量的信息,中途可能要输入密码,同时并行编译开始(大约需要几十分钟)。
编译之后请尝试在终端运行:
blockMesh显示如下信息则安装成功:
-
-
二、多版本共存
如果用户打算在Ubuntu系统上安装OpenFOAM-10以及OpenFOAM-11,可在终端输入:
gedit $HOME/.bashrc会打开一个文件,在文件的最底部重新取一行添加下述两行文字:
alias of9="source ~/OpenFOAM/OpenFOAM-9/etc/bashrc"
alias of10="source ~/OpenFOAM/OpenFOAM-10/etc/bashrc"
alias of11="source ~/OpenFOAM/OpenFOAM-11/etc/bashrc"
保存并关闭。重新打开新的终端的时候,环境变量自动生效。这时如果用户键入:
of10则调用OpenFOAM-10环境,类似的,键入:
of11则调用OpenFOAM-11环境。
-
三、设置环境变量$WDW
教程中使用的PTOFC不好记,此处用WDW(Wolf Dynamics World)。将教程OP文件夹复制到路径cd /OpenFOAM/。若无法复制参考下面链接进行设置:
设置好以后还是有一些问题(未解决,“error while copying”,点击skip以后可以正常复制,但是文件多的话需要每个文件夹都skip一下,比较繁琐,后面遇到了再解决。)
打开OpenFOAM9的bash文件:
cd OpenFOAM/OpenFOAM-9/etc
gedit bashrc
在bashrc中添加WDW环境变量(此处在140行添加):
# Location of cases in "Wolf Dynamics World" course # ~~~~~~~~~~~~~~~~~~~~~~~~~~~~~~~~~~~~~~~~~~~~~~~~~~ export WDW=$HOME/$WM_PROJECT/OP9of9检查是否添加成功:
echo $WDW添加成功则显示:
-

Error 1: 运行run_sampling.sh时,gnuplot出错
set terminal qt 0
"gnuplot/gnuplot_script" line 1: unknown or ambiguous terminal type; type just 'set terminal' for a list
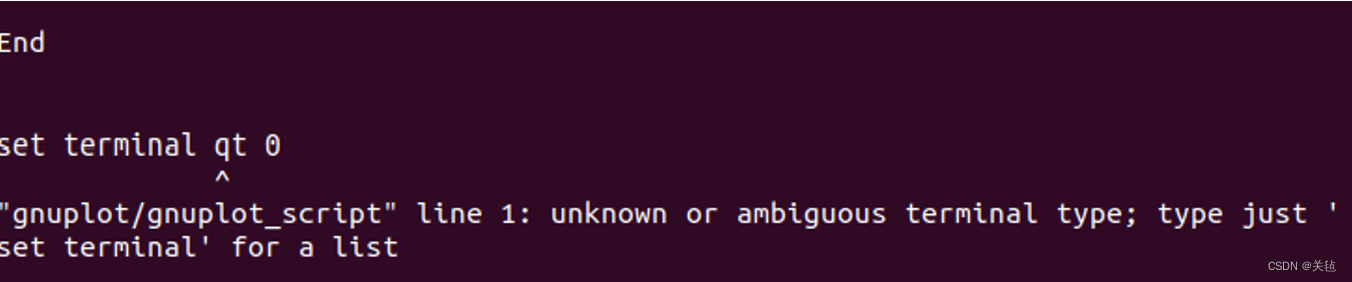
即文件gnuplot/gnuplot_script中第一行set terminal qt 0出错,没有安装qt terminal。
gnuplot中的终端类型:
Terminalshttp://gnuplot.info/docs_5.5/Terminals.html
查看可以使用的terminal:
gnuplot
set terminal
下载qt包:
sudo apt-get install gnuplot-qt


 750
750

 被折叠的 条评论
为什么被折叠?
被折叠的 条评论
为什么被折叠?
 到【灌水乐园】发言


